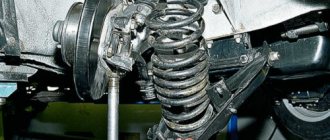
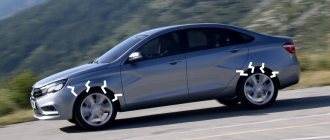
Ball joints are an element of the front (in some models and rear) suspension of a car, designed to provide a rigid but movable connection of the arms with the wheel hubs.
Their main function is to hold vertically rotating wheels in a certain position relative to the horizontal plane.
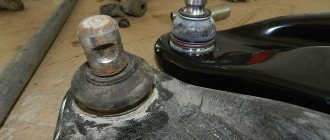
The “seven” ball joint consists of a cover (housing), a ball pin with a boot that protects it from dirt and moisture, as well as a pressure plate.
The pin on one side has a rounded shape, and on the other there is a thread with which it is attached to the suspension arm. When the car moves, it “swings” in the cover, tilting at a certain angle in different directions. All components of the structure are made of steel.
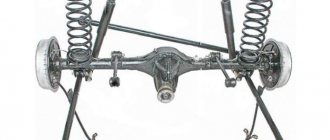
The front suspension of the VAZ 2107 is equipped with two pairs of ball joints: two supports for each wheel (lower and upper).
Malfunctions
During the operation of the car, especially on our roads, the suspension is subjected to significant load, most of which falls on the ball joints. Naturally, over time they wear out, which leads to an increase in the gap between the spherical surface of the finger and the bottom of the case. The reasons for premature failure of ball joints are:
damage to the anthers, resulting in moisture and dirt getting inside the structure;
- lack of lubrication inside the support;
- high dynamic loads when driving off-road.
You can determine that the ball joint has failed by the following signs:
- knocking in the front suspension while driving on rough roads;
- difficulty turning the steering wheel, accompanied by creaking;
- “wobble” of the steered wheels when driving, vibration in the steering rack, and as a result, uneven tire wear.
How to independently determine the malfunction
If your car shows signs of ball joint malfunctions, have them diagnosed. There are two ways to do this at home, but it is better to approach this issue comprehensively, using them in turn.
First, let's look at the most accurate method. The cover of the original VAZ ball has a technological hole at the bottom, through which you need to measure the distance between the surface of the cover and the edge of the spherical surface of the finger. This can be done using a special depth gauge or an ordinary thin rod and ruler. If the depth gauge enters the support more than 11.8 mm, it is time to change the support.
The next method is to determine the amount of play between the finger and the cover without any tools. You just need to touch the support body and your finger with your hand at the same time, and loosen the front part of the car. If there is play, you will definitely feel it.
Do I need to change ball joints and when to do it?
The average service life of ball joints for the VAZ 2107, depending on their quality and operating conditions, is 30-100 thousand kilometers. If the car has traveled 100 thousand km and the supports have not made themselves known, it is still better to replace them. Replacement is also necessary if any signs of malfunction appear.
Untimely diagnosis and replacement of these suspension elements will lead to the fact that at one point the wheel or wheels of the car will simply turn outward and lay the car on its “belly”. In this case, the entire suspension will have to be repaired.
How much do ball joints cost, and how much will it cost to replace them?
If one ball is faulty, it is recommended to replace all the others. Prices for a set of supports, depending on the manufacturer, can vary from 1100 to 3000 rubles. When choosing a kit, pay attention to the manufacturer, and do not skimp. The catalog number of the original upper ball joint for the VAZ 2107 is 21012904192, for the lower one – 21012904082.
The cost of replacing 4 balls at a service station is from 800 rubles.
https://youtu.be/https://youtu.be/Aw1H8p2Kc1E
_
Useful tips
The main difficulty when replacing a ball joint is squeezing it out of the eye. Many car enthusiasts, in order to make the task easier, are forced to resort to numerous non-standard solutions.
For example, if it is impossible to squeeze out a finger using a special puller, many people use the special tool WD-40.
Many experts advise, if the specified liquid is not on hand, to use ordinary dishwashing detergents from the average price category (not very rare). According to them, they cope with rust no worse than special means, but are cheaper.
The main problem, according to employees of many service stations, is considered to be a longer period of “acidification”. For example, if you can remove WD-40 after 15 - 20 minutes, then after detergent - after about 1 - 1.5 hours.
In addition, many service station employees have recently begun to complain about ball joints from French manufacturers, saying that the quality has dropped significantly compared to previous years.
Replacement
Required tool:
- open-end wrench 22;
- open-end wrench 13;
- special puller for ball joints;
- jack;
- wheel wrench;
- metal brush;
- rust remover (VD-40 or equivalent);
- special lubricant for ball joints.
Work order for replacing the upper ball joint
- We place the car on a flat horizontal surface and engage the gear.
- We jack up the desired side of the car and remove the wheel.
- We place a log or bricks under the bottom and remove the jack.
- We get rid of dirt and rust on the upper support fastening elements using a metal brush.
- We treat the support mounting nuts with an anti-rust agent.
- Jack up the lower suspension arm.
- Using a 22mm wrench, unscrew the nut on the ball pin a few turns.
- Use a special puller to squeeze the finger out of the steering knuckle.
- Unscrew the nut 22 completely and pull the finger out of the fist.
- Using a 13mm wrench, unscrew the nuts securing the ball joint housing (3 pcs).
- We dismantle the upper ball joint.
- We check whether there is enough lubricant in the new ball. If there is not enough lubricant, apply it to your finger and stuff it under the cover.
- We install the ball joint in the reverse order.
Work order for the lower ball joint
- Remove dirt and rust with a wire brush.
- We clean and treat the fastening elements of the lower support with an anti-rust agent.
- Using a 22mm wrench, unscrew the ball pin mounting nut a few turns.
- Using a puller, squeeze the pin out of the steering knuckle.
- Unscrew the pin nut.
- Using a 13mm wrench, unscrew the nuts securing the ball housing to the suspension arm.
- We remove the support.
- Carefully lubricate the pin and body with new ball grease.
- We install the new lower ball joint in the reverse order.
Replacement of ball joint Lada 2101 (VAZ 2101)
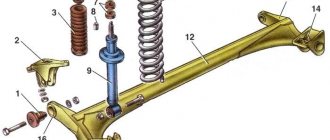
The VAZ 2101 suspension has a rather complex design. If we compare it with a more modern one, which is used on cars starting with model 2108, then we can put a minus in the “Reliability” column. is it so bad? Can a simple MacPherson be cooler than a cheap suspension? Yes, it can, and in terms of reliability it wins many points at once. Now let’s try to figure out what’s good and what’s bad about pendant pendants. More specifically, let’s first consider the VAZ 2101 front suspension arms and ball joints. How to carry out the replacement will be discussed in the following materials.
Recommendations for servicing the VAZ 2101 suspension
- In the absence of personal experience in servicing a car, use the services of certified service stations and workshops that provide a guarantee for the work performed;
- Buy and install parts exclusively from original, factory-produced parts;
- Do not violate the installation algorithm;
- Do not neglect the recommendations of the experts, take a moderate driving style as a rule;
- Try to operate the car on roads with a smooth surface, with a minimum number of holes and potholes.
Subject to compliance with the proposed recommendations, subsequent maintenance of suspension elements after 10,000 km, replacement after 30 - 35 thousand. A number of service station mechanics advise not to reach the specified interval, but to carry out preventive work already at around 7 - 8 thousand km. For domestic transport, 10,000 km is a long mileage. Diagnostics in later periods is not always effective and helps prevent breakdowns. Considering that the model has long been discontinued, and the average age is 30 - 35 years, the car must be inspected every two weeks.
Typical symptoms of malfunction
- Creak when turning the wheel to the side;
- A dull knock when overcoming road obstacles, bumps, holes;
- Beating in the steering wheel;
- The car becomes difficult to control already at speeds above 80 km/h;
- Uncharacteristic force must be applied to turn the steering wheel.
Frequent causes of breakdowns and premature failure of the VAZ 2101 suspension
- Failure to comply with the terms of technical inspection at the time of the factory warranty;
- Violation of the technology for installing parts and components;
- Violation of the rules for using a technical device;
- Purchase and subsequent installation of low-quality, non-original parts;
- Third-party mechanical damage to adjacent mechanisms, resulting in suspension malfunction;
- Systematic aggressive driving style.
Before starting repairs, we carry out comprehensive diagnostics in order to study the general condition of the car, identify breakdowns, and their localization. We calculate the number of necessary components, time, effort, and funds.
Since the complex diagnostic procedure is not complicated, we carry out the work ourselves. We turn to a car service center as a last resort when we need prompt assistance from specialists.
The importance of diagnostics is justified by the fact that it is not always possible to correctly identify a breakdown, as a result of which you take the wrong path from the very beginning. Many inexperienced specialists make this mistake. Diagnostics will help to significantly reduce the time spent searching for a breakdown, as well as assess the condition of the car as a whole, its individual elements, and assemblies.
Service center technicians, despite the presence of digital sensors in modern cars, independently carry out basic daily checks. For example: the level of engine oil, antifreeze, fluid in the expansion tank of the main brake cylinder, headlight washer. Assess the degree of fixation of the brake pads with the parking brake lever.
Also, don’t forget about tire pressure. Excess, as well as deficiency, has a detrimental effect on the engine, fuel consumption, control quality, wear of the suspension and shock absorbers.
Replacement for VAZ 2109, 2110, 2114
Next, let's look at how to replace the ball joint on more modern models - VAZ 2109, 2110, 2114.
Structurally, the suspension in them is similar, and its design uses only one support - on the lower arm.
To carry out the operation you will need:
- Open-end and spanner wrenches (required for 13, 14, 17, 19);
- Puller for supports;
- Mount;
- Hammer;
- WD-40.
The sequence of work is as follows:
The car is placed in the garage, on the side on which this element will be changed, it is jacked up and the wheel is removed. For ease of access, you can turn the steering wheel in the desired direction.
Use an open-end wrench to unscrew the pin nut. You should also immediately unscrew the bolts securing the support to the lever.
Use a puller to press out the finger.
Then use a pry bar to press the lever down to release the pin and remove the support.
The new support is put in place and everything is put back together.
If there is no puller, then the finger can be pressed out. To do this, a pry bar is installed between the hub and the lever and a force is created to push the lever down.
In this case, at the end of the lever, where the mounting hole for the finger is made, sharp blows are applied with a hammer until the finger comes out.
As stated earlier, before installing a new element, it is recommended to put grease in the boot, as well as lubricate the bolts and nuts.
Checking status
You can check the condition of the support yourself. First you need to examine it carefully. If upon inspection it is discovered that the boot is damaged and there are cracks on it, then it is better to replace it immediately, even if the condition of the element is satisfactory.
It’s just that over time, more and more dust and sand will get inside, leading to intense wear, and eventually you will still have to replace it.
If the boot is intact, then the element will be checked for play. There are several ways to do this.
First way.
The simplest is to insert a pry bar on top of the lever near the support so that the end of the pry bar rests against the body or subframe.
Then rock the mount with force, creating shock loads on the lever. If the ball is worn out, you will hear a distinct knock.
Second way.
You can also jack up the wheel from which the knocking or squeaking sound is coming. Then ask an assistant to depress the brake pedal to block the wheel, and then rock it.
Significant wheel play will indicate wear of the element we are considering.
The most time-consuming check is to remove the ball joint and assess its condition. If the finger moves freely in the body, there is axial play - the part must be replaced.
You can, of course, carry out the test using special equipment or stands, although the simple diagnostic methods indicated above are often sufficient.