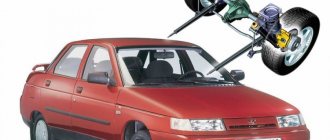
Replacing ball joints on a VAZ 2109 yourself
Many parts of any car, including the VAZ 2109, require regular replacement or repair. The ball joint also belongs to such parts. In order not to pay for the work of replacing the ball joint on a VAZ 2109, you can do it yourself in your own garage - it’s not that difficult. In this article you will find photos explaining the essence of the process, as well as a video of the process of replacing the ball on a VAZ 2109. Instructions for choosing a new ball and diagnostics are also included.
- Choosing a new ball joint
- Ball joint diagnostics
- Replacing the ball joint
- Tool
- Replacement
Choosing a new ball joint
Replacement of ball VAZ 2109
You can simply come to the store and ask for a ball for the required car model. But, after a couple of months, you will have to go to the store again and buy another one! There is no meaning to this action, and it only benefits the store owner. Let's choose the right ball joints. Please pay attention to the following points:
- Manufacturers often rivet ball joints from rubbish and regardless of the quality of the product. Noticing this pattern, car enthusiasts identified several companies with normal price and quality indicators.
- Among such manufacturers is the Trek company, which is highly praised by drivers, as well as service station workers.
- If you decide to use another company, remember that there is no such thing as cheap quality! Beware of counterfeits - the stingy pays twice. The price for balls is not that high.
- Still, when choosing a ball joint for a VAZ 2109, you should pay attention to its appearance.
- The housing must not have any damage or signs of wear. Also, the body of a good ball joint will definitely be welded from two parts.
- Pay attention to the ball pin. If it is painted black, this is a bad sign. Yes, the finger should be black, but not from paint, but from temperature hardening.
Advice! When choosing a ball, try turning the support pin. In a good ball joint it is very difficult to move without a knob.
- Don't forget about the ball joint configuration. What should be included there? The ball itself, nut, mounting bolts and boot.
- The anther must be intact and have no weak points.
- The ball joint bolts must also be hardened. Yellow bolts are usually of disgusting quality - the thread is bypassed without even tightening the nut (in some cases).
- The nut must have a Teflon insert or a cotter pin included, and there must be a through hole in the ball joint pin.
Advice! Usually lubricant is already added inside the ball, but it is often not enough. Don't forget to pay attention to this.
Determining the malfunction of the VAZ-2109 ball joint
Structural simplicity gives the ball joint the necessary degree of reliability with a certain service life. It can range from 15 to 150,000 kilometers. This depends on your driving style and the condition of the roads on which the car is used.
The main signs that the ball needs replacement are:
- knocking in the suspension area when driving on uneven sections of the road;
- uneven tire wear;
- arbitrary displacement (wobbling) of the car from the center line of movement;
- creaking suspension and increased steering effort.
All this signals that the ball joint has reached its critical state and the need for an emergency replacement. Otherwise, when driving, the wheel may simply separate from the car. I don’t even want to mention the result of such an incident.
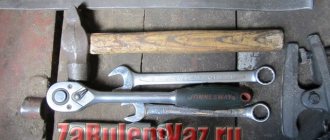
- a set of car keys (socket, open-end);
- mount;
- hammer;
- chisel;
- special puller for steering tips and ball joints;
- WD 40 (aerosol for cleaning, lubricating and protecting against corrosion of mechanisms and parts) or another similar preparation;
- jack;
- lubricant;
- wheel wrench;
- brush for cleaning metal.
If you don't have a puller, you can get by with a hammer and a pry bar. The presence of this key simplifies the replacement process, but is not of fundamental importance.
Ball joint diagnostics
It is very important to determine the time when the ball joint on the VAZ 2109 needs to be replaced and do it. Why? If on the road, at a good speed, the ball joint pin is pulled out of the ball joint itself, this does not bode well for either the car or the passengers. So:
- While driving, listen for knocking noises coming from the front of the car. A ball joint malfunction is especially evident when driving on an uneven road or when a wheel falls into a hole.
- If, when you hit a hole, you hear a dull thump from one of the front wheels, it is likely that the ball joint needs to be replaced.
- You can diagnose a ball joint in another way without special equipment. When parking the car, place your foot on the top of the front wheel.
- Next, you should make pushing movements with your foot towards the other wheel. If during this procedure you hear a dull impact sound, then you should turn to a more accurate diagnostic method and, most likely, replace the ball joint.
The following describes the most reliable way to check whether a ball joint needs to be replaced:
- For a more accurate diagnosis, you will need an inspection hole and a jack.
- The car is installed in a pit, with a parking brake and wheel chocks for greater safety.
- Using a jack, the car is raised.
Advice! You should select the jack's support point with extreme caution because the car will have to wobble from side to side.
- Once the wheel is off the ground, you can begin testing the ball joint.
- One hand is placed on the top point of the wheel, and the second on the bottom.
- Next, you should use careful and at the same time sharp movements to shake the wheels from top to bottom.
- If there is no sound of impact, move on to another wheel. If there is sound, then we do the following (a friend is needed).
- A second person should place two fingers where the ball joint pin connects to the control arm and onto the ball joint housing. If you feel the displacement of the finger in the ball body with your fingers, then it has become unusable.
How to remove a ball joint without a puller?
Wear or breakage of a ball joint is a serious malfunction that negatively affects the operation of the car and requires prompt elimination. The most common signs by which you can determine the need to replace a ball joint are:
Since car owners do not always have the desire or opportunity to contact the appropriate service center, and may also not have the necessary tools at hand, a number of questions arise. In this case, drivers are interested in how to remove a ball joint without a puller. We will consider this procedure using the example of several cars of different brands.
Why can't you hesitate to replace?
The simplest thing that can happen in the event of a malfunction is tire wear. Additionally, problems arise with driving. If malfunctions are ignored, the risk of events developing in which the support breaks out while driving on the roads increases. In this case, a safe result can only be obtained at low speed or when parked. Otherwise, the situation may result in an accident.
Replacing a ball joint on a Renault Logan
Owners of this brand of car are recommended to replace not only the ball joint, but also the lower suspension arm at the same time (here, I wrote on this topic). This procedure is performed as a result of wear or damage to the unit. To carry out the operation you need:
- Hammer.
- Flathead screwdriver.
- Socket wrench - size 30.
- Dimension key 13.
- Open-end wrenches for 16 and 18.
- Two pipes of different diameters.
- Bar.
Basic Process Steps
Reassemble the mechanism in reverse order.
Video instruction
How to replace a Lada Priora?
In this case, the role of a puller can be performed by a hammer and a reinforcement rod. To remove a worn or broken ball joint, you will need:
- The car is raised using a jack.
- The front wheel is removed.
- The two ball mounting bolts are unscrewed and the fastening nut is unscrewed (wrench 17 and 19).
- The reinforcing rod is inserted between the lever and the support body, and then pulled down.
- The pin must be hit from bottom to top in different directions so that the cone of the ball pin pops out of the lever.
- Once the cone is out, the support turns away from the steering knuckle.
- To prevent the ball from being pressed against the fist by means of a lever, the hub is supported, or the wheel is placed and the jack is lowered.
- Next, the ball joint, which is attached to the lever and knuckle, is replaced.
Video instruction
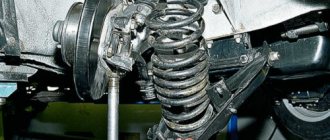
Replacing a ball joint on a VAZ 2109 car
This process is carried out not only when the ball joint is worn out, but also when there is a breakthrough in the boot. This cannot be ignored, as this entails danger for passengers and the driver. It is most advisable to use a lift or inspection hole for work. If you don't have one, you can use a jack. What you need to do:
- Remove the wheel on which the diagnostics revealed problems with the wheel brake.
- All structural parts are cleaned of dirt. Plus, the fastening elements are treated with a special rust removing compound. This will make installation and dismantling easier.
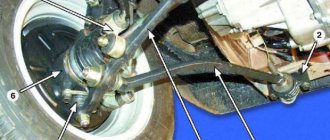
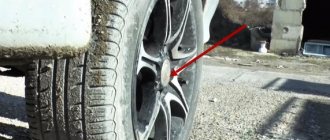
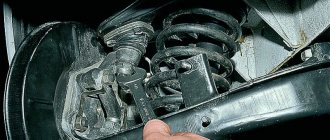
- Using a 19mm wrench, unscrew the nut that secures the ball joint to the suspension arm.
- Using a hammer and a pry bar, the SHO pin is pressed out of the suspension arm. To do this, the nut is not completely unscrewed, but several strong targeted blows are applied to the lever.
- Using a pry bar, the suspension arm is moved down to free the SHO pin from the lever.
- The bolts connecting the ball joint and the steering knuckle are removed using a 17mm wrench.
- The damaged ball joint is removed.
- The condition of not only the support, but also the boot is checked. Sometimes replacing the latter may be enough to fix problems. If obvious damage is detected, the ball joint is removed, a new one is installed, and the unit is put back together.
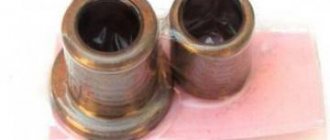
- It is necessary to pay attention to the condition of the finger. It should contain a spacer sleeve. If it is missing, it should be returned to its place, otherwise the updated SHO will not work correctly.
- The rubber boot is lubricated with grease before the reassembly process. Plus, grease will need to be applied to the installation site of the boot in the ball joint.
Is it possible to restore the support?
This element has 2 types of faults. Most often you may encounter the depletion of lubricant in the housing. With this development of events, restoring the ball joint to working condition is easy. Using a special syringe, the amount of lubricant in the housing is updated. Experienced craftsmen prefer graphite lubricant, but you can also use another type of it, preferably with similar values. I advise you to read the article on how to lubricate a ball lubricant. If the performance of the ball was restored using the above method, it is worth considering that it will not be possible to extend it for a long time. In cases where there is a high degree of wear, adding lubricant will not change the situation. A replacement part will be required.
The condition of most domestic roads means that car suspensions cannot last for a long time, as a result of which regular and frequent replacement of its elements is required.
As for the ball joint, removing it without a puller is not a big problem. This process requires a minimal set of auxiliary tools. At the same time, the absence of a professional tool will not have a negative impact on the parts of the mechanism.
Replacing the ball joint
When you are already convinced that the ball joint needs to be changed, you have chosen a good new ball joint and purchased it, then you can begin the repair. You need to start by preparing the necessary tool for the job. So, what does replacing ball joints on a VAZ 2109 require?
Tool
Replacing the ball joint VAZ 2109 - special puller
You will need:
- Jack
- Set of keys, heads
- Balonnik
- Wheel chocks
- Puller for ball joints VAZ 2109
- Hammer
- Mount
- Lubrication
- Metal brush
- WD-40 or equivalent
Now you can start - replacing ball joints on a VAZ 2109!
How to change the ball joint on a VAZ 2109?
After detecting all signs of malfunction, you can begin to replace the element. This operation is not complicated, and therefore can be done by any driver who has a standard set of tools and a place to carry out the appropriate repairs.
First of all, you need to purchase the appropriate ball joint. The most important thing in this matter is to save yourself from buying a defective part. First of all, pay attention to the price of the product. It shouldn't be too low. To save on materials, manufacturers make such ball joints from all sorts of rubbish, resulting in a hinge that must be replaced after just a month of use. The most famous and proven. If possible, buy ball joints from this company.
Procedure:
- Remove the wheel bolts and lift the wheel using a jack. Next, you need to completely unscrew the bolts and remove the wheel. For convenience, it is recommended to turn the wheel in advance in the opposite direction from the work.
- Now you need to find the connection between the ball joint and the arms. It is located at the bottom of the pendant. Treat the area with a metal brush and WD-40.
- Unscrew the pin nut, but not completely. Using a puller, press the ball joint out of the hub. After a corresponding click appears, pull out the puller and completely unscrew the pin securing nut.
- Now unscrew the ball joint on the arms and remove it. Install a new part in its place and tighten the fastening nuts.
- Drive a portion of lubricant under the boot of the new ball joint and install it in the reverse order. This time, during installation, the use of a puller is not at all necessary, since the pin can be tightened with a nut.
- Further assembly is carried out in reverse order.
This completes the replacement of the ball joint. We wish you good luck on the roads!
Checking status
Before changing the ball joint, make sure that this element has actually failed and is the cause of the car's inappropriate behavior.
There are two ways to check - simple and more complex.
First way
To check you will need to do the following:
- When driving, listen for knocking noises coming from the front of the car. The malfunction of the ball joint becomes especially noticeable when the wheel falls into a hole;
- If, when hitting a hole, there is a dull impact from one of the front wheels, the ball joint should be changed;
- There is another way - put your foot on top of the front wheel, and then start pushing it towards the second front wheel. If you hear a dull thump during manipulation, it is better to check the condition of the ball in more detail using the second method.
Verification procedure
Second way
The second testing method is more accurate, but will require a pit and additional equipment.
- Place the car over the inspection hole.
- Turn on the handbrake and place chocks under the wheels for your own safety.
- Raise the front of the car with a jack. Make sure the car is supported securely as you will have to wobble the car.
- After lifting the wheels off the ground with a jack, begin testing.
- Place one hand on the top point of the wheel, and the other, respectively, on the bottom.
- Using gentle but sharp movements, loosen the wheel from top to bottom.
- If you don't hear any knocks, check the second wheel as well.
- If extraneous sounds appear, you need to ask a friend to place two fingers on the area where the suspension arm connects with the ball pin, as well as on the SHO body. If you feel with your fingers that the ball joint pin is moving inside the body, the ball joint has outlived its usefulness and requires replacement.
It is necessary to change the SHO when signs of wear are detected or when the boot breaks. With a deformed boot, the ball joint will not last long, plus it is dangerous for the driver and passengers.
Dismantling process
- To work, you will need an inspection pit or a lift. But if they are not there, you can get by with a regular jack.
- Remove the wheel that has a ball joint problem.
- Thoroughly clean all elements from accumulated dirt, treat fastening components with WD40 so that the rust comes off and you can carry out dismantling work without any problems.
- Using a 19mm wrench, unscrew the nut securing the ball joint to the suspension arm of the VAZ 2109.
- Armed with a puller, press the SHO pin out of the suspension arm.
- If you don’t have a puller, you don’t need to go to a car service center. There is another way. You need to not completely unscrew the ball joint nut. The tension is created by a pry bar and several targeted, strong blows on the lever with a hammer. In 99% of cases, the finger comes out without any problems.
- Do not remove the pry bar too far, since it should now be used to move the suspension arm slightly downward, freeing the ball joint pin from the lever.
- Having picked up the 17 head, it is necessary to dismantle the pair of bolts responsible for connecting the steering wheel with the steering knuckle.
- Remove the worn ball joint.
- Check the condition of the boot and support. In some cases, it is enough to replace the boot. But if the ball joint is worn out and shows all signs of failure, install a new ball joint and reassemble the unit in the reverse order.
- Make sure there is a spacer on the pin. If it has been removed, do not forget to return the element to its place. Otherwise, the new support will not work properly.
- Be sure to lubricate the rubber boot with grease before reinstalling it. The lubricant is also applied to the place in the support where the boot is mounted.