Repair / From Ekaterina Larina
- Several ways to check functionality
Method No. 1 - Method number 2
- Method number 3
- For what reasons can fuel pumps fail?
- Preparing tools
Electric fuel pumps are installed on VAZ 2108 and VAZ 2109 models. The task of this device is to supply fuel under certain pressure into the fuel rail, and from there the injection system distributes fuel into the engine cylinders. In other words, it ensures the transfer of gasoline from the tank to the engine unit. However, electrical devices can cause some problems for owners of VAZ 2108/2109 with a carburetor. Their performance is not always flawless. Owners of domestic cars need to be prepared to know and be able to carry out inspections, repairs and replacements with their own hands.
What fuel pumps are installed on the VAZ 2108/2109 (carburetor)
Initially, both carburetor and injection models of VAZ 2108/2109 cars are equipped with DAAZ brand fuel pumps. Their direct manufacturer is the AvtoVAZ plant itself. These devices are characterized by low cost and accessibility for a wide range of car owners: DAAZ can be bought at any auto store.
However, despite the prices of the domestic manufacturer (from 700 rubles per product), many car enthusiasts prefer to remove the factory one as quickly as possible and install another one. This desire is explained by the presence of a large number of negative reviews from owners regarding the quality of DAAZ.
I drove around a dozen before buying this! stores... I checked with friends... I scoured the Internet... in general, there is only DAAZ on sale as in the photo... they all leak along the pedal axis... I'm waiting for this one to leak...
Tavrovod11
https://www.e1.ru/talk/forum/read.php?f=17&i=655450&t=655450
The most budget-friendly type of equipment for fuel systems of domestic cars.
An alternative equipment option is a petrol pump from Pekar. It is more resistant to all types of influences, and is also characterized by durability. Pekar is a leading manufacturer of automotive components in Russia.
I've been driving for over 30 years. and I had a lot of fuel pumps and changed them often. Either the membrane will wear out, or the valves will fail. In 2004 I bought myself a new Pekar fuel pump and now I don’t know any grief. With old gas pumps I carried a rag with water in the hot weather. When the gas pump stopped pumping, I soaked a rag and laid it on top, but this gas pump can withstand any temperature. And during this time I only changed the valves, and the membrane is still working. The stem was also changed once. Very good fuel pump I recommend to everyone
Hariton2058
https://otzovik.com/reviews/benzonasos_pekar/
High-quality and durable devices have gained popularity among many Russian VAZ drivers.
At the owner's request, during repairs, a fuel pump manufactured by the German company Bosch can be installed on the VAZ 2108/2109. The cost of the original device is more than 2 thousand rubles, but the quality will completely cover all costs.
Fuel pumps in VAZ 2108/2109 cars with injection engines are not located under the hood. Therefore, the search for breakdowns and malfunctions should not begin with the traditional opening of the hood. The device is located directly in the gas tank. That is, getting to it in the event of a breakdown will be quite difficult - you will have to recline or dismantle the rear seat.
Several ways to check functionality
Experienced owners of VAZ 2108/2109 cars know exactly how to check the functionality of the fuel pump. Malfunctions related to incorrect fuel supply may not always relate specifically to the pumping device. Therefore, you will need to be able to identify problems with the device yourself.
Method No. 1
You will need to turn on the ignition and listen to whether the pump is working or not. A buzzing sound should be heard in the cabin behind one of the rear seats. If there is no characteristic sound of the pump operating, then you will need to check whether power is being supplied to it.
The block with the relay is dismantled. For the convenience of the driver, the assignments of all relays in the block have schematic assignments. If the relay and fuse are working, then it is recommended to recline or remove the rear seat, open the hatch and measure the voltage on the device itself. Typically, a multimeter or wiring with a low-power lamp is used for this.
Method number 2
You will need to replace the fuel pump with a new one. If the problems disappear immediately, it means that the fuel pump was indeed faulty. If the car still cannot be started due to low pressure in the fuel rail, the problem is not in the fuel pump, but in the fuel system itself. It is best to contact specialists.
Method number 3
The performance of a gas pump can be checked by measuring the amount of gasoline it pumps over a certain period of time.
You will need to organize access to the fuel rail and unscrew the spool on the tube. Connect a hose to the hole, the other end of which is lowered into a container for measurement (for example, a three-liter jar). The pump on the “eight” and “nine” pumps approximately one liter of fuel per minute. If the readings are much lower, it means the high pressure filter is clogged.
How to repair a fuel pump, or is it the fuel pump itself?
Removal: 1) First, you need to remove the fuel pump itself from the car engine. (see “Removing the fuel pump”) 2) Next, when the pump is already removed, clamp it with a vice, and at this time unscrew all six screws that secure the lower and upper pump housings.
Note! If you don’t have a vice nearby, then perform the entire operation while holding the pump in your hands!
3) After unscrewing all the screws, separate the upper pump housing from the lower one.
4) Then, pressing the central metal ring of the diaphragm assembly with three or four fingers, turn it clockwise 90°, and as a result, the diaphragm assembly will be removed.
5) After you have removed the diaphragm assembly, grasp it with your hand and then remove it from the lower pump housing.
Note! After removing the diaphragm assembly, a small spring will remain on the lower pump housing, which also needs to be removed!
6) Next, visually inspect all the diaphragms of the “diaphragm assembly”; the presence of ruptures, various types of abrasions and hardening of the diaphragms is not allowed. (For clarity, the photo below shows all the components of the diaphragm assembly, and the diaphragms themselves are indicated under the number “4”)
Note! If you find defects on at least one diaphragm, then it is recommended to replace it with a new one!
Replacing diaphragms in the diaphragm assembly of the fuel pump:
To repair the diaphragm assembly and replace the diaphragms in it, after removing it, perform the following operations on it: 1. First unscrew the upper nut that secures the assembly rod.
2. After unscrewing the nut, remove the central metal ring of the diaphragm assembly. 3. Next, from the diaphragm assembly, remove the two diaphragms.
4. And then remove the inner and, together with it, the outer spacer.
5. At the very end of the operation, remove the last remaining diaphragm from the rod.
Installation: 1) When reassembling, the first thing to do is check the functionality of both valves of the upper pump casing by pressing both valves lightly with a screwdriver; when pressing, there should be no jamming, the valves should work smoothly, otherwise replace the valves, or the upper pump casing itself is new.
Note! The second valve is located on the other side of the pump housing!
2) Next, when you get to installing the diaphragm assembly, install it on the pump in such a way that the small protrusion that is located on the diaphragm is strictly oriented with the side of the pump, as shown in the figure:
3) Upon completion of the operation, always remember that all holes that are located in the remote gasket should be located as far as possible from the exhaust pipe of the vehicle muffler when installing the fuel pump in its place.
Important! 1) When assembling the diaphragm assembly, make sure that all the outer holes coincide with the holes on the lower pump housing! 2) Replace all metal parts of the fuel pump housing with new ones if chips and cracks appear on them!
What are the signs of a fuel pump malfunction and the possibility of repairing it?
The first sign of a malfunction may be a lack of pressure in the fuel supply system. This is expressed by interruptions in the operation of the engine unit (it begins to “cough”), after which the car stalls. Such symptoms can occur both while driving and when the engine is idling.
However, even earlier, before the fuel pump fails, an attentive driver can diagnose problems. These include:
- high tone of the engine;
- having problems starting the engine;
- gradual loss of power while driving.
Thus, if you listen to the nature of the sounds while driving and monitor the dynamic performance of the car, you can timely repair or replace the fuel pump without waiting for it to break down.
For what reasons can fuel pumps fail?
It is important not only to know exactly how to determine wear and tear of a fuel pump, but also to take into account the reasons why the device may fail.
The most common causes of breakdowns and incorrect operation of fuel pumps on VAZ 2108/2109 vehicles are:
- debris in the fuel tank;
- short circuit in the fuel system wiring;
- clogging in the fuel filter;
- pump overheating.
What to do if it leaks
Either fuel or lubricant (oil) may be leaking. If liquid leaks are found on the fuel pump body in a VAZ 2108/2109 car, it is recommended to take the following actions:
- tighten the clamps on the hoses of the device (at the “input” and “output”);
- check the integrity of hoses and connections;
- tighten the fuel pump cover bolt (or replace it if the thread has been stripped);
- replace the pump fitting.
What to do if fuel does not pump: repair
In cases where the device does not supply gasoline to the engine unit, you will need to establish the functionality of the gas pump itself. It is quite possible that it is functioning, but some element has failed.
Repairing a fuel pump is advisable only in cases where it is necessary to replace the smallest part of it. It is worth initially calculating the cost of materials, as well as taking into account the loss of time. It is quite possible that it is easier and cheaper to buy a new fuel pump.
Repair work to restore the functionality of the fuel pump, if it does not pump fuel from the tank, is carried out taking into account the following details:
- The fuel pump will need to be removed from the tank.
- Using the tool carefully, you will need to disassemble the device body.
- Inspect the pump components and find any damage.
Next proceed based on the existing problem:
- if one of the four springs bursts, you will need to replace it (as a rule, springs are inexpensive and are sold in almost all car stores);
- if the valve plate is seriously worn, this element will also need to be replaced, and the valve seat will need to be hammered into place with a blunt screwdriver;
- the pump drive rod has started to jam - you can straighten the surface of the rod to make it smoother;
- the surface of the fuel pump is dirty - you will need to clean the device with a soft, lint-free cloth
After troubleshooting, you should reinstall the fuel pump and check its functionality by starting the engine. If the ignition problems persist, most likely the problem lies in the fuel system itself, or your device will need to be replaced.
Video instruction: how to repair a fuel pump yourself
Disassembling and replacing the fuel pump
So, now we’ll tell you specifically about how to properly disassemble, replace damaged elements of the fuel pump, or completely replace this device with a new one.
Hatch
- In any case, we recommend purchasing a repair kit. It doesn't cost much. But there is no need to rush into buying a fuel pump. Who knows, maybe a simple repair will bring the pump back to life.
- Remove the air filter along with its housing.
- Disconnect the fuel supply and return hoses from the fuel pump fittings.
- Unscrew the mounting nuts that hold the pump itself.
- Carefully remove the pump, being careful not to damage the gaskets.
- Inspect the pump parts for cracks or damage. Check the fuel pump valves for leaks and perform all the operations we described above.
- Assess the current condition of the suction and discharge fittings. When dismantling, they must remain motionless in their seats. They break extremely rarely, but nothing should be ruled out.
- Check the fuel pump diaphragm. The presence of ruptures and peelings indicates that it must be replaced.
- Look at the current filter. Damage and excessive contamination are clear signs of wear and warrant replacement.
- Treat the filter components with clean gasoline and blow with compressed air using a compressor.
- If you find damaged elements, replace them with new ones using a repair kit.
- Replace the pump gaskets if necessary.
- When installing new gaskets, be sure to first treat their surface with Litol 24.
- If the pump housing itself is damaged or there are other serious problems, you will have to completely replace the fuel pump. Repairs won't help him.
- Next, when partial repairs are completed or you decide to take a completely new pump, it’s time for reassembly.
- Be sure to adjust the feed using shims of the required thickness so that the pusher output has an optimal indicator. We talked about this above.
- If the pushrod protrudes too much, it will cause the fuel pressure to be too high, causing your carburetor check valve to break.
- If the distance is less than required, as the load increases and the vehicle speed increases, the engine will not be able to receive enough fuel.
- Reassemble by following the reverse sequence of dismantling the fuel pump.
- Make sure the arrow on the body points towards the carburetor.
- When installing the diaphragm pump assembly, the holes in the gasket are located away from the muffler pipe.
Well, you figured out how you can repair and replace the fuel pump yourself. The task is really not difficult, although this unit plays a very important role in the performance of the entire VAZ 2109 car.
Replacing the fuel pump on a VAZ 2108/2109
The procedure for replacing a faulty fuel pump on a VAZ “eight” and “nine” is relatively simple. The main thing is to be careful so that when installing and dismantling you do not accidentally catch parts of other elements of the car.
Preparing tools
In order for the work to be completed quickly and not have to be distracted by searching for this or that tool, it is necessary to prepare everything in advance. So, to remove a faulty fuel pump and install a new one, you will need the following set of tools:
- Phillips screwdriver;
- flat screwdriver;
- socket wrench (or head) size 7 mm;
- extension;
- open-end wrench 17.
It is recommended to carry out all stages of operations with gloves so as not to stain or injure the skin on your hands.
Step-by-step instructions on how to remove a faulty fuel pump
The first stage of work is to dismantle the old device, which can be divided into several steps:
1. Turn off the ignition.
2. Fold down the rear seat in the cabin.
3. There is a small hatch under the foot carpet in the cabin; it must be opened by removing the fastening screws with a Phillips screwdriver.
4. Raise the hatch cover.
5. A plug will appear in your field of view; you will need to bend the latches on it and disconnect its parts.
6. Next, you need to unscrew the fuel pipes with a 17 wrench.
7. The tubes must be diverted in different directions so that they do not interfere with further work.
8. There is a pressure plate under the hatch - you will need to unscrew all the nuts on it to open it.
9. The fuel pump is located under the plate; to get it out you will need to pry off the rubber seal with a screwdriver.
10. As soon as you manage to lift the device a little, you will need to tilt it so as not to touch the body of the fuel level sensor.
Step-by-step instructions on how to install a new fuel pump
Further actions involve the reverse order:
- Carefully insert the new device into the hole, not forgetting to change the O-ring.
- Retighten all nuts on the pressure plate.
- Connect the fuel pipes to each other.
- Connect the two parts of the plug.
- Close the cavity with the hatch cover and screw the hatch.
- Place the carpet in its original place.
Video instruction: how to replace the fuel pump yourself
Thus, you can diagnose and repair the fuel pump in VAZ 2108/2109 cars yourself, without involving service station specialists. The procedure for determining the performance and replacing a faulty device is quite simple, so performing these procedures yourself will not cause difficulties even for inexperienced drivers.
Do-it-yourself fault diagnosis and repair of the Daewoo Nexia stove
Repair of carburetors VAZ 2108–2109
Checking the general condition of the fuel pump
First of all, let’s check whether the supply system of your VAZ 2109 is working at all. To do this, you need to take the following steps:
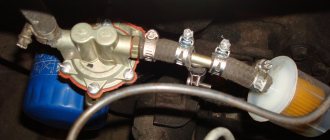
- Remove the pump fuel hose from the source or discharge fitting;
- Manually press the fuel pump lever several times;
- If the pump is operational, a strong stream of fuel will immediately flow through the fitting;
- If there is no jet or it is very weak, it will be necessary to carry out other checks.
Intake Valve Check
- Disconnect the hose from the suction fitting so that both hoses are eventually removed, each from its own fitting.
- Simply plug the suction fitting with your finger, then pull the lever several times to manually pump fuel. If everything works fine, your finger will begin to be sucked into the fitting. This effect indicates that the pump is working properly. Therefore, we look for the problem in the tank or lines.
- If there is no suction, you will have to disassemble the device to replace the inlet valve. Its tightness is most likely broken.
Pump diaphragm failure
You need to do the following for your fuel pump:
- Remove the upper part of the fuel pump housing and remove the diaphragm assembly from there;
- Unscrew the nut on the rod, and then pull out the 3 diaphragms;
- Replace faulty elements with new ones. They are available in any repair kit for the VAZ 2109 fuel pump;
- Reassemble the assembly in reverse order;
- If you have a Pekar pump, there is only one diaphragm. It can be removed by removing the cover;
- To disconnect the diaphragm assembly, rotate it 90 degrees.
Be sure to simultaneously check the condition of the spring located under the diaphragm. To do this, you need to remove the upper part of the pump housing, remove the diaphragm rod and look at the current state of the spring. If it is broken, deformed or lacks elasticity, replace the element.
Node elements
Intake and exhaust valve malfunctions
If both valves raise doubts about their functionality, certain measures will have to be taken.
- Remove the cap from the fuel pump and remove the strainer.
- Visually assess the condition of the pump cavity and inlet valve.
- With the top of the pump body removed, you can take a look at the outlet valve.
- If both valves are not installed tightly enough, they are not pressed well or have become motionless, replace the entire pump completely.
- If you find traces of clogged valves, remove them and blow out the housing with compressed air.
In the case of the Pekar pump, two valves are located in the cover, so to assess their condition, simply remove the cover from the fuel pump housing.
Damage to the pusher
It is not uncommon for a fuel pump to fail to operate due to damage to the pusher. We have prepared separate instructions for this case.
- Remove the pump from the studs by unscrewing the fastening nuts. The thermal insulation insert, pusher and gaskets remain on the motor.
- Rotate the crankshaft to extend the pushrod as far as possible.
- Measure the distance that the pusher protrudes relative to the top gasket. Normally, the figure is 0.8-1.3 millimeters.
- If the protrusion is smaller or larger, try adjusting it using thicker or thinner shims.
- Between the thermal insulation insert and the pump there is an external gasket with the greatest thickness. It is this that needs to be changed when adjusting the protrusion.
- New gaskets are available in repair kits, although many make their own. To do this you will need a piece of paronite.
