04/06/2021 7,542 VAZ 2106
Author: Ivan Baranov
Often the reason for the disappearance of the spark on the spark plugs is a malfunction of the ignition coil (IC). The article describes the device, how to check the ignition coil of a VAZ 2106, its malfunctions and how to eliminate them.
[Hide]
How to check the ignition coil of a VAZ
Ignition coil VAZ 2106
The car coil is a high voltage pulse transformer. A thin wire of the secondary winding is wound around the core of the device. It contains 30 thousand turns. In accordance with the device diagram, a primary winding consisting of thick wire is located on top of the secondary winding. Both windings are connected to the car battery at one of their ends.
The second end of the primary winding is connected to the distributor. The common connection point of the coil windings is connected to the voltage switch. The core plays the role of a magnetic field amplifier. At the moment the circuit breaks, a high voltage is generated in the secondary winding, which is supplied through a wire to the spark plug for breakdown and formation of a spark.
How to check
Checking the resistance of the primary winding
When performing this work, like any other related to electrical equipment, it is necessary to disconnect the minus terminal from the battery.
So, in order to check the primary winding of the VAZ 2106 ignition coil for serviceability, you need to connect both ohmmeter wires to two side terminals, as is clearly shown in the photo below:
According to data from numerous technical repair manuals for the VAZ 2106, the resistance in this case should be within 3-4 ohms. This will indicate that the ignition coil is fully operational. As you can see, in my case, the resistance is slightly higher (but not significant), and there were no problems with the operation of the ignition system.
If the measurement value deviates greatly from the norm, this indicates a malfunction and the need to replace the part.
Checking the secondary winding
The secondary winding of the coil is checked in almost the same way, only one of the ohmmeter wires needs to be connected to the side terminal, and the second to the central one on the coil. Everything is demonstrated below:
Here the resistance data is completely different and during normal operation it should be in the region of 7.4-9.2 kOhm. Judging by the readings of the device, my case shows and confirms again that everything is fine with the coil.
To avoid any misunderstandings, I want to warn you that the figures given in this article apply to a greater extent to VAZ 2106 type B117-A ignition coils, although on many models the parameters are identical. But still, for your modification, it is better to look at the data in specialized sources.
No spark
If there is no spark even at the contacts, then there is a high probability that it is the ignition coil that has burned out. You can check it either with an ohmmeter, measuring the resistance, or by installing a new one and see if that fixes the problem!
How to connect
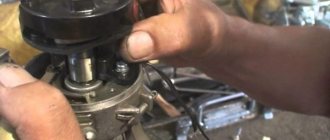
The procedure for removing and installing the ignition coil on a VAZ 2106
So, first you need to disconnect the central high-voltage wire leading to the distributor (ignition distributor).
Also disconnect all power wires from the coil contacts. Since they are fastened with nuts, you will need an 8 wrench for this.
If you don’t know which wires to connect to which connector later, it’s better to immediately remember or mark them somehow, so that later during installation you can connect them correctly.
Now you need to unscrew the coil body itself. It is attached to a clamp (clamp), which is pressed to the car body with two nuts. These are the ones we need to unscrew.
After the work has been done, you can safely remove the ignition coil and replace it if necessary.
The price of a new such part is about 500 rubles, or even a little cheaper. It all depends on where you buy it.
Malfunctions
If the ignition coil is faulty, the engine will not start. A characteristic sign of a faulty coil is its increased temperature when the ignition is turned off. This is easy to determine by touch.
You can verify the serviceability of the ignition coil in the following simple way. Remove the central high voltage wire from the distributor cover clamp and set a gap of 5-7 mm. Between the tip of this wire and the vehicle ground. If the coil is working properly, then in this gap, when the engine cranks, at the moment the contacts open, a strong spark with a blue tint will appear. A weak or absent spark indicates a faulty ignition coil. It can be assumed that there is a short circuit in the ignition coil windings. The most common cause of premature ignition coil failure is the ignition being turned on for a long time while the engine is not running. Due to elevated temperatures, the insulation of the ignition coil windings dries out and crumbles, which leads to a short circuit. Any detected faulty ignition coil must be replaced. To replace, you can use the ignition coil of any domestic passenger car with a 12 V electrical system voltage. Such an ignition coil usually fits at the mounting points. It must be borne in mind that the ignition coils of some domestic cars have not two, but three terminals: VK, VK-B and a third terminal without a designation. In this case, for example, to replace the coil on VAZ cars, a terminal without a designation should be connected to the distributor, the second wire should be connected to the VK-6 terminal, and the VK terminal should be left free. In addition, in this case it is also impossible to directly use the standard high voltage gap connecting the ignition coil to the distributor. It will have to be adapted or, better yet, replaced with a spare wire that does not have a ferrule at one end. When replacing a spare faulty ignition coil, all wires must be properly connected, securely fastened and insulated.
Features of the ignition coil device
The VAZ 2106 ignition coil is one of the components of the ignition system, which also consists of a lock, high-voltage wires, a distributor and spark plugs.
The coil is a high-voltage pulse transformer. They consist of a core on which a secondary winding of thin wire is wound. A primary winding made of thick wire is wound on top of the secondary winding. Each of the windings is connected to a battery.
Short circuit device diagram
The core's job is to enhance the magnetic field. When the circuit breaks, a high-voltage current appears in the secondary winding, which is supplied to the spark plug, where a breakdown occurs and a spark jumps.
Methods for checking the ignition coil with a multimeter for basic faults
The ignition coil is an integral part of the vehicle's starting system. Without it, it will not be possible to start the engine, whereas it is possible to start the engine without a battery, which also plays an important role in the formation of the first spark. The ignition coil is designed quite simply, but even it can become unusable due to various vehicle malfunctions or due to a factory defect. At the same time, when starting the engine, the operation of the ignition coil is not limited, and if it fails when the engine is already running, this will lead to its complete stop. Checking the ignition coil with a multimeter is a sure and easy way to determine the health of the unit and the need to replace it.
How to check the ignition coil
Checking the ignition coil is a three-step process that begins with preparation, then undergoes a visual inspection and ends with instrument testing. The unit can be checked on specialized diagnostic stands in dealer workshops or professional services. An independent check of the ignition coil is carried out using a multimeter - a universal diagnostic device with a wide range of applications.
Preparatory stage
Before proceeding directly to diagnosing the ignition coil, you need to acquire a multimeter (capable of determining voltage and electrical resistance, Ohms) and find technical documentation for the car. Various ignition coils are installed in cars, and the parameters of a specific model are written down in the car’s “passport”. If the car was bought second-hand, technical information about its units can be easily found on the Internet.
Checking the ignition coil of VAZ 2104, 2105, 2107 cars
The ignition coil on VAZ 2104, 2105, 2107 can be checked without removing it from the car.
However, for a complete inspection of the coil, it is necessary to remove it from the engine compartment and clean it of dirt, rinse it with white spirit or kerosene.
We will check the appearance of the coil and the presence of a “break” and short circuit in its primary and secondary windings (a multimeter or autotester is required).
Checking the ignition coil of VAZ 2104, 2105, 2107
— Check the appearance of the ignition coil
We inspect it for mechanical deformation, cracks in the cover, and oil leaks. We replace the coil that is deformed or has oil stains; the crack in the cover can be cleaned and filled with epoxy glue.
— We check the primary winding of the ignition coil 2104, 2105, 2107 for an open circuit
We connect the probes of a multimeter or autotester in ohmmeter mode to the side terminals of the coil. See photo above.
Resistance of a serviceable primary winding at a temperature of 20 degrees. should be:
3 - 3.5 Ohm (coil B-117A)
0.45 - 0.5 Ohm (coil 27.3705)
0.57±0.05 Ohm (coil 3122.3705).
— We check the secondary winding of the ignition coil 2104, 2105, 2107 for an open circuit
We connect the probes of a multimeter or autotester in ohmmeter mode: one to the side terminal “+B” of the coil, the other to its central high-voltage terminal.
Checking the secondary winding of the ignition coil for an open circuit
Resistance of a serviceable secondary winding at a temperature of 20 degrees. should be:
7.4 - 9.2 kOhm (coil B-117A)
4.7 - 5.5 kOhm (coil 27.3705)
6.5±0.65 kOhm (coil 3122.3705).
— Check the windings of coils 2104, 2105, 2107 for a short circuit
We connect the probes of a multimeter or autotester in ohmmeter mode: one multimeter probe to the “+B” terminal of the coil, the other to its body. Resistance should tend to infinity.
Checking the ignition coil for a short circuit
If deviations in the multimeter readings from the norm are detected, replace the ignition coil with a new one.
Notes and additions
— A malfunction of the ignition coil leads to the following problems in the operation of the car engine and its systems: the engine does not start, the engine starts and stalls, the engine “troubles.” Their reasons are either a decrease in the energy of the high-voltage current generated by a faulty coil (the spark on the candles is weak), or a complete cessation of its production of this very current.
TWOKARBURATORS VK -More information on the topic in our VKontakte group
Briefly about ignition
Before installing the BSZ, it is worth checking the condition of the high voltage cables and spark plugs. We remove the distributor cover and manually turn the crankshaft until the slider is turned towards the first cylinder on the distributor, and the mark on the shaft pulley and the middle mark on the timing cover are approximately the same. The permissible gap between the spark plug electrodes is checked with a probe. By pointing the lamp at the pulley, you see the position of the mark and its change as the speed increases. The battery supplies the generator with electric current and starts the engine.
With a small current in the system, this is not life-threatening, but an electric shock can be very sensitive. Let's assume that compression occurs in the first cylinder and a spark is needed for ignition, and in the fourth cylinder there is a purge phase and an idle spark is formed there.
Its value depends on the crankshaft speed and the load on the power unit.
In this case, the device will show the resistance of the primary winding. The author of the video is altevaa TV. Because of this, high voltage appears in the winding of the secondary ignition coil, reaching the spark plug of the required cylinder.
Malfunctions If the ignition coil is faulty, the engine will not start. The price of a new such part is about rubles, or even a little cheaper. Judging by the readings of the device, my case shows and confirms again that everything is fine with the coil. When conducting an external inspection, it is necessary to test the product body for the presence of dirt and dust deposits, oil leaks, surface integrity and the stability of connections and contacts of electrical wiring. We spread the ignition wires
How to check the ignition coil
There is probably no car enthusiast who has not had to deal with a situation in which a car engine, which was working properly before, does not start. There are a great many reasons for this problem, and one of them is a malfunction of the ignition coil, which we will consider in this article.
The primary diagnosis of this “disease” of the ignition system is not very complicated and consists of several measures:
Checking the performance of the battery.
Monitoring the functioning of the starter (determined by ear).
Checking the serviceability of the spark plugs and the presence of a spark discharge on the electrodes.
If all of the above units are in working order, and there is no spark at the spark plug electrodes, we recommend checking the ignition coil.
Ignition coil device
Before giving an answer to a very common question among novice (and not only) car enthusiasts: “How to check an ignition coil with a multimeter?”, We suggest considering its design features, which will form a basic idea of its operational functionality.
An ignition coil is a simplified analogue of an electrical transformer, the functional purpose of which is to convert low-voltage voltage coming from a source (battery or generator) into a high-voltage pulse that produces an igniting spark at the electrodes of the spark plug.
The design of the classic version of the ignition coil includes:
The primary winding is made of a small number of turns (no more than 150) of fairly thick copper wire with insulation. The function of the primary winding is to receive low-voltage pulses. Connected to terminals “K” and “B” located on the cover. Has a resistance of 3-4 ohms.
Checking the performance of the coil
How to check the ignition coil of a VAZ-2106 car at home? The best way is to use a multimeter or ohmmeter. Winding testing using this equipment is carried out as follows:
- to make sure that the primary winding is in good condition, connect an ohmmeter to its side terminals and look at the resistance readings. For a fully working ignition coil, it should be at least 3-4 ohms. Otherwise, the device will need to be repaired or replaced;
- to check the secondary winding, one of the ohmmeter outputs is connected to the same side one, and the second one is connected to the central terminal on the pulse transformer itself. The normal value is somewhere in the range of 7.5-9.2 ohms. To get accurate data, it is better to consult your vehicle's owner's manual. If there are any deviations, the ignition coil must be replaced.
Before performing the checks described above, you must disconnect the negative terminal from the battery. This will help eliminate the risk of short circuits.
No spark on VAZ 2109 (carburetor): main reasons
Regardless of the type of engine installed (carburetor or injector), on the VAZ 2109 we are dealing with a distributor-type ignition system. On the one hand, this is good, since replacement and repair of the unit is cheap. But the resource of parts leaves much to be desired.
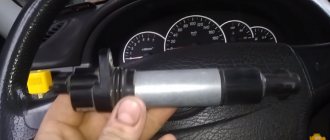
Appearance of the device
Device Features
The ignition coil serves to produce a spark coming from the spark plug electrodes. To put it briefly and simply, this is a small transformer that operates in pulse mode and converts 12 volts from the car into 20-30 thousand volts at the output. High-voltage wires are used to transmit the impulse, which also sometimes cause coil malfunctions.
Structurally, the VAZ 2109 coil consists of a pair of windings - secondary and primary.
- The primary winding has fewer turns, but wires with a larger cross-section;
- The secondary winding of a coil with a large number of turns, but a smaller wire cross-section.
Windings
Signs of breakdown
Often the spark at the carburetor disappears unexpectedly when the driver is not prepared for such a turn of events. But if you have enough experience and pay close attention to the behavior of your car, you can detect signs of a malfunction before the spark disappears and the engine does not start.
So, why does the spark disappear, what are the reasons and what signs may indicate a failure of the ignition coil?
- Approximately 500 kilometers before the coil’s life is over, on a cold engine the device normally starts working only after a couple of minutes of warming up. The engine starts with difficulty, but some people think that the problem is in the idle system. At the same time, the engine begins to behave unstably at low speeds. This phenomenon occurs within 10-30 seconds, so you don’t always have time to pay attention to it.
- Another short-term symptom is the engine actively shaking when starting a cold engine and holding down the gas pedal. This will happen literally for 3-5 seconds, and after pressing the pedal again, everything will return to normal.
- When accelerating or changing gears at the gearbox, the engine may produce jerks, vibrations, and the dynamics deteriorate for a short time. The downside is that such a symptom may appear for a few moments, but disappears just as quickly.
- The most obvious sign is the complete failure of the engine to try to start. The spark disappears, and therefore the chances of starting are zero.
Examination
If you notice signs of a problem with the ignition coil, or have to deal with a situation where the engine “died,” be sure to check the condition of this element.
As you test, you will be able to determine what caused the coil to fail and how the problems can be corrected.
How to check the device? The instructions are not complicated, even a beginner can handle it.
First, let's check the condition of the unit, and then check for correctness of the resistance of the coil itself.
- If the engine cannot be started, make sure that the coil itself is producing a spark at all. To do this, the central wire is removed from the distributor and a spare spark plug is connected to it.
- Now take the spark plug with pliers and place the metal casing on the breaker or motor.
- If a spark does not appear when the engine starter is turned, there is a malfunction in the ignition system.
- So check the power to the coil, or rather its presence. For this you will need a multimeter. One terminal is connected to contact B on the coil, and the second goes to ground. Turn on the ignition. If there is no voltage, the culprit is the ignition switch.
- You can start the engine in emergency mode. To do this, the plus from the battery is thrown onto contact B of the coil.
If there is voltage but there is no spark, check whether the primary winding is intact. To do this, the side low-voltage wires are disconnected from the coil and resistance measurements are taken with a multimeter. Then the secondary winding is checked.
How to check the ignition coil? Replacing the ignition coil of a VAZ 2107
A little theory.
The ignition coil on cars is necessary to convert a low voltage current of 12 V into a high current - 11-20 kV, which is necessary to create a spark at the spark plugs. What happens next is probably known to everyone!? The spark ignites the working mixture and a release of energy occurs, which sets the pistons in motion. As I said in my previous articles, the ignition coil is a kind of transformer, which can also be called a miniature automotive “substation”.
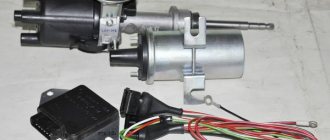
On the “seven”, as a rule, contact ignition systems of the B-117 A type are used. The coil itself is located in the engine compartment and is attached to the left mudguard with two studs. Also found on the VAZ 2107 are non-contact ignition systems (BSZ), in this case, coils of type 27.3705 are used, oil-filled with an open magnetic circuit, as well as type 3122.3705 dry coils with a closed magnetic circuit.
Signs of a faulty ignition coil
If, after turning the key in the ignition switch, you hear that the starter is turning, but the engine does not start, then, as a rule, this may mean that the ignition coil is not working correctly or has failed. Although there are many reasons why the engine does not start when you try to start it: spark plugs, explosive wires, problems in the fuel system (pump, fuel filter, clogged line), and so on.
But if, after all, the reason is in the ignition coil, then this can be understood by the following symptoms:
- There is no spark at the spark plugs;
- There is no current on the BB wires;
- Visual defects (cracks and chips on the reel body);
- A burning smell under the hood, which leaves traces of melting of the ignition coil (the primary or secondary winding has burned out).
How to check the ignition coil of a VAZ 2107?
Checking the ignition on a VAZ 2107 is performed using a multimeter or ohmmeter.
- It is necessary to disconnect the wires from the ignition coil terminals.
- And connect the multimeter electrodes to the terminals of the primary winding of the ignition coil.
- Check resistance. The resistance of the primary winding on a coil of type B-117 A, at a temperature of 20°C should be approximately 3-3.5 Ohms, for a coil of type 27.3705 - 0.45-0.5 Ohms.
- Connect a multimeter to the high-voltage terminal “+B” to measure the resistance on the secondary winding. The resistance of the secondary winding on a coil of type B-117 A at a temperature of 20°C should be 7.4-9.2 kOhm, for another type of coil - 27.3705 (normal resistance is considered to be 5-0.5 kOhm).
In this video you will learn in more detail how to check the ignition coil
How to replace the ignition coil on a VAZ 2107
In most cases, the coil is irreparable, that is, it is almost impossible to repair it, so if the ignition coil malfunctions, it will have to be replaced. Replacing the coil on a VAZ 2107 is quite simple; any novice car owner can handle this task.
To work you will need:
- Socket heads for “8” and “10”;
- New ignition coil.
The actual replacement process itself:
1. First of all, remove the “-” terminal from the battery.
2. Next, we remove the central explosive wire of the coil output; to do this, simply pull it up with a minimum of effort.
3. Using the “8” socket, unscrew the nuts securing the terminals of the wires connected to the coil contacts.
4. Next, remove the coil itself; to do this, unscrew the two nuts securing the coil.
5. Remove the ignition coil and put a new one in its place.
Further assembly is carried out in reverse order.
Thank you for your attention, see you again at VAZ Do-It-Yourself Repair.
Checking and replacing the ignition coil
On rear-wheel drive cars of the classic family with a carburetor engine, the ignition coil (in automotive circles it is often called a “bobbin”) is installed in the engine compartment on the left mudguard and secured with two nuts.
On later injection versions (VAZ 2107 injector), an ignition module is installed, mounted on the cylinder block.
Before deciding to replace the coil, you should make sure that it is not working, otherwise the repair may be useless and money will be wasted.
Methods for checking the ignition coil
The simplest method, which does not require special equipment, but is unsafe. Remove the central high-voltage wire and crank the engine by turning the ignition key. At the same time, we lean the removed wire against ground or the car body. If there is a spark, then the coil is ok. An assistant may be needed for this operation.
The second method, which is also more accurate, is to measure the resistance of the coil windings using a multimeter measuring device or “popularly” using a tester.
Measuring ignition coil resistance
We clean the coil contacts (studs on the body). The first check is the resistance of the primary winding. To do this, connect an ohmmeter to two studs and take measurements. Depending on the type of coil being tested, the resistance should be within the following limits: coil 2101-2107 B-117A = 3-3.5 Ohm; coil 2108-099 027.3705 = 0.45-0.5 Ohm.
Then we check the resistance in the secondary winding circuit. We connect one terminal of the tester to the central terminal of the high-voltage wire, and leave the second terminal of the probe at the terminal of the primary winding. In this case, the resistance of the working coil should be as follows: B-117A = 7.4-9.2 kOhm; 027.3705 = about 5 kOhm.
How to replace the ignition coil with a new one?
Replacing the ignition coil (bobbin) VAZ 2101-2107
1) Remove the high-voltage wire from the coil cover.
2) Using a size 8 wrench, unscrew the nut from the terminal marked “B” on the coil cover and remove the ends of the green and brown wires. To avoid losing small nuts, we recommend putting them in place.
3) Similarly, disconnect the blue wire with a black stripe from the terminal marked with the letter “K”.
If the colors of the wires turn out to be different, and this is possible, mark their position before disconnecting. From terminal “B” the wire is laid in the wiring harness, from terminal “K” - one is connected to the terminal of the ignition distributor, the second goes into the harness.
4) Using a 10mm wrench, unscrew the coil mounting nuts three to four turns.
5) Remove it from the car.
We install the new coil in the reverse order, observing the written order of connecting the wires.
Replacing the ignition coil on a VAZ 2107 car
To replace the coil we need the following tools:
- new ignition coil;
- socket heads for 10 and 8 with a knob;
- flat screwdriver.
Coil replacement sequence
- The hood of the car is opened, and both terminals are removed from the battery using a 10mm open-end wrench.
- The main high-voltage wire is removed from the coil. This is done manually; the wire needs to be pulled up with little effort.
- The coil has two terminals with wires. The nuts on the terminals are unscrewed with a socket head 8, the wires are removed.
- This gives access to the two coil mounting nuts. They are unscrewed with a 10 mm socket wrench.
- The coil is removed, replaced with a new one, after which the car’s ignition system is reassembled.
So, replacing the ignition coil is not a very difficult task and even a novice driver can do it. The main thing is to follow the above sequence of actions, and before starting work, do not forget to remove the terminals from the battery.