The transfer case is one of the main sources of vibration and noise in the VAZ 21214 and the modernized Urban.
The peculiarity is due not only to the specific design solutions of the unit, but also to the method of attaching the part to the car. So, instead of mounting it on the power components of the body, as is customary in the global automotive industry, engineers implemented a method of communication through silent blocks directly to the floor of the car.
The result is a rapidly collapsing bottom at the points of engagement and “splitting” at speeds above 80 km/h.
One way to relieve stress is to install a transfer case subframe on the Niva. At the same time, the owner will notice a decrease in vibration load, an increase in the natural service life, and also the protection of the transmission.
The disadvantages are the relative complexity of implementing the idea and the ground clearance reduced by 2-3 cm (corrected by a suspension lift).
Manufacturing according to the scheme
Although the market has no shortage of offers, it is possible to save money by making a subframe for Niva 2121 with your own hands according to the drawings.
Drawing 2.
Drawing 3.
Scheme 4.
Fig 5
Fig 6.
In the creation process, you will need a 4 mm sheet of cold-rolled steel 0.525x0.350 m, angles 35x35, 70x50, 70x70 with a length of 0.7 m, 0.4 and 0.4 m, respectively, as well as a 0.73 meter channel 16. Used as fasteners bolts M8, M10, M12x1.25 and M12x1.5.
Shaking problem
Many drivers who have a VAZ 2121 Niva at their disposal have encountered the fact that the cabin vibrates strongly while driving, especially off-road or at high speed. Vibrations that spread almost throughout the entire cabin cause a lot of inconvenience and constant discomfort. Technically, this was not corrected, so the people’s minds had to independently find a way out of the current situation.
Also interesting: VAZ 21213 transfer case device, diagram, alignment, removal of transfer case
The ready-made protective metal frame Niva Comfort is suitable for models 2121, 21213, 21214. The main purpose of the protective part is to eliminate all vibration from the transfer case. But the benefits of installing a subframe on a field turn out to be much greater:
- protection appears for the transfer case when driving off-road;
- the noise level in the cabin is reduced;
- the service life of parts that were previously damaged by excessive vibration increases;
- if you add a few parts, you get excellent protection for the Niva’s crankcase and engine.
After installing the transfer case subframe, the ground clearance will slightly decrease, but the car will be much more comfortable to drive.
Standard tool
- angle grinder;
- drill;
- caliper and ruler;
- core;
- hammer.
An alternative tuning option is permissible using not corners, but a square profile with a section of 60x30 or 40x25.
There are ideas of placing the RC and the checkpoint on the same “frame”.
How to attach
Usually the subframe is made in the form of a frame welded from metal profiles. Aluminum can be used to make the structure lighter. Fastening is carried out using the following parts:
- long studs and nuts
- bolts
- silent blocks
Depending on the type of vehicle, several subframes may be installed, depending on which element relative to the body part should be secured. The middle one is used for the transfer case and supporting the gearbox. The rear one protects the axle gearbox. the front one is necessary for more reliable fixation of the engine.
The shape of the subframes used varies depending on the type:
- square
- H-shaped (there may be different modifications with offset elements)
- in the form of crosses
The subframe has a wide range of advantages. It strengthens the side members, strengthening the car's structure. When installed in the front of the car, it absorbs vibrations from the engine. When installed in the middle part, additional protection of the transfer case and gearbox from impacts is formed. Can be used as a frame for attaching additional devices.
But there are also a number of disadvantages.
When using a subframe, body rigidity increases. This is a good indicator for cars used off-road. But on the highway, this can affect the safety of passengers as a result of an accident, since the deformation area of the body is reduced and the impact force increases many times over. Installation of a homemade structure can be carried out with errors, as a result of which it can become cumbersome and significantly reduce ground clearance.
To make a subframe on a Chevrolet Niva, you need the following set of tools: a hammer, a core, a ruler, a welding machine and an angle grinder.
You will also need some materials:
- steel corner 6*6 and 1.5 meters long
- 2 plates 25*25 and 2 plates 10*20 5mm thick.
- metal profile 40*20 with a length of at least 1.5 m
- 4 bolts 12*1.25 and 4 bolts 10
First, measure the distance where the subframe is attached to the side members in order to drill holes. It is necessary to make 2 on each side for installation. The caps of the bolts that will be used for fastening on the interior side must be welded to avoid twisting.
The transfer case mounting nuts must be loosened in order to mount the subframe. After installation, they must be tightened well again. The transfer case bracket must be attached to the subframe. The box must be positioned so that the flanges of the drive and intermediate shafts are at the same level.
If installed correctly, changes in the control and sensitivity of the suspension will immediately appear.
Design modification
To strengthen the subframe and reduce the profile height (up to 2 times), it is possible to additionally equip the side shelves of the channel with 4 corners at the level of the hole under the transfer case, followed by cutting off the sidewalls to the corner flange.
Finer tuning is provided by connecting the spar and subframe through couplings/bushings.
Preparation.
1. After the initial preparation of the elements, finishing processing and connection into a single structure is carried out: 1. In the channel, in accordance with the diagram, rectangular windows are cut out, ending no closer than 0.8 cm to the edge of the edge. Bevels (chamfers) are eliminated;
Also interesting: Repair of transfer case on Niva 21213, how to center it, do-it-yourself adjustment
2. In corners measuring 70x50 or 70x70, holes are made for bolted connections, after which they are tacked by welding.
3. Corners of 35x35 cm are fixed to the lower edge of the channel, to which sheets are welded to protect against impacts and dirt. In the latter, for the purpose of access to the drain plug and regular cleaning, service holes are cut out.3. Corners of 35x35 cm are fixed to the lower edge of the channel, to which sheets are welded to protect against impacts and dirt. In the latter, service holes are cut out in order to gain access to the drain plug and regular cleaning.
Installation
For ease of installation, the car is fixed on a lift or above a pit. Pre-preservation of surfaces (attachment points, subframe) is carried out using protective agents, for example, Movil.
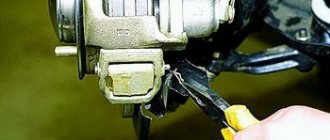
The finished product is tried on site individually for each vehicle. 4 holes are drilled along the perimeter of the structure, symmetrical relative to the center line. Having previously loosened the transfer case fasteners.
Having placed the plates on the interior side, as in the photo, the subframe is attached to the side members with M12x1.25 bolts.
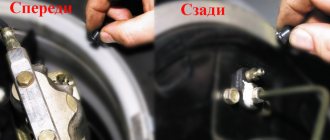
The RK brackets are sequentially removed, turned over and freely fixed to the subframe. The position of the shaft flanges is adjusted until minimal gaps are formed by moving the entire structure. Alignment is performed at 3000 rpm with the machine standing.
The bolts are thoroughly tightened.
Installing parts and protecting the bottom
Niva 21214 and most new models in this series have fastenings for installing protective body kits, so there should be no problems with installing the subframe. Factory versions, similar to the Niva Comfort frame, already have ready-made fastenings and they only need to be screwed into the right place. To install homemade products, you may have to make additional fastening points. You can, of course, screw everything directly to the cornfield frame, but this is not recommended.
And also interesting: Tikhaya Niva - it’s now possible - BEHIND THE STEEL - MirTesen media platform
You can make other protective parts for the Niva yourself. For example, engine crankcase protection in the form of a plate, which is located near the transfer case, is very easy to make even at home. It can be conveniently attached to the transfer case subframe, thus creating a whole protective kit.
If you often use your Niva for off-road driving, then you will need to assemble protective kit No. 2 of a complex design. It provides comprehensive protection for the lower part of the body and even perfectly covers the transfer case mount. Unfortunately, there is only No. 1 on sale - Niva Comfort, which is not capable of providing good protection for the underbody from external damage.
A purchased subframe is easier to install yourself, but it bends easily. If you often travel through the mountains or country roads, it is better to use a reinforced design. The same applies to a purchased reinforced plate for the engine. If you want to equip your field with a protective system, it is better to make all the parts yourself according to the drawings.
We make a subframe for the field with our own hands according to the drawings
To eliminate various vibrations and noise in a Niva Chevrolet car, it is possible to install a subframe. The subframe reduces the force transmitted from the transfer case to the car body. Mounting the transfer case minimizes angular vibrations in the longitudinal-vertical plane of the body. The subframe shifts the path through which vibrations and noise travel into the body. The so-called monolithic frame makes it possible to further increase the adjustment along the axes and significantly relieves the load on the floor. The frame is the ideal crankcase protection.
Assembly options
The first step is to measure the distance for the parts.
Using the subframe drawings, we assemble the structural parts according to the measurements obtained. Here are three build options:
- A simple version of the Niva-Comfort type frame, where you only need 5 main parts and a couple of fasteners for them. It is assembled from five square-shaped channel pieces with an additional reinforcement strip. The ends of the four parts are bent into the frame and holes are drilled into them for bolted connections. The frame parts can be welded or bolted together. A more complex design consists of almost a dozen parts and is assembled according to three drawings.
- In this homemade version, one wide channel is used as a basis, in which there will be a hole exactly for the transfer case. On the sides of the channel there are large corners, and at the ends there are shelves made from smaller corners. All parts are connected exclusively by bolted connections. This design protects the bottom of the machine well, but is more labor-intensive for manual production. The great advantage of this particular option is the installation of engine crankcase protection, which can be connected to the subframe; in addition, the protection of all parts around is improved.
- The simplest option, which doesn’t even require diagrams, is to take 4 channels and 4 corners. The subframe is assembled on the field in this way:
- two parts are placed lengthwise, and two across, so that the dispenser fits into the formed square;
- all parts are connected to each other with M10 bolts, 1 piece for each intersection;
- Weld corners to the ends of the longitudinal parts to make a place for connection with the bottom of the Niva, drill holes for bolts in the corners.
https://youtube.com/watch?v=-vFwRL5BBCA
Other device mounting options
Installed part on the machine
Another way to secure the structure to the spar involves fixing it to the lower surface of the spar. For this purpose, holes are also made in the fastening points, but only in the upper and lower surfaces of the spar. In this case, you should not particularly find fault with the diameter of the fastening bolt, since there will be no impact on it. But it will be impossible to install additional silent blocks to dampen vibrations.
Another additional element that can be installed on the structure is a special elastic support for the box. It is believed that it allows you to better set the position of the box relative to the gearbox. But in some cases they can do without it. It all depends on the wishes of the owner.
Some car enthusiasts cover this entire structure with a sheet of metal, which additionally protects the transfer case from contamination and possible damage when driving off-road.
The transfer case is one of the main sources of vibration and noise in the Niva 21214 and the modernized Urban.
The peculiarity is due not only to the specific design solutions of the unit, but also to the method of attaching the part to the car. So, instead of mounting it on the power components of the body, as is customary in the global automotive industry, engineers implemented a method of communication through silent blocks directly to the floor of the car. The result is a rapidly collapsing bottom at the points of engagement and “splitting” at speeds above 80 km/h.
One way to relieve stress is to install a transfer case subframe on the Niva. At the same time, the owner will notice a decrease in vibration load, an increase in the natural service life, and also the protection of the transmission. The disadvantages are the relative complexity of implementing the idea and the ground clearance reduced by 2-3 cm (corrected by a suspension lift).
Installing a transfer case subframe on a VAZ. + Drawings
Do-it-yourself tire changing machine drawings video
It started with the fact that I got tired of changing the crosspieces, injecting the splines of the cardan shafts, which I then replaced with new ones, and the splines on them were also covered with entrails. I went to 10 workshops to get the transfer case installed correctly, but nothing worked. The hum and ringing of the transfer case bouncing all over the body brought me to the forums. After reading a lot of smart articles on hanging handouts, I started doing it myself. Result - I drove for 2 months with slightly reduced vibration, and then bang - the intermediate cardan (if that's the correct name) was ruined. I climbed again myself. I removed the gearbox and gearbox and found: Boiled bottom (tear off the master’s hands), half of the bottom is flat (not boiled), the other is at an angle of 60 degrees. And rotten transfer case attachment points:
As a result, I went back to the Internet and here is my salvation: Transfer case subframe
- but it seemed heavy and difficult to manufacture (you need to look for such a channel), and I didn’t want to drill through the bottom. And the clearance is decreasing, as I understand it’s not bad. But there was a huge plus - there were drawings, and I, taking a caliper and a tape measure, crawled under my old lady, guided by what I had from the drawings at the last link, which was included in the basis, and the dimensions from the book on Nivka, but also with my own improvements.
You definitely need to measure it on your car.
So, I drew sketches and, based on them, first made a model from wooden beams and plywood, then I corrected the drawings and only after that I sent them to production:
I gave it to a local factory, and they welded me something like this from their material, according to my drawings:
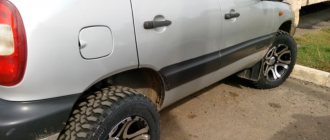
I wore it back and forth 2 times - for fitting (the main thing is that the suit fits):
The height of the structure is slightly less than in other mounting options, which has a positive effect on ground clearance.
ATTENTION. ATTENTION
ATTENTION. ATTENTION.
1) These drawings were developed taking into account the use of a square pipe - 60x30. During the work, it was decided to replace the material with a 40x25 square pipe (this strength is more than enough), while maintaining the axial dimensions. Unfortunately, there is no time to redraw. But at the factory they understood everything anyway.
2) I didn’t turn the bushings into the side members (labor-intensive), but for strength, so as not to squeeze the side member? I placed a plate on its outer side along the length of the subframe, which distributes the load over the entire length, and not pointwise.
Yes, by the way, the project budget was about 600 rubles: 500 rubles. - at the nth plant they welded the entire structure for me, from their material and 100 rubles. for bolts, nuts, etc.
Addition dated 05/08/07, author “vvv”.
Stretcher
made from a 60x30 rectangular pipe and 50x50 corners without welding. Everything is bolted on. Fastened with through vertical M12 bolts through the spar. In the interior, under the bolt heads, there are 100x100 mm washers, about 5 mm thick. The design has been on the car for 3 years. The flight is normal.