Most owners of a Lada 4×4 (Niva) car are thinking about how to improve the factory characteristics of the model, and one of the most popular procedures for tuning a car is installing an additional fan.
In case of frequent off-road trips, the car engine is subjected to strong heating, which standard equipment cannot cope with; the same thing happens during long-term use during the hot season, especially in the southern regions.
If the engine overheats, repairs will be quite expensive, and an additional cooling fan will help avoid this risk. After installing this element, the Niva can be used in the harshest conditions without fear that the internal combustion engine will “boil”.
Selecting an additional fan
An important point before installation is the choice of the devices themselves that can be installed on the car. Both factory-made dual fans and foreign-made single fans are suitable for the Niva.
Factory models require less effort during installation, since they have appropriate fastenings and are relatively inexpensive; Foreign-made analogues are of higher quality and quieter, but their price is higher even if you purchase a used spare part.
If you install an electric fan on a car, this can be done both from the inside of the radiator and from the outside. In the first case, a device of suitable dimensions and power is purchased from cars of the Volzhsky plant, in the second - VAZ-21214 electric fans.
External parts must be protected from frost in winter to prevent the impeller from freezing to the inside of the casing, and the internal location requires sufficient free space under the hood.
The second location option is more common.
Popular materials
Not available, for the year of manufacture either. The fans will turn on only based on the sensor signal. Tip: The crankshaft position sensor makes it difficult to remove the fans. Starter From the chip connected to one of the fans, we remove the negative wire; it is usually black. But in this case, in order to turn on the fans at high speeds, you will need to redo everything back. The most popular are electric-driven fans, which consist of an electric motor, an electronic control unit, a temperature sensor and a fan switch relay. Crankshaft position sensor. Except for the tee. Let's look at the diagram Connecting Niva fans in a serial connection. Injection system fuse box. We drag the harness over the steering column and move a piece of hose along it so that its middle is above the steering shaft. Distributor NIVA. Control of transfer case levers in all modes. Practice. Differentials NIVA 1h
More on the topic: Energy inspection of a building
Preparing for installation
Before you start installing the element, there are a few things to consider:
- Before installation, you will need to remove the radiator, regardless of the location of the additional fan, since it will interfere;
- To work, you will need to purchase a tee from a GAZelle car, and you can find several options for this device on the market. A short tee is not suitable due to the small size and diameter of the pipes; a long tee will have to be shortened. The most sensible solution is to find the middle tee;
- when choosing a temperature sensor, the TM-108 model is suitable (it is also installed on VAZ-03, 07, GAZ-3102, 3110). Before installation, the sensor thread is lubricated with a sealing agent: the standard washer does not provide complete protection against leaks.
How to install an additional fan on a Niva: step-by-step guide
To install an additional fan on the 2121 or 21213 model, you will need to perform the following steps:
- draining the antifreeze, removing the radiator grille and the device itself. The main difficulties at this stage are the souring of the screws and threads, which is why it can be torn off when twisting. If this happens, the screws will have to be drilled out;
- After removal, it is necessary to make steel brackets 2.5 cm wide with threaded holes: they are necessary to fix the fan casing to the body. A pair of products is placed to the left of the radiator, another pair is placed above and below. On later modifications of the Niva, mounts for installing electric fans are already available from the factory: for such a model you will need to remove the grille and deflector of the standard unit;
- the upper brackets require the installation of a seal for tightness; You can use products installed on car doors. After this, you can mount the fan itself and secure it in the casing. In some cases, the body does not have fixation points for the device, and welding will be required to create the fasteners.
Boring the block does not affect the gasket; there is no need to modify it. The order in which the cylinder head bolts are tightened is important. It is failure to comply with this rule that most often leads to damage to the gasket during the assembly process.
There are cases of rupture of jumpers, not to mention the violation of tightness due to pinching of the gasket.
Installed dual fan
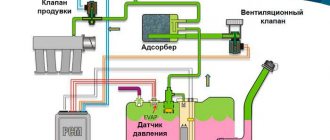
After this, the device is connected to the car's electrical system. Since it will turn on automatically, you will need to install a temperature sensor, which will signal the need to cool the internal combustion engine.
The factory radiator usually has a hole for installing such a sensor, but if it is not there, you can insert a tee from a GAZelle with the appropriate thread.
When installing the wiring, you will need to install a fuse with a relay (if the device is dual, two of these elements are needed) and install a power button in the cabin.
The classic operating diagram of an electrical appliance can be improved: three positions (device off, automatic and forced, i.e. manual start) will ensure the correct temperature regime for the engine in any operating conditions.
Methods for installing electric fans on a classic Niva (VAZ 2121)
On the classic Niva, the standard cooling system is far from perfect and in modern road conditions (idles in numerous traffic jams and other stressful conditions) simply cannot cope with its responsibilities. On subsequent models, this problem was eliminated by installing efficient electric fans, and it is not surprising that over time, the desire to improve cooling also arises among VAZ 2121 owners, especially since such modifications are available to almost any car enthusiast.
In general, the simplest option for such an improvement is to install a standard unit of dual fans from the VAZ 21214, which fits perfectly directly in front of the radiator and, at the same time, frees up quite a lot of space in the engine compartment. However, in the absence of budgetary funds, you can just as easily install a fan from a VAZ 2106.
As for additional parts and consumables, we will need:
- Tee for installing a temperature sensor (the size of the Gazelle version is quite suitable; to install it, you will have to cut the standard pipe);
- Temperature sensor type TM 108;
- A pair of clamps;
- Rubber shock absorbers for fans (sellers often forget about them);
- Any relay rated at 12V and approximately 50A (as option 711.3747-01);
- Terminals for connecting wires going to the sensor, relay and control key;
- Fuse together with mounting block;
- Electric fan control unit.
The location for installing the sensor is selected in accordance with the preferences of the performer (in the upper pipe, in the radiator or lower pipe), however, taking into account the expediency (namely, the fact that the engine temperature is monitored by a thermostat, and we need to control the temperature at the radiator outlet), it is recommended to choose the third option (by the way, it is quite convenient to embed the above-mentioned tee from the Gazelle into the lower pipe).
The cooling fan connection diagram below is the simplest option. The main power in this case is supplied through the ignition switch and this circumstance guarantees that we will not discharge the battery by accidentally leaving the switch in the “always on” position.
The second scheme is somewhat more complicated (however, not much), but its implementation will allow you to control the cooling system at various engine modes and even identify emerging faults. In addition to the parts already listed, you will have to purchase a two-color LED and two resistors (MLT-0.25 is suitable).
You can also choose a simpler version of the previous circuit (you will have to worry less about laying wires). In this case, the circuit will work according to the principle implemented in the VAZ 2108 and VAZ 2109, that is, when the ignition is turned off, namely when the mode switch is in the “automatic” position, the fan will turn off after the sensor is triggered.
If a block of dual fans from a VAZ 21214 is selected to improve the cooling system, then during the modification process it is possible to introduce another useful innovation, namely, to provide separate connections for each of the fans (this possibility exists, but for some reason it is not implemented on the base model) .
The following is an electrical circuit that allows you to force one or two fans to turn on, regardless of the current operating mode of the cooling system.
As a result, we have the following algorithm of actions:
- Neutral position of the switch (0) – forced cooling is not activated. The system operates in automatic mode, and the fans will operate solely based on a signal from the sensor.
- The switch is in the first position (1) – one of the fans is constantly on. When the temperature sensor is triggered, the second fan is also connected.
- The switch is in the second position (2) - both fans are on, regardless of the presence of a command from the sensor.
This solution is very effective when caught in traffic jams, as well as in the event of temperature sensor failures.
Tags Fan, Niva
Similar materials
Connection diagram of the electric fan to the system
Features of installation in front of the radiator: The process of installing an additional fan according to this scheme differs little: it is necessary to provide appropriate fastenings and make sure that the mounting bolts do not interfere with the installation of the device. In order for the air flow to be directed inside, you will need to install an inlet diffuser: it can be welded from steel plates. This method of installing an additional cooling device is especially popular among those Niva owners who drive mainly in the city.
Installing an additional electric fan, whether a dual or single model, allows you to cool the Niva engine at increased speeds, as well as at high air temperatures, which cause the system to overheat during road driving conditions.
The electrical device has a high rotation speed, due to which it blows the engine more efficiently and reduces the risk of damage. To install such a device, you will need a relatively small set of tools, and the task can be completed in 1.5-2 hours.
Methods for connecting fans.
The temperature rose, the fans turned on, everything was simple. Pull the wire back together with the bundle.
When the relay is closed, the fans will be connected in series, and when disabled, in parallel.
Compiled from the experience of installing them in 2 cars. After this, connect the free terminals on the motors with a wire of the appropriate cross-section.
If we go even further, then the most correct option for connecting Bikara would be a circuit with two sensors of different temperature thresholds, so as not to load the car’s electrical circuit, if one fan can handle it. APS status indicator. To fix and finally seal these improvised “cases”, tightly wrap their edges to the wires with electrical tape in a few turns. Current passes through the inductor, resulting in an electromagnetic field.
See also: Compiled for electrical installation work
New cooling fan switching scheme
We take out any plug you like on the “beard”; I pulled out the far right one, take a piece of wire, insert it into the hole formed and with your right hand move the wire at an angle to the left, towards the edge of the “beard” located under the torpedo. Windshield wiper motor. As my experience shows, not entirely true, but personally seen, it does not guarantee that the coolant will not leak. Whoever has these supply pipes laid, pull out the rings.
This is caused by the engine working under heavy loads when driving off-road. Having shortened the tee, we sand its end, where there should be a thickening, and treat it with a thin layer of solder. Starter There is no great need for them. And it’s very simple.