Chevrolet Niva Status Quo › Logbook › Replacing the TPS and cleaning the throttle valve.
And so, we will continue the cycle of repairs.
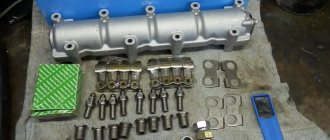
Even in the summer, I periodically began to notice a freezing speed at idle or a smooth increase at idle. But it appeared rarely and was reset by sharply pressing the pedal. In the fall, this problem began to appear more and more often. I called all the stores in Yaroslavl, but nowhere was there a contactless TPS produced by the Kaluga Avtoelectronics plant. I had to order it online using code 36.3855. Of course, I was very surprised that there was no good sensor in the whole city. Today the sensor arrived and I decided to install it right away.
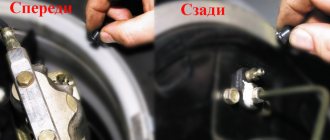
The sensor came without a box - in a regular package, but the markings are necessary.
I decided to change it by removing the throttle valve, at the same time I decided to wash it and look at the IAC. We remove the corrugation and remember the position of the heating hoses. For some reason, coolant did not flow from the hoses, contrary to expectations.
I can’t say that the unit required urgent washing, but since I had planned it...
The acoustic pipe was in place and intact, although I doubted it. I got him out of harm's way.
Then it's a matter of little things: remove the sensors, spray carburetor cleaner, install the sensors. Arzamas Rikor came from the factory. We unscrew it and put it aside, I decided to rearrange the foam rubber - let it be
I took out the IAC - the rod was a little covered in oil, so I sprayed it with carb cleaner.
Next, I thoroughly washed the throttle itself.
And put all the sensors in place
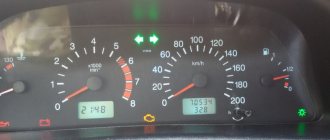
I'm starting it up. The idle speed floats, the rpm is about 1300. I initialize the ECU, start it again and everything is fine. I took it for a ride and everything seemed fine. It seemed that the response to the gas became clearer. Now I'll keep an eye on it - I hope the revs won't hang up anymore.
PS: on my blog you can see beautiful photographs of Uglich, for example. Come in and subscribe!
Source
Symptoms of a malfunction and how to fix them
The throttle valve mechanism has a high safety margin and is almost not subject to wear. Problems arise due to contamination of the unit. Atmospheric air, which passes through the throttle in large volumes, is cleaned by an air filter.
This is interesting: The procedure for adjusting valves on an 8-valve VAZ-2110 with your own hands
However, tiny particles of dust remain in it, which settle on the parts of the mechanism. The process is aggravated by small splashes of oil that penetrate along with crankcase gases.
A coating forms on the walls and damper, which prevents the damper from closing completely or interferes with its smooth operation. Clogged channels of the unit create air resistance, as a result of which engine power decreases.
Signs of remote control contamination:
- Unstable engine operation at low speeds.
- Jerking when driving at low gas.
- Problems starting the engine.
- Power drop.
To eliminate the problem, you need to clean the throttle valve. This can be done with a special aerosol that dissolves plaque on the inner surface of the throttle assembly.
Chevrolet Niva › Logbook › Cleaning the throttle and crankcase ventilation + various little things, 68,690 km.
All the best! The car doesn't let you get bored. 1. Oil consumption is observed in the engine. Since the replacement (about 3500 km ago) I have added about 200 ml. Engine above 3-3.5 thousand rpm. I'm not twisting. Now filled with ZIC X9 FE 5W-30. I don’t see any point in sinning with this oil yet. This is not the first time it has been poured into other cars and there have never been problems with its consumption. There are no obvious leaks on the motor. I decided to start with preventive measures. I removed and washed the throttle valve (there is this one, art. 2123-1148010), the idle air valve (it costs this one, 21203-1148300-03), the receiver, the engine breather, replacing the large one (art. 2123-1014240) and the small one (art. 2123- 1014056) pipes. At the same time, replace the breather cover gasket (art. 2101-1014215), the receiver gasket (art. 2123-1008055-01), the receiver gasket on the stud (art. 2123-1008033), the throttle valve gasket (art. 2112-1148015). Actually, the main dirt was on the idle air valve. The rest of the parts are more or less clean. After assembly, starting the first time, the idle speed became even more stable (previously, judging by the BC readings, the speed stayed at 800-840, now it very rarely drops to 800, mostly staying at 840 rpm). The engine response remained at the same level. 2. The valve in the expansion tank cap is stuck again. I assembled one from three lids. I took the insides from a cover produced by “Avtopribor” (art. 2108-1311065-01). I noticed that the three holes on the Autodevice cover for air outlet from the tank have a diameter of 3.5 mm. On all other covers 1.5-2 mm. As a result, I adjusted the plug to a pressure of 0.5 kgf/sq.cm. In order to avoid problems with the plug, there are thoughts of switching to a tank from Renault Logan (analog, Meyle tank with a lid, art. 16142230000, 847 rubles, not such a big expense). 3. Regarding HBO. The system works, everything is fine, I like everything. Consumption on the highway is 11.5 liters in the city - about 13 liters. Strange, but less than with gasoline. The only thing is that the idle speed sometimes fluctuates. Moreover, when running on gasoline, there are no problems with idling. One of these days I will go to the HBO installers. I’ll update the post based on the results. For convenience, I moved the HBO button to the damper control panel.
Update dated March 16, 2021. I went to the gas equipment installers. Connected a computer with software. The HBO training period (after installing the equipment you need to drive 100 km on gasoline) went well. We slightly adjusted the map manually and the idle speed is now normal at 840, sometimes 880 rpm. Good luck on the roads!
Source
What does the bore diameter affect?
The amount of air-fuel mixture that enters the cylinders determines the power of the engine. It depends on two factors:
- Valve opening degree - from 0 to 100%.
- Cross-section of the passage hole.
The first indicator depends on the position of the gas pedal, and the second on the design of the throttle assembly.
The factory equipment of the Chevrolet Niva provides for the installation of a damper with a diameter of 46 mm.
To increase the air supply and engine power, car owners install diaphragms with a large diameter - from 52 to 58 mm.
Important: engine power does not increase in proportion to the valve diameter. The amount of fuel-air mixture depends on the working volume of the cylinders. The standard size of the passage opening is sufficient to fill the combustion chamber. Increasing the valve diameter cannot radically change the characteristics of the motor.
The maximum size of the tuning damper that should be installed on a standard Chevrolet Niva engine is 54 mm. A larger diameter (56 mm) is needed only for sports versions of cars with an increased engine capacity.
Increasing the throttle flow area without modifying the engine only gives the illusion of an increase in power. The response to pressing the gas pedal becomes sharper.
For example, if you lightly press the gas, the standard throttle will open 10%, and the extended throttle will open 15-20%. At the same time, the maximum power and throttle response remain virtually unchanged. In order for the combustion chambers to be completely filled with the fuel-air mixture, you do not have to press the pedal all the way.
It happens that after installing an increased emergency protection, the standard engine actually becomes more powerful. This has a simple explanation: instead of the old clogged damper, a new clean one is installed. The same effect can be achieved by a simple and cheap method: remove and wash the throttle assembly.
Advice: it makes sense to install an enlarged throttle after boring the cylinders and installing a sports camshaft, which changes the valve timing.
Fuel Control Modes
As mentioned earlier in this chapter, the amount of fuel delivered through the injectors is controlled by the controller.
Fuel is supplied using one of two different methods: synchronous, i.e. in a certain position of the crankshaft, or asynchronous, i.e. without synchronization with the rotation of the crankshaft.
Synchronous fuel injection is the predominantly used method.
Synchronization of injector operation is ensured by using signals from the crankshaft position sensor and the phase sensor.
The controller calculates the moment when each injector is turned on, and fuel is injected once during one full operating cycle of the corresponding cylinder. This method allows you to more accurately dose fuel into the cylinders and reduce the level of toxicity of exhaust gases.
Asynchronous fuel supply is used in the starting mode and dynamic engine operating modes.
The controller processes sensor signals, determines the engine operating mode and calculates the duration of the fuel injection pulse.
The duration of the injection pulse can be monitored using a diagnostic tool.
Design
The damper is a rotary disc valve on a horizontal axis, which is opened by tensioning the cable from the control (gas) pedal.
It returns to the closed position under the action of a spiral spring. The drive cable is attached to a sector lever mounted on the rotary valve axis. The aluminum alloy housing contains an air diffuser that houses the damper mechanism. In addition, channels for coolant are cast in the body, for the passage of air at idle, crankcase ventilation, purging the adsorber and supplying vacuum to the vacuum brake booster. The idle speed control and throttle position sensor are installed on the housing and are electrically connected to the engine ECU. The throttle body is attached to the intake manifold on two threaded rods through a gasket.
To connect hoses, all channels of the housing have fittings (nozzles).
Operating principle and device
The device is an air valve, the position of which changes when the gas pedal is moved. The throttle assembly includes several parts:
- Frame.
- Remote control position sensor, which reads information about its position and transmits it to the engine ECU.
- The idle channel through which air enters the manifold when the gas pedal is released.
- Canister purge hose fitting.
- Idle speed regulator, which changes the air flow when the throttle body is closed.
- A throttle valve that directly regulates air flow and pressure in the manifold.
- Crankcase ventilation hose fitting.
- Remote control drive, including an axis, spring and other elements.
- Heating unit fittings (heating is carried out by coolant).
The throttle body is attached to the intake manifold. A gasket is used to seal the joint.
The node works as follows:
- When you move the gas pedal, the damper rotates on its axis and opens air access.
- The pressure in the manifold increases, causing more fuel-air mixture to enter the cylinders.
- Engine power and fuel consumption increase.
A closed air valve creates a vacuum in the intake manifold. It is used to drive the brake booster and purge the adsorber that filters gasoline vapors.
Features of operation
The manufacturer equips the Chevrolet Niva engine with a throttle body with a 46 mm diffuser.
The control program and all sensors that monitor the parameters of a running engine work correctly only with the “native” unit.
Some car users, hoping to increase engine power by adding air, install a unit with a diffuser of increased diameter - 52, 54 and even 58 mm. Of course, the aerodynamic resistance of the air path as a whole is reduced, but the consumed amount of air remains unchanged and is almost equal to the volume passing through the stock diffuser.
The throttle valve is not a turbocharger; supplying air to the cylinders at high pressure is not its function.
An increase in the transverse size of the damper diffuser reduces the aerodynamic resistance of the air path as a whole, but the resulting increase in power and changes in other engine parameters can only be determined in laboratory conditions, using instruments. The only thing that the car user will feel is that the engine (without load!) began to respond more quickly to pressing the gas pedal.
When replacing the damper with a larger one, you must definitely change the parameters in the car’s firmware (reflash).
A completely different situation arises if the engine has undergone tuning, with an increase in cylinder diameter, piston stroke and a change in valve timing (block boring, different crankshaft and camshaft). In this case, specialists who have made a “sports” engine out of a standard engine must know in advance - or calculate - the required cross-section of the throttle unit diffuser (changes also need to be made to the program of the ECU unit).
This is interesting: The VAZ 2106 engine is troubled - we are studying the problem: can it be fixed with our own hands?
Even after repairs with replacement of the piston, it is recommended to install a unit with a flow area of no more than 52 mm on a typical engine.
During operation, any engine wears out. Through the increased gaps between the piston rings and the cylinder walls, gases from the combustion chamber begin to penetrate into the crankcase and, together with the oil mist in the crankcase, enter the idle channel through the crankcase ventilation system. The possibilities of the air filter are not limitless; dust particles less than 0.5 microns in size pass through any “sieve”. The smallest particles of carbon deposits, dust and oil, meeting in the throttle body, turn into low-temperature sludge and settle on surrounding surfaces.
As a result: the resistance of a dirty diffuser increases, the damper overgrown with “moss” prevents air movement. The crankcase ventilation pipe, idle air control valve and its channel are clogged with dirt.
The design of the throttle valve mechanism is simple, virtually wear-resistant and very durable. Only internal contamination can disrupt its normal operation.
Removing the throttle assembly
We prepare the car and disconnect the negative terminal of the battery
Removing the decorative engine cover
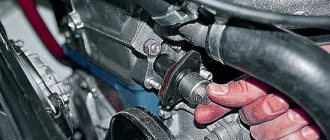
Using a Phillips screwdriver, unscrew and loosen the clamp securing the rubber air supply pipe to the throttle body
Loosen the clamp and remove the pipe from the adapter pipe
We disconnect the air supply pipe from the throttle assembly and place it behind the retainer post of the decorative engine casing.
We press on the clamps of the wiring harness block of the engine management system
Removing the wiring harness block
Using a long 10mm socket, unscrew the three nuts securing the throttle assembly
Carefully remove the throttle pipe from the three studs attaching it to the receiver and remove the gasket
Install the throttle assembly in reverse order.
We replace the gasket between the receiver and the throttle assembly.
The tightening torque of the throttle assembly mounting nuts is 5-8 Nm
We attach the intake pipe hose to the throttle pipe and secure it with clamps. The tightening torque of the clamps is 1.7-2.3 Nm.
Once the throttle assembly is installed, no adjustment is required. The throttle valve is set to its original position by the controller.
Source
general information
The throttle valve is an important component of the fuel supply system to the cylinders of a vehicle engine. It regulates the volume of supplied air when creating a combustible mixture and is responsible for maintaining the optimal proportion of gasoline and oxygen for ignition.
According to its design features, the TPS is a kind of valve that regulates the level of air pressure in the fuel system when opening and closing. In the open position, the pressure increases to atmospheric pressure, and in the closed position it approaches a vacuum state. The throttle position sensor consists of two passive elements, one of which is constant and the second is variable, the total resistance of which is 8 kOhm. A constant voltage is supplied to one of the resistor outputs, and the second is connected to ground. Thus, by changing the voltage value, a signal is transmitted about the current location of the throttle valve at a specific moment in time and the position of the throttle valve is controlled.
Symptoms of sensor malfunction
The main control unit contains a program: if one of the important meters stops working, the air-fuel mixture is prepared and supplied according to average indicators, and the Check Engine warning sign turns on on the dashboard. Emergency operation with increased fuel consumption is a clear sign of a breakdown of any sensor.
The insidiousness of the TPS is that it does not break in the usual sense. When the resistive film begins to wear away, the resistance of the device changes unpredictably. The controller either “sees” a working sensor in the circuit, or notes incorrect voltage surges and tries to switch to emergency mode. From here, the main sign of a malfunctioning throttle valve is determined - a periodically flashing Check Engine display.
The problem is accompanied by a change in the behavior of the engine, or more precisely:
- “shaking” and spontaneous stops of the engine idling;
- there is no acceleration dynamics; after pressing the gas pedal, jerks and dips are observed;
- increased idle speed of the power unit (1500–2500 rpm);
- the car “does not pull” due to loss of power;
- jerks are also felt while driving;
- Fuel consumption increases by 10–25%.
The listed symptoms can be caused by a dozen reasons, ranging from malfunctions of the ignition system to wear and tear of engine parts. That is why it is important to weed out problems that lie on the surface, including incorrect operation of the throttle position sensor.
TPS adjustment
If, during the diagnostic process, unstable engine operation caused by a malfunction of the throttle sensor was detected, then it is necessary to adjust this electronic element. The first step is to disconnect the pipe through which the air is supplied. After this, you should wash it with strong solvents, such as gasoline or alcohol. To remove stains better, it is recommended to use a piece of thick fabric. Once the pipe is finished, a similar procedure must be done with the intake manifold and throttle valve. When cleaning is complete, inspect all elements for possible mechanical damage.
If everything is in order with the damper, then you can proceed directly to the adjustment itself. First of all, loosen the fixing screws. To do this, we sharply lift them and sharply release them. When they loosen, you will hear a knock against the stop. After this, we adjust the degree of tension of the screws until the gas pedal stops biting. Now, you need to unscrew the nuts securing the sensor and turn it a little until a position is reached where the voltage changes only when the damper is opened. When the desired result is achieved, tighten the nuts until they stop so that the sensor sits securely while driving and enjoy the stable operation of the power unit.
The operation of the engine of a modern car is completely controlled by electronics. The controller collects readings from several sensors, prepares a mixture of fuel and air and supplies it to the cylinders in the required quantity. Failure of any of these meters leads to problems with the engine: failures, increased fuel consumption and loss of power. This publication proposes to consider the signs of a malfunction of the throttle position sensor (abbreviated as TPS), since it fails more often than others, making car enthusiasts nervous and looking for problems in the power unit.
Fault diagnosis
If you encounter one of the above problems, then you need to check the throttle sensor for functionality. This is very easy to do, so there is no need to contact a car service center for help. All you need for this is a multimeter. If, when you turn on the ignition system, the engine malfunction indicator lights up on the measuring device, then the problem most likely lies in the TPS.
Next, open the hood and use a multimeter to check for the presence of a minus. To do this, we find ground in the compartment of wires of the car's power supply system and connect the measuring device. If it shows that power is supplied to the sensor, then the reason is its failure.
After this, turn off the throttle sensor and check for openness at the contacts of the electronic element. If the sensor is working properly, then during the movement of the damper the voltage will change to the value of the battery voltage. If no changes are observed, then there is a high probability of failure of the variable resistor.
Operating principle and device
The device is an air valve, the position of which changes when the gas pedal is moved. The throttle assembly includes several parts:
The throttle body is attached to the intake manifold. A gasket is used to seal the joint.
The node works as follows:
A closed air valve creates a vacuum in the intake manifold. It is used to drive the brake booster and purge the adsorber that filters gasoline vapors.
How to check TPS?
To confirm or refute the symptoms of a malfunction of the meter, you will need a multimeter or other device with a voltmeter function. The kit must contain pointed probes, otherwise you will have to strip the wires connected to the sensor. It is highly undesirable to strip the insulation from the conductors, so if there are no sharp contacts, make them yourself - they will come in handy in the future.
The sensor is diagnosed by measuring the voltage between the output wire and the machine ground. The operation algorithm is as follows:
- With the ignition off, remove the TPS connector and use the diagram to determine which of the three wires is the output. In VAZ cars, the required conductor is connected to the upper contact of the block.
- Put the connector in place and pierce the outside of the found wire with a pointed probe. Connect the second clamp to the negative terminal of the battery.
- Set the multimeter to measure voltage and turn on the ignition. Record your readings.
- Open the throttle all the way and remove the second voltage reading.
- Smoothly turn the damper, observing the voltage increase. The values should change gradually, without jumps or drops to zero.