The bumper is the part that needs replacing most often. The fact is that it is often damaged in an accident, which requires repair and painting work. Naturally, it is not always necessary to contact specialized repair organizations to carry them out, since general skills are quite sufficient to perform such work. That is why every owner of a car of this brand needs to know how to remove the bumper on Kalina.
In addition, replacing the front bumper of a Kalina car may be required in conditions of remoteness from populated areas and, accordingly. In this case, other than replacing the failed unit yourself, there is no way to perform this repair. Also, dismantling the shock absorber may be necessary during tuning.
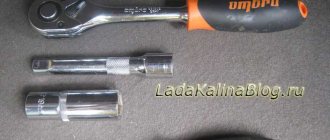
Tools required for dismantling
Replacing Klin bumpers is easy to handle when the right tools are used. These include:
- wrenches 8 and 10 (wrench heads);
- Phillips screwdriver, both long and short;
- small ratchet;
- wrench and head 13, used for unscrewing the shock absorber reinforcement beam when removing the headlight.
This set of tools must be prepared in advance so as not to select it as the work progresses. In addition, using any other “suitable” tool is highly undesirable, since in this case you can damage the body of the car itself and the damper. As a result, you will have to spend extra money because of such a trifle.
Why do they remove the LADA Kalina bumper?
- While driving, and even in an open parking lot, parts of the car are exposed to constant physical and chemical attack. Therefore, the decorative paintwork of the bumper loses its attractive appearance and requires restoration, which is carried out by removing the bumper.
- The tough and brittle carbon fiber of the bumper can crack even during a minor accident and require repairs. This is especially true in winter, when at low temperatures carbon fiber becomes especially fragile and can burst even with relatively light contact with a snowdrift. Restoring the paintwork and soldering the bumper material requires dismantling this part from the car.
- If the LADA “Kalina” bumper is severely damaged, it needs to be replaced with a new one, which also requires dismantling the old part.
- You have to remove the bumper to replace the Kalina headlight units.
- Tuning a car's front body kit usually requires dismantling the bumper in order to modify it, paint it, or replace it with a finished tuned product.
Reasons for removing the bumper
There are several reasons why you will need to remove the front bumper from Kalina. This is mainly due to physical destruction of both the part itself and the elements underneath it. Let's consider what factors push the owner to begin this difficult task:
- Road accident. Typically, damage to the front bumper due to a collision is the fault of the driver himself. A simple failure to maintain distance can cause disaster.
- Painting work associated with paint fading will also require dismantling the bumper.
We'll paint the bumper
- Tuning . Installing a new body kit will require dismantling the front buffer.
Exclusive tuned bumper
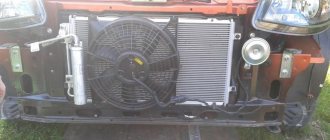
- A separate case may be dismantling the radiator .
- Damage to body parts when the bumper is not damaged. Hitting an obstacle when the radiator frame is damaged from below.
All these reasons push the owner to dismantle the front bumper. Many of them, not wanting to pay for removal at a car service, do this procedure with their own hands.
Kalina front bumper
The body design of the Lada Kalina car has specific features that require the mandatory removal of the damper even when simply replacing the headlights. This is due to the fact that the bracket mount is attached here in such a way that it covers the entire area in the shock absorber area, thereby complicating access to other structural elements of the car.
As a result, replacing the Lada Kalina bumper is far from the only reason for its dismantling. The bumper of this model car is made of plastic, so when working with it, extreme care must be taken to avoid damaging it.
Remember that before starting work, it is imperative to disconnect the battery terminal in order to avoid electric shock.
Features of dismantling the bumper of the new Kalina
Removing the front bumper of Kalina 2 has its own characteristics. The fact is that it is extremely precisely adjusted to its location and therefore dismantling it without damaging the plastic elements of the structure is quite difficult. To prevent this from happening, it is necessary to study in advance the design of the bumper, as well as its attachment points.
Removing the front element
Let us remind you that the front bumper is dismantled not only for its own repairs, replacement with a tuning product, but also to replace some other components. For example, to replace the headlights you will also need to remove the structure we are considering.
If it is not possible to dismantle the front bumper yourself, we recommend contacting a competent service center; they will know exactly how to remove it. Most owners can easily remove the bumper themselves, spending little time.
Let's move on to describing the sequence of actions that allow you to quickly remove the product.
- Initially, before dismantling, we de-energize the electrical network by removing the terminals from the battery terminals.
- Under the hood we find three bolts. They fix the radiator grille. We carefully unscrew them, being careful not to damage the adjacent painted surfaces with the tool.
- After removing the grille, we unscrew two bolts and a pair of screws that hold the frontal part of the bumper. Now unscrew the two fastening components of the lower grille and dismantle it.
- Next, we “defeat” two bolts located under the bottom of the product.
- We unscrew the three fasteners holding the bumper to the body and a pair of screws connecting the structure to the fender liners.
- We move to the wheel arches, where we unscrew two screws on each side. For ease of operation, you can twist the steering wheel to the appropriate side.
- We remove the product after prying it off.
The owners of Lada Kalina spend about an hour on the entire dismantling process. To do this, you should acquire the necessary tools in advance. We recommend grouping the entire list of fasteners so that when installing the product you do not confuse them or lose them. Next, replacement is carried out, and the installation algorithm itself is absolutely the opposite of the removal process.
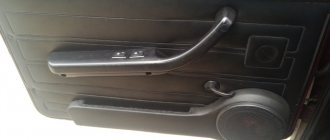
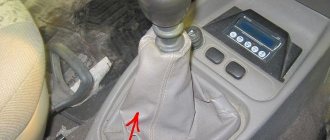
Armrest for Kalina
Instrument panel Kalina
Wheel size Kalina
Installation of bumpers on Lada Kalina
Installing the bumper on the Lada Kalina, both front and rear, is performed in the reverse order.
Before starting work, it is imperative to clean the places where the bumper is attached to the body from dirt and rust. The same applies to the attachment points of the lower grille.
When reassembling the lower grille, as well as the bumper device itself, it is necessary to pay attention to the exact fit of all parts, so if it is done poorly and does not get “in place,” you can only spoil very expensive parts.
The instructions for the car will help you put the front or rear shock absorber back correctly, which you should always have with you. So, for example, if the front bumper mounts cause problems, you can always find answers to the most difficult questions in it. In especially difficult cases, you can ask for help from a more experienced car owner who has already changed this element several times.
Removing the rear body kit
To complete the work, you will need a Phillips screwdriver and a 10mm wrench. You can understand how to remove the rear bumper by studying Fig. 2.
- Unscrew the self-tapping screw connecting the upper mount of the part to the body in the area of the arch under the rear wheel, as well as the three self-tapping screws securing the mudguard.
- The self-tapping screw for the lower fastening of the mudguard, it is located at the bottom of the car, can be unscrewed. Only after this can the rear bumper be removed. The mudguard, which belongs to the left wheel, is removed in the same way.
- Using a 10mm wrench, unscrew the lower mounting bolts (three pieces), they connect the rear bumper to the body.
- When the trunk lid is open, use a 10mm wrench to unscrew the four bolts. The last bolts relate to the upper mount connecting the body and the rear bumper. Next, the self-tapping screw that provides the lower fastening of the mudguard is unscrewed, after which its bolts (three pieces) that connect the rear bumper to the body are unscrewed. Next, the bolts (four pieces) that provide the upper fastening, allowing you to connect the body and the rear bumper, are unscrewed.
- Taking the side of the body kit with both hands, make every effort to remove its top from the bracket related to the body, that is, its flange. Then the same operation is performed on the opposite side of the car.
- Now the rear bumper is removed.
- Next, the nuts that connect it and the energy-absorbing beam are unscrewed, then it is removed, like the top of the sidewall, from the flange.
- The rear bumper is removed before removing the beam, when three nuts of the same fastening are unscrewed.
Removing the rear bumper
To install the part in place, perform the same steps, only in reverse order. In general, when installing a Lada Kalina bumper, both rear and front, you can do it without outside help.
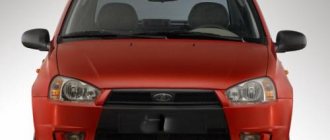
Photos of the appearance of Lada Kalina 2 Sport
Nobody hides, and it is impossible to hide, that the basis for the construction of the sports version of the second generation Kalina was the hatchback Kalina of the second generation. Logical, isn't it?
However, the charged version differs quite seriously from its civilian counterpart. Moreover, this applies not only to the technical content, but also to the appearance.
Experts agree that the Kalina 2 Sport has become more aggressive, sportier in appearance, and there are clearly notes of striving forward, a certain track affiliation. Due to its dimensions and appearance, this hatchback would be perfect for participating in a rally.
Lada Kalina Sport 2 front photos
The front part attracts attention with excellent optics against a darkened background, which makes the appearance even more attractive. The headlights, together with the false radiator grille, seem to form one whole composition, and in the very center is the company nameplate from Tolyatti
The huge front bumper with many aerodynamic elements, a radiator grille and fog lights integrated at the edges creates the most positive impression.
Side of the hatchback
The side view reveals fairly large side windows, doors identical to the civilian Kalina, large exterior rear-view mirrors, rather voluminous wheel arches, as well as quite interesting rims made of light alloy.
Updated taillights
At the rear there is excellent practicality combined with a sporty appearance. Large optics, original dimensions, spoiler above the luggage compartment glass, easy access to the trunk, plastic trim on the rear bumper. The designers did a very good job with this component. To be honest, in many ways we did not expect such pleasant changes.
It should be noted that there is a special sports body kit along the entire perimeter of the body, as well as original door sills. The car has become noticeably lower, which is quite reasonable for a car that has Sport in its name.
It is important to add that AvtoVAZ will offer two variations of the external design of its new product. The first version was simply named Sport, and the second - NFR
However, there is no need to look for a serious difference between them in terms of appearance. As the manufacturers note, the main distinguishing features are the presence of air intakes on the hood, as well as different rims that Kalina will be equipped with.
Overall dimensions of Kalina Sport 2
As for the dimensions, they are as follows:
- length - 3895 millimeters;
- height - 1495 millimeters;
- width - 1700 millimeters;
- wheelbase - 2476 millimeters;
- ground clearance - 125 millimeters.
How to replace the front bumper on a VAZ 1117-VAZ 1119?
Note! When you go to the auto store, think about what else you need to buy for the new bumper, for example, as we already said, there is a beam under the bumper, it can be different depending on your car (That is, it can be plastic or metal, it will be metal if you have a viburnum Sport or a new model Kalina), and also if your bumper is equipped with fog lights but the linings into which they are inserted broke upon impact, then you will need to stock up on new linings (These are the mounts where the fog lights are inserted)!
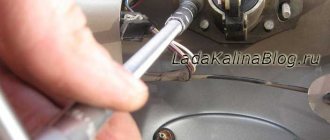
Removal: 1) To remove the bumper, you must first remove the radiator grille; to do this, use a screwdriver to unscrew the three top screws (see photo 1) and then lift the grille a little and disengage its brackets as shown in photo 2 below.
2) Let's move on, now if you have fender liners installed on your car, then unscrew three screws on both fender liners and exactly in those places where the fender liners are attached to the front bumper of the car (see photo 1), then move to the lower part and there on the sides unscrew the two screws securing the bottom trim (see photo 2) and then remove it from the car bumper (see photo 3), then unscrew two more bottom screws (see photo 4) but this time these screws secure the bumper itself to plastic beam that is located under it.
3) Well, finally, take a socket wrench (They are simply convenient to work with), or if you have socket heads and a wrench, you can use them, so using the wrench, unscrew the three lower bolts as shown in photo 1 and after that the two side upper bolts and unscrew the two side central screws (see photo 2) and then bend the bumper on the sides so that it disengages from the brackets (see photo 3), and accordingly remove the bumper from the car.
Installation: The new bumper is installed in its place in the same way as it was removed, but if you also want to replace the beam or brackets (For example, if these brackets on which the beam is installed are bent, then the bumper will no longer stand straight), then this is done very easy, the beam is secured by four bolts, two of which, by the way, you can already see in photo 1, these bolts secure the beam at the edges and if you unscrew them, you can remove it from the car, and when you remove it, you can also remove the brackets and replace them with new ones, They are also fastened with two bolts. For more details about the brackets, see photos 3 and 4.
Additional video clip: You can see the process of replacing the bumper in more detail and clearly in the video below, but only there the bumper is removed to install fog lights in it, think about it, maybe you decide to install them for yourself, you don’t need much there.
Replacing the speed sensor on Kalina
Flushing the gearbox on all VAZ cars
Technical characteristics of Kalina Sport 2
Now it’s time to talk about the most interesting component of the car, which promises to show solid sales results this year.
Does AvtoVAZ really have any reason to call this hatchback charged and add the word Sport to its name? Let's try to figure this issue out.
So, the car will be offered on the market in two options for equipping the engine compartment.
- The Sport version involves the use of a 1.6-liter 4-cylinder gasoline engine. Its power is a pretty good 118 horsepower. Such a power unit will allow the car to accelerate from a standstill to a hundred kilometers per hour in 9.5 seconds. At the same time, the maximum speed freezes at around 197 kilometers per hour.
- The NFR version perhaps looks more preferable. The fact is that with a similar volume of 1.6 liters, the power of such a unit is increased to 140 horsepower. This also led to an improvement in dynamic characteristics to 8.5 seconds for acceleration from zero to hundreds.
AvtoVAZ offers both engines with only one uncontested 5-speed manual transmission. However, it is adapted specifically for improved acceleration of the car.
General form
It is worth noting that Kalina 2 Sport was built on the platform of the second generation civilian Kalina, but quite a lot of changes have occurred.
- The steering has been reconfigured.
- Changes have been made to the suspension design.
- The car was equipped with other braking system mechanisms.
It’s worth mentioning separately about the NFR version, for which:
- We made a separate subframe for the power unit;
- Made major changes to the suspension settings;
- The brake discs were enlarged.
Due to these manipulations, the car has become sportier not only in terms of the amount of horsepower, but also in the operation of all systems and mechanisms responsible for speed, cornering, braking, and so on.
Conclusion
The new generation of Lada Kalina served as an excellent platform for creating a charged hatchback.
The best part is that the car was not just equipped with sports body kits and an engine with improved power. Serious adjustments were made to the design, important components were improved, allowing Kalina 2 Sport to be called a truly sports car.
Back view
Yes, many may complain about the lack of horsepower or some other shortcomings, which, of course, occur in a hatchback. However, take a look at the prices and study the equipment list. For the money this is a very attractive option. Will you find better alternatives among the cars presented in Russia? You can count them on your fingers.
One way or another, the choice will always be yours.
Removing and attaching rear body kits
To remove the rear bumper of the first generation model, the tool kit must be supplemented with a short Phillips screwdriver, since it is impossible to insert a long one between the tire and the wheel arch, and turning it from the side is inconvenient. In addition, TORX key screws (the so-called sprocket) are used for fastening to the fender liner.
Advice. Usually the back of the car gets more dirty than the front, so it is recommended to wash and dry the car before disassembling.
Later generations of hatchback and station wagon cars are even more difficult to disassemble, because the rear lights have to be removed to remove the body kit. The primary fastening of the elements is also provided with latches, so they are removed in the same way as the front bumper. But due to the difference in design, disassembly must be considered separately.
To install the rear body kit, you must repeat the presented algorithm in reverse order.
Removing the rear element of Kalina 1
Disassembly work can be carried out without an inspection hole, since the lower bolts are located close to the overhang and access to them is not difficult. The procedure is as follows:
- Unscrew the 3 screws located at the rear of the wheel arch. Two of them hold the mudguard, the third is located a little higher.
- At the back of the mudguard there is 1 more bolt with a 10 mm head, unscrew it.
- Using a 10 mm wrench, remove the 3 bolts securing the bumper from the bottom. Two of them stand in the middle, the third is a little to the left (in the direction of travel).
- Open the trunk lid and unscrew the 4 screws of the upper body kit mounting.
The main thing is to carefully pull the edge of the part and release the latches
Then proceed in the same way as with the front element. Pull the side of the part, unlocking the plastic latches, and carefully remove it with an assistant. If you need to get to the body, then unscrew 3 more bolts and remove the plastic bumper reinforcement.
Places where fasteners are located
Differences in disassembling Kalina 2
To remove the rear bumper of a station wagon or hatchback, you will need to open access to the bolts that are hidden under the bottom of the lights, for which the latter will have to be removed. Their fastening consists of bolts with 8 mm socket heads located behind the rubber seal of the trunk lid. The bolts need to be unscrewed, and the lights need to be pulled out, disconnecting all the wires.
Attention! Before disassembling, be sure to disconnect the battery terminal.
2 of the 8 bolts are hidden under the taillights
Removing the body kit from the Lada Kalina 2 hatchback body is carried out in the following order:
- From below, the part is screwed to the body with a pair of bolts (located in the middle) and two self-tapping screws (at the edges). Loosen and unscrew them.
- Under the wheel arches, unscrew 3 screws (TORX keys T10 and T20) and remove the rubber retainer from the mudguard.
In addition to 3 TORX screws, there is a plug
- Unscrew the 8 top mounting bolts. Six of them are located near the threshold of the luggage compartment, two more are in the sockets of the removed lights. Location of the lower bolts
On a hatchback there are a couple of bolts in the center and a couple of screws on the sides
- Now unlock the latches and remove the bumper.
The difference between disassembling Kalina 2 in a station wagon is that the element is attached to the body from below with 3 bolts, but there are no side screws. In other places the fastening is the same - 3 screws under the arches and 8 bolts around the luggage opening.
In a station wagon, the body kit is screwed on from below with 3 bolts
This is interesting: How to prepare a car for painting?
In what sequence to remove the bumper on Kalina
- First of all, you should open the hood, under which you will notice three bolts. The function of the latter is to secure the radiator grille. Next, carefully unscrew the bolts so as not to damage the paintwork. After this, the screws, which are safely unscrewed, need to be put aside for a while.
- The next step is to remove the radiator grille. Now you have an approach to the area where the bumper is attached. You will notice bolts and screws - 2 pieces each. Your task is to unscrew them.
- Next, you need to unscrew the mounting screws (2 pcs.) located on the lower grille. Now you should remove the grille. By the way, there is nothing complicated here - this design can be removed quite easily.
- Now we have access to 2 more bumper bolts. They are located below behind the bars that you previously dismantled.
- Then you will need to unscrew the screws (3 pcs.) of the bumper attached to the car body. They are located in the lower compartment and can be easily found. In addition to these screws, you have to unscrew 2 more screws, thanks to which the bumper is attached to the fender liner.
- To remove the bumper of your Kalina, you will have to unscrew a total of 4 screws (2 on each side of the front bumper). They are located in the wheel arches. They attach the bumper to the fender liner. To make this procedure more convenient, before unscrewing, you should turn the steering wheel to the right or left until it stops.
Now that there are no obstacles, you will be able to remove Kalina's bumper. Here you literally just have to pry the structure with your hands from both sides.