I think that many Kalina owners already know that under the hood of the car there are two coolant temperature sensors. One of them is installed on the side of the cylinder head, which sends a signal to the arrow in the instrument panel. And the second is located on the thermostat, and it transmits its readings directly to the ECU to turn on the fan. In this article I will talk about the second engine temperature sensor (coolant).
So, to replace it on Kalina, you will need the following tool:
- Phillips screwdriver
- Driver or ratchet
- Head 19 - best deep
- Extension
Progress of repairs to remove and install the sensor
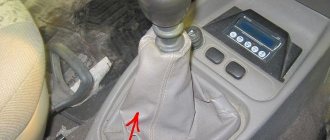
To make dismantling more convenient, you need to unscrew the clamp of the intake pipe, which goes from the air filter to the throttle assembly:
And after that you need to pull the pipe, pulling it out of its seat. And then move it a little to the side so that it does not interfere, approximately as shown in the photo below:
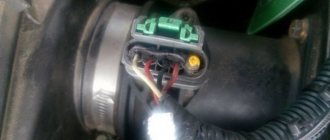
And the photo below clearly shows the location of the temperature indicator sensor:
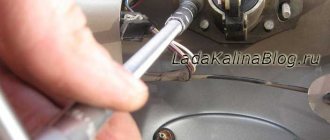
First you need to disconnect the power plug, which is fixed in the same way as most others - just lift the latch up and pull the plug:
Now, using an extension cord and a deep socket, unscrew the sensor. If the pipe still gets in the way, you can move it a little more to the side with one hand, and at the same time put on the head with the other. Then unscrew the sensor with a ratchet:
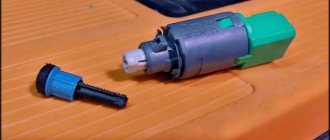
After this, you can completely unscrew the sensor by hand. And this is what it looks like after extraction:
Now you can start replacing this part. Its price is approximately 150 rubles. So, even if you have to change this part, this repair will cost very little.
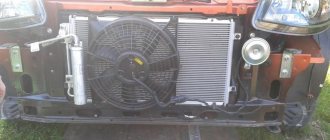
The cooling system is responsible for the optimal temperature regime of the power plant, at which the power output is maximum. This system includes a radiator cooling jacket and pipes through which fluid circulates. Circulation is provided by a pump driven by the crankshaft.
The system also includes a thermostat, which ensures quick warm-up of the engine by shutting off the pipeline going to the radiator, while the liquid circulates only inside the cooling jacket. When a certain temperature is reached, the thermostat opens the pipe, after which the liquid circulates in a large circle, including the radiator.
The radiator cools the heated liquid. To cool the liquid faster, a fan is installed on the radiator, which creates additional air flow. But this fan does not always work; it turns on only when the liquid temperature exceeds a certain value.
Leon1193 › blog › decoding the fuse box VAZ 2109-2114
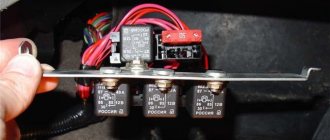
Decoding of the VAZ 2109 fuse box F9 (7.5 A) Right fog lamp and fog lamp turn-on indicator lamp F8 (7.5 A) Left fog light fuse F1 (10 A) Headlight wiper motors (at the moment of switching on), headlight wiper switch relay (contacts ) and headlight washer activation valve F7 (30 A)
Electric motors for headlight cleaners (in operating mode). Relay for turning on headlight wipers (winding). Electric motor for heater fan, washer pump, rear window wiper. Rear window washer timing relay. Rear window washer activation valve. Relay for the electric radiator cooling fan (winding) and for turning on the rear window heating.
Indicator lamp for turning on the heated rear window and glove compartment lighting F16 (15 A) Turn indicators, relay-breaker for turn indicators and hazard warning lights (in turn indicator mode). Indicator lamp for turning on the turn signal. Rear lights (high-speed running lights). Windshield wiper motor and relay.
Generator excitation winding (when starting the engine) and brake fluid level warning lamp F16 (15 A) Fuse VAZ 2109 warning lamps: emergency oil pressure, closing the carburetor air damper, turning on the handbrake. “STOP” board. Coolant temperature and fuel level indicators.
New Lada: Buy Lada Priora 2021 in Moscow: configurations and prices from an official dealer
Indicator lamp for reserve fuel remaining. Voltmeter. “CHECK ENGINE” indicator light. “TEST” board. Warning lamps for the on-board monitoring system, seat belts not fastened and doors not closed. Power circuit for inertial door lock switch F3 (10 A) Rear lights (brake signal lamps).
Interior lighting F6 (30 A) Electric window motor, power window relay F10 (7.5 A) License plate lights. Engine compartment lamp. Instrument lighting lamps. Indicator lamp for turning on the side light. Heater lever illumination display. Cigarette lighter lamp Left headlight (side light).
Left rear light - side light F5 (20 A) Radiator cooling fan electric motor and its activation relay (contacts). Sound signal and relay for its activation F11 (7.5 A) Right headlight (side light). Right rear light (side light) F2 (10 A) Direction indicators, relay-breaker for direction indicators and hazard warning lights (in hazard warning mode).
Hazard warning light F4 (20 A) Rear window heating element. Relay for turning on the heated rear window (contacts). Socket for connecting a portable lamp. Cigarette lighter F15 (7.5 A) Right headlight (high beam) F14 (7.5 A) Left headlight (high beam). Indicator lamp for high beam headlights F13 (7.5 A)
Left headlight (low beam) F12 (7.5 A) Right headlight (low beam) 1 (8 A) Reserve fuse in the VAZ 2109 unit 2 (8 A) Reserve 3 (8 A) Headlight wiper motors at the moment of switching on). Relay for turning on headlight wipers (contacts). Headlight washer activation valve 4 (16 A) Headlight wiper motors (in operating mode).
Relay for turning on headlight wipers (winding). Heater fan motor. Electric motors for the rear window washer and wiper pump. Rear window washer timing relay. Valve for turning on the windshield and rear window washer. Relay for the electric radiator cooling fan (winding) and for turning on the rear window heating.
Indicator lamp for turning on the heated rear window and glove compartment lighting 5 (8 A) Turn indicators, relay-breaker for turn indicators and hazard warning lights (in turn indicator mode). Indicator lamp for turning on the turn signal. Rear lights (high-speed running lights). Windshield wiper motor and relay.
Generator excitation winding (when starting the engine). Brake fluid level warning lamp. Indicator lamp for emergency oil pressure. Indicator lamp for covering the carburetor air damper. Indicator lamp for turning on the hand brake. “STOP” board. Coolant temperature gauge.
Fuel level indicator. Indicator lamp for reserve fuel remaining. Voltmeter 6 (8 A) Fuse for rear lights (brake signal lamps) in block 2109. Interior lighting 7 (8 A) License plate lights. Engine compartment lamp. Instrument lighting lamps. Indicator lamp for external lighting.
Heater lever illumination display. Cigarette lighter lamp 8 (16 A) Radiator cooling fan electric motor and its activation relay (contacts). Sound signal and relay for its activation 9 (8 A) Left headlight (side light). Left rear light (side light) 10 (8 A) Right headlight (side light).
Right rear light (side light) 11 (8 A) Direction indicators, hazard warning relay-breaker (in hazard warning mode). Hazard warning light 12 (16 A) Rear window heating element. Relay for turning on the heated rear window (contacts).
Diagnostic Unit VAZ-2107-20
Like 42 Subscribe
Coolant temperature sensor
To monitor the coolant temperature, a coolant temperature sensor is included in this system. The readings of this sensor are displayed on the dashboard, which provides the driver with information about the temperature conditions of the engine.
But this is not the main task of this sensor. The coolant temperature sensor transmits temperature data to the electronic control unit, after which this unit adjusts the fuel supply depending on the temperature. When the engine is cold, based on the readings of this sensor, the control unit sets an enriched mixture; after warming up, the fuel mixture becomes normal. Based on the readings of this element, the electronic unit regulates the ignition timing.
How to check the functionality of the coolant sensor
There are two main methods for checking the health of the coolant temperature sensor. The first - with its dismantling, the second - directly on the seat in the car engine. In turn, the first method can also be divided into two more. The first is with the use of a thermometer, the second is without it. Removing the sensor can usually be done using an ordinary wrench of a suitable size, after first disconnecting the contact terminals from it. But before dismantling the sensor, you need to make sure that power is supplied to the DTOZH. Typically it is equal to 5 Volts DC voltage. This can be easily found out by disconnecting its chip from the sensor, and using a multimeter set to DC voltage measurement mode (with the appropriate range) using probes to check the voltage value. If voltage is present and at the specified value, then further testing of the coolant sensor can be performed.
Checking the temperature sensor on the car
Many car enthusiasts are interested in the question of how to check the coolant temperature sensor without removing it from its seat in order to simplify the work and complete it as quickly as possible. And they do this using a multifunctional tester, measuring the resistance between its output contacts, that is, the resistance of its electrical winding.
They do a DTOZh check right on the car by disconnecting the chip from the sensor so that there is normal access to its electrical contacts (terminals). Please note that if the engine is hot, you need to work carefully so as not to burn yourself or melt the electronic multimeter and/or its probes! Next, using a multimeter switched to resistance measurement mode, you need to measure this value between its terminals. As mentioned above, on a cold engine the value will be quite high, and on a hot engine it will be lower. As an example, we provide technical information for the VAZ-2110 car , which gives a general understanding of resistance values. It is necessary to understand that for other passenger cars (using sensors of similar models) these values will be very similar, that is, they will not differ critically.
| Water temperature, °C | Resistance value, Ohm | Water temperature, °C | Resistance value, Ohm |
| +5 | 7280 | +45 | 1188 |
| +10 | 5670 | +50 | 973 |
| +15 | 4450 | +60 | 667 |
| +20 | 3520 | +70 | 467 |
| +25 | 2796 | +80 | 332 |
| +30 | 2238 | +90 | 241 |
| +40 | 1459 | +100 | 177 |
To be fair, it must be said that sensors do not break down so often, but instead there are situations when the DTOZH “lies”, that is, it produces incorrect information. Therefore, you can compare the temperature readings on the dashboard and compare them with the obtained resistance value. If the sensor still produces incorrect information, then it makes sense to dismantle it and carry out additional diagnostics using a thermometer and a water heater.
Checking with a thermometer
So, you must first remove the sensor from its seat on the car engine. This is usually not too difficult and can be done using a wrench of the appropriate size. At the same time, you can carry out preventative maintenance on its threads in the pipe, clean and lubricate it, and the sensor itself, too, if it is in good working order and the car owner will not replace it with a new one.
Design, principle of operation
The design of this sensor includes a thermistor - a resistor that changes resistance depending on the temperature surrounding it. This thermistor is placed in a metal case with a thread applied to it. A tail section made of plastic is connected to this body. This part contains contacts for connecting wiring. One contact is positive and it comes from the electronic unit, the second is negative and it is connected to ground.
In order for the thermistor to work, a voltage of 5 V is constantly applied to it. This voltage is supplied to it by the electronic unit through a resistor having a constant resistance. Since the coolant temperature sensor thermistor has a negative temperature coefficient, as the temperature increases, its resistance will decrease, and the voltage supplied to it will also decrease. Based on the drop in this voltage, the electronic unit calculates the engine temperature and also displays its value on the dashboard.
The exact installation location of this temperature sensor differs from car to car, but only slightly. It can be installed in the cylinder head near the thermostat housing, or on the thermostat housing itself. It must be located near the outlet pipe through which the liquid flows into the radiator. It is located near this pipe in order to transmit accurate temperature data.
Signs of sensor malfunction
This sensor is considered to be very reliable due to its comparative simplicity of design. However, there may be problems with it too. Usually they come down to a violation of the calibration, which leads to a violation of the resistance and, as a result, incorrect operation of the electronic unit, since it performs part of its functions based on the engine temperature.
One of the most obvious signs of failure of this sensor is the failure of the fan to turn on when the temperature exceeds the set value. But this indicator will not be reliable if there are two sensors - the main one, for transmitting the temperature value to the electronic unit, and the additional one, responsible for turning on the fan. In this case, failure to turn on the fan will indicate damage, oxidation of the wiring, or failure of the sensor responsible for its operation.
On modern cars, a malfunction indicating incorrect operation of the coolant temperature sensor is displayed on the display of the on-board computer. However, a fault message does not always indicate sensor failure. Often problems in its operation are associated with broken wiring or oxidation of contacts.
Incorrect functioning of the coolant temperature sensor or a break in its wiring leads to excessive fuel consumption, high idle speed, and detonation. It is possible that the power unit will have difficulty starting after warming up. The biggest trouble that can occur due to the inoperability of this sensor is overheating of the power plant, which can cause the cylinder head to move.
General information about the sensor
DTOZH on the Lada Kalina should not be confused with an external sensor for outside air temperature or interior temperature. To begin with, we suggest that you familiarize yourself with basic information about this device. In total, Kalina uses two regulators - one of them goes to the control unit, and the second goes to the dashboard, where the temperature of the power unit is displayed.
Location
The regulator in Kaliny is mounted in a thermostat. Finding this device is not so difficult, since its installation location is identical for many VAZ models. As for the controller, which displays information on the control panel, it is located nearby.
Purpose and principle of operation
The purpose of the regulator is to monitor the temperature of the engine or coolant. It should be noted that this procedure depends on the voltage - on a warm internal combustion engine it is lower, and on a cold one it is high. The temperature regime of the motor affects many features of its operation. The DTO ECU also sees when the cooling system fan needs to be turned on.
Thanks to the operation of the coolant temperature sensor, the ECM performs the following functions:
- Setting the ignition angle. DTOZH monitors the volume of exhaust gases, and thanks to the correct ignition settings, their quantity will be lower. This, in turn, allows for more efficient operation of the power unit.
- Fuel enrichment. If the temperature is too low, a signal will be sent to the injectors, preventing possible fluctuations when the engine warms up. This procedure allows you to ensure its normal operation at idle.
- DTOZH records all changes occurring in open and closed loop conditions. If the regulator fails, the signals will be transmitted from the lambda probe, but they will not receive feedback, which, in turn, will contribute to a deterioration in idle speed (the author of the video about diagnosing the device is the Vehicle Device and Repair channel).
As for the principle of operation, complex processes always occur inside the power unit. If the engine is cold, a rich air-fuel mixture will be needed to warm it up, and if the engine overheats, then a large volume of this mixture can lead to engine failure. If the DTOZH is operating in normal mode, then all information regarding the engine temperature will be displayed on the dashboard. If there is a break in the electrical circuit, this will lead to a violation of the indicators; accordingly, the system can supply an enriched mixture when it is not needed. In turn, this leads to increased gasoline consumption.
As a result, wear and tear on engine components increases, which leads to increased emissions into the environment. If a short circuit occurs in the electrical circuit, the ECU will perceive signals from the DTOZH as the engine overheating, and accordingly, it will begin to supply a lean mixture. And if in fact there is no overheating, then this can lead to less efficient operation of the power unit, as a result of which its stability and power decreases.
Sensor check
Checking the functionality of this sensor is not difficult. But before you do it, it is advisable to check the integrity of the wiring going to it. You can also check the voltage coming from the control unit. To do this, you need to disconnect the chip with wires from the sensor and connect it to a voltmeter. After this, start the engine and measure the voltage supplied to the sensor; it should correspond to 5 V. If the voltage is normal, check the sensor for resistance.
Replacing the coolant temperature sensor
The coolant temperature sensor cannot be repaired, so if it is found to be operating incorrectly, it is simply replaced.
Video: Replacing the coolant temperature sensor (DTOZH) VAZ 2115 (2113, 2114)
After purchasing a new sensor, it is advisable to immediately check it using the specified methods. If all readings are normal, it is installed in place of the one removed. Before screwing it into the seat, the threads are treated with sealant.
After installing the new element, a leash is connected to it; it is impossible to confuse the position of the chip, since it has special guide grooves. Next, the coolant in the system is brought to normal. Then you should check whether liquid is leaking through the sensor, and then start the engine.
If replacing the sensor does not give any result, the engine continues, for example, to overheat or does not reach the proper temperature, look for the cause in other elements of the system. It is possible that the thermostat does not work and the liquid is constantly circulating either in a small or large circle.
Share with your friends:
The Lada Kalina family car is equipped with over ten digital sensors that monitor the operation of mechanisms and assemblies. Most often, drivers complain about premature wear of the coolant temperature sensor (hereinafter referred to as DTOZH).
They say it displays incorrect data, and sometimes is completely inactive. The process of replacing the DTOZ yourself is not at all complicated. The task can be done by a driver without experience in servicing equipment.
ATTENTION! A completely simple way to reduce fuel consumption has been found! Don't believe me? An auto mechanic with 15 years of experience also didn’t believe it until he tried it. And now he saves 35,000 rubles a year on gasoline! Read more"
What temperature sensors are installed
The principle of operation of the DTOZH is as follows: after receiving data on the current antifreeze temperature, the measuring device sends the readings to the electronic control unit of the ECU.
The on-board computer compares the received data with the programmed ones. In case of discrepancy, an error is indicated on the dashboard. The owner of the car, seeing a system error, decides on the nature of the breakdown and visits a service station to order a comprehensive diagnosis.
In addition to the DTOZH, the Lada Kalina car is equipped with an external temperature sensor (hereinafter referred to as the DNT). However, not on all trim levels, but only on Lux and Premium.
If desired, the owner can install the measuring equipment himself. The installation work is not at all difficult. In time no more than an hour.
DTOZH is designed to monitor the temperature of antifreeze in the cooling system circuit of the power unit. After receiving the “degree” data, the ECU increases or decreases the speed of the power unit in order to adjust the temperature.
The quality composition of the fuel mixture depends on the accuracy of the DTOZ readings. The service life of the sensor is unlimited, with the exception of mechanical damage or short circuit in the circuit.
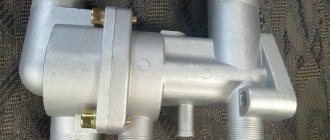
Where it is located: the standard installation location is the outer part of the thermostat housing. The base is screwed into the thermostat body. Two power contacts are connected to the upper part for power supply from the on-board network.
A melting element is installed inside the DTOZh base. As soon as the antifreeze degree reaches “90”, the contacts close and the on-board computer signals an error.
Next, the driver decides on the advisability of stopping the car immediately, carrying out preventive maintenance, or calling a tow truck.
Catalog articles, prices of temperature sensors for Lada Kalina:
| Name | Catalog item | Price in rubles |
| DTOZH (original), 8 valves | 2112-385101000 | from 250 |
| DNT air (original), 16 valves | 21120385101082 | from 350 |
The device is installed in the mounting location of the front bumper, to the left of the center of the radiator grille. The DNT shape is conical with two contacts on the back side.
The fuse in the mounting block at number 24 is responsible for the operation of the DNT. The absence of temperature readings on the dashboard is the first sign of a malfunction.
Replacing the fan switch sensor on a VAZ 2101-VAZ 2107
Welcome! The fan switch sensor is far from the last sensor in a car, because thanks to it, the radiator fan turns on when the engine temperature reaches a certain point, but not on all cars, for example, if we take the very first VAZ 2101, they did not have this sensor at all , later, of course, it appeared, but closer to the removal of this car from the assembly line, but these cars almost never warmed up, since their fan was spinning constantly, but if the cooling system of the car is fully operational, then the cars with a sensor thanks to which turn on the fan will also not heat up, and it will warm up much faster because the fan does not spin and allows the engine to heat up very quickly.
New Lada: Replacing the cabin filter - Lada Kalina Blog
Note! To replace this sensor, take with you a set of tools: In this set you must have a wrench set to “30”, with its help you will turn out the sensor, in addition to it, stock up on a large container (a 10 liter basin will be perfect), but although if you do everything quickly, you won’t need any container, in general, a little later (As you read the article) we will explain to you why you need a basin and what to do if you don’t want to get it dirty!
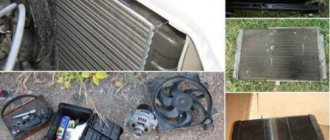
Where is the fan switch located? Let's start with the fact that you need to look for it in the engine compartment of the car, opening the hood immediately look for the radiator (It is indicated by a blue arrow in the large photo), the sensor will be screwed into this radiator (the sensor is indicated by red arrows), but only as you see in the photo below, the wires from the sensor are disconnected, respectively, they will be connected and you will see a slightly different picture, besides this, as you can see, all the radiators have a completely different shape and some have holes for the sensor in the lower left part (see large photo), and for someone in the lower right part (see small photo), if you have it in the right, then the sensor will be located just above the lower pipe, which is indicated by a blue arrow, but on an aluminum radiator this sensor is generally located at the very bottom under the pipe and not above it , so look for it, in fact, it always has one shape, and you can see its shape perfectly in the photographs below.
When do you need to change the fan switch sensor? It is replaced when it fails, namely, if the radiator fan stops turning on, you will immediately understand this if your car heats up to a high temperature and the fan still does not turn on, although in this case the electric motor of the fan may also be to blame, but all this (the serviceability of the sensor also means the fan motor) is easy to check, just grab with your hands in this case both wires that are connected to the sensor (These are essentially terminals, see the photo below) and disconnect them, and when they come out, bridge them together and hold it, it’s better to do this with gloves on and we don’t advise you to handle the terminals, just grab the wires themselves and jumper the ends of the terminals, after that the cooling fan should start working immediately (In this case, the sensor needs to be changed), and if the fan doesn’t turn on, then either you have a problem with the electric motor or something with the wiring that is connected to the sensor, but basically the fan always turns on and this indicates that the sensor has stopped working, by the way, if this sensor breaks in your traffic jam, then you can safely disconnect these two wires from it and rewind them with insulating tape so that they fit together, after which your fan will work constantly, or rather until you open the terminals. (Ignore the arrows in the photo below)
Note! When you connect the wires to each other, do not forget to turn on the ignition on the car and what else, if suddenly when you connect the wires your fan does not work, check the fuse that controls the electric motor, it may have burned out and needs to be replaced!