Modern cars are much more comfortable than the models of the past; computer technologies serve to make drivers more comfortable. The clutch sensor on the Lada Vesta is needed to synchronize the rotation of the crankshaft and the gearbox input shaft. In this case, there are two types of devices, one is intended for a manual gearbox, and the second for a robotic gearbox.
Why an additional system is required: special gears are responsible for synchronizing the speed of the power plant with the rotation of the gearbox input shaft. If the synchronizer of any gear wears out, you will not be able to change gear. The presence of a sensor helps eliminate synchronizers from the circuit, since the electronic signal is transmitted directly to the control unit, and the power unit raises or lowers the speed to the required level. The system also helps to cope with the jerking of the car when changing gears.
The sensor installed on the Lada Vesta has two position options:
- "Enabled"
- "Turned off".
The control unit adjusts the engine speed to the position automatically. With automatic transmission, the system works in exactly the same way, and the data is transmitted to the electronic unit. The robotic box allows you to take into account the speed of movement and some other factors.
Sensor location and dismantling process
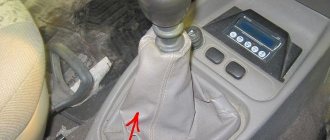
On the Lada Vesta, the sensor is located near the steering shaft, next to the pedal. If jerking or jerking occurs when changing gear, the car owner should check and adjust it.
To dismantle an element, you need:
- press the latch and carefully disconnect the block with wires;
- Rotate the component counterclockwise ninety degrees and remove it.
When installing the part in place, you need to make sure that the brake pedal is in the upper position; the actions are performed in the reverse order.
After installation, the pedal is carefully lowered, after which the block with wires is connected.
Clutch LADA Vesta
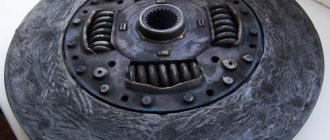
The AvtoVAZ company installs a single-plate dry clutch on its cars. The clutch on a manual transmission is hydraulic, and on an automatic transmission it is electromechanical.
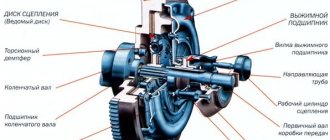
What is the clutch made of? The first part is the driven disk, and the second is the pressure disk assembly or simply “basket”, as drivers call it.
The basket consists of a steel casing into which a pressure disk is installed.
The LADA Vesta clutch basket and disc were developed by the German company LuK. AvtoVAZ received the right to produce German products at its plant in the city of Ulyanovsk.
Checking the Clutch Sensor
To check what position the sensor is in, you will need an ohmmeter. Next you need to follow this algorithm:
- the rod lock is moved to the extreme right position using a flat screwdriver;
- ohmmeter probes are connected to terminals 3 and 4;
- if the rod is in the free position, the resistance value should tend to infinity, that is, the circuit is in an open state;
- the circuit closes; if you press on the rod, the ohmmeter will show a resistance of about zero.
If the readings are incorrect, the sensor has failed and requires replacement.
LADA Vesta: Adjusting the clutch pedal travel sensor
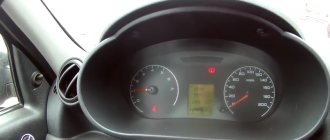
Some owners of LADA Vesta cars, while operating their cars, experience jerking, heaving and jerking when shifting into 1st, 2nd and 3rd gears. Sometimes, error number P0830 appears.
One of the reasons that can cause this behavior of the car is the incorrect operation of the clutch pedal travel sensor, whose incompletely thought-out design causes the above problems.
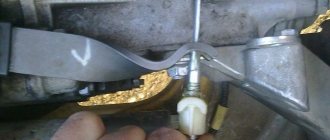
This sensor may differ depending on what modification of the car you own. In my case, it was a Renault 253250007R sensor with a rectangular rod and risks.
This element of the clutch system is located under the dashboard, next to the steering column and is attached to the top of the clutch pedal.
The problem with the machine jerking occurs when the rod plunges into the sensor housing. If you pull it out again to the required length and put the sensor in place, the problem will disappear and the car will begin to behave normally, but not for long, because any sudden return of the clutch pedal to its base state will cause the rod to shorten again.
The fact is that the white latches around the base of the rod cannot hold it when the clutch pedal is sharply returned and therefore, over and over again, the rod falls into the body and shortens, depriving the driver of comfortable movement and provoking jerks.
After all, the sensor transmits a signal about the position of the clutch pedal to the engine, and it, in turn, synchronizes its speed with the input shaft, which has a beneficial effect on the transmission.
Faced with this problem once again, I began to think about how to solve it once and for all. Having considered various options, I finally came to the conclusion that it was possible to install a spacer between the moving white part and the adjusting rod.
Replacing and adjusting the sensor
If you need to replace a faulty part on a car with a manual transmission, just install a new one. If the gearbox is robotic, then in addition to replacing the element itself, adjustments will need to be made.
The dismantled sensor must be measured - the rod should protrude at a distance of 17 to 18 millimeters. There is a special marking on the rod itself. It also helps with navigation. Usually it is required that the rod extends three or four notches.
The rod can be adjusted by gently pulling the end. If during the process the rod completely separates from the sensor or it is necessary to pull the end three or more times to achieve the desired values, then the element is faulty and a new part must be purchased.
What does adjustment help with?
If the element is in working order and the adjustment is carried out correctly, positive changes will be noted:
- the movement of the machine will become smooth;
- the car will not jerk when changing gears;
- There will be no shaking when releasing the gas.
The adjustment process does not take much time and is easily carried out on your own without the involvement of specialists from car services.
If after installation the rod is not held at the specified distance, you can try to fix it using a small piece of plastic tube or a spring of a suitable diameter.
If after adjustment the car behaves as before, it is recommended to contact a service center and carry out diagnostics.
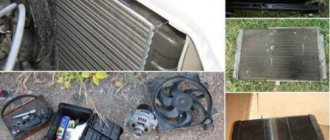
Replacing the clutch on Lada Vesta
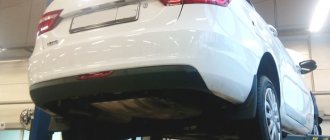
This is not an easy job, no matter what type of transmission is installed. The further operation of the car will depend on the quality of the operations performed, and therefore it is better to entrust this to qualified specialists. The cost of such work is quite high and, depending on the complexity and type of transmission, can vary from 3,500 to 15,000 rubles. Of course, replacing the clutch of a Lada Vesta robot, and especially on a manual one, is quite possible. But this requires a wealth of experience and skills, and in the case of a robotic gearbox, also special software, without which it is impossible to adjust the transmission (adaptation).
Replacing the clutch on an AMT
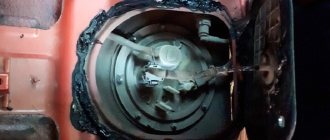
To change it on a Vesta with a robotic transmission, you will need to completely dismantle the gearbox. The further algorithm of actions is as follows.
- If replacing the pressure plate is not included in the plans, then its position relative to the basket should be marked with paint so that there are no problems during assembly.
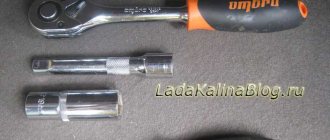
- Using a 8mm wrench, unscrew the bolts securing the basket to the flywheel of the power plant, remove the pressure and friction disc.
- Remove the release bearing along with the drive.
- All failed elements must be replaced, after which assembly is carried out in the reverse order of disassembly. Also, to install the basket, you will need a mandrel to center the friction disc.
In order not to carry out the labor-intensive process of dismantling the clutch several times, it is recommended to immediately change all the assembled parts.
Adjustment will require special equipment and knowledge. You definitely can’t do without specialists here.
Replacing the clutch on a manual transmission
Structurally, this mechanical unit is no different from an automated transmission, with the exception of some nuances. The replacement process is identical, however, in the case of a hydraulic drive, a procedure for bleeding the system from air will be required. This work is performed as follows.
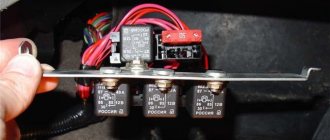
- Remove the battery, its shelf, and the dust shield of the power unit.
- Unscrew the cap of the master cylinder reservoir and add brake fluid to the maximum level.
- Remove the protective plug from the fitting and put a suitable size hose on it (preferably transparent). The other end of the hose is released into a container with working fluid.
- Displace the fitting tube tip by lifting the clamp.
- Wait until air stops flowing along with the brake fluid through the tube, then release the lock and remove the hose from the fitting.
- Add fluid to the reservoir to the optimal level.
Even a beginner can identify clutch faults on a Vesta, be it a manual gearbox or a robotic one, if you follow all the instructions. Another thing is replacing the clutch. Not only a beginner, but also many experienced car enthusiasts cannot cope with this. The fact is that, in addition to the tool, you will need special equipment, as well as a lot of experience.
It’s easier to save a lot of time and nerves by trusting professionals. In addition, you can receive a quality guarantee for such work, which means you can be confident in further operation without any problems.
During the operation of the car, some owners note the appearance of pecks, jerks or twitches when switching to 1st, 2nd or 3rd gear. The cause of this problem may be the clutch pedal travel sensor, which can be adjusted with your own hands in a couple of minutes.
Attention!
Depending on the vehicle equipment, the clutch pedal travel sensor may differ. Next we are talking about the Renault 253250007R sensor with a rectangular rod, which has risks).
How to remove the clutch sensor
:
- Disconnect the clutch pedal travel sensor connector.
- Turn the clutch pedal sensor 1/4 turn counterclockwise.
The rod can only be moved when adjusting dimension X. The clutch pedal travel sensor must be replaced if the rod is separated from the sensor or adjustment requires more than three changes in dimension X.
How to adjust the clutch sensor
:
- Measure the X dimension of the stem protrusion. If dimension X is less than 17mm, adjust it by gently pulling the end of the rod.
- Dimension X must be between 17 mm (no less) and 18 mm (no more).
Clutch Sensor Installation
done in reverse order. Press the clutch pedal with your hand. Install the sensor on the pedal assembly. Lock the sensor by turning it 1/4 turn clockwise. When returning the clutch pedal to its original position, support it with your hand. Connect the connector.
Note
: The clutch pedal travel sensor is adjusted automatically depending on the pedal position. During automatic adjustment, clicks of transition through fixed positions are heard.
Reviews
read the owners in the comments.
ps On the Lada XRAY the clutch travel sensor is not adjustable.
Let us remind you that if the clutch pedal position sensor is faulty, engine operation may be unstable (speeds fluctuate, jerks when releasing the gas), and error P0830 will appear. Before replacing the sensor, it is recommended to check it with a multimeter.
Related posts:
- How to change the stove motor on a VAZ 2114
- Lada Vesta knocking front suspension
- The best winter tires without studs
- How to insulate a UAZ loaf with your own hands
| Turn off the engine and press the clutch pedal two or three times. | There should be no jamming, creaking, knocking or any other extraneous sounds in the drive mechanism. |
| Start the engine. | If at the same time a howling sound is heard from the manual transmission, which becomes more distinct when the pedal is depressed, it means that the release bearing is badly worn and needs to be replaced. |
| With the engine running, depress the clutch pedal and engage any speed. | At the same time, there should be no creaks, knocks, or crunches. Otherwise, extraneous sounds indicate incomplete disengagement of the clutch. This usually indicates airing of the system. If there is no air, it means there is a malfunction of the master or working cylinder, or a broken diaphragm spring. |
| With the engine running, turn on the speed and smoothly release the clutch pedal. | When the car starts to move, there should be no jerking or extraneous noise. Otherwise, the cause of failure may be damage to the discs, damper, or oil getting on the discs. |
| While driving, you need to press the accelerator pedal sharply. | If the revolutions have increased, but the car has barely accelerated, it means the clutch is slipping. It is easy to understand about slipping by the characteristic burning smell from the friction linings of the disc in the cabin. The problem is solved by replacing the disks. |