Many VAZ 2110 owners are dissatisfied with the performance of their car's heater. It would seem that the interior has already been insulated, no cold air is coming in from outside, the stove seems to be working, but it is still cold in the cabin.
Therefore, auto craftsmen come to the conclusion that the original stove may be nothing, but modifying the thermostat on the VAZ 2110 will not be superfluous at all. Therefore, someone, having bought a new thermostat, even before installing it on the car, makes modifications: the circuit on the 5-hole one is redone, making it 6-hole.
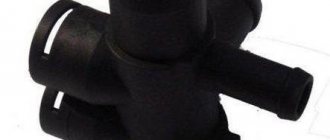
Factory thermostat
Others believe that it is enough to narrow the canal bypass. Third, it is much better to install a Granta thermostat, since it completely shuts off a large circle of coolant and, accordingly, the heater begins to supply hot air to the cabin much faster.
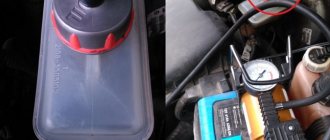
Let's consider all the options, but first you need to check whether the thermostat is to blame for the fact that there is clearly not enough heat in the cabin.
Modification of the thermostat
On a VAZ 2110, it is quite possible to modify the thermostat by adding another hole to the 5-hole device. Why is this needed and what does it give?
So:
- In cars, in particular on the VAZ 2110, the injector becomes warmer with the advent of the sixth fitting due to the fact that the bypass channel decreases. For reference: a bypass is a pump for circulating liquid in a parallel pipeline;
- For the stove to operate, it is necessary for the coolant to circulate in a small circle. This happens through the bypass channel. The smaller its diameter, the more liquid will flow through the stove;
- An additional fitting, as a rule, prevents the heater return tee from leaking, since such malfunctions are not uncommon on “tens”.
An additional 8 mm hole is drilled in the body of the vehicle (thermostat). Install an additional pipe parallel to the same one going to the stove. It is needed so that the “waste” liquid from the heater enters the thermostat cavity, and there is no overcooling of the engine.
Upgrading a 5-hole thermostat to a 6-hole thermostat
Upgrading a 5-hole thermostat to a 6-hole thermostat
Upgrading a 5-hole thermostat to a 6-hole thermostat
You also need a throttle washer - to increase the flow of fluid through the stove if the small circle is open, and an adjusting bolt resting on the leg of the element in order to regulate the opening temperature of the vehicle from the outside.
By the way, having modified it in this way, you can turn the carburetor TS 82, by drilling and tapping, into an injector suitable for the VAZ 2110.
Replacing the thermostat VAZ-2110 injector 8 valves photo, video
Replacing the thermostat on a VAZ-2110 is quite easy. Of course, it is best to change the part when the coolant is changed or vice versa. The whole process will take about half an hour. It is mandatory that the car must be cold.
Video about replacing the thermostat on a VAZ 2110-2112
The video will tell you how to replace the thermostat, tell you about the features and nuances of the process
Thermostat replacement process
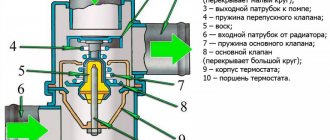
Thermostat design and operation
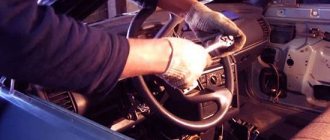
To replace the thermostat on a VAZ-2110 you will need some tools. So, to change the product you will need: a screwdriver, a 6-point hex, an 8-point wrench. When everything is ready, you can proceed directly to the replacement process:
- We drain the coolant.
- Remove the air filter.
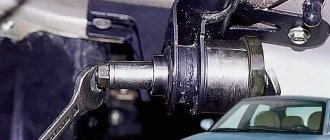
Unclip the clips and remove the air filter - We loosen the inlet and outlet pipes that go to the thermostat.
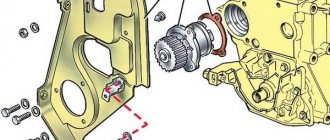
Remove the clamps from the pipes that fit the thermostat - Now, you need to unscrew the bolts that secure the thermostat housing to the block.
After unscrewing the mounting bolts, remove the thermostat housing - We dismantle the cover.
- Remove the thermostat from the housing.
We are replacing the old thermostat with a new one - We carry out the assembly in the reverse order. It is worth noting that the new thermostat must have a rubber seal.
Thermostat selection
Old style thermostat, 5 hole more modern 6 hole
The choice of thermostat should be taken very seriously, because the cooling of the main power unit depends on the operation of this unit. So, which thermostat to install on a car, and at what price.
Original part
View of the thermostat assembled with the housing manufactured by AvtoVAZ
2110-1306010 is the original catalog number of the thermostat, intended for installation on VAZ 10-series cars. The average cost is 220 rubles.
Narrowing of the bypass channel
If you decide that it is the bypass channel on the VAZ 2110 that needs to be adjusted, then the 6-hole thermostat should not have any problems. But with a 5-hole one, malfunctions may occur due to the fact that the cold pipe of the stove (outlet) will not be washed. Therefore, think about whether you need such a modification; maybe it’s better to immediately install a Granta thermostat or a six-hole one.
To reduce the bypass, you need to do the following:
- Cut a plate out of sheet aluminum so that it fits exactly inside the vehicle;
- Secure the plate with a rivet or cold welding, but so that the fastening does not interfere with the flow of coolant in a small circle;
- In this plate you need to drill a new hole of 5 or 6 mm (instead of the standard 8 mm);
- In addition to the steps described above, on a 6-hole heater, the stove return is connected to a thermostat.
Standard bypass channel in thermostat
Aluminum plate to reduce bypass channel
Installed plate with reduced bypass channel
Self-tapping screws are made flush
After this modification, you will notice that the interior will warm up better and faster, but engine warming up will slow down somewhat.
How does CO work?
CO scheme
- On the 8-valve injection VAZ 2110, the cooling system operates due to coolant forcedly circulating through it. When the engine heats up, excess pressure arises, which is released through the exhaust valve.
- For the 16 valve injection VAZ 2110, the cooling system has an optimal operating temperature in the range of 90-95 degrees Celsius. And the valve is activated when pressure occurs with indicators from 1.2 to 1.4 kgf/cm2.
- When the excess pressure is released, the engine returns to normal temperature and the intake valve is turned on. This happens cycle after cycle.
- If the pressure balance is disturbed, overheating occurs, the consequences of which can be various types of breakdowns, including the need to completely replace the power unit.
- Due to the operation of the thermostat and electric fan, the VAZ 2110 maintains the required constant operating temperature. There is a sensor on the cylinder head that transmits information about the current coolant temperature to the control unit.
- A command is sent from the coolant temperature sensor to the cooling system, which begins to work in order to reduce engine heating.
- If there is electronic injection in the car design, it also has a special sensor that sends a message to the electronic control unit about overheating of the power unit.
- The pump supplies coolant, distributed by the thermostat.
- When you turn on the engine, it needs to warm up to operating temperature. To do this, the thermostat directs the coolant through a small circuit, without including circulation through the radiator. The small circuit includes: Heater for warming up the interior;
- Carburetor heating unit (naturally, only on carburetor VAZ 2110);
- Heating of the throttle unit;
- Intake manifold.
We recommend: Flushing the engine cooling system - 6 popular methods for quick and high-quality cleaning
Diagram and design of the heating system in the VAZ-2110
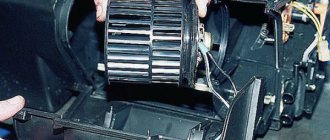
The heating unit itself is represented by several components:
- Electric motor. A ventilation device is fixed on it, designed to pump a hot air flow.
- A radiator device, the failure of which will lead to the inoperability of the stove. On old-style heating systems, the radiator assembly is not equipped with a valve designed to shut off the flow of coolant through the device. Therefore, the unit practically does not leak, since leaks are usually associated with the faucet. The absence of this element ensures the fastest heating of the car interior.
- Three dampers. One of them is designed to close and open the heating channel, the second is used for recirculation, and the third is necessary to control the heater.
- The resistor device is designed to regulate the blowing speed.
Components of the heating system
Main parts of the heating system for the interior of a VAZ 2110 car:
- 1 - electro-pneumatic valve device;
- 2 — front housing of the air intake of the heating unit;
- 3 - water deflector device, presented in the form of an air intake flap;
- 4 — valve device for controlling the damper of the air flow recirculation system;
- 5 — recirculation system damper;
- 6 — rear part of the air intake housing of the heating unit;
- 7 — heating channel damper;
- 8 — damper of the heating unit control system;
- 9 — radiator unit;
- 10 - protective plastic casing of the radiator device;
- 11 - bushing installed in the steam outlet pipe;
- 12 — bushing for the supply line of the heating unit;
- 13 — bushing of the outlet pipe;
- 14 - electric motor of the heating system;
- 15 — electric motor housing;
- 16 - supporting surface of the damper drive lever used to control the stove;
- 17 — drive handle for controlling the damper of the heating system;
- 18 — gear motor of the drive device, presented in small sizes;
- 19 - resistor element;
- 20 - protective cover for the heating unit lining.
Connection diagram for blowers and controls
Main components of the stove:
- 1 - air ducts designed to warm up the rear of the car;
- 2 — plastic lining running from the center console to the rear seats;
- 3 - blowers designed to blow feet;
- 4 - main nozzles for ventilation of the car interior;
- 5 — side nozzles for interior ventilation;
- 6 — nozzles intended for heating the glass installed in the front doors;
- 7 — control knob for the interior heating unit;
- 8 — plastic housing of the air distribution device;
- 9 — damper for the foot warming system;
- 10 - plastic flap designed to warm up the windshield;
- 11 - heating unit.
We recommend: Do-it-yourself carburetor troubleshooting
The difference between old and new stoves
Old and new type heating systems have some features in connection diagrams as a result of the following differences:
- Radiator design. Heats in cars of different years of manufacture have different radiator assembly designs. In older heating systems, radiators are equipped with taps to drain the refrigerant.
- Different designs of SAUO controllers. Cars manufactured before 2003 used five position controllers. In newer versions of the car, devices numbered 4 and 5 were removed from the design.
- Micro-gearbox design. The main difference is the different type of resistor elements. When replacing elements, you need to consider whether these parts are interchangeable or not.