Without a cooling system, the operation of an internal combustion engine is impossible. The SOD serves to quickly warm up the engine to the optimal temperature and removes excess heat, preventing the power plant from overheating. The VAZ 2110 is equipped with a standard ODS. It is reliable, but if breakdowns occur, repair or replacement cannot be delayed. Otherwise, a faulty system threatens rapid wear of engine parts until it fails.
Cooling system
Design and operating principle of SOD VAZ 2110
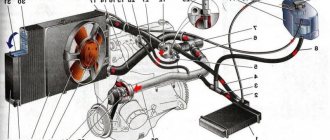
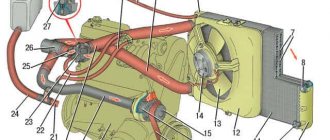
The diagram of the heat removal system installed on the VAZ 2110 is classic for an injector. The composition includes a main radiator, a heater, a water pump, a thermostat, an expansion tank, a forced cooling fan, a temperature sensor, an ECU and several connecting pipes.
Radiator
The radiator on the VAZ 2110 is used in the system only when antifreeze moves through a large duct - passing through it, the working fluid is cooled. It is usually an aluminum body with tubes on the inside and plates on the outside, also called honeycomb. It is equipped with two plastic tanks, separated by walls, through which antifreeze moves. When the large circle opens, the coolant enters the radiator through the upper outlet, and the outlet is the lower one.
Expansion tank
It is made of heat-resistant plastic and is intended for filling coolant and monitoring its level. There are “minimum” and “maximum” marks on the wall; in normal condition, the level should be at the middle mark. The tank has two pipes, one of them serves to remove steam from the main radiator, the other - excess heat from the stove radiator.
A special valve cover is installed on the expansion tank of the VAZ 2110, which is responsible for the tightness of the entire system. Structurally, it consists of inlet and outlet valves.
As the antifreeze heats up in the SOD, the pressure increases, the excess of which is released through the release valve. As the engine cools, the pressure decreases and air is forced through the intake valve.
Thermostat
The thermostat, by its purpose, is a bypass mechanism; it redistributes the flow of antifreeze from a small to a large circulation circle. When a cold engine starts, the liquid begins to move along a small circuit without entering the radiator - along the cylinder block jacket, the heater radiator and the heating of the throttle assembly. When the temperature reaches 87-90 degrees, the thermostat valve opens slightly. When the temperature reaches 102 degrees, the valve opens fully, allowing a flow of antifreeze through the radiator in front of the engine.
Water pump
Liquid circulation is ensured by a water pump. It has a single drive with a timing mechanism. A common cause of timing belt breakage is a jammed pump. The body is most often aluminum. At one end there is a rigidly fixed drive gear pulley, and at the other there is a plastic or aluminum impeller.
Various engines were installed on the VAZ 2110 - owners of the legendary 124 engine do not have to worry about the valves meeting the pistons when the timing belt breaks, this will not happen. The situation is different for owners of 21120 engines - their valves bend. It remains to be advised to monitor the condition of the pump more often and, if faults are detected, immediately replace it, since the part is not repairable.
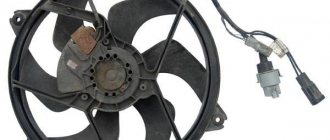
Radiator fan
The coolant temperature is regulated not only by the radiator and thermostat, but also by the electric fan. It has 4 plastic blades and an electric motor. When the temperature of the working fluid reaches 110 degrees, the fan switch on sensor on the VAZ 2110 sends a signal to the electronic engine control unit, which transmits the readings to the relay - the electrical circuit is closed and the electric fan is turned on. It will blow on the radiator until the temperature drops to 90-95 degrees.
Coolant sensor and heater radiator
The coolant sensor is designed to monitor changes in the temperature of the antifreeze in the engine. It is located on the cylinder block and transmits readings to the ECU. Do not confuse it with the temperature sensor, which sends a signal to the instrument panel. The heater radiator serves to heat the interior with warm air. It is integrated into the cooling system using connecting hoses. Antifreeze circulates through it continuously, since it is included in a small circulation circle. The throttle assembly has two pipes: one serves to drain excess working fluid, and antifreeze is supplied through the other. The second pipe also contains a sensor that monitors the temperature and level of coolant.
In later VAZ 2110 models, the sensor is mounted in the aluminum throttle body, and the capacity of the expansion tank has become significantly larger.
Three main water pump problems
- During the operation of domestic vehicles, you can sometimes hear noise and play in the bearings. If damage is detected, you should not drive the car for a long time, otherwise the pump may jam or rupture.
- The substance boils away through the hole - this is an alarming signal that indicates rapid wear of the spare part.
- A broken impeller means a malfunction; the car’s engine quickly overheats.
Cooling fan: The car engine will also overheat greatly if the fan in the vehicle is not working properly.
Poorly tightened and faulty clamps can cause your personal car to overheat. Sometimes it happens that thin hoses become clogged and therefore the throttle valve heating return flows poorly.
Operating principle of SOD
The cooling system is closed and always works, no settings are required. Antifreeze is poured into the expansion tank. Most often, antifreeze or another coolant is used as a coolant. This is a solution of water with ethylene glycol, thanks to which the liquid does not freeze at low temperatures. The cooling system of the 10th family uses about 8 liters of coolant; it needs to be topped up if necessary. After reaching a mileage of 75,000 km, it is recommended to flush the system and change the coolant. The operating principle of the SOD can be divided into several stages:
- The circulation of the working fluid is carried out thanks to a centrifugal pump (pump). It is integrated into the cylinder block and driven by the timing belt.
- Circulating through the jacket of the cylinder block, the antifreeze begins to heat up from the parts that are heated as a result of the operation of the internal combustion engine. At this time, a sensor located right there measures the temperature of the coolant, which moves only along a small circuit. When the antifreeze heats up to 90 degrees, the thermostat valve opens slightly, allowing the liquid to circulate through a large circuit. This means that the coolant begins to pass through the main radiator, where it cools and returns to the system - this is how heat is removed. The small and large circuits operate in parallel. After the temperature rises to 102 degrees, circulation occurs only in a large circle.
The fluid in the radiator is cooled by the oncoming flow of air while the car is moving, but this does not always happen. For example, in traffic jams there is no way to cool the coolant with a counter flow of air. In this case, when the antifreeze heats up to more than 102 degrees, the temperature sensor monitors the excess of operating values and transmits information to the controller, which sends a signal to the electric fan relay to start forced cooling.
As the liquid heats up, it increases in volume. Excess antifreeze is returned through the steam pipe to the expansion tank, and after cooling it is fed into the system.
Partial repair or complete replacement of the radiator
Below we will describe in detail the main features that may arise during the repair work.
Flushing the cooling system
A complete replacement of the radiator may occur when clogs cause the engine to overheat.
But before you start replacing the radiator, you can first try flushing it completely with CO from the engine of the vehicle. Quite often it turns out that flushing helps a lot and the car’s engine stops overheating.
Step-by-step instructions for proper rinsing:
- To do this, vehicles must be parked on a perfectly flat surface.
- Next, the top cap of the expansion tank is unscrewed.
- Then the coolant is drained, while unscrewing the lower plug in advance.
- The next step should be to twist the water plug from the cylinder tank.
- It passes between the engine and the fan near the starter, then the antifreeze drains from it.
- Water is poured into the central system, and the lids are subsequently screwed on.
- After completing the steps, you need to let the engine run for a certain time and finally empty the water from the tank. If it is very dirty, then this process should be repeated in the same sequence. If necessary, in case of large contamination, washing is carried out repeatedly until the water becomes clear.
- After flushing, fresh coolant is poured into the reservoir. We should not forget that on a VAZ 2114 CO is 7.8 liters and the entire total volume of antifreeze does not fit - this only means that a plug has appeared in it from the air. To avoid engine overheating, it is necessary to fill the entire tank as much as possible.
- Most professionals insist on washing the engine while it is not warm. This is necessary so as not to get burned on the antifreeze later. On the one hand, if you look at it, this is the best option. But there is one “But”: if the engine is not warmed up, the dirt that has accumulated in it will settle on the walls and the likelihood of achieving an effective washing result will be very low.
It is necessary to carry out this work in waterproof clothing and special gloves, but even with such self-protective actions, unusable substances must be drained very carefully. The service life of antifreeze and antifreeze is set by manufacturers to range from 2-5 years.
Radiator replacement
But if washing turns out to be useless, then it should be replaced and this is not a difficult task.
- First, remove the expansion tank cap.
- Then the antifreeze is drained from the radiator itself and the cylinders. Before this, you need to take care and take unnecessary containers to drain old substances into them.
- Next, the air filter housing is dismantled, because in the future it will be very difficult to remove the old radiator.
- The next step is to disconnect the plug from the electric fan, and you need to unscrew the 2 screws that hold it in place and remove the assembly.
- Then the clamps are loosened from the side where it is more convenient to do this and the pipes are subsequently disconnected.
- 2 screws are removed from the top, which secure it to the main body frame.
- Tilt the body towards the engine itself and then easily remove the required part. Now the removal of the radiator is complete.
- Reassembly is carried out in the reverse order, after which fresh antifreeze is poured into the tank and the engine is started.
Radiator repair
If the owner of the car suddenly has a desire to make minor repairs to the engine with his own hands, this very often happens and is considered a necessary measure.
- If you urgently need to go to the right place only in emergency cases.
- In the case when the family budget did not plan to replace the radiator.
All plastic car parts can be treated with a special epoxy resin or simply soldered. But if the leak occurs through the honeycomb in such a situation, you can resort to a special chemical composition by adding antifreeze and subsequently blocking the leak site.
But there is a high probability that such chemistry may complicate the flow of coolant through the central system.
And that’s just why DIY repairs are considered very expensive, and a lot of time is spent on it. Today in stores you can buy an expensive version of a new radiator made of copper - it is much easier to repair.
Cooling system malfunctions and ways to eliminate them
There can be a lot of problems with the cooling system. In most cases, this is due not so much to the reliability of the SOD, but to the low quality of the components. Typical malfunctions are as follows:
- low coolant level in the tank due to broken hose connections or damage to the tank;
- lack of pressure in the system caused by a failed water pump;
- overheating of the liquid due to the electric fan not working normally - the electric fan, relay, temperature sensor are faulty;
- failure of the thermostat - this malfunction can be determined by two signs: either the coolant circulates only in a large circle, or only in a small one, as a result the engine does not heat up or overheats.
It is recommended to regularly use the self-diagnosis mode to promptly detect temperature deviations and monitor the coolant level in the expansion tank.
Antifreeze leak
First you should check the coolant level in the expansion tank. If it is low, you need to inspect the engine compartment for leaks. Usually the reason for their appearance is a weak connection of the clamps, damage to the radiator or heater radiator. In all cases, replacement of elements will be required.
Antifreeze circulation in the system
To check the presence of pressure in the system, you should open the cap of the expansion tank and see how the antifreeze flows inside. Poor circulation may result from contamination of the SOD, in which case it will need to be flushed. Another reason is the failure of the pump, but in this case the timing belt is guaranteed to break, and expensive repairs of bent valves will follow.
The engine gets very hot
In most cases, the cause is a faulty thermostat. To check, you need to touch the lower and upper radiator pipes with your hand. If the top one is hot at engine operating temperature, but the bottom one remains cold, it means the thermostat is stuck in the closed position.
If it gets stuck open, the engine will take a long time to warm up. In the summer this is not scary, but in the winter it will bring a lot of inconvenience. In both cases, the thermostat must be replaced. The engine may overheat if there is an air lock in the system or the electric fan does not work. You also need to check the radiator - perhaps its cells are clogged with dirt.
Replacing the water pump
For convenience, it is better to remove and put the adsorber aside without disconnecting the hoses. The plastic cover on top of the engine and the timing belt guard also need to be removed. The further algorithm of actions is as follows:
- Use a jack to lift the right front side, thereby hanging the wheel; this will be needed in the future to install the marks.
- The wheel must be removed, unscrew the nut securing the crankshaft pulley and remove the pulley.
- Loosen the nuts securing the tensioner rollers and remove the timing belt.
- Insert a suitable block of wood between the camshaft gears to prevent them from turning.
- Unscrew the three mounting bolts securing the pump and remove the pump.
The new pump is installed in the reverse order; it is recommended to apply a small layer of silicone sealant to the points of contact with the block.
After completing the work, you need to add coolant and check the functionality of the system.
Radiator replacement
You should first drain the antifreeze from the system by unscrewing the drain plug at the bottom of the radiator, after placing a suitable container. Next, you need to drain the coolant from the block jacket. Further work is carried out as follows:
- Removing the wire plug and turning off the electric fan.
- Unscrew the two bolts on the left side.
- Unscrew the two nuts at the top and the bolt at the bottom.
- Now you can remove the radiator along with the electric fan, having first disconnected the lower and upper pipes.
The new radiator is installed in the reverse order; it is recommended to change the coolant.
Replacing the thermostat
Before replacing the thermostat, drain the coolant from the radiator and cylinder block. Now you need to loosen the clamps of the pipes going to the thermostat and dismantle it. The new device is installed in the reverse order; it is recommended to replace the clamps as well.
All this work, as well as replacing connecting hoses or the heater radiator, can be carried out in a garage. You don’t have to go to a car service center for this. Replacing a pump costs at least 800 rubles, a thermostat – 400-500, a radiator – 300-400. The amounts are not so large, but the work is not difficult. Do it yourself or use a service station - everyone chooses for themselves.
Leak search
Finding out the reason for this state of affairs is not always easy. To do this, the driver will have to carefully examine the situation under the hood. Usually you can only notice a wet pan. In this case, it is worth checking the coolant level in the system. Most likely, there has clearly been a decline.
The cause and location of the leak is not easy to recognize. It is useful to “drive” the car at idle for some time so that the thermostat opens. And only when the optimal pressure is reached will the source of the leaks reveal itself. Most likely, one of the connections of the pipes is leaking, often it can be the pipes for supplying antifreeze to the heater radiator; if this is the case, we proceed to replacement.
Flushing the cooling system
In modern cars, antifreeze or antifreeze is used as a coolant. Sooner or later, the coolant begins to boil away, which means its level in the tank decreases. Previously, car enthusiasts added distilled water to the system, now they add antifreeze of the same brand. The coolant removes heat from the engine and, passing through the radiator, is cooled for further circulation. Antifreeze partially lubricates the elements and components of the cooling system, protecting them from corrosion.
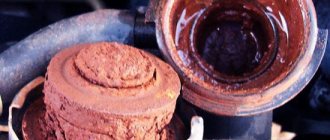
With significant mileage (more than 75,000 km) without replacing the coolant, it practically loses all its properties, gradually darkens, and its smell changes. Such symptoms also indicate SOD contamination. In any case, you will need to replace the antifreeze with pre-flushing. If this is not done, the fresh liquid will quickly become contaminated and the procedure will have to be repeated.
Cleaning or flushing the cooling system consists of two main stages. First you need to remove the radiator and manually clean its grid-shaped honeycomb from dirt and insects. The best tool for this would be a high-pressure car washer - a directed jet will quickly knock out all the dirt from the honeycomb. At the same time, in order not to damage the soft aluminum plates, you need to handle the radiator from a distance of at least one meter.
At the next stage, you can begin flushing the system. This not only cleans the SOD from dirt, but also removes rust and scale (especially if water was used). Flushing will also be necessary after solving some problems with the engine, when engine oil and gases from the combustion chambers enter the cooling system, which also has a negative effect on the ODS. For cleaning, special products or ordinary distilled water are used.
Before starting the procedure, you should drain all old antifreeze from the radiator and cylinder block. To speed up the process, unscrew the expansion tank cap. In this case, the engine must be cool. Washing is carried out in a few simple steps:
- Tighten all drain plugs and pour distilled water or a special cleaning solution into the expansion tank.
- Start the engine and let it idle for 15-20 minutes until the temperature rises to operating values until forced cooling with an electric fan starts. While the engine is running, the heater must operate at maximum speed for heating.
If the temperature rises too quickly or there are other abnormalities, this may indicate the presence of air in the system. In this case, you need to get rid of the air lock in any available way. Then you can turn off the engine and let it cool, then drain the fluid from the system.
In case of severe contamination, the washing procedure should be repeated and continued until clean liquid begins to drain. After this, you can add antifreeze.
Repair
Let's look at how to fix problems that arise in the cooling system according to the order in which they are listed:
- Antifreeze cannot just disappear, it does not evaporate in a closed system, which means you need to find the leak and fix it. First of all, you need to check all the hoses and pipes; perhaps they are poorly secured, or the clamps are worn out. Also carefully inspect the cooling radiator for leaks;
- If in cold weather you have to warm up the engine to operating temperature for a long time before setting off, then it needs to be insulated. Moreover, if in the area where the VAZ 2110 is operated, frosts above -10°C do not last long, then it is enough to insulate the radiator while driving (for example, using cardboard, which should be in the trunk for this case). If we are talking about serious cold tests, then we will have to insulate, as they say, thoroughly. Then there will be no need for long heating. You can, of course, purchase a sheepskin coat for the engine, but this is expensive and not always justified. You can use tiviplen or isoflex with polyurethane foam for this purpose. You just have to tinker for a long time - cut, fit, secure. In the end, felt will do for insulation, even an old blanket secured under the hood using scrap materials. Just make sure that the fastening is secure and that a piece of your insulation does not get under the generator belt;
- if the engine has already begun to detonate, then most likely you have “worked hard enough” for this, not paying attention to the “signals” that the cooling system gave. It’s good if everything “goes away” after putting it in order, but the engine may also need to be repaired - and this is bad, unpleasant and expensive;
- the arrow of the coolant temperature sensor in the red sector requires immediate response from the driver. First of all, it is advisable to turn off the car so that overheating does not cause serious consequences. Open the hood and see if there is coolant in the reservoir, but do not unscrew the cap yet, you can get burned. If you react to the sensor in time, it won’t come to a boil, steam won’t come out from under the hood and there won’t be a whistle;
- A particularly unpleasant moment is when the engine head gasket blows. Then serious repairs can no longer be avoided.
Installing the Thermostat
Ways to refine the SOD
Any domestic car cannot be considered technically perfect, and the VAZ 2110 is no exception. The cooling system can work better if tuning is carried out:
- Installing a 6-hole thermostat keeps the coolant temperature at a stable level.
- Install SOD from Lada Kalina - the antifreeze will warm up faster at low temperatures, and the pressure will decrease.
- Installing a more efficient water pump or installing an additional pump increases the circulation rate of antifreeze.
- Replacing the electric fan with a more powerful and less noisy one - cooling is faster, and the start can be adjusted.
- Installing alternative ECU firmware allows you to turn on the electric fan at a lower temperature.
You should also use only high-quality and proven antifreeze or antifreeze, the performance and reliability of the SOD depends on this. The cooling system on the VAZ 2110 may not be the most ideal in technical terms, but it is simple and reliable, and problems with it do not arise so often. If you change consumables in a timely manner, monitor the antifreeze level and check the system for faults, you can be sure of a long service life. All repair and replacement work can be carried out independently, it is not difficult. The only exception is replacing the pump, since you will have to deal with the timing drive.
We recommend reading:
- Modern muffler for VAZ 2110
- Maintenance and repair of the VAZ 2110 generator
- We install new injectors on a VAZ 2110
- Brake fluid in a VAZ 2110 car: replacement
- Replacing the thermostat VAZ 2110
- Instructions for replacing the fuel pump mesh on a VAZ 2110
ODS repair
If the coolant temperature is high or, conversely, too low when the car is running, or if the injector cooling pump is very noisy, then these are signs of a malfunction - the car requires urgent repairs.
First you need to check the fluid level and eliminate possible leaks. If it exists, it should be eliminated. Hoses may also be damaged. In addition, coolant circulation may be impaired.
In order to solve circulation problems, your VAZ-2110 may need to flush the cooling system.
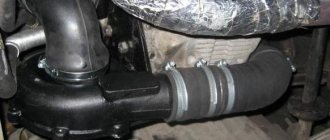
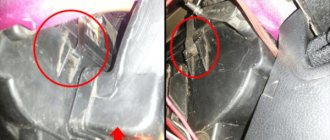
Standard pipes with union connector
Standard
If such hoses are present, dismantling them is carried out as follows:
- Elements of this type are usually mounted using clamps. Just check what kind of clamps they are - disposable twist type or standard worm clamps. If they are disposable, we highly recommend replacing them with worm driven items. They are more practical and reliable;
- Armed with a screwdriver, loosen the clamp slightly and move it along the pipe. This way you can completely release the fitting;
- The hose is carefully, without unnecessary or sudden movements, removed from the receiver, that is, the fitting. Quite new pipes that have not yet worn out are easy to remove, but old ones can “stick”;
- If the element does not want to be removed just like that, twist it on the receiver, pry it with some sharp object, and pull it. You just can’t put in a lot of effort, because the pipes are very fragile. If the situation is really sad, just cut the hose with a knife. It is simpler, easier, although it will require large financial costs;
- When installing new hoses, clamps are first put on and then pulled onto the cooling system receivers;
- If you previously used a twist-type clamp, be sure to remove it. As an alternative, both a screw clamp and a worm clamp are suitable. There is no big difference in price, but the level of reliability is significantly higher;
- If you have difficulty fitting the elastic pipe onto the fitting, slightly wet the latter with soapy water. Another option is to warm the ends of the hoses in warm water;
- To facilitate installation, never use lubricants containing oils;
- Pull the ends of the hoses onto the fitting, check the correct installation and laying in the engine compartment;
- Now move the clamp to the required position and tighten, thereby ensuring a strong fastening of the new element of the cooling system;
- Follow the procedure to fill the system with coolant;
- Turn on the power unit and watch for signs of coolant leakage. It is quite possible that the clamp was not tensioned tightly enough, or there is a defect on the pipe itself. Although such things should be checked before purchasing.