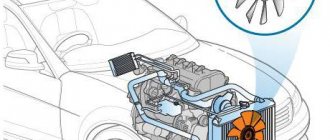
Simplified operation of the VAZ 2114 cooling system
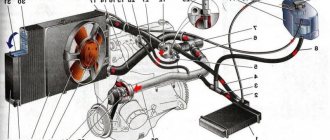
Cooling diagram for VAZ 2114: 1 – element in the form of a plug for the expansion tank;
2 – expansion tank; 3 – hose for draining liquid from the pipe; 4 – hose passing between the radiator and the expansion tank; 5 – hose leading from the radiator; 6 – tank to the left of the radiator; 7 – aluminum tube; 8 – plug systems; 9 – tank to the right of the radiator; 10 – drain plug; 11 – middle of the radiator; 12 – casing for electric fan; 13 – plastic wings of the electric fan; 14 – electric motor; 15 – toothed pump pulley; 16 – pump impeller; 17 – camshaft drive belt; 18 – engine block; 19 – pump pipe; 20 – radiator hose with supply function; 21 – heater radiator hose with drain function; 22 – hose supplying coolant to the throttle pipe; 23 – exhaust pipe; 24 – hose for refilling; 25 – heater radiator hose with supply function; 26 – thermostat; 27 – coolant temperature sensor; 28 – coolant level indicator sensor. The coolant enters the water jacket of the engine block through the pipes. In the water jacket, the coolant circulates in a small circle until the engine (and therefore the coolant) reaches a temperature of 95 degrees Celsius.
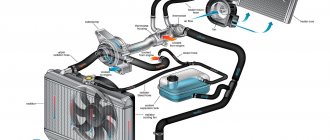
At this moment, the thermostat opens and coolant is delivered through the pipes to the radiator. The radiator removes excess heat from the coolant. Excess hot coolant returns to the expansion tank.
The entire cooling system is under high pressure of 1.2-1.8 atmospheres, due to the operation of the pump and the increase in coolant volume due to heating.
From the above text we conclude: malfunctions of the cooling system are not easy to detect with small leaks, since the coolant evaporates almost immediately, having a high temperature, and work to find the location of the leak sometimes requires the intervention of a professional.
Attention!!!
All work on the cooling system must be carried out with the car turned off and the coolant cooled down.
Step 1. The pipe burst
Since the pipes are the “blood vessels” of the car, failure of any of them will result in loss of coolant.
This malfunction is clearly visible on a warm engine while driving. A large amount of steam appears from under the hood. The burst pipe is clearly visible.
But there are times when the coolant leak is small. Then, first of all, attention should be paid to the articulation of the pipes with the vehicle components.
When using coolant in the form of antifreeze or antifreeze, a characteristic oily coating remains in the leak areas.
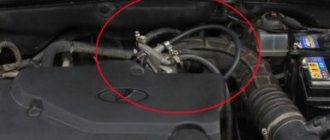
Step 2. Radiator problem
A radiator malfunction is extremely difficult to detect. At the site of a coolant leak, a large amount of scale sometimes forms, making it difficult to see the location of the damage.
Pay attention to the tightness of the filler plug. If everything is OK with the tightness, then to check you will need a compressor with a pressure gauge or a pump.
Disconnect the upper pipe and connect the compressor. The pipe must be plugged. We create excess pressure and see where the leak appears. We dismantle the radiator. We take it to a specialized service center, where they will check it again under pressure, find a leak (there may be more than one) and weld it with a special compound.
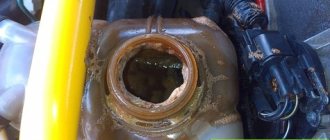
Step 3. Gases in the expansion tank
This malfunction occurs due to the entry of exhaust gases (a specific smell is clearly felt in the car interior) into the cooling system under enormous pressure of 90-96 kPa.
The reason is a faulty gasket between the valve head and the cylinder block. It is caused by coolant leaking from under the expansion tank cap.
The check is quite simple. We start the engine on a cold car, remove the cap from the expansion tank and sharply press the accelerator (in common parlance, the gas pedal).
If the coolant rises sharply, the gasket must be replaced. Stop operating the vehicle immediately until the problem is resolved.
Sometimes the expansion tank cap, due to spring wear, may not withstand coolant pressure.
We recommend reading: Antifreeze in oil
Step 4. Gray emulsion instead of oil
If you notice that your car has started to “trouble”, a large amount of steam comes out of the exhaust pipe, which smells like coolant. The amount of coolant is constantly decreasing and when checking the oil dipstick, it is clear that the oil has turned into a gray emulsion.
All this indicates a malfunction of the cooling jacket of the engine cylinder block. I categorically do not recommend operating the car in this condition! In addition to the problem with the cooling system, the lubrication of all moving parts of the engine is impaired, which can easily lead to its breakdown.
Step 5. Antifreeze in the cabin
In addition to cooling the engine, the coolant is used to heat the vehicle interior. If the interior radiator or the pipes leading to it malfunction, a large amount of coolant leaks onto the floor.
The malfunction is very unpleasant, as it entails disassembling almost the entire front part of the car's interior.
Which heater tap to choose
The ceramic faucet from YVVA is, according to most, the highest quality.
For VAZ-2113-2114-15 models, a single valve from 2108 is suitable. The car is equipped with far from the highest quality spare parts from the assembly line, since the membrane valve is completely plastic. True, analogues have not gone far. So, the opinions of many auto repairmen differ regarding which heater tap to choose for the VAZ 2114 and other Samar models. Some claim that you shouldn’t overpay and just buy a regular plastic one. Others say that a ceramic one can last a little longer than 50 thousand km (approximately the same service life of a standard heating faucet) and if it is not possible to install a ball one, then it is better. And still others even advise redoing the system in order to move the whole thing under the hood, and install a regular water tap there to forget about the leak problem forever. Therefore, let’s see what the manufacturers offer us, what the price is for the heater tap, and decide which one is best for your “four” to choose.
Plastic membrane (original)
The machine is factory equipped with a standard coolant control valve. 21080-8101150-00
, which has only one, and even then a dubious, advantage: low price. But you have to pay these 60 rubles again and again, every season - the leak starts where the flow control axis is located. So, given the problems that you have to face due to the failure of your car’s heating tap, it’s worth considering more reliable options. Although, to a large extent, the quality of the stove’s membrane tap depends on the manufacturer, and there may be several of them. For example, a standard plastic heater faucet for the VAZ 2108 is produced by DAAZ, and in several packages (one of them is specifically for AvtoVAZ). But besides them, on store shelves you can also find such budget ones as: Aroki and Grand RiAl. This means that the problem of unreliability may lie precisely in an unscrupulous manufacturer.
Ceramic heating tap
Ceramic Luzar and ball Chance-auto heater valves for VAZ 2108-14-15 from the middle price category and the same quality.
Of all the options listed, this one is the leader in popularity. But don't think this is an obvious choice. Quite often it fails no less than the standard one, and only lasts for a couple of seasons. It is chosen solely because the ceramic curtain inside the locking mechanism keeps it tightly closed. This is where the advantages end; like the previous one, it is also not deprived of disadvantages. Firstly, it is a higher cost compared to the factory and ball models. Secondly, the throughput in this option is lower than the ball one. Thirdly, there is a lot of defects, and either at the junction or from under the lever (damper axis), a leak soon begins to appear. Moreover, most often it is the latter problem that is the reason for replacement. And all due to the fact that at the factory the hole for the rod is made with poor quality and the rubber seals quickly wear out. If reducing the incoming heat is not critical for you, and the presence of a share of high-quality parts does not frighten you, you can also purchase a ceramic heating tap.
The situation with them is exactly the same as with standard ones, different manufacturers - different quality. According to reviews of many owners of VAZ 2108, 2109 and 2113-15 cars, they are looking for the Ulyanovsk YVVA
(spare part code
2108-8101150-12
) which will cost 350 rubles, since it has good equipment (fastening nuts, washers, rubber sealing rings), aluminum body, ceramic insides.
LUZAR LV0108
on the market (100 rubles cheaper, but few are satisfied with the quality, since it lasts for 2 years or even less), modified
Pramo
(21088101150P), quite expensive
PEKAR
(costs about 500 rubles), and also the Polish
Avrora
(HV-LA2108) and the very budget
TSN
852 (even more quality problems than the Luzar).
Ball valve for radiator
This is already a more suitable part if you focus on the price-quality ratio. To the radiator ball valve (cat. no. 2108-8101150-14
) the price is slightly higher than the standard model, but the quality is also higher, but compared to ceramic it is even cheaper. However, here too there is a relatively high susceptibility to souring.
The market represents only a couple of manufacturers of such faucets: Ulyanovsk ( Simbirsk Foundry Alloy
) and
Chance-Auto
. One of the main disadvantages of the SLS ball valve is that it is very difficult to move it from the closed state to the “open” position. And this, in turn, negatively affects the stops in the plastic drive mechanism of the dampers and the tap at the places where the cables are attached. Owners of "Samar" probably encounter such a problem even with regular efforts. So, most likely it will have to be modified, but the thickness of the walls of the pipe and the quality of the plastic inspire confidence. But the axis, although it wobbles a little, but the ball rotates in the plastic inserts and holds it very tightly. Which is true, just like ceramic, over time it will flow along the lever bushing.
Water tap in car
Yes, and this method has a right to exist. Some people think this is an overly simple solution to the problem, while others have been using it for a long time without any problems. Below we will look at this option in more detail.
Fix it yourself or go to a service station?
Once again I want to draw your attention, this is very important! All work on replacing cooling system elements is carried out exclusively with the engine turned off and the coolant cooled down.
You can replace the pipes, thermostat, radiator filler cap, and expansion tank cap yourself. Remove the filler cap on the radiator. Unscrew the drain plug on the engine and drain the coolant into a clean container.
As for replacing the gasket between the valve head and the piston block, repairing a rotten engine cooling jacket and repairing radiators, these works are best done at specialized stations.
Since such repairs will require the use of specific tools and the necessary experience and knowledge.
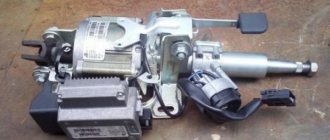
How to remove and replace the heater valve
The price for replacing a stove faucet at a service center will be about 1000-1500 rubles, so despite the complexity of the procedure, many try to remove and change it themselves. In addition, it is much easier and faster than doing repairs. To completely replace a VAZ 2114 heating tap, a simple set of tools is sufficient, in particular:
- Wrenches of different sizes (socket wrenches, open-end wrenches for “10” and “13”), and if it’s a head with a cardan, that’s great.
- Worm clamp with a diameter of 16-23 mm
- Silicone sealant.
- Rags.
- Screwdriver with Phillips bit.
- New heating tap.
- We also recommend that you immediately buy two pipes going from the heater tap to the radiator (since they lose their elasticity over time and can leak).
- A container where you will need to drain the coolant.
- Well, if possible, use a fresh coolant itself, so as not to pour the old one back in.
And besides the tool, it is advisable to have an inspection hole or overpass at your disposal, since the tap is unscrewed from the engine compartment, and an assistant is needed from inside the cabin.
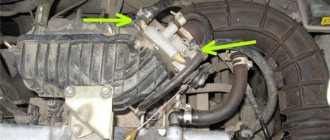
The work of replacing the heater tap on a VAZ 2114 car is carried out according to the following algorithm:
- Make sure the engine is completely cool before starting work. Having installed the car in the pit, remove the crankcase protection.
- Then you need to drain the coolant from the engine block (drain bolt behind the ignition module) and the cooling radiator (faucet at the bottom), as well as from the pipes leading to the faucet from the engine compartment. At the same time, treat the stud nuts with a wedge, let them dry out until the moment when we unscrew the faucet, this will greatly facilitate its dismantling.
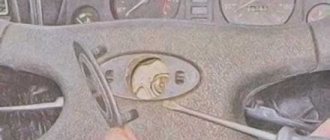
- Next in the cabin, on the front passenger side, you need to remove the side trim of the torpedo (unscrew 5 screws) and remove the carpet to get to the faucet and its pipes.
- To prevent the interior from flooding with antifreeze when the hoses are removed (by loosening the clamps with a Phillips screwdriver), the first step is to lay a rag.
- To make it convenient to remove the tap, it is better to remove the pipes from the stove.
- They will come back under the car again and use the key or a “10” socket to unscrew the nuts from the studs and go back up into the cabin.
- Using pliers and a flat-blade screwdriver, disconnect the drive cable of the faucet locking mechanism, after first removing the bracket holding the rod. It will be more convenient to do this on the driver’s side, but then you will also have to remove the trim there.
- Now you can extract the culprit of all events.
- Take a new faucet and install it in the same place, after replacing the rubber gaskets. We install the control cable in place and check the tension.
- We carry out the same steps in reverse order. Be careful when tightening the pipe clamps, especially on the through plastic ones. After all, if you don’t hold it in enough, then in cold weather it will start to suck in air, but if you overtighten it, then many taps have such a quality of plastic that they simply burst.
After installation, all that remains is to check its operation. Turn on the fan by opening the air intake damper. Open or close the access of coolant to the stove. If the flow is blocked, the air temperature in the cabin should decrease. But do not rush to install the side covers back and during the check, look to see if the faucet is running back, since such cases have occurred more than once, especially if it is ceramic. They all have one common disease - the constipation lever begins to leak. And all because the two o-rings that are there are either weak or quickly wear out during operation.
Several important nuances when choosing cooling system components
The most important thing is to use special antifreeze or antifreeze liquids, which have a higher boiling point.
Choose pipes from well-known manufacturers, do not skimp on this. Especially when making replacements inside the car.
Replace the expansion tank cap only with the original one. Do not reduce the number of coils of the spring, they are designed for a certain pressure. It is important!
When replacing the radiator and thermostat, pay special attention to the volume and response temperature. This is critical for proper engine operation. Excessive or too low temperatures will lead to either overheating of the engine, or it will not heat up to operating temperature at all.
How does poisoning occur?
Immediately after taking ethylene glycol, a short-term state of mild alcoholic intoxication may occur. A person can fall asleep or feel quite satisfactory for 8-12 hours without noticing the first symptoms of poisoning.
After 12-15 hours, symptoms develop that indicate a deterioration of the condition:
- severe headaches
- dizziness, loss of coordination of movements
- attacks of nausea, vomiting
- sharp and/or cramping pain in the abdomen, lower back, and muscles
- flickering of “flies” before the eyes, objects are seen unclearly, double, short-term onset of blindness
- the surface temperature of the skin decreases, it becomes pale or gray, so-called “marbled”
- spasms of the upper and lower extremities
- lowering blood pressure
- severe stimulation of the nervous system or the onset of a coma
How to identify stove malfunctions
First, you need to visually inspect the unit and determine the acceptable level of antifreeze in the expansion tank. Raise the floor mats and see if there are any signs of special fluid leaking. Also, the malfunction may be a consequence of a ruptured pipe, their mechanical damage, or the operation of the radiator.
When the coolant supply regulator can no longer be repaired, an urgent replacement of the VAZ 2114 heater valve is required. To do this, you don’t have to involve professionals, but just repair the system yourself.
First of all, you need to buy a new mechanism; there are three types:
- factory
- ball
- and from ceramic plates
Ceramic heater tap VAZ 2114
All of them have their disadvantages and advantages, and only the owner can decide which crane will be more profitable for his car (in terms of functionality and price equivalent).
Attention: before replacing the stove faucet on a VAZ 2114, you need to make sure that the pipes connecting the heating unit and the radiator are intact and undamaged. Otherwise, over a long period of use, they become less functional and can cause fluid leaks
What tools are needed for the job?
- Phillips screwdriver.
- Empty container more than 5 liters.
- New faucet.
- Clamp 16-23 mm.
- Antifreeze.
- Regular dry cloths.
- Keys No. 10 and No. 13.
- Silicone sealant.
- If possible, a car inspection pit or a lift.
When everything is in stock, then we can safely change the heater valve of the VAZ 2114.
Detailed product installation instructions
The first thing to do is drain the antifreeze into the prepared container. We place it under the engine and remove the plug on the cylinder block. The valve is located under the center console, and to remove it you need to remove the right side dashboard flap. It is secured with five bolts.
When the liquid is completely glass, do not remove the container far. We find the pipes that lead from the motor to the stove regulator. Loosen the clamps, pull out the tubes, and pour the remaining liquid into the prepared container.
Replacing the heater valve on a VAZ 2114 at the next stage involves lubricating two mounting studs, cleaning them with a brush with steel bristles and “soaking” them with brake fluid.
This must be done, since the nuts can turn when unscrewing, thereby turning a simple job into a huge problem. Why does this happen? The stove faucet is fixed not on studs, but on bolts (the caps are included in the plastic housing).
The nuts securing the unit are self-locking, have a plastic ring, and therefore do not unscrew so easily. What if we add rusted threads and oxidation on the contacts? As a result, stress occurs on the bolt, which can cause damage to the plastic around the head. To fix them, pliers or special keys are used.
Now we need to consider how to remove the heater valve of the VAZ 2114.
After removing the pipe, you need to get into the cabin again and unscrew the faucet nuts with a ten-point socket wrench. After preliminary efforts, they should unscrew without complications.
And here is the last stage - we take out the faucet, making small motor efforts on the passenger side, then we remove the latch and remove the control cable of the furnace unit of the heating system.
Installation of a new mechanism
The fastening process is performed in reverse steps. The cable is disconnected, then the crane is screwed to the body
It is important to secure the cable with a fastening fastener in advance, since this will be quite difficult to do with the installed unit (pay attention to this)!
This is how to replace the heater tap on a VAZ 2114. The matter is not very troublesome, and with the help of basic training and practical advice it is quite easy to do.
The space between the crane and the body, according to the “operation code,” must be sealed with clamps. To install the pipe, you must use silicone sealant.
At the last stage of replacing the coolant regulator, you need to screw in the plug and fill in the coolant. Next, start the car, give it time to run, and then turn on the heater. Visually inspect the entire system, check for the presence or absence of antifreeze leakage.
If everything is in order, then everything was done correctly. After a few weeks, the new clamps should be tightened. When the air flowing from the stove is cold, then the fault must be looked for in the air damper of the car’s radiator.
Now you know perfectly well how to change the heater faucet on a VAZ 2114.
Have an easy job and have a nice journey! Let fewer breakdowns “meet” on your way!
Replacing and connecting the stove
Installing a new heater radiator is done in the reverse order. When installing rubber hoses, it is recommended to treat them with sealant. When connecting electrical connectors, use the markings applied during disassembly.
After assembly, coolant is poured into the system. To prevent an air lock from forming, remove the hose from the throttle assembly after loosening the clamp. Antifreeze should be poured into the expansion tank slowly, observing the disconnected hose. As soon as coolant flows out of it, the hose should be put back on the fitting and tighten the clamp. If everything is done correctly, the operation of the stove will not cause any complaints.
When installing a new heater radiator, it is recommended to pre-treat the pipes with sealant
When installing a new heater radiator, it is recommended to pre-treat the pipes with sealant