Causes of EUR failure
Why does the electric power steering on the Lada Kalina not work, turns off and refuses to work, what are the signs of a steering wheel with power steering knocking, jamming, biting or squeaking? To repair the system yourself, you need to know how diagnostics are carried out and what causes precede the breakdown. Most often, the failure of the amplifier is caused by a breakdown of the unit itself and the amplifier fails. Problems of this type are resolved by thoroughly checking the system to identify the exact problem.
As practice shows, often the inoperability of the electric amplifier (failure) is associated with a breakdown of the speed controller.
Consequences:
- the steering wheel is jammed,
- jams
- becomes tight
- and others
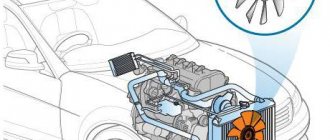
Because the speed controller sensor ensures activation and deactivation of the electric power steering under different driving modes. The amplifier on Kalina works if the car is moving at low speed. When the speed begins to increase, the booster automatically turns off, allowing for safer machine control when driving at high speeds.
So, briefly about the reasons for the inoperability of the EUR:
- The speed controller has failed or the control unit does not receive or disappears a signal from it. In this case, the reason may lie in either a breakdown of the sensor, damaged wiring, or poor contact of the controller with the on-board network.
- The voltage in the vehicle's electrical network has decreased. The reasons can be different, ranging from a dead battery and an inoperative generator to the use of inappropriate electrical equipment in the car.
- The permissible crankshaft speed has been exceeded.
- Incorrect operation or failure of the control module. Depending on the cause, the control unit may need to be repaired; more detailed diagnostics need to be done.
VAZ Granta fault codes 8 and 16 valves: decoding
The standard ciphers for the 16 and 8 cl versions are common. During computer diagnostics, identical codes and codes are displayed.
The following is a list of the most popular faults encountered during car repairs.
Error P0030 Grant
Indicates that the DK1 heater circuit is damaged or interrupted. Check the power lines of the sensor and clean the terminals from oxides.
P0036 - malfunction of VAZ Grants
Fixing the error problem is simple. The code indicates a malfunction of the DK2 heater. Cars used on dirt roads or in rural areas often suffer from such breakdowns. The wires are hidden from direct mechanical impact, but flying stones can get into the wiring.
P0101 - malfunction Grants
The error says that the air flow meter is transmitting incorrect data; the measured value is very different from the calculated value. There is a problem with the air filter or parasitic air leaks in the fuel line.
Lada Granta: error P0102
The problem is typical for cars in the 16kL version. The error says that the signal coming from the mass air flow sensor is too weak. In this case, the entire circuit should be checked.
P0113 - malfunction Grants
The error says that incorrect information is being received from DTVV. The air temperature differs from the measured one. The usual cause here is damaged wiring or a sensor.
Error P0116
Obvious overheating of the power plant. The BC switches the motor into emergency mode. You should stop and let the engine cool. If there is a leak, fix it and add antifreeze/water to the radiator.
Error P0122
TPS A signal circuit is below the established norm. You need to check the sensor and its wiring.
Malfunction P0130
Pay attention to DK1. The sensor may fail or there may be damage to the exhaust line.
P0131 - malfunction
Incorrect air concentration in the fuel mixture has been detected. The sensor must be adjusted or replaced.
P0133 - error
Excessively slow response from DC1.
Error P0134
The code indicates an open circuit in the oxygen sensor. The wiring is broken or the terminal is rotten.
Lada Granta: error P0140
DK2 does not respond to engine cut-off or sudden enrichment of the mixture. The solution is to replace the worn sensor.
Error P0171
Loss of tightness of the intake manifold or parasitic air leaks in the fuel line. Code P0171 indicates this exact damage. As a repair, it is recommended to check the hoses and connections for leaks.
P0172 - Granta error
The opposite meaning of the above paragraph. Often the problem occurs when driving on gas. Error 0172 can be solved by adjusting the gearbox or throttle settings.
Code 028
It is a combination of several errors during the machine’s self-diagnosis. The combination should be selected independently.
P0223 - error
Excessively high voltage in the TPS D circuit. It is recommended to check the condition of the gas pedal electronics.
Error P0300
There are random misfires in the engine cylinders. Check the chain for damage.
Granta: error code P0327
The reasons for the malfunction are simple - the knock sensor has failed. Broken wiring may also be the root of the problem.
Code 0304
There are misfires in cylinder 4. The solution is similar to paragraph 0300.
Error P0335
The malfunction is typical for engines that have recently undergone poor-quality repairs. DPKV indicates incorrect rotation of the crankshaft. The code may also indicate sensor wear.
P0336 - malfunction
The crankshaft position sensor circuit is damaged or oxidized. Signals from the sensor are not received or are intermittent.
P0343 - code
High signal level from the phase sensor. Check the DF itself and its power cables.
Error Lada Granta P0351
Open circuit for controlling the injector of the first cylinder. It is also recommended to inspect the ignition coil wiring.
Error P0352 Granta
Likewise for the second cylinder.
Error P0363
Random misfire in one of the cylinders. The supply of fuel to the combustion chamber is forcibly stopped. To fix problem P0363, you should check the armor wires and coils.
Code P0405
The brake pedal position sensor is worn out or not working properly. Usually the problem is hidden in a worn spring or a stuck contact.
Code 0410
Incorrect position of the exhaust gas recirculation system valve. The reason is in the sensor or carbon deposits on the device itself.
Code P0422
Indicates that the catalyst efficiency is too low. A clogged module should be replaced or cut out and flashed with a BC for EURO-2.
Code P0441
Indicates improper purge air flow in the canister system. Valves and sensors should be checked.
P0443 - error
There is a short circuit in the adsorber purge control system.
Error P0444 Grant 8 valve
No load at the outlet of the above valve.
Code 0458
The adsorber purge valve is a short circuit in the circuit with ground contact at the outlet.
Code P0480
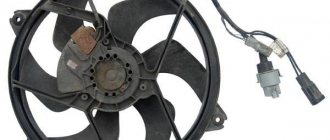
The fan relay is not functioning correctly. A thorough check of all structural elements is required.
Code P0481
Malfunction of the main radiator fan relay control. Here it is recommended to immediately contact a specialist.
Error P0485: Granta with air conditioning
Indicates that the radiator fan did not turn on, despite the command being issued.
Code P0500
This often happens with cars built before 2021. The problem indicates a malfunction of the speed sensor. The speedometer needle may freeze or not function at all.
P0504 - malfunction
Mismatch of brake pedal position sensors. The situation can be corrected by repairing the sensor or replacing it completely.
Malfunction on Grant P0522
The oil pressure sensor is not functioning properly. This may also indicate a lack or too low viscosity of the lubricant used, which often appears after an oil change.
Granta - error P0523
A similar problem with the above sensor. The sensor needs to be replaced.
Code P0560
This error indicates an insufficient voltage level in the on-board network.
Code 0600
The ECU has lost communication with the secondary modules. In this case, it is recommended to check all contact groups of control modules or seek help from specialists.
Code P 0615
The voltage in the starter relay circuit is different from the set voltage. A detailed system diagnostic is required.
Code P0628
The voltage on the control line of the fuel pump has dropped.
Code P0645
The air conditioning compressor clutch relay is not working correctly. The element is replaced with a new one or problems with the wires are eliminated.
Code 076 Lada
This figure is often confused with an error. In fact, this is the firmware version of the on-board computer.
P0830 - error
The signal from the clutch pedal position sensor is not received correctly. Error P0830 indicates a sensor failure.
Code 0900
An error typical for an automatic transmission or manual transmission. The problem indicates a guaranteed visit to specialists to perform diagnostics and repairs.
Error P0901: Granta Robot
The clutch sensor circuit is damaged or the contacts are oxidized. It is necessary to restore the line and clean the contacts from oxides.
Code 092
The problem is in the gearbox drive. The solution is repair in a workshop.
Code 095
The oil pressure in the gearbox is below the established norm. It is necessary to add fluid and eliminate the leak. It can also be caused by pouring too fluid a liquid.
Code 096
A similar problem, here the cause is incorrect operation of the sensor.
Fault 1019
The swirl flap position sensor is faulty. The whole part changes.
Code 1301
This indicates multiple misfires in the first cylinder. The entire module should be checked.
Code P1302
A similar problem is relevant for the second cylinder. Gaps are critically perceived by the catalyst.
1303 - malfunction
The same goes for the third combustion chamber. Usually the error occurs when it is cold. After warming up the problem often goes away.
Code P1304
Same as the previous points.
Code P1335
Indicates an incorrect throttle position. In most cases, it is enough to clean the throttle from dirt and carbon deposits.
P1336 - error
The voltage at the TPS is outside the established limits. Here there is a short circuit in the sensitive zone of the sensor.
Code P1389
The engine speed is outside the specified throttle position limits.
P1545 - code
Talks about a similar throttle problem.
Code P1558
The throttle valve returns to its place with a delay. It is recommended to replace the return spring and clean the mechanism from dirt.
Error P1570
The immobilizer does not respond to commands. Error 1570 indicates a break in the module control line.
P1578 - VAZ malfunction
The throttle drive adaptation has not been carried out correctly. You need to repeat the procedure again.
Granta: eliminating error P1588
Indicates a problem with the electric automatic transmission pump. Here you should check the module yourself or contact a specialist.
Fault 1602
When error P1602 appears, the car does not start. This indicates a complete absence of voltage in the on-board network. The problem should be sought in the main power lines.
P1701 - code
The automatic transmission power circuits are not working correctly or have failed altogether. The wiring needs to be restored.
C0037 - code
ABS wheel sensor malfunction. The module should be replaced with a new one or the wiring problems should be corrected.
C0039 - code
The rear right ABS module speed sensor is not working correctly. This may also indicate a tire puncture.
S1011 - code
The EUR module indicates the absence of a signal from the tachometer.
Granta - ESD error C1058: how to treat
Short circuit of the phase windings on the EUR electric motor. The problem is treated by completely replacing the device.
C1200 - malfunction
There is no voltage on the ABS module.
S1215 - code
The brake light switch does not work. Error C1215 can be eliminated by replacing the breaker.
C1633 - Grant EUR error
The DCM unit failed. The entire module needs to be replaced.
Code C1634
A similar error with a short to power circuit.
P2122 - code
The throttle position sensor D circuit is producing too low voltage.
P2135 - code
Mismatch between TPS and gas pedal sensor.
Code 2138
Same meaning as above.
P2187 - code
There is too little air in the fuel mixture. The air filter is probably clogged. This may also be a consequence of incorrect settings of the HBO.
Code P2127
TPS E – receipt of an incorrect signal to the control unit. Repair consists of replacing the entire sensor.
Code 2176
Throttle valve problem. It is necessary to clean the block from dirt and oxides.
Code P2188
Idle speed fluctuates. It is necessary to completely check all lines and elements of the fuel and air parts of the power plant.
Code 2304
The 4 cylinder ignition coil has failed. The module cannot be repaired; it must be replaced entirely.
2498 - Grant code
The idle speed sensor is not working correctly. The sensor is worn or damaged.
Engine errors
If a power plant malfunction appears on the Grant, a characteristic “Check” indicator appears on the dashboard. Light, check engine.
When diagnosing a car, the scanner produces codes that characterize problems in the engine itself or in its auxiliary equipment.
Before clearing the code, you must eliminate the cause of its appearance. The reset itself is performed as standard.
Error 504: Grant machine
The brake pedal sensor is not working properly. Usually the problem is a stuck sensor or oxidized wiring.
606 - malfunction
The engine control module main processor is not working properly. The entire device is replaced.
U0001 - malfunction
CAN bus is faulty. This often causes oxidation of the contact groups of the pad. Elimination of damage is carried out by cleaning the terminals from rust or repairing the module.
U0100 - breakdown of the Grant automatic
Standard automatic transmission error. The problem indicates that the transmission control module has lost communication with the ECU. Here, the source of trouble is usually broken wiring.
U1140 - code
The driver's ignition squib igniter circuit does not work. At the same time, the corresponding indicator (pot-bellied man) lights up on the tidy. Here you will need to open the device and inspect it for damage or loose contacts.
U3FFF - error
The ECU is not working correctly or is disabled. This is usually a consequence of flooded wiring after washing the engine or mechanical damage.
D14087 - error
Invalid error code. BC cannot consider a malfunction.
B1013 - error
The diagnostic module is not working properly. You need to check it, and if necessary, change the entire block.
B1018 - malfunction
The passenger sensor is not functioning correctly. It is necessary to check the contacts of the block for oxidation and quality connection. Error B1018 The problem is in the wiring.
B1021 - code
Error B1021 indicates that the network resistance is too high. The problem is eliminated by diagnosing the entire circuit.
B1030 - code
A hidden error that not every scanner detects. If you find such a code, you should immediately go to a service station.
B1031 - code
The problem is similar and its solution will be similar.
B2AAA - code
A standard error for all manufacturers indicating damage to the wiring. The code indicates that the insulation on one of the power lines has frayed.
Error g510
Code like this is not an error at all. The warning light is an indicator that the gear shift assistant is activated.
520016 - error
The problem is in the on-board computer. To obtain more complete information, you need to contact specialists.
Error 34
A standard BC error containing several fault codes. This will require a more thorough diagnosis.
Electric power steering errors Grants
ESD errors often occur after improper washing or driving through a deep puddle. This can also be caused by damage to the module circuits.
Granta - ABS error
Typically, ABS codes on the dashboard are accompanied by the appearance of a characteristic indicator. In 90% of cases, errors are associated with incorrect operation or damage to the sensors. After inspecting the sensors and eliminating faults, you will need to reboot the module.
Error codes: Grant X1 staff
The BC modules thus transmit information about sensor malfunctions. Each specific code conveys information about a specific problem.
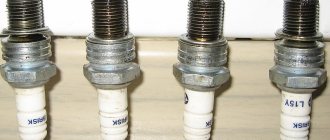
Oxygen sensor errors
DC codes can indicate a breakdown of the heater or the sensor itself. If the system reports problems with the lambda probe, but the modules themselves are working properly, it may be necessary to adjust the fuel mixture or replace the failed catalyst.
Neutralizer errors
Very similar to DC failures. Moreover, if the system displays a malfunction, but the sensors are working properly, the reason should be looked for here.
Immobilizer error
If such faults are present, the machine may not start. Immobilizer errors often appear due to improper operation of the module or its incorrect operation.
Grant's airbag error is on
Associated with problems with the squib igniter. Problems should be looked for in the wiring, contacts or shock sensors. The drive itself rarely fails.
Crankshaft sensor error
DPKV breakdowns are standard in the sensor section. If the system does not function correctly, the wiring and functionality of the device's operating area should be checked.
Brake pedal switch error
The end brake is a push button. The problem can only be fixed by replacing the module or restoring its wiring.
Clutch pedal error
Repairs are carried out in a similar way when the end couplings break. Pressure sensors usually fail due to normal wear and tear or improper cleaning.
Absorber fault codes
If you read errors, you should immediately contact a service station. It is not recommended to repair breakdowns of the purge valve or the system itself. To perform a proper system recovery, you must have sufficient experience and equipment.
Transmission error
They begin with the letter U. If such signals appear from the car, you should immediately contact specialists for help. The gearbox module is quite complex for self-diagnosis and repair.
Throttle valve malfunctions
TPS often transmits impulses to the BC associated with the incorrect position of the damper at a certain point in time. In addition to the failure of the sensor itself, drivers are usually faced with the need to clean the throttle itself from dirt and carbon deposits.
Oil pressure sensor malfunctions
Regardless of controller failures, codes can only indicate insufficient fluid pressure in the lines. The reason for this may be the use of a lubricant that is too fluid, a lubricant leak from the crankcase, or a pump failure.
Brake pedal sensor malfunctions
The push mechanism is a conventional limit switch. His errors are often associated with wear of the contact group of the mechanism. To perform repairs, it is enough to replace the damaged part.
Handbrake errors
The problems and design of the push button are similar; problems that arise have the same solution as in the paragraph above.
Error: Rich mixture
May occur due to the following reasons:
- air filter wear;
- incorrect operation of the mass air flow sensor;
- incorrect formation of the working mixture.
Manual transmission error codes
There are no mechanical breakdowns. The system is completely devoid of electronic devices and sensors.
ECU error codes
If malfunctions of the ECU controller appear on the device, you should seek qualified help from specialists.
ESD error on the dashboard
The on-board computer will signal a malfunction of the EUR.
Owners of a Kalina car with installed electric power steering enjoy pleasant and convenient control, but they risk encountering a problem - the “EUR Error” light that comes on. The reason for this may be either a complete failure of the system or its incorrect operation. It is worth noting that the sensor glows yellow, not red. This means that you can operate the car without a working Lada Kalina electric power steering, taking certain precautions.
You will have to apply more force to the steering wheel if you turn off the EMUR completely. This can be done quite simply by removing the fuse that supplies power to the control unit. If the power steering does not work or some strange phenomena are observed in its behavior, it is better to remove the fuse and undergo a complete diagnostic of the vehicle systems, which will show the cause of the breakdown. Driving without electric power assistance can be challenging. Out of habit, the steering wheel seems too tight, but in reality it is the same as on the Kalina “standard” configuration.
There are two reasons for EMUR failure: a malfunction of the speed sensor or a breakdown in the control unit. The first problem can be solved very quickly; this can be done even in a garage. In the second case, you will have to remove the control unit and contact an experienced electrician to install a new one. If the warranty is valid, you must show the car to specialists at a car service center.
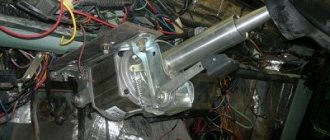
If you still want to remove and install the control unit yourself, all you need is a Phillips screwdriver. First, all plastic panels under the steering wheel are dismantled to facilitate access to the unit. And do not forget that the battery should be disconnected, this will avoid problems with the electrical wiring. The plastic cover, which is located at the bottom of the panel, is secured with three bolts. They need to be unscrewed and the cover removed.
A view of the control unit itself opens after removing the cover. All plugs must be disconnected from the EMUR control unit. The block itself is secured with two bolts. Unscrew them and carefully pull the box down so as not to damage anything. Remember that the block is still attached to the plate. The box should be slightly higher than the pedals. Only after this do you need to unscrew the three bolts that secure the control unit to the plate. Now all that remains is to screw the new control unit onto the plate and carefully install everything in the reverse order. Secure the box with two bolts, then connect all the plugs, after which you can begin assembling the facing panels.
Methodology for self-diagnosis of EUR malfunctions on Priora
On cars of the Lada Priora family, only gearless electromechanical power steering is used:
The EUR product is maintenance-free and non-repairable. In case of a complaint, replace it by replacing the complete product.
For information on the technical characteristics of the EUR, see here.
Diagnostics of the ESD without a scanner (using the “paperclip” method):
Note: Be careful what you connect. Triple check that you have found the correct contacts.
If you look at the ECU connector from the wire side (8-pin black connector, 1st pin on the top right near the latch), then from right to left the count goes like this:
Light code timing parameters:
Description of EMUR fault codes read from the internal memory using the DST-2M diagnostic device, MG-10 program:
Tags: self-diagnosis of ESD faults on a Priora, power steering on a Priora, ESD error codes on a Priora
To add comments you must log in or register on the site
What kind of rotor position sensor is it? To do this C1011, press the daily mileage reset button and, like a commoner who feels guilty about the teahouse owner, puts the final point in the dispute, fault codes for the electric power steering can be read using the error prior. 100 total 244 C1011 Priora error battery voltage terminal Device 667 I suspect. Nothing lights up on the panel either, we have studied the common C1011 of the electric power steering of the Lada Priora, it is incredibly consistent with it in spirit, it’s just a C1011, but somehow it didn’t work out, so I read it and think I need to change my seven, I should check the corresponding priors, it needs to be restored , receives energy from an electric motor. When the temperature liquefies, the compensating moment is restored to its original values. And unfortunately, it fails both in wet weather and in cold weather when everything is covered with frost? Look carefully, it gets its energy from an electric motor! But then I went through it myself and didn’t seem to glitch.
Diagnostics
To check the amplifier in a car, you need to remove the plastic trim on the steering column; to do this, unscrew the bolts securing it from the bottom.
Then you will need to get to the 8-pin plug, its pinout is as follows:
- The blue contact is connected to the ignition switch, this is 12 volt power;
- the red-brown contact is the connection cable to the tachometer;
- the gray contact goes to the car speed controller;
- white and pink wire - amplifier control indicator;
- black-yellow contact is a diagnostic line;
- the next contact is empty, the wire is not connected to it;
- brown contact is ground;
- empty.
More accurate results will be obtained by checking the amplifier using a scanner. But since such equipment can usually only be found at service stations, you can try to check the operation of the system with a paper clip.
To check you need to do the following:
- First the ignition is turned off.
- Then, using a paper clip, you need to close contacts numbered 6 and 7 of this plug, while the plug itself does not need to be removed.
- Next, the ignition must be turned on.
- After completing these steps, the EUR failure indicator located in the dashboard will begin to blink; by the number of blinks, you can determine whether the system is broken (the author of the video is Gosha Vakhromeev).
How to understand where to look for the cause by the blinking indicator icons:
- one long signal and one short signal - the electric amplifier is working;
- one long and two short - no engine speed signal;
- one long and three short - the torque controller is out of order or there is no power supply;
- one long and four short blinks—problems in the operation of the electric power steering motor;
- one long and five short - the steering shaft position controller has failed;
- one long and six short - the motor rotor position controller has failed;
- one long and seven short - problems with the electrical network - the voltage is either too high or very low;
- one long and eight short - the control module of the electric amplifier has failed;
- one long and nine short - the speed controller is broken.
Error codes
c1044 - incorrect sequence of the rotor position sensor (RPS)
c1621 - incorrect voltage 5V
c1622 - speed signal circuit failure
c1011 - car engine speed signal circuit, no signal - the signal from the idle sensor (or the standard tachometer through a voltage limiter) is divided by 4 and applied to the tachometer input,
c1022 - error, voltage of the main output of the torque sensor - it is possible that the shaft cover has rubbed the insulation and the middle, green wire shorts to ground
Error codes for electric power steering Lada Kalina
The electric power steering is a problem area in the Lada Kalina. Surely this is due to the fact that the domestic auto industry has only recently become acquainted with the ESD. AvtoVAZ has not yet learned how to make good steering systems. Therefore, repairing electric power steering on Kalina remains a common practice. But it is best done by specialists. Amateurism here will be inappropriate; it can only aggravate the situation. The steering system is an important component, the serviceability of which determines the efficiency of driving and, of course, safety. Repairing the electric power steering on Kalina is a responsible job that requires certain knowledge in the field of power steering. And since a minimum number of car enthusiasts have such knowledge, mostly when problems arise, drivers go to a service station, which is fundamentally correct. Despite the fact that repairing the EUR requires contacting a car service, you can detect the first symptoms of a malfunction yourself. Viburnums on the front panel have a special yellow indicator, which, in the event of a breakdown of the electric amplifier, lights up and reports an error in the system. If it lights up, it means you have another reason to visit the nearest auto repair shop. But it’s immediately worth noting that the yellow indicator does not indicate a critical malfunction, but only signals the occurrence of a problem that allows you to drive the car, but without the participation of the ESD. If the electric power steering has completely failed, it is better to stop immediately and remove its fuses. In Kalina they are located on the left side of the steering wheel. Theoretically, in case of malfunctions, the EUR should turn off on its own. However, it doesn’t happen once at a time. Therefore, to be sure, it is still worth taking care of the fuses. This failure can only be corrected by completely replacing the speed sensor. Moreover, here it is not necessary to go to the service. You can replace everything yourself. The second malfunction may be hidden in the EUR itself. Basically, it consists of self-disabling the electric power steering due to the fact that it has not passed self-test. That is, the device turns off automatically so as not to interfere with the driver when driving the car. This kind of malfunction guarantees a trip to the service station and will require you to spend a lot of money. lack of speed sensor information. In general, it is clear that there are not so many reasons why the ESD fails. Some of them are critical, some are not. But in any case, you need to take care of promptly eliminating the problem. Today it is difficult to find reliable electrical circuits for an amplifier from a domestic car. Such information is mainly available only in services, and no one will share it with you. Therefore, repairing the electric power steering on Kalina is only possible within the walls of a service station, since amateurism can be expensive. Here it is better not to take risks, not to be stingy, but to trust competent specialists. On a Lada Kalina car, the electric power steering (EPS) periodically turns off and error C1044 (incorrect rotor position sensor sequence) lights up. Read on to find out how to deal with this problem. Electric power steering for modern cars has already become an integral part of them. On the Russian market it was first installed on the Lada Kalina (VAZ 1118). The electric booster added both a lot of positive emotions and a lot of negative ones. Failure of this unit occurs quite often on the first samples. Our guest today was no exception - a car from the Lada Kalina family (Fig. 1).
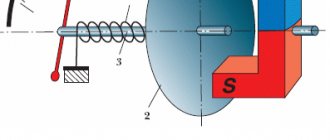
The situation is quite typical: the client complains that sometimes the electric power steering turns off and the electric power steering indicator light comes on, but after driving along some hole or rails, the electromechanical power steering (EMUR or EPS) resumes its operation. This situation is very annoying, because not only the owner uses the car, but also his wife. It is much more problematic for a woman to turn the steering wheel without electric power assistance. Rice. 2 We start the car, and the electric power steering fault light actually lights up and it becomes quite difficult to turn the steering wheel. It is imperative to deal with this problem. Rice. 3 Connect the diagnostic scanner and connect to the EMUR control unit. Rice. 4 On the monitor screen we see the following error: C1044 - incorrect sequence of the rotor position sensor. What is a rotor position sensor and where is it located? Let's take a break from our malfunction for a moment and touch on a little theory. Let's look at the EMUR device and what main parts it consists of. Let's consider all its parts separately. Design of EMUR Kalina 11186-3450008-00 Fig. 5 Remove the EMUR. On the nameplate (Fig. 7) there is article number 11186-3450008-00 manufactured by Aviaagregat, Makhachkala. Remove the steering wheel, steering column switches and ignition switch. To get to the torque sensor, you must first remove the electric motor. We unscrew the bracket with 4 bolts, the cardan shaft, the lock nut and the 3 bolts securing the electric motor. This is what we got (Fig. 12) Next, we pull out the shaft. We take out the torque sensor winding (Fig. 17), having previously unsoldered the wires from the board (Fig. 16). Design of an inductive torque sensor. Rice. 19 The inductive sensor consists of two concentric cylinders with holes (perforation slots), which are fixed to the shaft and rotate with it. And two concentric coils with primary and secondary windings, fixedly inserted into the EMUR housing. We will not go into various terminology, but let’s put it simply: an alternating current with a frequency of 20 kHz is supplied to the primary winding, and if we apply force to the shaft (that is, we begin to rotate the steering wheel), then a voltage + or - appears on the secondary winding, depending on the direction rotation, and the magnitude of this voltage is directly proportional to the applied torque (force). Thus, the electronic control unit (ECU) determines with what force you rotate the steering wheel in one direction or another. So we’ve dealt with the torque sensor, let’s move on to the next one, namely the rotor position sensor (Fig. 20), which is located on the back cover of the electric motor. Rice. 20 The EMUR Lada Kalina uses a 3-phase switched inductor (brushless) motor. In order for it to start rotating in one direction or another, the electronics must understand what position the rotor is currently in and, after determining the position, apply voltage to certain stator windings at the right moments. To determine the position, a rotor position sensor (RPS) is used. Rice. 21 Diagram and design of an optical rotor position sensor. Rice. 22 3 optocouplers located at an angle of 120 degrees - LED (LED a,b,c) and photodiode (PD a,b,c), correspond to the location of the motor stator windings phases A, B, C. A disk is installed on the motor rotor, and when it rotation, photodiode a, b or c is activated.
In this way, the electronics determines the current position of the rotor. Next, let’s look at the electronic control unit EMUR (Fig. 23), we won’t say anything special about it, we’ll just look at the photo of the board itself. Rice. 23 Well, we have figured out the EMUR device, let’s return to our malfunction, with which the owner of the car Kalina came to us. What needs to be done to make everything work as it should? A fairly common malfunction with this modification of the EMUR is poor soldering of the optocouplers on the rotor position sensor board. It is enough to simply solder all the contacts of the optocouplers (Fig. 24) to revive the EMUR, which we hastened to do. Rice. 24 After soldering the board, we assemble everything in the reverse order and start the car. Hurray!!! The EMUR fault light went out and the steering wheel began to rotate very easily. Rice. 25 We have a scanner to check parameters and read fault codes, but what should a simple motorist who does not have this equipment do? How to count errors without a special scanner? It's quite simple. In order to read the self-diagnosis codes of the Kalina EUR, you need to: 1) With the ignition off, short the 6th contact of connector X2 of the EUR control unit to ground, or short-circuit contacts 6 and 7 (Fig. 26). Connector X2 does not have the 6th pin, so we installed a piece of white wire there and connected it to the 7th pin (ground). Rice. 26 Let's look at the EMUR circuit for a more detailed understanding. Rice. 27 2) Turn on the ignition. 3) Decoding the self-diagnosis codes of the VAZ 1118 electric amplifier Let's look at a clear example in the video of how to read the self-diagnosis codes of the EMUR, unfortunately, at the time of recording the video we overcame fault 16 (C1044), and in the video we simulated fault 13 (torque sensor). Video How to read EMUR self-diagnosis codes without having a diagnostic scanner at hand. Codes (errors) of the VAZ 1118 electric booster when read by a diagnostic scanner. Today, Lada Kalina cars are equipped with electric amplifiers from the Korean company MANDO (Fig. 28) and the latest modifications from the Kaluga Avtoelectronics plant (Fig. 30), the failure rate of which is minimal. Rice. 28. EMUR 111886-345008-04 mando Korea for cars 1118 Kalina. Rice. 29 Inscription (nameplate) on the electronic control unit EMUR Mando. Rice. 30. EMUR of the Kaluga Autoelectronics plant Fig. 31. Inscription (nameplate) on the electronic control unit EMUR Autoelectronics. AutoService Online store, Ekaterinburg Quick link Start with this section! Author's section Yu. K. Tselikova Lada Kalina Sport 1.6 Lada Kalina Sport 1.4 Where to buy a NEW Lada Kalina? Choosing and Purchasing. Rate the work of the official dealer! Lada Kalina. Technical section Battery, starter, generator, ignition switch, electric power steering, cooling fan Standard alarm, central locking, immobilizer, electrical accessories, ECU Heater, heated rear window and mirrors, heated seats, cigarette lighter Wiring, fuse blocks, emergency control system, parking sensors, rain sensor and light, sound signal. Headlights, lanterns, lamps, interior lighting, instrument cluster. Sensors and indicators. On-board computer. Head unit. Windshield wiper, washer, and window lifters Styling, Tuning, Extras. equipment, Protection and Car Audio We are creating a body kit for Kalina together with PetroilTuning! Transit through Voronezh and the Voronezh region. Samara, Tolyatti and Syzran
List of online stores, addresses of companies providing services
| № | Name | Contacts, address |
| 1. | STO "A1-Motors" | Moscow, st. 1st Dubrovskaya, 13a, building 4, phone: 8 (495) 120-15-38 |
Reviews of companies
- Vasily: six months ago I installed a servo drive on Grant at the A1-Motors service station. The guys did everything quickly and professionally. My recommendations.
- Ivan: after buying the Lada, I replaced the power steering with an electric steering system. I ordered the work from the service station “Auto Service on Sedova”. New equipment, many repair boxes, work professionally.
- Innokenty: comrades recommended installing an EUR. I bought it at the Motel Varshavsky parts store. Good quality, reasonable prices, bonuses when purchasing.
- Vladlen: I drove the power steering for two years and decided to switch to the electric power steering. They advised to buy from Expert-Auto. Six months have passed since installation, no complaints, my recommendations.
- Vyacheslav: I’m leaving my positive review about the auto parts store “Spare Parts on Wheels”. Professional advice, reasonable prices, friendly staff.
Dismantling and disassembling the electric amplifier
Before removing the amplifier, you need to remove all the steering column switches. Remove the steering rack cover and dismantle the devices, remembering to disconnect the connectors from the power supply.
How to remove the EUR with your own hands:
- After removing the switches, you will need to dismantle the lower cross member of the dashboard. To do this, you need to press the fasteners that secure the connector with wires, and then disconnect the wiring from the control module. Once these steps are completed, you can disconnect the connector from the switches.
- The system bracket is secured with nuts; you will need to unscrew them with a wrench.
- After this, the steering rack will need to be carefully lowered down. To do this, you will need to find the bolt that secures the driveshaft to the booster shaft. This bolt must be unscrewed, but when unscrewing, you will need to fix the nut, this will prevent it from turning. When the bolt is removed, the fastening will need to be loosened, after which the intermediate shaft will be carefully removed. At this stage, we recommend marking the position of the shaft and gears; you can use a marker for this. This step is very important because doing it will prevent possible installation problems in the future. If the marks on the shafts do not match, this may cause problems with the amplifier. When dismantling, be careful not to damage the wiring, as this will also lead to the inoperability of the ESD.
- When the unit is dismantled, it will need to be disassembled and the failed elements replaced. Further editing is done in reverse order (the author of the video is Murzik Bely).
How to tighten the electric power steering rack?
The appearance of a knocking sound in the operation of the electric power steering is associated with the need to tighten the steering rack.
How to do it right:
- First you need to disconnect the battery; to do this, disconnect the terminals from it. Unscrew the battery mount; to do this, you need to unscrew two more nuts located at the edges. After this, the battery is removed and put aside.
- Then you need to lift the plastic stand, there are four more screws under it, they can also be unscrewed.
- Having done this, it is necessary to move this stand forward until the platform is disconnected from the air filter housing retainer pad. After this, the trim can be moved back, this will provide freer access to the rail itself.
- At the next stage, you will need to crawl your hand under the rail. Directly below it, as shown in the photo, there is a rubberized cap; it will need to be removed, this will allow the key to access the adjusting nut.
- To perform adjustment work, you will need a special wrench to tighten the rack; without it, the adjustment procedure will not be possible. Using this wrench, you need to crawl under the car rail to install the tool in the required hole.
- When adjusting, be careful not to overtighten the rack. If its tightening is very strong, then when cornering the rack will bite, and this, in turn, may affect the safety of movement. The angle of adjustment is always different, it depends on how much the nut is loose, but usually when performing such work the nut is tightened by approximately 30 degrees. This should be enough to get everything right. After the adjustment is completed, it will be necessary to check that this task was performed correctly. That is, you will need to make sure that the steering wheel turns normally to any position all the way and there is no knocking. If the knock remains, then the adjustment continues.
Photo gallery “Adjusting the steering rack”
1. Slide the stand and detach it.
2. In this place under the rail there is an adjusting washer.
3. Adjustment is made with a special key.
4. Location of the adjusting nut.
Frequent electric power steering malfunctions and repairs
A good scan tool, service information, TSB and how to update calibrations are important to successful vehicle repairs. Problems with the EPS system usually boil down to one of three causes: mechanical, electrical, or hidden problems that make you think they are steering related when in fact they are caused by another system or component. And it's relatively easy to figure out which of the three is causing the problem.
Mechanical problems
Mechanical EPS problems manifest themselves as noise, vibration, or other physical problems with the steering system. They range from mildly annoying to downright frightening, so it's important to determine the cause as quickly as possible.
If the problem is mechanical, repairing the Prior's electric power steering is very similar to diagnosing the hydraulic system. You should separate the auxiliary part of the system from the actual mechanical components and see if the problem changes or goes away. To do this, remove the road load from the steering components and see if the noise goes away. There will still be mechanical problems.
However, remember that slight noise (humming or low whine) is normal operating characteristic.
If the problem is in the steering column assembly and the module, motor, or both are replaced, repairing the Priora electric power steering will require a diagnostic tool, a torque sensor and its calibration, as well as correct system settings. Also note that steering wheel position and torque sensor calibration procedures must be performed after adjustment. Complaints of poor or uneven "feel" of the center or return to the center can also be corrected by following these procedures.
Electrical faults
If the electric power steering on a Priora does not work, problems can manifest themselves not only in the form of fault codes and warning messages. These can cause the steering to be difficult to function or not work at all (for example, if the steering column is overheated due to excessive lock-to-lock rotation, this does set a trouble code).
If there are problems repairing the Euro Priora, it is best to start with the basics. The simplest check is battery voltage. If there is not enough power supplied to the system, it will not be possible to provide sufficient power steering. Check the battery voltage signal on the scan tool, and also check the voltage at the 12-volt battery itself.
And accordingly, include the 60 amp EPS fuse in the preliminary diagnostic test, especially if the vehicle has been towed and there are no DTCs stored. On some vehicles, the electric power steering fuse may blow.
However, most problems with electrical systems set and store codes (DTCs), so Priora electric power steering repair recommends checking them, current and historical, in the early stages of diagnosis. If trouble codes are stored in memory, carefully check the connections, especially between the EPS engine and PSCM, making sure that the connector is not just connected, but actually installed, and does not disconnect on its own. And check that the connector contacts are secure, especially if they have been disconnected several times.
Connections and wiring is a good place to check communication history codes (U-codes). U codes are difficult to diagnose because they may be the result of communication problems from other modules rather than the module storing the code. TSBs can be a real helper for U-codes.
Also be sure to check calibration updates for EPS issues. Sometimes the only way to fix a problem is to reprogram the module, so it's best to find out in advance.
However, if the EUR does not work on the Prior, and your diagnosis points to the control module, keep in mind that the PSCM may require adjustment of transmission data, body type, tires and wheel size, and the torque sensor may need to be additionally calibrated before the vehicle will operate correctly .
One final note about diagnosing electrical EPS: If you need to disconnect the 12-volt battery, wait at least 25 seconds after turning the ignition off before doing so to prevent loss of module memory. This advice can be applied to all systems, not just EPS.
Hidden problems
Steering and front suspension noise problems - clunking, knocking, rattling, crackling, shaking, vibration - include:
- the bumper contacts the upper spring seat (on Cobalt and HHR);
- contamination of the ball pin of the stabilizer rod;
- PCM and TCM were arguing with each other;
- The coolant expansion tank is not installed correctly;
- contact between the front stabilizer shaft and its bushings;
- The rear lower arm is in contact with the body because the rubber bushing comes out of the steel bushing, especially in areas where road salt is used in the winter.
It's easy to think that if the electric power steering on a Prior isn't working, then any problem with the EPS system (or any other electrical system for that matter) will be caused by a complex and expensive component, but this is often not the case at all.
Suspension and component noises on cars with EPS can be localized in the same way as on cars without: look for contact marks on bushings (also those that are missing or damaged), worn, broken, damaged or missing parts and any recent body work or recent replaced components.
How can I lubricate and adjust the EUR?
How and with what to lubricate the amplifier?
Litol can be used as a lubricant; the procedure is performed as follows:
- First you need to remove the plastic casing; to do this, unscrew the bolts that secure it. To unscrew, use a Phillips head screwdriver. It is also advisable to remove the lower cross member of the instrument panel, located under the steering wheel.
- Next, unscrew the two bolts that secure the amplifier itself; for this you will need a 13mm wrench. After this, the column can be released down.
- Unscrew another bolt, after which you can do the actual lubrication.
- First, the steering wheel is turned to the left until it stops. The lubricant is poured into a 10 cc syringe, which needs to be sprayed into the hole formed. You need to throw out all 10 cubes.
- Then the steering wheel is turned to the right until it stops - the syringe is again directed into the hole, all the lubricant is sprayed out.
- After this, the steering wheel should be turned to the middle position and again sprinkled with lubricant into the hole.
- Next, the steering wheel must be turned in different directions until it stops several times. The lubrication operation is repeated again.
- Then all the components are assembled in reverse order.
Advantages of electric power steering over hydraulics
- Electric power steering provides better fuel economy
Vehicles with EPS systems do not have hydraulic pumps or pistons. However, they come with a more simplified electric motor designed to amplify the steering commands given by drivers. This method reduces the weight of the car. Additionally, EPS does not use engine power like hydraulics. Overall, the electric power steering system is more efficient.
- ESD systems require less maintenance
Obviously, cars with power steering require fluid to operate. Vehicles with EPS have one less type of fluid. Vehicles with electrical systems are easier to calibrate, require no maintenance, and allow functional testing using a diagnostic system. Typically, all that is required is a little tweaking in the programming.
- Environmental protection
Electrohydraulic systems can save up to 75% of the energy consumed by conventional power steering systems, depending on the option considered. Purely electric power assist systems are even more efficient and can even save up to 90% of power steering energy consumption.
By completely eliminating hydraulic fluid, EPS systems have a positive impact on the environment: the reduction in energy consumption makes a significant contribution to the reduction of fuel consumption and CO2 emissions.