An air lock in the engine cooling system is one of the main reasons for the engine taking a long time to warm up to operating temperature. Therefore, every driver should be interested in removing air lock from the cooling system of his car.
How to properly remove an air lock from the cooling system?
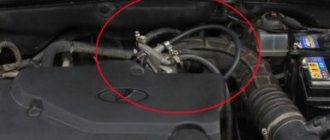
According to the law of physics, air accumulates in the highest place. In a car, the highest link in the coolant chain is the throttle body. That is why the air must be removed from there. There are several ways to get rid of an air lock. Here's the first one from the bottom:
If you have a 1.6 liter engine, then the first step is to remove the plastic cover on the engine - unscrew the cover on the engine to fill the oil, and then pull out the entire cover. It is seated on rubber seals. After removing this plastic screen, screw the oil cap back on to prevent dirt from getting into the crankcase.
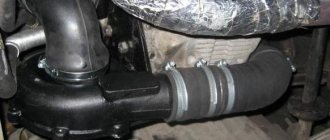
- We find the heating pipes for the throttle assembly (there are 2 of them), see the figure. Pick up any phone
- Next, unscrew the cap of the expansion tank (coolant reservoir) and cover the neck of the tank with a clean rag.
- We begin to blow into the tank with liquid. We blow until all the air comes out of the hose and antifreeze flows out.
- We quickly put the tube back on and tighten it with a clamp so that no air gets in.
(It is worth noting that depending on the tube that you removed, antifreeze may leak from both the tube and the fitting from which the tube was removed)
The second method of removing air from the cooling system is less perverted. There is no need to blow anything here:
- Warm up the engine to operating temperature
- Warm up, turn off the engine
- The expansion tank cap does NOT need to be unscrewed.
- As in the first method, unscrew the clamp of the coolant pipe on the throttle assembly.
- Having removed the heating pipe of the throttle assembly, release the air, and after the antifreeze begins to flow out, immediately put it back on the fitting and secure it well with a clamp.
But be careful and careful! Don't forget that the coolant temperature is approximately 90 degrees.
There is also a simpler, but less effective way to eliminate an air lock:
1) We drive up a steep hill so that the radiator cap becomes the highest point of the cooling system.
2) Unscrew the cap of the expansion tank and the radiator cap.
3) Let the car warm up to operating temperature
4) Then we accelerate several times and at the same time add coolant into the barrel.
Do this until bubbles stop appearing.
How to remove an air lock on a VAZ with electronic (e-gas)?
Since there is no throttle valve cooling system, you need to bypass this unit. Here you can also set the car up.
I hope that these three methods will help you solve the problem, and that you have found all the answers to your questions on the topic “How to get rid of an airlock?”
An air lock in a car's cooling system can cause problems in the operation of the engine, electronic sensors, thermostat and other mechanisms. Next, we’ll figure out how to solve the problem yourself.
FEATURES OF ENGINE COOLING VAZ 2114
This car, like the VAZ 2113 and VAZ 2115, uses a VAZ closed liquid cooling system, the coolant in which is antifreeze or antifreeze. The coolant circulates through special channels in a running engine. Its circulation is ensured by a pump, which is driven by the engine crankshaft using a drive belt.
It regulates the flow of coolant, its direction, by a device called a thermostat. It is designed in such a way that before the coolant warms up to operating temperature, it circulates in a small circle, bypassing the radiator. When the liquid reaches a temperature of 87 0 C, it opens and the liquid flow is directed to the radiator for cooling.
The radiator is blown by a flow of oncoming air, and when there is not enough air, an electric fan turns on. For these purposes, a sensor is installed in the radiator, which produces a signal to turn it on. Also, hot liquid flows through the heater radiator and heats the interior of the car in cold weather. Excess antifreeze from thermal expansion is collected in an additional tank, which is called an expansion tank.
General recommendations for prevention
The first thing you need to pay attention to is the level of antifreeze in the cooling system . Always monitor it and top up if necessary. Moreover, if you have to add coolant very often, then this is the first call indicating that something is wrong with the system, and additional diagnostics are necessary to identify the cause of the malfunction. Also check for stains from antifreeze leaks. It is better to do this in the inspection hole.
Try to use the antifreeze recommended by your car manufacturer. Make purchases in trusted, licensed stores, minimizing the likelihood of purchasing a counterfeit. The fact is that low-quality coolant can gradually evaporate during repeated heating, and instead of it, an air plug forms in the system. Therefore, do not neglect the manufacturer's requirements.
Instead of a conclusion
Finally, I would like to note that if the described signs of airing in the system appear, it is necessary to carry out diagnostics and check it as quickly as possible. After all, an air lock significantly reduces the efficiency of the cooling system. Because of this, the engine operates under conditions of increased wear, which can lead to premature failure. Therefore, if you detect airing, try to get rid of the plug as quickly as possible. Fortunately, even a novice car enthusiast can do this, since the procedure is simple and does not require the use of additional tools or devices.
Source: etlib.ru
PRESENCE OF AIR IN THE SYSTEM
Air in the engine cooling system is an unacceptable phenomenon. Heat exchange processes in the motor are disrupted, which can cause it to overheat, thereby creating the preconditions for failure. In cold weather, there will be no heating of the car interior or body glazing. Sensors installed in injection engines begin to provide distorted information to the electronic control unit, which disrupts the engine’s operating cycle.
WHY DO AIR LOCKES OCCUR?
In order for an air lock to occur in the cooling system, one of several possible reasons for its occurrence is sufficient. These may be such violations in the operation of the system:
You may also be interested
Why does antifreeze turn brown or rusty?
If the antifreeze turns brown, this is a reason to check the performance of the cooling system components, as well as the quality of the mixture itself. Checking several factors at once will help you figure out why the liquid has changed color. Read more in the article on our website.
Why does antifreeze foam and foam form in the expansion tank?
A car with poor heat dissipation from the engine is sensitive to any overheating. If the antifreeze foams, this indicates problems with its composition and requires attention from the car owner. Let's talk to experts about what to do in this situation.
Causes and symptoms of malfunction
The reasons for the formation of air jams may be of the following nature:
- Thermal contraction of the material, due to which cracks are formed in the places where the pipes are attached, through which atmospheric air enters the system.
- The valve installed on the expansion tank cap has failed.
- The need to replace the cylinder head gasket due to its wear.
- Presence of cracks in the cooling or heating radiator.
- There are leaks in the pump (worn seals or another reason).
- The presence of blockages in the pipes and radiator, mechanical damage to these parts.
- The thermostat is partially not working.
Principles of designing cooling systems
A decrease in the efficiency of the cooling system leads to an increase in the temperature of the pistons and a decrease in the gaps between the piston and the cylinder. Thermal gaps are reduced to zero. The piston touches the cylinder walls, scoring occurs, overheated oil loses its lubricating properties and the oil film breaks. This mode of operation can lead to engine seizure. Overheating is accompanied by uneven expansion of the cylinder head, mounting bolts, engine block, etc. Subsequent destruction of the engine is inevitable: cracks in the cylinder head, deformation of the joint planes of the head and the cylinder block itself, cracks in the valve seats, etc. — it’s unpleasant to even list all this, so it’s better not to let it come to that!
The engine and oil cooling system is designed to prevent such developments, but in order for the system to cope with its tasks, it is necessary to use high-quality coolant (coolant). Low-freezing coolants are called antifreeze - from the English word “antifreeze”. Previously, coolants were prepared based on aqueous solutions of monohydric alcohols, glycols, glycerin and inorganic salts.
Currently, preference is given to monoethylene glycol, a colorless syrupy liquid with a density of approximately 1.112 gcm2 and a boiling point of 198 g. The task of coolant is not only to cool the engine, but also not to boil over the entire operating temperature range of the engine and its components, to have high heat capacity and thermal conductivity, not to foam, not to have a harmful effect on pipes and seals, and to have lubricating and anti-corrosion properties.
In the 70s, antifreeze was produced based on an aqueous solution of monoethylene glycol with a crystallization temperature of 40 degrees. It did not require dilution with water when added to the cooling system. This drug was called TOSOL - after the name of the laboratory “Technology of Organic Synthesis”. Because the name is not patented, then TOSOL is a ready-to-use product, and “antifreeze” is a concentrated solution (although TOSOL is also antifreeze).
Ready-made antifreezes are colored for safety and catchy colors are chosen: blue, green, red. During operation, antifreeze loses its beneficial properties - its anti-corrosion properties decrease, and the tendency to foam increases. The service life of domestic coolants is from 2 to 5 years, imported 5-7 years.
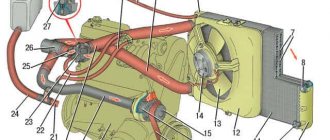
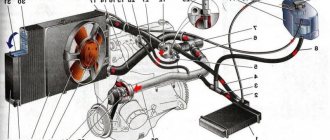
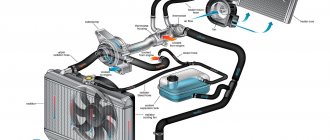
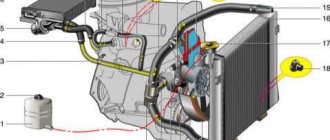
The figure below shows a diagram of the car's cooling system. There is nothing special or complicated in the cooling system and yet...
Rice. 1 - engine, 2 - radiator, 3 - heater, 4 - thermostat, 5 - expansion tank, 6 - radiator cap, 7 - upper pipe, 8 - lower pipe, 9 - radiator fan, 10 - fan switch sensor, 11 - sensor temperature, 12 - pump.
When the engine starts, the water pump begins to rotate. The pump drive may have its own pulley driven by an accessory belt or driven by the rotation of a timing belt. The cooling system contains an impeller, which rotates and drives the coolant. To quickly warm up the engine, the system is “shorted”, i.e. The thermostat is closed and does not allow fluid to enter the radiator. As the temperature of the coolant rises, the thermostat opens, transferring the system to another state when the coolant passes along a long path - through the radiator of the cooling system (the short path is blocked by the thermostat). Thermostats have different opening characteristics. Typically the opening temperature is marked on the edge. It’s probably not worth explaining the design of the radiator. A fan switch sensor is installed at the bottom of the radiator. If the coolant temperature reaches a certain value, the sensor will close, and because If it is electrically connected to the break in the power supply circuit of the electric fan, then when it is shorted, the cooling system fan should turn on. As the coolant cools, the fan turns off and the thermostat closes the long path to a short one. It's simple, but not very...
We recommend: Antifreeze or antifreeze, which is better to fill and what is the difference?
This scheme is the basis, but life does not stand still and various manufacturers are improving cooling systems. On some cars you will not find a sensor for turning on the cooling fan, because... The fan is turned on by the engine ECU depending on the readings of the coolant temperature sensor. It is worth paying attention to the situation in which when the ignition is jammed, the cooling system fan immediately turns on. Either the temperature sensor is faulty, or its circuits are damaged, or the engine ECU itself is faulty - it “does not see” the engine temperature and, just in case, immediately turns on the fan.
On some cars, special electric valves are installed on the way to the heater, allowing or blocking the path of coolant (BMW, MERCEDES). Such valves sometimes “help” the cooling system fail.
Air removal methods
If you observe on the dashboard that the operating temperature of the engine is constantly exceeded (100 degrees or more), follow a number of steps to identify the problem:
- examine the joints of the pipes, the water pump and the expansion tank for leaks;
- check the fluid level in the tank;
- make sure that the cabin heater is functioning properly;
- If the temperature sensor is installed outside the cylinder head, check the operation of the electric fan by closing the contacts.
Before bleeding the cooling system, it is necessary to eliminate all leaks, if any are found. A water pump seal that has lost its seal should be replaced (as a rule, together with the pump), hose clamps should be tightened, and so on. There is no point in removing an air lock from a leaking cooling system.
Checking the heater and fan sensor will help you more accurately determine the location of the air bubble. When the engine temperature reaches a critical threshold and the heater does not heat up, it means that the plug is in a small circulation circuit - in the stove itself or in the supply pipes. If the sensor does not turn on forced airflow in time, then it has entered an area where the movement of antifreeze has stopped - the bubble is in a large circuit.
Advice. Often, due to an air lock, the thermostat refuses to open the passage of antifreeze in a large circle because it does not “see” the temperature increase. Don't make a common mistake and don't rush to change the thermostat - first try to bleed the cooling system.
Method one - blowing
This simplest method requires caution from the car enthusiast, since it is performed on a fully warmed-up engine. The order of operations is as follows:
- If necessary, add fluid to the minimum level and warm up the power unit to operating temperature. Carefully unscrew the cap of the expansion tank.
- Wear gloves and disconnect the thin coolant pipe at the highest point. For an engine with an injector, this is the throttle valve heating unit; on a carburetor engine, it is the intake manifold or the lower part of the carburetor itself.
- Wipe the reservoir neck thoroughly. Place a wide bowl under the removed hose and blow into the expansion tank. When clean antifreeze flows from the pipe, put it on the fitting and secure it with a clamp.
Attention! On a warm engine, unscrew the expansion tank cap slowly, allowing air to escape. If you remove it abruptly, hot antifreeze will splash out of the neck and burn your hands.
If your vehicle has a thermostatic main radiator cap, try removing the air lock through it. Open both plugs and blow into the neck of the expansion tank.
Method two - complete replacement
This option is suitable for all cases when it is not possible to detect and push a bubble out of pipelines. The point is to completely empty the system and fill it back with antifreeze, following all the rules. The disadvantage of the method is the difficulty of implementation in road conditions.
We recommend: What is the normal thermal clearance for piston rings?
The procedure is performed in the following order:
- Drain the antifreeze into a wide basin, placing it alternately under the plug on the cylinder block and the main radiator.
- Replace all caps and tighten them.
- Loosen the clamp and remove the throttle body or carburetor heater pipe (the highest point of the system).
- Insert a funnel into the neck of the expansion tank and slowly pour coolant in a thin stream. Air will be removed through the removed hose.
- Monitor the moment when antifreeze runs out of the pipe and immediately put it on the fitting.
Before emptying, be sure to fully open the cabin heater tap.
When the throttle (or carburetor) heating hose is put on and secured with a clamp, add fluid to the container to the required level. Next, check the functionality of the cooling by completely warming up the engine until the thermostat opens and the electric fan turns on.
Method three - road
When faced with overheating of the power unit on the road, try to remove the airlock using this method:
- Having secured the car with the handbrake, lift the front part with a jack to a height of 0.3–0.4 m.
- Slowly unscrew the expansion tank cap, start the engine and turn on the cabin heater to maximum mode.
- Pour antifreeze into the tank in a thin stream until its level reaches the upper limit. Increase the crankshaft speed to 3000 rpm and wait until it warms up completely.
- Squeeze the lower hose leading to the radiator with your hand. The air should escape through the expansion tank. Use gloves or thick cloth to avoid getting burned.
The procedure ends when air stops coming out of the tank. Feel the remaining pipes - they should warm up. Make sure the stove produces a hot stream.
To avoid having to fuss with removing air pockets, always fill in antifreeze according to the instructions described in the previous section. This is the best way to force air out of the system. Fix leaks in a timely manner, do not drive with endless additions of coolant.
Pump replacement
To replace the pump, you need to unscrew the three bolts that secure it to the engine block. But you need to take into account that some difficulties may arise during removal. Very often the body just gets stuck. Therefore, it is advisable to lightly tap the pump housing, trying not to damage the important elements that make up the cooling system of the VAZ 2114.
After removing the pump, you need to thoroughly clean the entire surface in the engine block so that there are no problems when installing a new one. You can use silicone sealant, which is applied to the paronite gasket in a thin layer on both sides. Pay attention to the package. In addition to the pump, the kit should contain bolts with engraving washers, as well as a gasket.
