Removing the heater radiator on a VAZ 2101-2107 and those models between (2102, 2103, 2104, 2105 and 2106) is not as difficult as it might seem at first glance, the only thing you need is to stock up on antifreeze or antifreeze, depending on what is filled.
I removed the heater radiator for the first time for a trivial reason: the heater tap was leaking. Replacing it involves removing the radiator completely.
Also, the reasons for removing the radiator may be due to the fact that the stove does not heat well, as was the case for me.
And it is possible that the radiator itself may leak, as my friend had, then you will have to buy a new radiator (preferably copper).
And these are the main reasons when it is necessary to remove the heater radiator on a VAZ classic.
Now let’s look at how to remove the heater radiator using the example of VAZ 2105 and 2107 (on other VAZ cars, the process is similar).
Replacing the heater radiator Lada 2101 (VAZ 2101)
Removing the heater radiator on a VAZ 2101-2107 and those models between (2102, 2103, 2104, 2105 and 2106) is not as difficult as it might seem at first glance, the only thing you need is to stock up on antifreeze or antifreeze, depending on what is filled.
I removed the heater radiator for the first time for a trivial reason: the heater tap was leaking. Replacing it involves removing the radiator completely.
Also, the reasons for removing the radiator may be due to the fact that the stove does not heat well, as was the case for me.
And it is possible that the radiator itself may leak, as my friend had, then you will have to buy a new radiator (preferably copper).
And these are the main reasons when it is necessary to remove the heater radiator on a VAZ classic.
Now let’s look at how to remove the heater radiator using the example of VAZ 2105 and 2107 (on other VAZ cars, the process is similar).
What are the risks of self-installation?
If, say, in a VAZ 2101 car this hub mechanism is easily accessible, then in cars of modern brands it can be difficult to get to. The second difficulty is the fragility of modern mechanisms, since practically all modern faucets are structurally made of ceramics or special types of plastic, which are not afraid of corrosion, but require a delicate approach. In order not to aggravate the problem and not damage the heater stove, it is better to contact a company that will provide professional replacement of the heater tap. Such an enterprise is Time Service.
Our offers
Our car service has a full-fledged technical base to provide all types of repair and restoration work. If necessary, you can perform all additional types of car maintenance at our service station. The main advantage of the services is that all spare parts and mechanisms can be purchased at the Time Service store. If you decide to replace the heater tap with us, you do not need to worry about looking for spare parts and components - everything you need is purchased locally. Long-term cooperation with regular suppliers allows us to provide optimal prices. Replacing the faucet, the price of the part and a set of gaskets depends on the make of the car and the complexity of installation. We provide a guarantee for all services!
Signs of a malfunction of the VAZ 2107 heater radiator
A malfunction of the heater radiator can be due to two reasons:
- Coolant leakage from the radiator.
- Clogged internal channels.
It is necessary to remove the radiator of the VAZ 2107 cooling system; if any of these problems are detected, after dismantling it is repaired or replaced with a new one. The replacement process itself is not very complicated; you need to be careful and careful. To replace the heater radiator you will need the following tools:
- Key to 7;
- Key for 10;
- Crosshead screwdriver;
- Rags;
- Coolant;
- two new rubber gaskets.
The stove doesn't heat
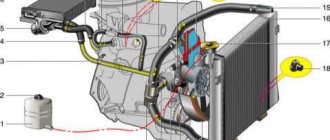
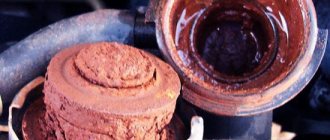
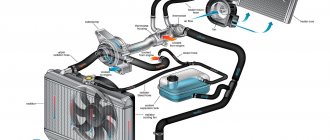
If the engine is warm, the heater valve is open, but cold air is coming from the heating system, then most likely the radiator is clogged or there is a low level of antifreeze in the cooling system. To check the coolant level, just look at the level in the expansion tank or unscrew the main radiator cap with the engine off. If there are no problems with the level, then you need to deal with the heat exchanger, you may have to flush it or the entire cooling system. To avoid possible clogging of the heater radiator, you should not add various additives that eliminate small leaks. Such products can easily clog the stove tubes.
Cold air flow from the heating system can also be caused by air in the system. In this case, you will need to remove the air plug and add coolant.
Airing is the appearance of an air lock in the cooling system during repair work or when replacing the coolant.
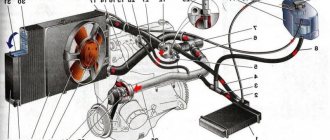
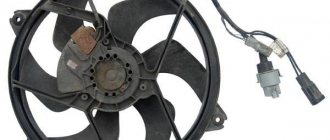
In addition, the problem is possible with the tap itself, which over time can become clogged or scale may form if water is used instead of antifreeze. If there is a problem with the tap, the part is disassembled and cleaned or simply replaced. Another, although rare, but possible cause of a cold stove, may be pump failure. In this case, the engine warms up, but the pipes going to the heater radiator remain cold. In this case, the water pump must be repaired immediately. Warm air may also not enter the cabin due to problems with the heater fan. The problem may be with the motor itself or its power circuit, for example, if a fuse blows.
Refinement using a new snail
To radically change the airflow of the stove and make it quieter, you can install a snail from the VAZ-2108 on the VAZ-2101.
What to buy
To do this you will need:
- New airflow mode switch.
- Resistance from a VAZ-2108 car.
- Snail from VAZ-2108.
- Wires, bolts, nuts, aluminum or any other corners.
- Thick plexiglass for the box.
- Industrial hair dryer to bend plexiglass.
Work step by step
As a result, we will get an improvement in all heating indicators - the cabin will be warm, and the most pleasant thing is that the noise will be significantly reduced.
- We make a housing for attaching the “snail” from plexiglass. That is, we cut it, bend it with a hair dryer, getting the desired shape. To reduce the size of the case, you can cut off the snail plugs.
- The side walls can be made of duralumin (1.5 mm thick). If cracks or crevices appear in the joints during work, they should be sealed with silicone sealant.
- We make collapsible air channels through which the flow will go to the air duct openings.
- Turns must be made smoothly to reduce air resistance in the flow and direct the air straight.
- If you want to bring airflow to your feet, make slots with flaps in the right places. If desired, you can install a variable resistor for adjusting the speed of the cochlea instead of the backlight brightness resistor.
If you do everything correctly, you will get a stove that operates almost silently, especially at low speeds. Despite the large number of bends in the design, the air flows will be sufficient to quickly heat the interior, and the second and third speeds can be turned on only in emergency cases - when you need to heat the interior very quickly.
Therefore, if you are not satisfied with something in the VAZ heating system, try to modify it. And you will succeed!
Source: remam.ru
How to change the stove in a VAZ 2107
Having found out that the heater needs repair, it will require complete or partial dismantling. If there is a problem with the motor, then it is enough to remove the lower part of the assembly. If there is a problem with the radiator, you must first drain the coolant from the engine cooling system. To carry out repair work you will need the following tools:
- Phillips and flathead screwdrivers;
- set of open-end and socket wrenches.
To replace the stove you will need a set of keys and screwdrivers
Heater removal
After the coolant has drained and the necessary tools have been prepared, you can begin disassembly. It is carried out in the following order:
- Remove the negative terminal from the battery.
- In the engine compartment, loosen the two clamps that secure the hoses to the heater pipes. When the hoses are pulled together, a small amount of antifreeze will leak out.
Unscrew the clamps and pull the hoses off the radiator tubes - Unscrew the screws and remove the rubber seal.
Unscrew the screws and remove the rubber seal - We move into the cabin, unscrew the fastening of the shelf under the glove compartment and remove it.
To remove the shelf located under the glove compartment, unscrew the fasteners in the form of screws - Remove the panel with the clock and cigarette lighter by unscrewing the screws on the right, left and bottom.
To remove the panel with the clock and cigarette lighter, you will need to unscrew the corresponding screws - Disconnect the wires from the cigarette lighter and the clock, and then move the panel to the side.
Disconnect the wires from the cigarette lighter and clock - We dismantle the internal cavity of the glove compartment in order to move the right air duct aside and provide access to the heater valve. The left air duct is also dismantled (when the stove is completely removed).
It is necessary to disconnect the right and left air ducts from the heater - Using a 7 key, unscrew the bolt that secures the crane control cable.
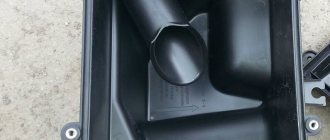
Using a 7 key, unscrew the cable fastener - To partially disassemble the stove, you will need to dismantle the lower part of the housing. To do this, use a screwdriver to pry up the metal latches (2 on the right and 2 on the left).
To remove the lower part of the heater you will need to pry off 4 latches with a screwdriver - After removing the latches, pull the lower part towards you and gain access to the motor. If repair or replacement work is required for this unit, we will carry it out.
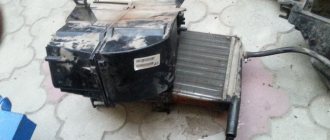
After dismantling the lower part, access to the heater fan opens - To dismantle the radiator, we take it out of the housing along with the tap.
To remove the radiator, simply pull it towards you. - To completely dismantle the stove, remove the upper part of the body, which is secured with four 10mm wrench bolts.
To completely remove the stove, you need to unscrew 4 10mm wrench bolts. - We unscrew the 2 bolts securing the heater control bracket and loosen the screws that hold the rod mounting brackets.
- We remove the remaining part of the stove.
When the fasteners are unscrewed, remove the upper part of the stove body
Preparation
If the stove needs repair, then before replacing its radiator you should prepare everything necessary.
- sets of wrenches, both open-end and socket;
- hacksaw blade;
- coolant collection tank (it must be completely drained);
- silicone based sealant;
- wiping ends or rags.
At the same time, it is advisable to replace the pipes leading to the heater. Over time, they crack and also begin to leak antifreeze.
Next, care should be taken to empty the cooling circuit. Without this procedure, it is impossible to dismantle the main element of the stove. The standard method is used here. The coolant is first drained from the main radiator, and then from the cylinder block. It makes sense to reuse the fluid only if more than a quarter has passed since its last replacement.
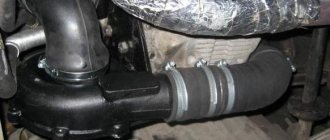
After this, the air filter and the pipe leading to it, as well as the battery, are dismantled in the engine compartment. Only then will you be able to gain access to the hoses leading to the stove. Loosen the clamps holding them in place, place the container and remove - there is usually about a liter of antifreeze left in the pipes.
Near the hoses, in the wall between the passenger compartment and the engine compartment, there is another nut - it secures the retaining plate located in the cabin. Unscrew it - otherwise it will interfere with removing the radiator. Move into the cabin, here you need to remove the accelerator pedal (three bolts hold it in place), and before that the cable drive is removed from it.
When all the described work is completed, the decorative panel located on the right side of the center console is dismantled. On the 1st Kalina you will have to raise the brake pedal as much as possible. To do this, you need to completely unscrew its rod.
Simple rules that, if followed, will extend the life of the heater radiator
In order for the radiator to last a long time, you need to follow a number of rules:
- When purchasing, you should not save money and buy a low-quality unit. You should pay attention to the material of manufacture and the manufacturer.
- Only high-quality liquids should be poured into the system. Do not pour water and mix antifreeze with antifreeze. No lubricant or fuel should enter the system.
- When idle during the warm season, when the heater is not in use, you need to open the heater tap at least twice a month so that liquid enters the radiator. Thus, the unit will not dry out and the heater tap will not stick.
If you carefully operate the heating system and fill it with high-quality antifreeze or antifreeze, then its components will last for many years.
Replacement procedure
You can buy a new heater radiator for a VAZ 2107 at any auto store; an aluminum one will cost about 1 thousand rubles, and a copper one will cost a little more, but it can be soldered, which, however, is only a temporary measure. The kit should include spare parts necessary for installation.
First you need to disconnect the battery terminal so as not to damage the car's electrical system during operation. Radiator installation begins with draining the coolant. To do this, use a 13mm head to unscrew the drain plug, which is located on the cylinder block; there is no need to drain the cooling system radiator.