In cars with a manual transmission, the clutch needs to be replaced periodically. To replace the mechanism with your own hands, you need to stock up on special equipment and instructions for performing the replacement. If your car's disk mileage ranges from 70 to 150 thousand kilometers, then you should replace the clutch.
But you also need to take into account the operating conditions of the car and the manufacturer of the clutch mechanism that is installed in the car. After analyzing all these factors, you can watch a video about replacing the clutch with your own hands.
Changing the clutch yourself
The cost of a complete clutch replacement can vary depending on the quality of the parts and the availability of the necessary tools for the job.
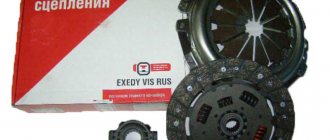
If you decide to do everything yourself, then without a new release bearing, clutch, disc and basket, cylinders, cable, you will not be able to complete the complete replacement process.
Why is clutch needed?
The clutch is used when starting or stopping. There is a smooth connection between the engine and the gearbox. The clutch is also necessary when there is a sharp decrease or increase in engine speed. The clutch disc rotates between the flywheel and the clutch pressure plate. This gradually equalizes the difference in torque.
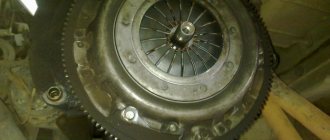
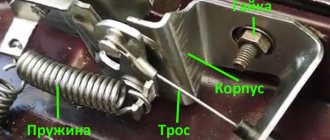
The clutch basket is fixedly mounted on the flywheel. Springs or leaf plates press the clutch disc against the flywheel through the clutch pressure plate. The splined part is located in the center of the clutch disc. Connected by the gearbox input shaft.
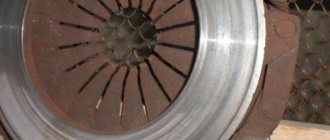
When you press the clutch pedal, the lever is pressed, which acts through the bearing release on the paws or petals of the clutch basket. The clutch disc begins to move freely from the flywheel and clutch basket.
How to properly remove and install a gearbox
If you have a rear-wheel drive car, first disconnect the clutch that connects the manual transmission to the driveshaft. And if your car is equipped with a front-wheel drive mechanism, then start by removing the drive shafts, do not forget to install plugs during replacement. Now disconnect the cables.
Unscrewing the nuts on the mount, remove the input shaft, which is located in the bearing inside the engine flywheel. The appearance of oil stains in the area of the rod indicates a problem with the seal.
Let's start the installation. From special equipment, you will need a winch to rotate the shaft on the gearbox during installation. This way it is guaranteed to fit into the splines that are located in the flywheel. The last stage of installation is the process of adjusting the length of the rod.
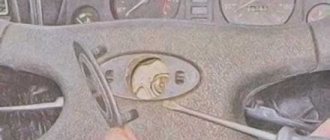
How to center a clutch disc without an input shaft
A little about clutch disc alignment. And a popular myth:
Myth.
If you do not center the disc, the clutch will “beat”. Is it true.
If you do not center the disk, you will not be able to install the gearbox in place, because the centers of the holes in the basket, disk, seat on the flywheel must coincide, otherwise the shaft will not go all the way.
In general, there are 2 official methods for centering a disk.
1) Centering the disk on the seat of the input shaft.
This method is routinely used in service centers for opulent cars, incl. and Lanos. A mandrel according to the dimensions of the input shaft is used. For Lanos like this
2) Centering the disc on the basket.
This type of tool is used
There are many unofficial methods - using a shovel handle, a finger, other parts of the body and any other crap that comes to hand.
But I will describe 2, which are very simple, do not require investment, and can be made from scrap materials in 5 minutes
1 Method. Bolt and blue electrical tape.
In general, blue electrical tape is a unique thing. She can repair anything. And not only to repair.
We will need an M10 bolt or a 10 or 11 mm drill. — a roll of blue electrical tape First, wrap a certain amount of electrical tape around the end (of the bolt) and try it on so that it (the end of the bolt) fits into the seat of the input shaft on the flywheel with a slight interference. Then, we measure the distance at which the clutch disc will be located and wrap the required amount of electrical tape so that the disc can fit with a slight interference fit. Those. we get an analogue of the device from the official 1st method.
2 Method. Using 2-sided tape.
We will need - double-sided tape - scissors. The idea is simple, we must fix the clutch disc to the basket by aligning it in the center. To do this, cut 3-4 small pieces of 2-sided tape, 5x5 mm in size. No more. Paste on the basket as in the photo
The name is so long because it is difficult to find information on this particular model. Thanks to everyone who answered the questions, special thanks to Dima trilian for the tips. I’m writing but I haven’t finished it yet - I haven’t pumped the clutch. I hope for some advice. The symptoms for replacement were as follows. In 4.5 gears, if you give the gas sharply, the revolutions first increase, then the car accelerates. The mileage is about 250. The clutch was most likely original Valeo. I only changed the disk without the basket. Only stellox 0700094sx could find the disc separately. I don’t trust this company, but I couldn’t find any other analogues. If you know, write. Okay, at least this one fits. Now the price according to the autodoc is 1370 rubles, and in winter I took 1000 rubles from the party committee. Assembled Valeo costs 6-7 thousand and the release one costs about 5. This is if you do it wisely. And don't forget the gearbox oil.
The slave disk found only this one, okay, at least it stood up
Independent work on replacing disks and baskets
You need to start the repair process by unscrewing the bolts in the basket, then you should remove all the parts that are in the flywheel. Pay attention to the surfaces of the flywheel so that there are no traces of oil there.
The driven disk must also be clean; if there are marks, the oil seal must be replaced. Also change the driven disk and basket if you find damage on them in the form of deep scratches. The flywheel and driven disc of the basket must be clean and free of grease. Cleaning can be done with gasoline.
We insert the disc into the basket and put the mount either on the manual transmission input shaft or on the mandrel. There is a hole in the flywheel where we place the entire set of parts. Insert until it stops and screw the basket onto the bolts.
This process must be done two or three times to ensure an accurate and even installation. Now you can tighten the bolts, applying a force of 2.5-3.5 kgf/m. Information about the force power is available in the repair instructions for your car brand. We change the clutch basket according to a similar scheme.
Changing the engine oil with your own hands - step-by-step instructions on how to correctly, quickly and easily change the oil in the engine and transmission (125 photos and videos)Do-it-yourself speed controller - how to make a simple adjustment device or smooth descent (120 photos)
- Can a non-owner apply for compulsory motor liability insurance?
You have replaced the clutch and feel vibration in this area - you need to adjust the centering of the disc or check the tightening power of the basket.
The following malfunctions may occur in the clutch basket:
- The petals (otherwise known as pressure plates) may break;
- The pressure plate may be subject to wear;
- Rivets and fasteners may become worn and play may increase.
Basically, when repairing a clutch, the faulty element is always replaced. It should be clarified that experts in this field recommend replacing the clutch basket together with the driven disk, as well as the release bearing. This must be done due to the fact that the clutch part is constantly subject to loads, as well as uniform wear. Therefore, we can conclude that if you replace only one clutch basket, you will still have to replace the driven disk, and after that the release bearing. And when any clutch repair operation is performed, removal of the gearbox is a mandatory factor for this. The only exception is adjustment work.
Thus, we can conclude that it is much wiser to replace the entire assembly at once. Of course, much depends on how the driver drives in the trouble-free operation of the clutch, as well as in correctly made adjustments. In addition, you should not install a clutch basket on your vehicle, which was produced in an unknown place, as people sometimes say, “in artisanal conditions.” You need to purchase car parts only from trusted and good companies. At the moment, the best manufacturers of clutch baskets have proven themselves to be: Kraft, MecArm, SACHS, VIS (Vazinterservice) and LuK.
Changing cylinders
There is a reason to change the main cylindrical system if the functionality of the system does not improve after replacing the o-rings. Replacement with new clutch cylinders is installed when the brake fluid runs away even after replacing new cuffs.
Perform the process of removing the working cylinder and installing it according to the following diagram:
- We get rid of the spring near the pedal.
- We unscrew the two nuts that secure the cylinder to the gearbox;
- The process of unscrewing the rubber hose attached to the working cylinder is carried out by weight;
- We screw a new type cylinder to the hose to avoid leakage of the brake compound;
- We pump everything out of the cylinder, unscrew the fitting, close the hole;
- We unscrew the nuts that secure the master cylinder to the car body;
- To release the hinge connected to the pedal, you need to pull it towards you. Pull out the pin, this will release the cylinder from the pedal.
- Install the two cylinders in the same way as you disassembled them.
After replacing the cylinders, bleed the main clutch. When the air stops escaping, the cylinder is installed correctly.
How to install a clutch disc: step-by-step instructions
The main task of the clutch is to ensure smooth gear changes. The car starts moving as carefully as possible, the transmission and engine operate without significant loads, thanks to which they remain in working condition for a long time. Since the clutch is subject to great forces, replacement is carried out regularly: after 100 thousand km. Signs that it is time to change the clutch disc include these changes:
- slip;
- incomplete disengagement of the clutch;
- difficult gear shifting;
- tight clutch pedal (possible sagging);
- lack of traction in a vehicle, especially a truck.
It is not recommended to change the part yourself if the car enthusiast has little understanding of the car’s configuration and has never carried out the installation himself. A poorly mounted clutch disc will not work properly and the unit will have to be disassembled again.
How to install the clutch disc correctly
Most often, installing a new clutch basket is required, but sometimes just replacing the disc is enough. The process itself does not cause difficulties, but most car enthusiasts have a question: how to install the clutch disc? This task can be performed in 2 ways:
- with preliminary removal of the gearbox;
- without removing the gearbox.
The second option is the simplest and fastest, and if the car is equipped with rear-wheel drive, even an inexperienced driver can handle the task. With front-wheel drive the situation is more complicated, but replacement is still possible.
To install the clutch yourself, the car is placed in the garage on an overpass or pit. Before installation, stops are placed under the tires to prevent the car from moving.
Clutch disc: how to install correctly?
Replacement steps
The entire installation and dismantling of the clutch disc takes place in several stages:
- The cardan and working cylinder are detached from the gearbox. Then the limit switches of the electrical wiring of the reverse signal switch are turned off.
- Using a spanner, unscrew the bolts holding the KCP cushion. The pillow itself is dismantled.
- The PCP is moved a considerable distance from the motor, while the switch is tightly close to the bottom. This is necessary so that the transmission is located on the inlet pipe of the exhaust system. To do this, the gearbox is supported by a jack or a special support.
- The flywheel is dismantled and the 6 bolts holding the clutch basket are unscrewed. The crankshaft must be rotated regularly to ensure easy access to the bolts.
- The clutch basket is moved into the emerging shaft to make it easier to dismantle the part. To remove the basket, it must be moved towards the engine. After which the fork and release bearing are dismantled.
- To install the clutch, all the above steps are carried out in reverse order. The bearing hole of the gearbox input shaft is lubricated. The area with which the clamping part is in contact is wiped with a cloth.
What you need to know when replacing
During installation, the driven disk is centered relative to the axis of the crankshaft. The best rule is that the input shaft is splined. If the installation is carried out correctly, it is quickly and easily pulled out.
The bolts holding the casing are screwed in with equal load, otherwise it will move. On the side of the casing there are rectangular recesses into which 3 pressure plate hubs will fit. This structure will ensure maximum high-quality transmission of torque to the element. Also, it is better to move it relative to the axis when the clutch is disengaged.
18 springs are installed in pairs between the pressure plate and the casing. Each element has coils directed in different directions. This is necessary so that the structure always works smoothly. All springs belong to the same category so that the working disk does not warp under the required force.
Section of a splined shaft and bushing with a straight-sided profile
Washers are installed to prevent the springs from overheating when the clutch slips. The washers are made of compressed asbestos, as it can withstand sudden temperature changes and has good thermal conductivity.
Also, cone-shaped springs and spherical nuts are installed on the ends of the tail forks. All this creates the effect of the mechanism rolling, which is required when leveling the distance between the axles and when retracting the clutch disc.
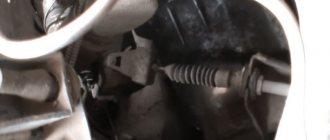
Replacing the clutch slave cylinder
First, we disconnect the cotter pin element, which drives the hydraulic drive mechanism itself, using pliers. We use them to remove the spring. We do not scroll the fitting hose completely.
Do-it-yourself engine repair - major restoration and maintenance of an internal combustion engineDIY bumper: how to make a unique polymer bumper for a car at home (125 photos)
Do-it-yourself car painting - preparation for coating and the main stages of high-quality car painting (100 photos)
Using the 13th key, remove the 2 bolts from the crankcase. And only now we take out the pusher. Access to the cylinders is open. How to further replace the working clutch is shown in more detail in the video.
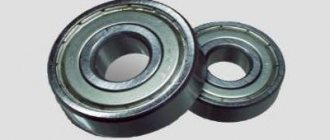
Replace the cable and release bearing
Replacing these parts is advisable after exceeding the 150 thousand mileage mark of the car. By freeing the fork from the spring, you can remove the cable. Unspinning the connection will make it possible to remove the cable from the clutch pedal.
If necessary, replace the entire part. To remove the spent cable, you need to pull out the pin. We install the new one using the same method as you removed it.
You know your car better than anyone, so armed with the appropriate equipment and tools, you can replace the clutch yourself without much difficulty.