What models are installed on VAZ 2106/2107 cars
All types of carburetor mechanisms equipped with the VAZ 2106/2107 are aimed at reducing fuel consumption and giving the car maximum dynamism. In addition, an important role is played by such an indicator as environmental friendliness. For a decade, AvtoVAZ engineers gave preference to the most environmentally friendly types of carburetors.
Carburetors of three different models were installed on modern VAZ 2106/2107, as well as on cars produced in previous years:
- Manufacturer: Dimitrovgrad Automobile Assembly Plant (or DAAZ). It should be noted that the company produced carburetors under license from Weber. Structurally, these devices were as simple as possible both in operation and in further maintenance. In addition, their main advantage was to provide excellent speed performance for cars of the sixth and seventh VAZ models. At the same time, DAAZ carburetors consume a very large amount of gasoline - from 10 to 14 liters per 100 kilometers.
- Manufacturer: DAAZ, modification “Ozone”. This is a more advanced version of the first type of DAAZ, which has high environmental performance. The device provides good acceleration characteristics and consumes less than 10 liters of fuel per 100 kilometers. However, the disadvantage of this model is that it comes with a second camera. In its operation, a pneumatic valve plays an important role, which, in case of contamination or poor-quality adjustment, can stop the carburetor from working.
- Manufacturer: DAAZ, modification 21053, which is produced under license from Solex. One of the most modern types of carburetors for equipping the VAZ 2106/2107. Maximum environmentally friendly and productive. It has a more complex design; the first in the DAAZ line is equipped with a reverse fuel supply system, which makes it as economical as possible. However, Solexes are demanding on the quality of gasoline - otherwise the fuel nozzles become clogged very quickly.
Modern VAZ 2107 models are equipped with this unit.
Common features in the design of carburetors for the VAZ Six and VAZ Seven
The carburetor mechanisms that are equipped with all VAZ 2106/2107 models throughout the entire production period of the car are two-chamber, that is, they have two internal combustion chambers . Structurally, all carburetors have three indivisible parts:
- at the top there is a cover of the device, which protects the mechanism from dirt, and fuel fittings;
- the middle part is a housing, inside which the chambers and diffusers themselves are located, transfers the air-fuel mixture to the engine;
- The float compartment and throttle valves are located in the lower part.
In the operation of DAAZ carburetors, small parts are of great importance - gaskets, jets, float, economizer or dampers. All elements of the system are interconnected and failures in one part will inevitably lead to failure of the entire device.
The DAAZ carburetor on the VAZ 2106/2107 works according to the following principle:
- Gasoline enters the float chamber through the inlet valve.
- The required fuel level is regulated by the needle of the forced idle economizer or power stroke economizer - in any case, fuel enters the chamber in a strictly defined proportion.
- Next, the fuel is sent to emulsion chamber No. 1 through nozzles.
- In the chamber (or VBC), gasoline is crushed into small parts and mixed with air.
- When the torque increases during acceleration, internal combustion chamber No. 2 may also be activated.
- After the formation of the air-fuel mixture, the pump directs it to the diffusers, and through them to the engine.
That is, the main task of the carburetor is to form the air-fuel mixture in a strictly adjusted proportion to ensure smooth operation of the engine.
The presence of many small elements ensures reliable operation
Replacing the cylinder head gasket of a VAZ 2107.
Good afternoon to all visitors of the site zerga.ru. In this article I will tell you how to correctly replace the cylinder head gasket of a VAZ 2107. This process is almost the same for all classic VAZ (Zhiguli) models, so I will limit myself to only one VAZ 2107 model.
When is it necessary to replace the cylinder head gasket?
There are several reasons, some of them are critical, while others are not so much, that is, with some damage the car can be used, but with others it is not. I will try to list the main symptoms.
Breakdown of the gasket between the cooling system channel and the drainage channels of the lubrication system.
With such damage, the coolant enters the oil pan and mixes with the oil. When mixing coolant with oil, a light brown emulsion is obtained. You can see this when checking the oil level in the engine by pulling out the dipstick. If you see that the coolant is leaving the radiator and the oil has turned a cloudy light brown color, then most likely the gasket has ruptured and further operation of the engine is strictly prohibited, because it can lead to jamming and destruction of the engine.
Breakdown of the gasket between the cooling system channel and the cylinder.
If the cylinder head gasket is not of good quality or the head is not tightly tightened, the gasket may break through and then some of the gases under pressure enter the cooling system and, as a rule, eject coolant from the expansion tank.
Burnout of the gasket between the cylinders.
It looks something like this.
With such a burnout, compression in the cylinders drops, and the engine begins to operate unstably. In this case, the cylinder head gasket needs to be replaced.
Destruction of the gasket.
Well, another reason is the destruction of the gasket. How does this manifest itself? This is manifested by the fact that coolant begins to seep between the block and the head, which is accompanied by bubbles.
An attempt to tighten the head did not bring any results. The seepage still remains.
For all these damages, the cylinder head gasket needs to be replaced.
Let's start replacing the cylinder head gasket. Disassembly.
The first thing we will start with is to remove the air filter; how to remove it, I recommend reading the article “Air Filter”. Now we can see everything and have access to everything.
Next we move on to the carburetor. Some mechanics do not remove it and pull out the cylinder head along with the carburetor, but I still recommend removing it for convenience and so as not to damage it. How to properly remove a carburetor, read the article “Removing and installing a VAZ carburetor.”
The next step to free the mounted components and mechanisms will be to remove the ignition distributor and its wires; you can find out more about this in the special article “Ignition distributor”.
And now we get to the engine. In the next step, we need to drain the coolant from the cooling system. This process is quite interesting, because the manufacturer installs a regular plug in the block, not a tap, and draining the coolant is very inconvenient for a person who often does not do this.
It goes something like this. We are looking for a container for liquid, about ten liters and about a meter of rubber hose, approximately the size so that the hole is at least ten millimeters. Place a container under the engine and place one end of the rubber hose in it. We connect the other end of the hose to the drain plug. Take the key and unscrew the plug. Next, remove the plug with one hand, and with the other hand, quickly press the hose against the hole, and the liquid will drain into a special container. The only downside to this process is that some liquid will spill on your hands.
After the coolant has been drained, disconnect the rubber pipes. We disconnect two pipes from the tee, which is attached to the head, and one pipe from the stove.
Now we need to remove the valve cover. Unscrew the eight nuts and remove the figured washers. Be careful not to lose the clamping washers, because they provide the best clamping.
After removing the head cover, we need to remove the chain from the camshaft gear. To remove the gear you need to loosen the chain tensioner. We take the key and release the special nut on the tensioner, or it’s better to remove it altogether by unscrewing two nuts, whichever is convenient for you.
Now that the motor chain is loose, you can remove the timing gear. The bolt that secures the gear to the camshaft is secured with a special lock washer. Using a large screwdriver and hammer, bend the edges of the lock washer.
Bend back the lock washer and unscrew the bolt.
The entire disassembly process can be viewed in more detail in the article “Disassembling a VAZ engine part 2.”
We take out the bolt and remove the gear from the shaft. Carefully remove the chain from the gear. We will not be able to remove the chain completely and we need, no matter what it falls down, to do this we need to tie it with wire and secure it.
Let's move on to removing the camshaft. To do this, you need to unscrew nine nuts and remove the shaft itself.
And finally we just have to remove the exhaust pipe from the exhaust manifold. The receiving pipe is secured with four nuts, which are made of brass. They are made of brass so that they do not stick to the studs, so if you have regular nuts installed, then there is a chance of tearing off the stud.
We have come to removing the cylinder head. We take the head with a powerful wrench and unscrew the ten bolts that secure the cylinder head.
Let’s not forget about the eleventh small bolt, which is installed on the ebb of the head.
The head can be removed very easily, you just pry it up and take it out, you can also ask a friend to help, no matter what scratches the car.
Next, you need to inspect the gasket itself for damage.
Search for defects in the cylinder head gasket.
As a rule, by looking at the gasket you can see where it is damaged, but our task is to determine the reason why the gasket failed. By identifying the real cause, we can prevent a similar malfunction in the future. Usually, after replacing a couple of gaskets in a fairly short period, we begin to change the heads, grind them and carry out other (unnecessary) procedures that we could do without.
Let's look at some of the causes of head gasket problems.
In the photo above you can see how the gasket between the cylinders has burned out. What caused this to happen? There is a very small distance between the cylinders and cooling is poor, which means overheating is possible. The use of low-quality fuel leads to detonation, and this is the engine’s worst enemy, as they say, “It breaks where it’s thin.” Another point is the deformation of the head itself. Under all the above conditions, the head is subject to deformation and such burnout is possible in the future.
Here is another example of a damaged cylinder head gasket. What do you think caused the gasket failure? I have seen this a couple of times in my life, and the owner of this car used ordinary water instead of antifreeze or antifreeze. For the winter, he drained the water, and the car sat until spring. Here the gasket was simply destroyed by rust. So saving can lead to undesirable consequences.
There are, of course, reasons such as poor quality spare parts and gaskets, so it’s like a lottery whether you’re lucky or not. Having purchased a new gasket, we install it in place.
Installing the cylinder head gasket. Assembly.
Before installing a new cylinder head gasket, thoroughly clean the gasket contact surface on the cylinder block from traces of the old gasket. If this is not done, then during engine operation small channels may form through which, then coolant or oil will leak out. You also need to inspect the cylinder head and if some repairs are required, it is better to do it right away than to disassemble it again later. I recommend reading the corresponding article on this topic, “Repairing the cylinder head of a VAZ car.” After cleaning the block, install a new gasket.
The photo shows how we install a new type of gasket. How is the new gasket different from the old gasket? The gasket contains sealant, which is applied in a thin strip around the perimeter. To be honest, I don’t see any benefit in this, just to increase the cost. Also, the holes for the coolant are made round with a small diameter, and not shaped like on the old gaskets. But since there were no others, we will put this one. We lay the gasket and center it using two guides, they are indicated by red arrows in the photo above.
Having cleared the head of traces of the old gasket, we install it in place.
The next big step is to tighten the cylinder head. This process will determine how long the new gasket will last. Tightening the head is not done just like that, but with a certain force and the required sequence. The bolts must be tightened with a special (torque) wrench. To properly tighten the bolts, there is a special diagram that shows in what order they should be tightened.
As shown in the photo, the bolts are tightened from the middle, which ensures uniform pressure. The bolts are tightened in at least two passes, the first with a force of 4 kgf m, and the second 11.5 kgf m. The eleventh bolt is tightened to a maximum force of 3.8 kgf m. What is kgf m? It stands for kilogram of force per meter.
After installing the cylinder head, install the gas camshaft. The most difficult thing that can happen is installing and adjusting the camshaft gear. I recommend installing a split gear; it makes adjustments easier and more accurate. How to install a split gear on a Classic, I recommend reading the article “Installing a VAZ split gear.”
Next we put everything back together.
That's all, we replaced the cylinder head gasket of the VAZ 2107.
How to repair a carburetor yourself
Repair work on the VAZ 2106/2107 carburetor involves removing and disassembling the mechanism. In this case, the repair includes all two stages:
- Washing (cleaning, blowing) elements from carbon deposits and adhering dirt.
- Replacement of worn or failed parts.
Before carrying out any actions with the unit, you must firmly make sure that the carburetor is faulty. Often, incorrect operation of other systems can affect the performance of the carburetor mechanism.
For the smooth operation of an internal combustion engine, high-quality cooling is necessary. One of the elements of this system is a water pump, which circulates the antifreeze. You can read more about repairing your pump yourself here:
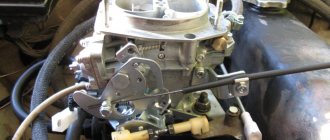
The carburetor is located under the hood, above the engine.
Troubleshooting
DAAZ carburetors of any modification are designed to operate stably regardless of operating modes. However, it is precisely the change of modes (for example, starting “cold” or accelerating when overtaking) that can show the first problems in the operation of the device. The carburetor is clearly faulty if:
- at idle there are failures in engine operation;
- while driving, a time interval is noticed between pressing the gas pedal and accelerating the car;
- jerks in engine operation at high speeds;
- a series of jerks when overtaking;
- Gasoline consumption has increased significantly;
- Difficulty starting the engine after long periods of parking.
Each of these signs, as well as their combination, indicates that there is a problem with the carburetor and repairs or adjustments are necessary.
Overflows
One of the most common problems with carburetor engines is the so-called overflow. An excessive amount of fuel is supplied inside the device, and for some reason the check valve is not able to drain excess gasoline back into the tank. Therefore, under the carburetor and on it itself, the driver may notice drops of fuel.
In this case, it is recommended to clean all the fuel supply and exhaust channels, as well as the jets - most likely, the holes are clogged with debris. Diagnostics of the accelerator pump will not be superfluous.
Shoots
This concept is inextricably linked with transfusion. If the carburetor begins to shoot (or sneeze) - that is, jerk sharply while driving and even ignite - there is a fuel leak. The mechanism needs to be flushed.
Gasoline is not supplied
The problem may lie either in the carburetor itself (the jets are seriously clogged or the pump is broken) or in the supply hoses. It is recommended to blow out the fuel supply pipe and test the operation of the fuel pump. If they function normally, you will have to remove the carburetor and wash it.
The secondary internal combustion chamber does not work
Failure to operate PIC No. 2 will immediately affect the vehicle’s dynamism: it loses almost 50% of its original speed characteristics. The problem is that the throttle valve is sticking, which regulates the flow of fuel into the chamber cavity. You will have to disassemble the mechanism and replace the damper with a new one.
Video: how to repair a carburetor on a VAZ 2106
Idle speed adjustment.
Idle speed is adjusted to ensure stable engine speed at idle with a minimum content of carbon monoxide (CO) and hydrocarbons (CH) in the exhaust gases. We recommend carrying out this operation at the “CO-CH” adjustment points.
Idle speed adjustment is carried out using a quantity screw, which reduces or increases the amount of fuel-air mixture entering the engine, and a quality screw, which regulates the air-fuel ratio.
We carry out the adjustment using a gas analyzer. The engine must be warmed up to operating temperature, the ignition and valves must be adjusted, and the choke must be fully open.
- Using the quantity screw, we adjust the crankshaft rotation speed to 820–900 rpm;
- Using the quality screw we achieve a CO concentration in the exhaust gases within 0.5–1.2%! at a given position of the quantity screw;
- Again, use the quantity screw to adjust the crankshaft speed to 820–900 rpm;
- If necessary, use the quality screw to adjust the CO concentration within 0.5–1.2%!
How to remove the unit
Indeed, this question may take an inexperienced owner of a “six” or “seven” by surprise. But the dismantling procedure itself is not considered difficult. The main thing is to remember or write down the connection points of different hoses, since the reverse installation may cause difficulties during the first experience.
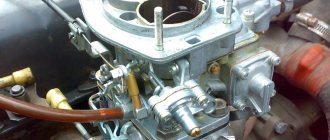
It is recommended to dismantle the DAAZ carburetor on a cold engine, since the device is located directly on the intake manifold.
It is important to disconnect the fuel lines and wires in sequence
The preparatory stage includes removing the air filter box, since the filter will prevent free access to the carburetor . Further work takes no more than 10 minutes:
- First, two thin wires are disconnected from the carburetor body - the first ensures the operation of the air damper, and the second is connected to the throttle.
- The return spring and its retainer are immediately disconnected.
- The next step is to disconnect the forced idle economizer wire.
- Loosen the clamp connection on the wide gasoline supply pipe and remove the hose itself. After this, you can remove the fuel return hose.
- The ventilation and vacuum hoses can be disconnected from the fittings at the top of the housing.
- Next, it is possible to dismantle the carburetor block itself. To do this, you need to unscrew the four fastening nuts and carefully remove the carburetor along with the gasket from the studs.
- During work, it is recommended to close the open hole in the manifold with soft cloths or a special plug, which can be purchased at a car dealership. This will ensure the cleanliness of the engine and prevent dirt from getting inside the power unit.
Idle adjustment: the last stage of carburetor tuning
After setting up the float chamber and debugging the starting device, you can safely move on to the final stage, which allows you to adjust the engine idle speed. For this purpose, the carburetor design includes so-called quantitative and qualitative screws.
As in the case of debugging the starting mechanism, it is necessary to warm up the engine well beforehand. After this we perform the following steps:
- Using a high-quality screw, we set the maximum engine rotation speed;
- Let's move on to the quantity screw. Using it, you need to reduce the speed by about 100 rpm. After this, we start the power unit and continue to turn the screw to achieve the optimal level of engine speed.
Correct adjustment of the idle speed makes it possible to achieve stable operation of the engine, as well as eliminate possible malfunctions and failures. If your goal is also to increase power, you can make a number of changes to the design of the standard carburetor or replace it with a Solex-type device that functions more efficiently.
To tune the carburetor, work is carried out such as removing the spring from the vacuum drive, installing more efficient air and fuel jets, as well as installing a new diffuser marked 4.5 (instead of the standard 3.5). Such a simple modification makes it possible to significantly improve the performance of both the device itself and the car engine.
Washing DAAZ without disassembling
Flushing DAAZ carburetors is recommended by the manufacturer in cases where there are clearly any problems with its operation: increased gasoline consumption, jerks and jolts when driving, unstable idle speed, problems with starting.
The traditional method of washing carburetors is to completely disassemble them into individual components, which is not always possible for an inexperienced VAZ owner to do. To simplify the procedure, a technique was created for washing and cleaning the carburetor without disassembling it into components. This technique is based on the use of special aerosols in cans. The most affordable carburetor cleaners are considered to be aerosols produced by ABRO and Mannol - they can be bought at any auto store for 100–150 rubles.
The cans are equipped with a thin tube for access to all parts of the carburetor
These cleaners do an excellent job of cleaning carburetor mechanisms, and they are also very easy to use. To flush the carburetor, it is recommended to turn off the engine, let it cool and begin the procedure:
- Remove the air filter box from the car and place it to the side.
- Unscrew the solenoid valve from the carburetor body.
- Place a special narrow nozzle on the aerosol can and treat the nozzle channels, first and second chambers, dampers and all visible elements of the carburetor assembly with liquid.
- After this, spray the aerosol on the external parts of the mechanism.
- Wait 5–8 minutes (depending on the aerosol manufacturer’s recommendations). During this time, the liquid will be able to corrode accumulations of soot and dirt.
- Next, you can start the engine so that it removes all remaining dirt.
- If during one procedure the carburetor did not have time to be properly cleaned, then you can treat it again with the same aerosol.
After such cleaning, the VAZ 2108/2109 will significantly increase its dynamic characteristics, since the accumulation of dirt will not interfere with the normal operation of all parts of the carburetor.
Types and contents of repair kits
Repair kits can be divided into two categories - full and small. Small kits usually contain a limited number of parts, for example - only the fuel valve, gaskets, all parts except the valve, etc. Complete repair kits contain all the necessary parts; they also often include small repair kits.
You should buy repair kits based on the car model, the engine and carburetor installed on it. Only in this case the parts are guaranteed to fit the carburetor, and the repair will be carried out without interruptions in searching for missing spare parts.
How to change the gasket
Over the years, gaskets made from a wide variety of materials were installed on DAAZ: heat-resistant cardboard, paronite, metal. The main function of the gasket is to create the most reliable and tight connection between the carburetor body and the surface of the engine intake manifold. This is the only way to ensure normal operation of the power unit.
After dismantling the carburetor, it is necessary to inspect the gasket for deformations, tears or severe dents. The manufacturer recommends changing the seal after each carburetor removal.
On the left - new, in the center - when dismantling the carburetor for the first time, on the right - after 3 years of operation of the car
The gasket is selected according to the type of the old one. You cannot install a gasket made of a different material or with a change in shape - it will not be able to provide an adequate joint between the parts of the mechanisms.
The gasket replacement procedure is not difficult:
- A new gasket is placed on the carburetor mounting studs.
- Before this, you need to clean the planting site from soot and dirt.
- It is necessary to install the gasket in the same position as the old one.
- Then install the carburetor on it and tighten the fixing nuts until they stop.
Types of gaskets used in the carburetor
The following types of gaskets are used in the carburetor:
- Gasket between carburetor and intake manifold. In most engine models, this part is made of paronite. This part is installed directly on the collector plane;
- Thermal insulation gasket. This part is also installed under the carburetor. The thermal insulation gasket is usually made of textolite, so it copes with its function perfectly;
- Lower carburetor gasket. This part is installed between the heat-insulating gasket and the carburetor flange. The lower carburetor gasket is made of metal-textolite material. This gasket perfectly prevents the formation of leaky areas in the lower part of the carburetor mount;
- Upper gasket. This part is installed between the carburetor and the air filter pipe. It is made of dense rubber, therefore it provides a tight connection, preventing the leakage of untreated air;
- Carburetor cover gasket. It is made of thick cardboard and serves to reliably seal the two halves of a Solex carburetor. The Solex carburetor gasket most often causes carburetor malfunction, but this problem can be easily solved if the old gasket is replaced with a new one.
DIY adjustment
Each car owner of a “six” or “seven” has the ability to adjust the carburetor independently. Adjustment work can enhance the dynamic qualities of the car, as well as reduce gasoline consumption. Undoubtedly, these are important indicators for any car owner, so you should be responsible when adjusting the carburetor.
Preparatory stage
Before you start work, you need to prepare thoroughly. This stage is necessary to ensure that nothing distracts the driver during setup and configuration.
First, it is recommended to prepare your work area. The carburetor must be installed on a flat and hard surface; it is better to stock up on rags in advance, as gasoline leaks are possible. In addition, it is necessary to ensure that the room in which the adjustment is planned is well ventilated and has high-quality lighting.
The second point of preparation is the set of necessary tools. You will need to prepare in advance a set of wrenches and two screwdrivers - a Phillips and a flathead with a narrow blade.
Next, find the service book for your car. It is there that the operating parameters are indicated, which will need to be checked during adjustment.
Attention! Adjustment work is carried out only after the carburetor has been washed, worn elements have been replaced and the device has been installed on the engine.
How to enrich or lean the mixture
Enriching or depleting the air-fuel mixture must be done at engine idle speed:
- Start the engine and wait until it warms up to its operating temperature.
- Tighten the fuel quality and quantity screws until they stop.
- Next, unscrew each screw 3 turns back.
- Referring to the idle speed data given in the VAZ service book, set the required number of revolutions by adjusting the screws in one direction or another.
- That is, the principle of adjusting the mixture is to set the idle speed recommended by the manufacturer by reducing or increasing the enrichment of the mixture (quality screw) and reducing/increasing the amount of mixture (quantity screw).
At the bottom of the tube there is a quality screw, and a little to the right in a tube of smaller diameter there is a quantity screw
How to reduce gasoline consumption
The main element in a carburetor is the float. After you have adjusted the enrichment/leanness of the mixture, the float will invariably return to its axis. However, it may be slightly higher than normal - in this case, fuel consumption will increase. In addition, adjusting the float is also necessary in order to reduce the toxicity of gas emissions, since due to poor-quality sealing of VAZ cars, some gases can enter the cabin.
Adjustment of the float mechanism is carried out on a completely cooled motor. In order to get to it, you will need to remove the air filter box and unscrew the carburetor cap:
- The float tongue needs to be adjusted.
- The float stroke should correspond to the recommended value of 8 mm. If on a VAZ 2106/2107 this value is greater, fuel consumption increases; if it is lower, losses in dynamics appear.
- Adjusting the clamps and axle fastenings allows you to set the desired stroke.
- Then you need to install the cover on the carburetor and screw the filter box into place.
The following article will help you adjust the carburetor on a NIVA car:
Adjustment of the float tongue is ensured by screws and clamps
Carburetor tuning – what should you know?
It is worth noting that replacing parts may not always help. You also need to pay attention to other elements and devices of the car. Very often a problem arises in the correct operation of the throttle valve. Therefore, it should be checked and, if necessary, repaired.
Many car owners want to improve their carburetor. To do this, you need to buy a modernized carburetor repair kit. The air jets included in it create less resistance to air flow, as a result of which engine power increases.
The most important element of carburetor tuning is the upgraded fuel jets, which come in the repair kit. However, to screw them in, you need to bore the carburetor, since their threads are slightly different. It is not worth taking on the task of modifying and improving the carburetor yourself, since this process requires technical skills, and without practice it may not work out the first time. As a result, you will only ruin the repair kit and, most likely, the carburetor itself.
In order to repair the carburetor as little as possible, it is necessary to promptly replace the fuel and air filters. And also fill it with higher quality high-octane fuel. A standard carburetor repair kit from the manufacturer, as a rule, is of the highest quality, and its work should be enough for 100 thousand km.