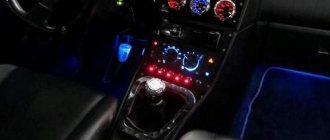
Let's be honest - the VAZ 2110 does not have the most beautiful “native” instrument panel, either on the first cars or on the “improved” ones. Therefore, many owners of this model are trying to make it more modern and somehow decorate it (with LEDs, beautiful lights, etc.).
But, before you decide on some kind of upgrade, it is necessary that you have before your eyes the pinout of the instrument panel for the VAZ 2110, otherwise you can simply get lost in a heap of wires, sensors and buttons. Moreover, it will be useful regardless of whether you completely change the panel, or simply make some additions to the dashboard of your VAZ 2110.
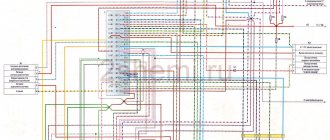
Instrument panel VAZ 2110
Connection knowledge
Before starting dismantling work, you need at least a conventional pinout on paper, otherwise it will be very difficult: you will need to “trace” every wire and every connection that is on the “path” from the devices to the power button.
In fact, the pinout of the VAZ 2110 dashboard is not so difficult to understand, but there are differences between cars produced in different years and at different factories. There is an old model, there is one with a mechanical odometer, and a new (Euro) model, so there are differences in the pinout of the instrument panel, depending on the type to which it belongs.
Instructions for installing the Europanel on a VAZ 2110 can be found here:
Modifications of the VAZ-2112 car
VAZ-21120 . Modification with a 16-valve injection engine with a volume of 1.5 liters and a power of 93 horsepower. 14-inch wheels were installed on the car. This modification has a problem with valves bending when the timing belt breaks. The problem can be solved by increasing the depth of the grooves in the piston bottoms.
VAZ-21121 . The car was equipped with a VAZ-21114 8-valve injection engine with a volume of 1.6 liters and a power of 81 horsepower.
VAZ-21122 . Budget modification with an 8-valve injection engine VAZ-2111. The car was produced without electric windows, the wheels were 13 inches in size, and the brakes were unventilated from a VAZ-2108 car.
VAZ-21123 Coupe . Three-door, five-seater hatchback. The only two doors for entering the car are 200 millimeters wider than those of the five-door hatchback, and they are mounted on new, durable hinges. The rear arches of the car have become wider. The engine was installed with a 16-valve injection engine with a volume of 1.6 liters and a power of 90 horsepower. The car was produced from 2002 to 2006 in small quantities, the reason for this was the high cost of the car.
VAZ-21124 . Modification with a 16-valve injection engine VAZ-21124 with a volume of 1.6 liters. Produced from 2004 to 2008. For this type of engine, the problem with valve bending was solved. To do this, the depth of the grooves in the piston heads was increased (up to 6.5 mm). In addition, the design of the cylinder block was changed to achieve a working volume of 1.6 liters, for which its height was increased by 2.3 mm, and the radius of the crankshaft was increased by 2.3 mm accordingly. There were also a number of other minor changes.
VAZ-21128 . The luxury version of the car, produced by Super-auto JSC, was equipped with a 16-valve VAZ-21128 engine with a volume of 1.8 liters and a power of 105 horsepower.
VAZ-2112-37 . A racing modification of the VAZ-2112, prepared for the “ring” in the Lada Cup qualifying group. The car was equipped with a 1.5-liter VAZ-2112 engine with a power of 100 horsepower. The racing car was equipped with a safety cage, an external aerodynamic kit and a front extension of the strut support cups.
VAZ-2112-90 Tarzan . All-wheel drive modification with a VAZ-2112 body on a frame chassis with transmission and suspension parts from a VAZ-21213 Niva. It was also equipped with a 1.7 or 1.8 liter engine from the Niva.
General diagram of devices
If you look from the back of the instrument panel, here it is in sequence - from top to left to right:
- Fuel level indicator;
- Combination of instrument lighting lamps;
- Right turn control;
- Left turn control;
- Tachometer;
- Next is the block, there are a lot of plugs in it;
- And the top part of the dashboard is completed by an antifreeze temperature indicator.
VAZ 2110 dashboard connection diagram
The lower part of the dashboard (also from left to right and from the back of the dashboard). The following part of the instruments is located here:
- high beam controller (bulb);
- alarm controller;
- brake fluid level control lamp;
- speedometer;
- CHECK ENGINE controller;
- battery charge control;
- parking brake controller;
- oil pressure controller;
- air damper controller in the carburetor;
- outdoor lighting controller.
You can familiarize yourself with speedometer malfunctions in this material:
White block
The connector number, wire color and the unit (assembly) to which it goes are located in the white block as follows:
- The first connector has a black wire. Its purpose is the body (mass);
- In the second - red-brown - this is a low-voltage supply from the electronic control unit - tachometer;
- The third, yellow one is also a tachometer, but this is a high-voltage supply from a coil;
- The fourth, red-blue is Const from the battery + 12V, going through the sixth fuse;
- The fifth, green-white - it is intended to indicate the coolant temperature;
- Sixth, green-yellow – for size fuse F1;
- The seventh connector does not have its own color and goes to the “choke”, the throttle valve;
- Eighth, red and white - CHECK ENGINE light;
- In the ninth and tenth there are 2 orange wires each, leading to 2 power fuses F19+12V;
- In the eleventh there are 2 blue-brown wires leading to the “BK” terminal of the parking brake;
- The twelfth, brown-white is the output “D” of the generator;
- Thirteenth, gray and blue – for the oil pressure sensor.
White block (X1) and Red block (X2) of the VAZ 2110 instrument panel
Red block
The number is the connector according to the account, followed by the color of the wire and an indication of the device to which it goes in the red block of the VAZ 2110:
- Blue and red go to the sensor showing the external temperature;
- Orange - power fuse F19+12V;
- Black, 2 wires – ground, body;
- White - light switch for all devices;
- Blue - right direction indicator;
- Blue and black - left turn signal;
- Blue with pink - TJ level;
- Brown – leading to the trip computer;
- Gray - speed indicator;
- Pink - Fuel gauge (terminal “T”);
- 2 black-green wires - high beam fuse (F3);
- Blue and white - emergency light switch;
- White - leading to the ignition switch (terminal 50).
An article dedicated to tuning the dashboard backlight can be found here:
Common faults and solutions
Tidy "tens" with installed LEDs
The control panel may stop working for several reasons.
As a rule, removing the instrument panel is carried out for the following malfunctions:
- The backlight on the “tens” control panel stopped working. In this case, it is necessary to diagnose the condition of the contacts, as well as the condition of the wiring responsible for the suspension. The shield could stop working simply due to the combustion of safety elements, or the lamps could fail due to wear, often the cause is a short circuit. In principle, as practice shows, there are more than enough reasons, so sometimes identifying and solving a problem without a tester can be very problematic.
- One of the most serious problems for which a disassembled device may have to be replaced is complete failure. If there is a system failure, and all sensors and indicators on the dashboard stop working without exception, the controller arrows fall down, and the light bulbs simply do not light up. To eliminate the problem, you must first diagnose safety component number 15, it is marked as F6 and this part is located in the fuse block. If this component is burned out, then this problem can be solved simply by replacing it with a new one. However, first you need to figure out exactly what the reason for its burnout is. First, you should find and eliminate the cause, only then install a new element. As a rule, the cause of a blown fuse is a short circuit in the on-board network.
- The arrows began to spontaneously move up and down. This problem occurs quite often in domestic dozens; as a rule, the main reason is the problem of poor ground contact. Firstly, the ground wire is connected to a partition designed to separate the passenger compartment and the engine compartment. If you need to get to it, you will need to dismantle the audio system from its installation location; the quality of its fixation must be checked. Secondly, quite often during installation the mass is removed to another place so that it is more conveniently accessible. So if you have an anti-theft system, but there is no wire under the car radio, try looking for it under the trim, in particular, next to the driver’s left foot. Thirdly, the ground wire could have been damaged during installation of a new car radio. When the negative wire is connected, the ground wire must be unscrewed. Next, it is reinstalled, however, as practice shows, it is often less reliable than it was originally. As a result of vibrations that occur during driving, driving on uneven roads, including potholes and bumps, the mount begins to weaken over time. Accordingly, this leads to the contact being lost, and this, in turn, leads to the inoperability of the control panel. So, first of all, you need to securely fix the wiring, as this can cause certain difficulties in the future.
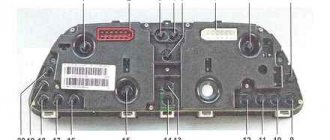
- Malfunctions related to the operation of the device itself. If you need to qualitatively check whether everything is normal with this device, dismantle it as much as possible from the installation site, but to do this, do not disconnect the wires that power it. First, the white wire marked X2 is diagnosed, which is connected to the first contact. In addition, using a multimeter, you should also diagnose the presence of voltage on pins 9 and 10. If the system is working properly, you will notice when diagnosing that the system voltage is 12 volts. We also recommend checking the back of the dashboard - all conductive tracks on it should be intact.
- As practice shows, the problem of the control panel not working is often caused by the failure of the cigarette lighter itself. This is because many car enthusiasts practice connecting various electronic devices and gadgets to this socket for various functions. For example, it could be a charger for a mobile phone, a tablet; the charger can also power a video recorder, radar detector, GPS navigator and other devices. Since devices of this type consume a large amount of current, the devices are often damaged by the cigarette lighter itself, and the problem of burnout of the F19 fuse element can also often occur. Accordingly, the control panel either turns off completely or continues to function, only incorrectly. If the fuse is working, you can try to disconnect the plug socket. If these steps do not produce any results, then simply replace the safety device.
- Tuning the dashboard of a VAZ 2110 is often the reason for its performance. The new shield may not have been installed correctly and is no longer working. Or, during installation of the device, not all wires were connected, or they could simply be bent. If the problem is in the wires, then replacing them will solve the problem (video author - LedStyle70).
Nuances of work
However, these pinout diagrams for the VAZ 2110 are, so to speak, basic, mostly the same, but there are also differences in color markings (especially by manufacturer). Therefore, you need to either use the instruction manual that came specifically with your car, or, armed with a marker and self-adhesive labels, “write everything out” in detail and not get confused when installing a new instrument panel.
Connecting wires to the VDO panel on a VAZ 2110
Connecting wires to the “Schetmash” panel in Kursk on a VAZ 2110
Connecting wires to the “AP” panel in Vladimir on a VAZ 2110
Connecting wires to the panel from the Kalina car to the VAZ 2110
During subsequent assembly, there will probably be a lot of devices that are not taken into account here, and, taking into account modern realities, many car owners plan to install them on the updated dashboard.
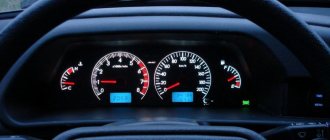
Indicators
Dashboard
At the moment of ignition, all the lights on the instrument panel light up; after the engine starts, most of the indicators go out. Sometimes, even after starting the engine, one light continues to glow or even blink. This alarms drivers, because it is difficult to say which component in a VAZ 2110 car is malfunctioning; diagnostics are required to determine the breakdown.
We know that the “ten” can be old or new. In both versions, the designations remain identical, the only difference is the location of the light bulbs and their diagram.
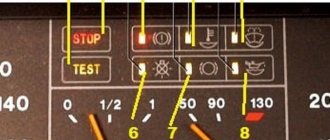
At the bottom of the instrument panel there are indicators that indicate a malfunction in the operation of various systems of the VAZ 2110. If they continue to light when the engine is running, it means that repairs will have to be carried out.
We go from left to right:
- The leftmost light, located on the instrument panel, refers to the air damper - the indicator is present in models with a carburetor engine;
- Oil can icon. If the indicator lights up or flashes, it means that the oil compression in the power unit has dropped and the pump is not working properly;
- The letter "P" inside a circle. The dashboard tells you that you forgot to turn off the parking brake;
- A light indicating a faulty battery or generator. Perhaps the alternator belt has broken, there is an open circuit in the circuit, charging is not performed;
- When the “high beam” is working, the headlight icon lights up on the panel;
- On light bulb icon – the indicator shows the lights on;
- "Check Engine" indicator. If it burns, then it is urgent to carry out diagnostics and subsequent repair of the VAZ 2110 engine; serious defects have appeared in the operation of the power plant. The best solution is to stop moving;
- Directly above the faulty engine sign is a warning light.
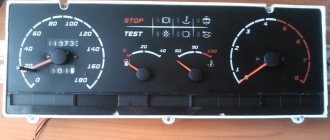
In addition to these indicators, the front part is equipped with a display showing mileage. Also in this area are the clock and setting keys for it. In the “tens” of the new generation, the screen may be of a narrow format, but the layout remains the same.
Additional panel
New cars have an additional panel with useful indicators. A flashing icon depicting a person with a seatbelt informs you that you should fasten your seat belt - this applies to both the driver and his companions. While driving, the wheel icon may light up; there is a possibility that the pads are worn out and require repair.
- Oil light - lights up when the oil level drops below normal - you should check the level as soon as possible.
- Windshield washer - it tells us that the washer fluid is almost empty.
- The thermometer above the container indicates an increased temperature of the coolant.
- A crossed out arrow icon means the parking or brake lights are not working.
Connecting the trip computer
The mentioned diagram took into account only one, brown wire leading from the red block to the trip computer, but this is clearly not enough. Therefore, let's see how the pinout occurs here.
- The fuel consumption signal from the electronic control unit is indicated by a green wire;
- Orange leads to terminal “15” in the ignition switch;
- Red and white - to terminal “30” in the ignition switch;
- Black, which is common, goes to ground;
- The speed indicator corresponds to brown;
- The positive terminal of the fuel sensor is green and red;
- Responsible for lighting the dashboard white, it leads to the light control.
Make sure that the board is not damaged, on which, in fact, uninterrupted reading of information from your VAZ 2110 depends, and providing it to you through all those sensors and devices that you always see in front of you.
- Author: ratico19
Rate this article:
- 5
- 4
- 3
- 2
- 1
(14 votes, average: 3.4 out of 5)
Share with your friends!
Pinout
If you want to perform repairs or other operations on the instrument panel, then you need a VAZ 2110 pinout. If you don’t have it, you will have to track every wire from the indicator, button to the device. The diagram allows you to determine which of the devices does not work in the event of a malfunction in one or another node. If the indicators in the old and new VAZ 2110 are identical, then the pinout is slightly different. There are two pads - red and white. Pinout may seem complicated only at the beginning. Let's take several connectors as an example.
The first number indicates the black wire that goes to ground. The thirteenth number is tied to the oil pressure sensor in the system, as the diagram tells us. The white block indicates the connector number, the wire and the unit (unit) to which the wiring goes. The red block is read in exactly the same way. The first connector contains blue and red wires; they go to the external temperature sensor. As for number thirteen, here the white wire leads to the ignition switch.
The pinout and diagram shown in this article are basic. They may differ in color marking, because many variations of the VAZ 2110 have entered the market. To avoid confusion, it is recommended to compare the data from the article with the instruction manual, which also contains a diagram and pinout.