How to find out what exactly the pump on 2109 has failed
The main problem that prevents the continued use of a water pump is its loss of tightness, which leads to the leakage of working fluid. Slightly less often, problems are caused by bearing wear.
In the first case, the pump remains suitable, therefore the easiest way to protect the power unit from overheating is to regularly restore the volume of liquid in the cooling system. This measure, however, gives only a temporary effect, since the leak will intensify day by day.
Bearing damage is much more serious. At first, this element signals its wear and tear with a fairly loud noise. If you do nothing, the destructive process will accelerate, and, most likely, the matter will end in the complete destruction of the part. The backlash formed in it is manifested by the following signs:
- loud grinding noise;
- pump jamming.
Ultimately, the likelihood of the drive belt breaking or even damaging the engine valves increases.
The pump installed on 2109 cannot be repaired, and therefore, if its improper operation is detected, the unit is dismantled and a new one is installed in its place.
The procedure, fortunately, is not particularly complicated, which means that replacement with a VAZ can be done without going to a car repair shop. The pump is located in an easily accessible place and no overall engine components (for example, a carburetor) will have to be touched.
What is a pump
A water pump unit responsible for removing heat from the engine using antifreeze. It is also called a centrifugal pump. If a car can use an injector or fuel injection is carried out by a carburetor, then the pump is always the same in design. With the help of this unit, coolant circulates through the system, removing heat from the vehicle's power plant to the radiator, which is responsible for cooling.
The pump must be changed after every 90,000 kilometers. This way you will have less trouble with the engine of your vehicle. VAZ-2109 models are no longer produced today, so they are all older than seven years, so you need to take care of the car more carefully. Their timing belt is changed after 45,000 kilometers, and the pump should be changed after one installation.
It is convenient to replace the pump when installing a new timing belt, since this pump is located in a casing under the camshaft gear.
What you need for work
To replace the pump on your VAZ-2109, you need to prepare some tools and materials. In particular, you will need:
- heads and wrenches (socket and socket) 17 mm and 10;
- knob;
- wide flat-tip screwdriver;
- sharp knife;
- wiping ends;
- capacity up to 10 liters for liquid;
- silicone neutral sealant;
- jack and additional support for the car;
- new pump with gasket.
Replacing the VAZ-2109 carburetor pump should be carried out on a level surface. In summer it is not forbidden to work outdoors, but in winter it is better to use a warm garage.
Pump location
The water pump is installed on the right (in the direction of travel) side of the engine under a plastic cover. There is also a gas distribution mechanism that drives the pump toothed pulley through a belt. This arrangement creates a number of problems.
- To inspect the pump you have to remove the plastic casing.
- Due to a leaky seal and a small leak, antifreeze gets onto the belt, which quickly fails.
- If the bearing is severely worn, the shaft may jam, and the timing belt may jump off or break. In 90% of cases this leads to pistons hitting the valves, and subsequently to expensive repairs.
The coolant pump is installed on the right side of the engine
For these reasons, it is necessary to periodically (every 10–15 thousand kilometers) inspect the gas distribution mechanism for belt tension and pump performance.
Preparatory activities
First of all:
- position the car in a place convenient for you and be sure to set the handbrake;
- make sure the gear lever is in neutral;
- If the machine has been used recently, wait until its power unit has cooled down.
Next, drain the coolant from the system. For this:
- move the heater adjustment lever to the right until it stops;
- remove the ignition mechanism with the bracket holding it;
- in the engine compartment, unscrew the coolant reservoir cap;
- find the drain hole (it is located at the bottom of the cylinder block);
- place the container;
- remove the plug;
- wait until the antifreeze has completely drained out;
- Wipe the engine dry if liquid gets on it.
An important point is that when the coolant is very dirty, it would be advisable to flush the entire system.
Replacing the water pump on VAZ 2108 and 2109
Even an inexperienced car enthusiast can repair and replace the pump on a VAZ 2108/09. You will need a standard set of tools - open-end and socket wrenches (10 and 17), screwdrivers, etc. If you plan to replace the pump, you should purchase a kit consisting of the pump assembly itself and a sealing gasket, and silicone sealant. In addition, for work you will need rags, acetone solvent and a canister of fresh antifreeze.
The repair kit for the water pump must contain a new gasket
As already noted, the pump is built into the bore of the engine cylinder block. The pump drive pulley is rotated by the timing belt. Therefore, to dismantle the pump, you must first remove the belt protective cover and the belt itself. But before this you need to perform a number of preparatory operations.
- The negative terminal of the battery is disconnected.
The negative terminal of the battery is indicated by a pictogram on the lead contact
The drain hole is located at the bottom of the cylinder block
The tension roller is loosened by unscrewing the fixing screw
After removing the belt, you can proceed directly to dismantling the pump. Using a 10mm wrench, unscrew the three mounting bolts and remove the pump. This is not always easy to do. The pump may “stick” to the landing site. In this case, you will need a chisel and a hammer, with the help of which the layer of old sealant in the socket is carefully torn off. After this, the pump can be easily removed.
The pump is secured with three bolts to the cylinder block body
It is impossible to completely remove the pump in the normal position of the car - the body gets in the way. You need to raise the motor slightly. To do this, the right side of the car is lifted on a jack - the engine is tilted.
If you have an assistant, you can do without hanging the body. One person forcefully pulls the motor in the direction opposite to the direction the pump exits the socket. Another person pulls out the pump at this time.
After removing the water pump, the impeller blades are inspected. They may break off or crack. This happens if the engine has been severely overheated, or the impeller is made of poor quality material. Small blade fragments usually fall out of the drain valve.
Chips on the impeller sharply reduce pump performance
To be completely sure that the cooling system is clean, it is recommended to flush it using the following algorithm.
- Remains of sealant, dust and debris are removed from the engine surface with a rag and solvent.
White spirit cleans the surface well from sealant residues
Professionals recommend replacing the tension roller along with the water pump. To check the serviceability of the roller, rotate it by hand. If the roller rotates with difficulty or a crunching sound is heard, it needs to be replaced.
It is generally accepted that the water pump should be changed every 90 thousand km of the car. However, this figure is conditional, depending on the operating conditions of the vehicle. Obviously, in the city cycle with constant traffic jams and limited speed, the cooling system will wear out faster than on the highway. Therefore, the need to replace the pump should be assessed based on its actual condition.
The main factor that destroys the bearing and oil seal of the water pump is an overtightened timing belt. If there is no key with a dynamometer, craftsmen use an ordinary steelyard. It is necessary to achieve such a belt tension at which the deflection of the rubber sheet in the middle between the pulleys is 10–15 mm. with a force of 10 kg. The steelyard hook clings to the belt and is tensioned to the 10 kg mark. The depth of belt deflection is measured.
Video: disassembling the water pump of a VAZ 2109/08 car
Replacing the VAZ-2109 pump
To carry out the replacement, it is necessary to remove the timing belt protective cover. It is held in place by 3 bolts - unscrew them with a 10 mm wrench. Next, the cover is dismantled and placed next to it, since there are marks on it that help set the TDC of the first cylinder.
Now, holding the crankshaft by the pulley, turn it until the notch on the camshaft gear coincides with the convex point located on its rear cover. Upon completion of the described manipulations, the casing is returned to its place, but not screwed, since you only need to make sure that the marks on it coincide with the position of the pulley.
It is also advisable to look into the inspection slot of the clutch housing - there the notches should similarly coincide. If this does not happen, you will have to turn the crankshaft some more.
At the next stage, arm yourself with a 17 mm wrench and use it to unscrew the nut holding the tension roller. The last element must be completely removed - be sure to check its functionality (unimpeded rotation and absence of play indicate serviceability).
Remove the transmission belt from the camshaft gear and throw it down. Now, using the same 17 mm wrench, remove the bolt holding the above-mentioned sprocket. To prevent it from spinning, wedge it with a screwdriver. Carefully remove the gear and be careful not to lose the locking key.
All that remains is to remove the nut and 3 more bolts that secure the rear camshaft cover - here you will need a ten key. After dismantling the named part, the pump can be removed quite easily - you just need to unscrew the elements that secure it.
Proceed to remove the pump - you will not be able to do this with your bare hands. First, it is pryed up with a screwdriver and torn from its place, and then a jack is placed under the engine (exactly where the failed unit is located). The 2109 engine is raised a little - this allows you to increase the gap between it and the fender liner, without which it is simply impossible to move the pump.
When the assembly is dismantled, the installation site should be cleaned, since often part of the old sealing gasket sticks and peels off. This can be done conveniently with a regular knife. Upon completion of the action, everything must be wiped thoroughly with a dry, clean cloth.
The new unit is mounted with the marking facing up (it is located at the end). Tighten the retaining bolts thoroughly, but be careful - they are screwed into the aluminum. Further work is performed in the reverse order to that described.
Troubleshooting
Malfunctions of the water pump on front-wheel drive VAZ models manifest themselves as follows.
- Extraneous noise appears on the right side of the engine, increasing with increasing speed.
- Traces of coolant (not to be confused with engine oil) form near and under the timing belt assembly.
- A puddle appears under the car, and the level of antifreeze in the expansion tank drops noticeably.
- The electric cooling radiator fan turns on more often than usual in any weather.
The protective cover is attached to the engine with three bolts
Practice shows that most car enthusiasts discover the problem at the penultimate and final stage of wear, when the antifreeze has already leaked to the ground or the pump shaft has jammed.
It is quite difficult to clearly identify the sound of worn water pump bearings against the background of a running engine. The problem is compounded by noise from other faulty components, such as knocking valves. Therefore, at the first suspicion, you should remove the plastic timing case by unscrewing three bolts with a 10mm wrench and diagnose the pump as follows.
- Carefully inspect the area around the water pump gear and timing belt for traces of coolant.
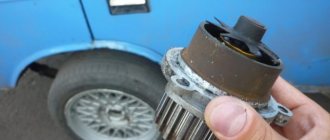
Traces of coolant under the pump indicate an antifreeze leak
- Look at the position of the toothed pulley relative to the other gears and the plane of the steel casing. It shouldn't be skewed.
After complete wear of the bearing, the pump shaft may become distorted.
- Try rocking the gear along the shaft axis with the belt tense. If this succeeds, the pump must be dismantled.
- Loosen the tension roller and timing belt and rock the shaft. If play is detected, move the belt and turn the pulley by hand. It should rotate easily and silently.
These symptoms can appear individually or simultaneously. You can detect oil seal wear when the bearings are working (there are traces of antifreeze, but there is no shaft play), and vice versa. In any case, the pump should be removed and, if necessary, disassembled or replaced.
The method for identifying a faulty water pump is the same for versions of a car with a carburetor and an injector; there is no difference.
Video: operation of a faulty pump
Assembly nuances
When returning drive belt 2109 to its place, make sure that all marks on the crankshaft are in the correct position. If they move, you will have to spend additional time adjusting both the ignition and the gas distribution system.
When the tension roller is put in place, do not forget to also make sure that the belt does not dangle on it.
Sometimes, after the reassembly is completed, the car does not want to start or starts poorly. This symptom indicates that the belt is installed incorrectly. To fix the situation:
- remove it from the gear;
- turn it literally a couple of millimeters;
- put the belt back in place.
How to remove the coolant pump?
It may be difficult to remove the pump yourself if you are doing it for the first time:
- Disconnect power from the battery (disconnect the negative terminal).
- Drain all coolant.
- After this, remove the timing belt along with the tension rollers. If necessary, replace them with a functional one.
- Remove the camshaft gear.
- Then unscrew the five nuts to gain access to the pump.
The final removal of the pump must be done carefully, as the pump may be damaged. Clean the threads from metal shavings and corrosion residues. If necessary, restore the thread.
Basic cooling system malfunctions
The main indicator of the performance of the cooling system is the engine temperature sensor. It is located on the dashboard inside the car.
The engine temperature sensor on the dashboard of the VAZ 2108/09 is located to the right of the fuel sensor
If the engine overheats, the gauge needle is in the red zone. There may be several reasons.
- Insufficient coolant level or leakage in the system.
- Thermostat failure.
- Problems with the water pump.
- Temperature sensor malfunction.
First of all, you should lift the hood and inspect the cooling system. The very fact of a coolant leak is easily determined by the liquid level in the expansion tank. It is much more difficult to find the exact location of the leak. This often requires a thorough inspection of all areas of the engine compartment.
The most unpleasant option is a breakdown of the gasket under the valve head and coolant entering the oil sump. A symptom of this development of events is a change in the color of the oil. It turns dull white with rainbow streaks caused by ethylene glycol.
Sometimes the cooling system hoses leading to the interior heater are damaged. This usually happens after severe frosts or prolonged inactivity of the machine. In this case, the coolant leak should be looked for under the “dashboard”, lifting the floor mats and removing the interior trim. The leaking liquid accumulates under the floor mats or is absorbed by the interior insulation.
Overheating of the engine often occurs due to the fact that the radiator honeycombs become clogged. Dirt, dust and fine sand, falling on the front plane of the radiator while driving, form a dense crust, which prevents engine cooling. In this case, it is enough to clean the radiator with a jet of water under pressure. It is not recommended to use a wire brush.
A clogged radiator honeycomb leads to engine overheating.
A thermostat failure, as a rule, does not lead to engine overheating. The valve that falls on it opens a large circle of coolant circulation, thereby reducing the temperature of the liquid.
Reasons for failure
A centrifugal pump does not always survive until scheduled replacement, since there are many other reasons for its failure. First of all, the malfunction is a decrease in the level of antifreeze in the system, which often happens when the oil seal is damaged. The reasons for this may be the following:
- sudden changes in temperature;
- contamination, for example, liquid dirt that accidentally gets under the hood;
- rare changes of antifreeze (it may contain a lot of oil and combustion products);
It is possible to detect oil seal leaks by characteristic leaks that are visible during external inspection. If you notice a knocking sound from this unit, this may indicate bearing failure. With this symptom, it is necessary to immediately replace the VAZ-2109 pump, since driving such a car can lead to jamming of the pump or displacement of its shaft.
The following signs may indicate that the pump is faulty:
- traces of antifreeze on the ground after parking the car;
- Howling sounds are heard while the engine is running;
- engine overheating (usually this happens due to rotor failure).
If you are not sure whether to replace the pump, it is advisable to feel the upper hose going to the radiator. If it is warm, then it is necessary to urgently replace the failed part.
When you change the timing hose, remove the casing from the unit and inspect it for integrity. In some cases, the water pump fails due to defects or cracks in the housing.
Self-diagnosis
Based on indirect signs, one can guess whether the pump needs to be replaced, but this issue can only be more accurately understood by removing and inspecting this unit from all sides. You can preliminary judge the condition of the pump only by some indirect signs. For example, when the engine is operating in normal mode, a pump malfunction may be indicated by the temperature of the upper radiator hose and the presence of liquid in it. The hose must be warm. This can be determined by touch.
An external inspection can easily determine the condition of the oil seal. To do this, just remove the timing cover and inspect the oil seal hole. If there were leaks, deposits of a characteristic color will tell you about it.
