Objectively, the carburetor installed on Oka cars has a simple design. And if you use it correctly, then no problems should arise.
The main thing here is to respond to changes in a timely manner, and also not to waste time and effort.
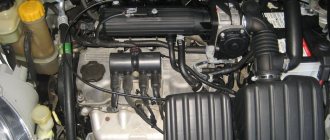
The carburetor is the main working element of the engine on the VAZ 11113. Depending on the period, different modifications were installed on the Oka. But in general their device was the same. The difference was observed only in certain settings.
Device
Oka first appeared on the Russian market in 1987. The production continued until 2008.
The first was the VAZ 1111 version. This is a car with a 2-cylinder engine and a 0.65-liter engine.
Then an updated version of the VAZ 11113 appeared. It has been produced since 1995. Here the engine already had a volume of 0.75 liters.
For the first version of Oka, a DAAZ 1111 carburetor was developed. For the subsequent modification with a 0.75-liter engine, carburetors of the DAAZ 11113 series were used. Then they were slightly adjusted.
Objectively speaking about the old carburetor is almost pointless. There are fewer and fewer cars with it. Yes, and the settings are carried out in the same way as on the updated version.
The DAAZ 11113 carburetor is a device that creates an air-fuel mixture in factory-specified proportions. This ensures stable operation of the internal combustion engine, regardless of the currently selected mode.
The body is made of 3 elements:
- top cover;
- the main part that comes with the float chamber;
- the lower part where the throttle valves are located.
The device itself is two-chamber. Sequential opening of existing throttles is provided.
Structurally, it is worth highlighting the following components:
- GDS. This is the main dosing system. Works in all available modes. It consists of diffusers, fuel supply jets, as well as air jets in both chambers.
- XX. This is the idle system. Serves to maintain stable operation of the internal combustion engine at minimum speed. Helps you use fuel wisely.
- Economizer. Helps enrich the air-fuel mixture when the speed increases and the engine operates under a fairly high load.
- Acceleration pump. Its main task is to work smoothly without noticeable failures. Even if the driver presses the gas pedal sharply.
- Starting device. Aimed at stable starting of the car engine in any weather.
- Float chamber. Ensures that a constant level of flammable liquid in the carburetor is maintained so that the engine runs stably;
- Transitional system. Helps to accelerate smoothly, eliminating jerking when the secondary chamber opens.
Each component of the system has its own specific task.
To set up and adjust the unit, special adjusting screws are used. Tuning is also carried out by selecting jets and changing the angles of the throttle and air dampers.
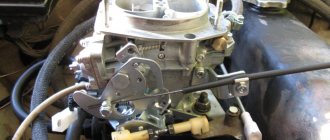
Carburetor "Oka"
The power units of the Oka car 1111 and 11113 were equipped with a carburetor power system. Now such a system is outdated and not used, but at the time of the start of production it was a priority; injectors were not used on domestic cars of those years of production.
The main element of such a power system is the carburetor. VAZ-11113 and its “junior” version received their own separate carburetor manufactured by DAAZ. This unit could not be simply borrowed from other models due to the fact that the Oka engines are 2-cylinder, and the performance indicators of the carburetor of the same VAZ-2108 simply did not meet the required requirements.
But the designers took the DAAZ-2108-1107010 from the Eight (aka Solex) as a base and based on it they created the DAAZ-1111-1107010, which was installed on the Oka.
It is noteworthy that when creating the Oka carburetor, not only Solex was used; some design solutions were also borrowed from Weber and Ozone carburetors.
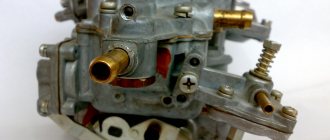
The VAZ-11113 carburetor is similar in general construction principle to the Solex from the VAZ-2108, but there are some features, for example, in the Oka unit on the body there are two plugs, by removing which you can get to the fuel jets without disassembling the carburetor itself .
How it works
The operation of the carburetor in question on Oka cars is based on the same principle as similar systems on other wheeled and widely used vehicles.
- First, fuel from the float chamber enters the well through the fuel system to form the air-fuel mixture.
- The nozzles then transfer the mixture to the diffusers of the main component, that is, the carburetor.
- The device responsible for idling takes gasoline from the wells. It follows the jets and forms a mixture with oxygen in specified proportions.
- Air coming from the second and first carburetor chambers is also added to the components.
- When the throttle is opened slightly, the gasoline mixture moves into the chamber. If the fuel fluctuates, the economizer regulates this phenomenon and stabilizes engine operation.
When ignited, the air-fuel mixture creates a force that allows the crankshaft to rotate and thereby set the wheeled vehicle in motion. In this case it is Oka's car.
What carburetors are installed on Oka cars?
To equip the power units of Oka cars, carburetors produced by the Dimitrovgrad Automotive Unit are used; DAAZ carburetors of a special series are produced.
The DAAZ-1111 carburetor has some specific differences from similar devices . Thus, the float chamber of the mechanism is placed not along the carburetor, but across it. Thanks to this device, the carburetor mechanism can receive additional enrichment of the mixture immediately at the moment of sudden acceleration or braking.
Carburetor mechanism used to equip Oka cars
The DAAZ-1111 itself has a simplified design, as it contains a minimum number of electronic components. The main parts of the unit are:
engine starting device;
two internal combustion chambers;
float chamber and float.
All elements of the device are combined in a common housing cup. Protection from dirt, dust adhesion and unfavorable climatic conditions is provided by the housing cover.
For ease of operation and maintenance, the carburetor is divided into three parts:
The upper one, which consists of a cover with a flange, studs for fastening the air filter element and a fuel fitting.
The middle one is the carburetor body itself, which contains diffusers and a float chamber.
The lower one consists of throttle valves and drive rods.
The carburetor on the Oka performs its functions in exactly the same way as similar mechanisms installed on other vehicles. The fuel is supplied to the cavity of the float chamber, from where it is sent to the first or second chamber for air enrichment. Special sprayers crush gasoline droplets, so they easily mix with air and turn into an air-fuel mixture. This mixture enters the carburetor through diffusers and then into the engine.
Table: parameters of DAAZ-1111–1107010 carburetor dosing systems
How to clean a carburetor
Before you start adjusting the carburetor on the Oka, you must clean it. It is pollution that is the main reason for unstable engine operation on these machines.
The carburetor unit becomes clogged over time. Especially if you use low quality fuel. Dirt penetrates the jets, as well as the fuel channels.
This may result in the following symptoms:
- loss of idle speed;
- the engine does not gain speed;
- the effect of engine tripping occurs;
- fuel consumption increases;
- Black smoke comes out of the exhaust pipe.
In many of these situations, major repairs are not necessary. It’s enough just to clean the system and then start adjusting the carburetor on the Oka 11113.
Practice shows that most often the HDS channels become clogged when the engine does not gain speed when the damper of the first chamber is opened. Although the idle speed does not disappear.
Here you should remove dirt using compressed air without removing the carburetor.
The meaning is this:
- turn off the Oka engine and raise the hood;
- remove the air filter housing;
- use a pump, blower or compressor to blow out the channels from the GDS;
- start the engine;
- check the stability of its operation.
If the behavior has become normal, then the filter is put in place and the machine continues to be used. If not, then you need to blow it again.
Overfills the carburetor
Often on the Oka a situation arises when the carburetor floods; with such a malfunction it is usually very difficult to start the car, and in other cases the engine does not start at all. There may be several reasons for the problem:
- does not hold the needle valve;
- the fuel pump creates too much fuel pressure (if a return line is not installed);
- the level in the PC is set incorrectly (more than normal);
- The float is not sealed.
Finding the cause of the defect usually begins with inspecting the parts of the float chamber, and if there is significant overflow and smells of gasoline, first of all you should pay attention to the locking mechanism.
How to adjust the fuel level
Another important point on how to properly and completely tune a simple carburetor installed on an Oka car.
Sometimes the owners of this domestic small car are faced with such a problem. The fuel level in the float chamber decreases. It turns out to be noticeably smaller than recommended. This causes the mixture to become lean. As a result, the car accelerates with difficulty, fuel consumption increases, etc. If the level increases, then the appetite also increases. In both situations, you need to adjust the position of the float.
Self-adjusting the fuel level in the carburetor of Oka cars should not cause any particular difficulties. It is important to remember the following. When the carburetor fills with fuel, this indicates problems that have nothing to do with adjustment. Most likely, the locking needle does not fit tightly enough to the seat. The problem with the situation is that adjusting the fuel level will not in any way correct the situation in the carburetor of the Oka small car. You will have to completely change the locking mechanism in the chamber.
When the level is low and there is not enough gasoline in the chamber, a simple adjustment will help correct the situation. You don't need any special skills to work.
The instructions are presented as follows:
- remove the air filter cover;
- disconnect the choke cable;
- disconnect both fuel hoses, that is, the supply hose, as well as the return;
- unscrew the 5 screws that secure the top cover;
- check the condition and remove the cover along with the gasket to the side;
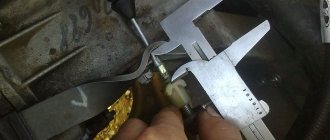
- arm yourself with a caliper or a cut piece of a ruler;
- measure the distance between the upper edge of the housing and the surface of the fuel;
- Normally, this distance for Oka is 22-23 mm;
- if the actual data differs, you need to bend the float tongue to one side;
- bend the tongue until the distance corresponds to the norm;
- If the adjustment is successful, return the cover and filter to their place.
Now you understand how you can adjust the fuel level inside the carburetor float chamber on the Oka yourself. But you need to remember one thing. When making adjustments, the locking needle may fall out when removing and installing the cover.
Carburetor repair at Oka
The concept of carburetor repair includes the following:
- proper dismantling of the device;
- washing;
- defects;
- device diagnostics;
- OKI carburetor adjustment;
- replacement of defective parts as necessary;
- reassembly and its installation in place.
The car owner must understand the following - if he does not have any experience in vehicle maintenance, then adjusting the OKI carburetor with his own hands is impractical. For VAZ-OKA cars, carburetor repairs must be performed only in a car repair shop.
Before reading further, I recommend that you watch the video, in it you will see a lot of useful information on repairing, cleaning and adjusting the DAAZ 1111 carburetor:
The main defects that occur during carburetor operation
The carburetor is designed in such a way that exhaust gases are removed not simultaneously, but over time. In other words, the engine will experience certain difficulties when operating at high speeds. In addition, the design of the DAAZ 1111 carburetor allows lubricants from the engine to enter the carburetor. And this is a direct path to the formation of soot.
During normal operation of the ignition system, the carburetor of this model may experience the following problems:
- Unstable operation of the power plant due to the fact that carbon deposits have formed on the jets;
- Due to incorrect operation of the gas pedal, the air jets became clogged;
- A decrease in the dynamic parameters of the car, which occurs due to a decrease in the fuel level in the carburetor float chamber. That is, the engine ceases to receive the required amount of fuel to operate at high speeds;
- Uneven movement of the vehicle (jerky) indicates that carbon deposits have accumulated on the float mechanism, preventing the normal movement of fuel in the system;
- Floating engine speeds, with a constant fuel supply, indicate that there is a need to regulate the carburetor starting device.
But the main sign of malfunction of the OKA carburetor - VAZ 11113 is a sharp increase in fuel consumption.
If these defects are detected, one thing can be said - adjusting the OKA carburetor with your own hands is inevitable, and if this does not help, then it will have to be repaired in a specialized workshop where the necessary devices, fixtures and tools are available.
Removing the carburetor on the oka
Removing the carburetor from the engine is not that difficult. But you still need to adhere to a certain sequence of actions. To perform dismantling, you will need keys with jaw sizes 8 and 13, and a flat-head screwdriver.
BY THE WAY! IT IS APPROPRIATE TO CARRY OUT ALL WORK RELATED TO MAINTENANCE OF THE POWER UNIT, INCLUDING THE OKA CARBURETOR, WITH THE BATTERY DISCONNECTED.
Removing the carburetor on the oka
The sequence of operations that must be performed to dismantle the carburetor:
- Removing the air filter. Unfortunately, the carburetor is installed in such a way that it blocks access to the carburetor.
- After removing the filter, it is necessary to unscrew the bolt with which the damper is connected to the bracket and release the drive rod from all connections.
- After releasing the draft, it is necessary to disconnect the ventilation hose connected to the fitting and disconnect the wiring leading to the economizer valve.
- The next step is to disconnect the vacuum regulator hose.
- By loosening the clamp on the fuel line, you can remove the hose. In this case, you need to be prepared for the fact that a small amount of fuel may spill.
- After the carburetor is completely freed from the rods and sleeves, you can begin to dismantle it.
Immediately after the carburetor is removed from the power plant housing, a hole will be visible in it that needs to be covered. This is necessary to prevent dust and dirt from getting inside. Only then can the carburetor be adjusted.
How to stabilize idle speed
Several symptoms indicate problems with idle speed:
- idle speed disappears altogether;
- the engine behaves unstably at low speeds;
- The engine stops spontaneously and stalls.
In certain situations, such phenomena require removal of the carburetor. And this is a troublesome matter. But first, it makes sense to try to solve the problem without dismantling it. Purging is applied.
To clean the idle air system channels, you must:
- turn off the engine;
- remove the air filter cover;
- disconnect the power cable;
- unscrew the solenoid valve from the XX system;
- close the channel with your finger in the area where the solenoid valve was disconnected;
- start the engine of the car;
- give gas;
- let the power unit run for a while;
- Blow out the jets and valve with compressed air;
- return everything to its place;
- connect the power wire;
- use the quantity screw to add speed and start the internal combustion engine.
If the cleaning was effective, then the engine will run when idling. But the speed will be increased.
Then you need to tighten the quality screw and adjust the fuel mixture. Tighten until the internal combustion engine begins to reduce speed and show slight signs of failure.
Next, unscrew the quality screw a little. Until the engine starts running stably. Using the quantity screw, set the idle speed to normal. For Oka cars this is about 850-900 rpm.
In a situation where purging does not give the desired result, you will have to dismantle the carburetor, disassemble the element, and also thoroughly clean it.
VAZ 11113
Adjusting the carburetor drive
Performed when replacing the carburetor
, as well as when drive parts are worn or replaced.
- When the gas pedal is fully pressed, the throttle valves should be fully open, and when released, they should be closed.
- If this is not the case, by unscrewing or tightening the adjusting nuts on the front end of the drive cable (carburetor side), we achieve the correct position of the throttle valves.
- The tension of the cable with the pedal fully released is checked as follows: we pull the cable in the middle of the branch near the carburetor by about 10 mm, while the throttle valves should not open. If you pull the branch back a large amount (about 15 mm), they should begin to open slightly.
Adjusting the fuel level in the float chamber
Performed when replacing a needle valve or float (see also “Diagnostics of engine malfunctions”).
- We remove the carburetor cover (see “Disassembling the carburetor”) and measure the protrusion of the needle valve above the cover, which should be 10 mm. If this is not the case, replace the gasket or valve with gasket.
- Having placed the float with its lower part on a flat surface, measure the distance from it to the center of the float axis. It should be 23.1 mm. We adjust the size by bending the lever.
- We measure the distance from the tongue to the top plane of the float, which should be 2.0 mm.
- A drill can be used as a gauge.
- We adjust the distance by bending the tongue. In this case, its supporting surface must be perpendicular to the axis of the needle valve.
Adjusting the starter
Performed on a removed carburetor.
- When turning the choke control lever counterclockwise all the way, the choke should close completely. If it does not close, eliminate the cause of the jam (or straighten the deformed valve).
- With the air damper completely closed, the throttle valve of the first chamber must be slightly open to the starting gap C (see figure).
- This gap is adjusted by turning the screw on the throttle drive lever with a thin slotted screwdriver.
- With the air damper completely closed, press manually (you can use a screwdriver, stick, etc.) on the trigger rod until it stops. In this case, the air damper should open slightly to the starting gap (see table above). We use a drill as a gauge.
- To adjust the gap, use an “8” wrench to loosen the lock nut of the screw located on the starter cover. Inserting a thin slotted screwdriver into the slot, unscrew (to increase the gap) or tighten (to decrease the gap) the screw, and then tighten the locknut.
Starting device: 1 - starting device lever; 2 — throttle valve; 3 - thrust screw for opening the throttle valve; 4 — lever on the axis of the throttle valve of the first chamber; 5 — starter control cable: 6 — lower edge of the cam groove; 7 — upper edge of the cam groove: 8 — air damper spring; 9 - air damper: 10-lever on the air damper axis; 11 — trigger diaphragm rod: 12 — trigger diaphragm: 13 — diaphragm thrust (adjusting) screw; 14 — screw for fastening the trigger lever; B - starting gap of the air damper; C - starting gap of the throttle valve.
Adjusting the idle system
Performed during maintenance or engine malfunctions (see “Diagnostics of faults”).
- The adjustment is performed on a warm engine. At the factory, the engine is adjusted to a minimum crankshaft speed of 820-900 rpm and a carbon monoxide (CO) content of 0.5-1.2%, after which a restrictive plastic sleeve is pressed onto the screw head. If by turning the bushings it is not possible to restore the factory adjustment parameters, we unscrew the screw, breaking the bushing, then by rotating the quantity screw we set the crankshaft speed, and by turning the quality screw we set the content of carbon monoxide in the exhaust gases.
- When you press the gas pedal, the engine should increase the crankshaft speed without interruption, and when you release the pedal, it should not stall.
- When turning the quantity screw clockwise, the crankshaft speed increases.
- When turning the quality screw clockwise, the CO content in the exhaust gases increases.
Adjusting the carburetor float mechanism
Adjusting the float mechanism is a very important and at the same time simple operation when servicing a carburetor. Due to the design of the float mechanism, errors made here are most often the cause of its unsatisfactory operation.
The adjustment is performed with the cover removed and includes two operations:
— checking the degree of protrusion of the needle ball;
— adjusting the position of the float bracket tongue.
The first operation is performed to determine the condition of the needle damping ball and the resulting ability to make subsequent adjustments. At the same time, on the cover removed from the carburetor, measure the distance from the plane of the gasket to the ball protruding from the needle. A distance of 10 mm is considered normal. With a smaller size, you can install an additional gasket under the needle seat.
Before checking the fuel level, first unscrew the carburetor cover mounting screws, leaving the two middle screws tightened. Also, loosen the screw securing the clamp on the fuel hose. Then manually pump up the fuel with a fuel pump until the float chamber is completely filled; As quickly as possible, to prevent “excess” fuel from penetrating into the float chamber, remove the hose from the fuel supply fitting.
If the measured value does not correspond to the tabulated data, bend the float tongue; To lower the level, bend the tongue up, to raise it, bend it down. Before checking the level again with a rubber bulb or syringe, remove at least a third of the fuel from the float chamber.
Once correctly adjusted, the float mechanism remains for a very long time, being disrupted most often due to careless handling of the removed cover, as well as due to the natural wear of the rubbing parts of the mechanism: the needle locking cone, its seat, the tongue and the axis of the bracket.
In operation, there is usually no need to specially disassemble a properly functioning carburetor to check the adjustment; it is enough to combine its control with regular cleaning of the float chamber and air jets.
How to set up a carburetor
The carburetor is one of the most complex components of a modern car, allowing the use of a particular engine with maximum efficiency. It is the correctness of its adjustment that determines fuel consumption and the content of toxic substances in exhaust gases. Regardless of the specific model of carburetor and car, it is possible to correctly adjust the parameters of the air-gasoline mixture only using a gas analyzer and professional measuring equipment. It is advisable to adjust the carburetor for efficiency after any work on the engine.
However, you can adjust it to your driving style yourself.
Video tutorial on how to clean and adjust a VAZ carburetor
In this case, you should follow the basic rules:
- The carburetor can be adjusted only after the engine reaches operating temperature;
- You should check and clean all high-voltage wires, as well as battery terminals;
- It is necessary to make sure that the fuel supply system is working properly and that the ignition is set correctly. You can start adjusting only after making sure that all other systems are working properly. Often the cause of dips and poor response to the pedal is simple contamination of the mesh filter;
- During adjustment, it is advisable to turn on all powerful consumers of electricity: high beams, stove, heated windows, etc.;
- Before disassembling and cleaning the carburetor, it is advisable to purchase a repair kit for a specific model. It contains jets, sealing gaskets, diaphragms of the accelerator pump, starting device and other auxiliary elements;
- It is unacceptable to use rags, brushes or metal wire to clean internal surfaces. The best option is to use compressed air.
SOLEX is a popular manufacturer of carburetors for domestic cars
The main manufacturers of carburetors for domestic cars are Ozon, Weber, PeKAR (K151) and Solex (SOLEX). There are no fundamental differences in their adjustment. However, it must be taken into account that all modifications of the Solex 2108 carburetor have different calibration data, which is caused by their widespread use on VAZ, ZAZ and AZLK vehicles.