December 14, 2015 Lada.Online 34 305 2
Many modern foreign cars have daytime running lights designed in the style of angel eyes. Such lights can be made using different methods, but we will focus on only one of them. Let's look at the advantages of plexiglass tubes, as well as their disadvantages.
Angel eyes on cars - what is it and what types are there?
Angel eyes are luminous circles installed in the car's standard optics. This type of tuning became popular after the release of production BMW cars with such headlights. Nowadays, these lights are serially installed only on some models, but you can install angel eyes on any car yourself.
They are not only a car decoration, but can also be used instead of side or parking lights. LED rings cannot be used as daytime running lights.
Angel eyes are a car decoration and can also be used as side lights or parking lights.
LED angel eyes or LED
The ring is made of LEDs soldered to the base. Since LEDs are afraid of voltage surges, they must be connected through a stabilizer.
LED Angel Eyes are made from LEDs soldered onto a base.
Pros:
- high brightness;
- service life up to 50 thousand hours;
- consume little energy;
- are not afraid of shaking and vibration.
Minuses:
- must be connected via a stabilizer;
- If one diode fails, the entire ring has to be replaced.
Gas discharge or CCFL
The glass ring is filled with neon and protected by a plastic case. For them to work, you need to connect the ignition unit.
Gas discharge angel eyes - glass ring filled with neon and protected by a plastic case
Advantages:
- light is distributed evenly throughout the ring;
- are not afraid of vibrations;
- produce soft light;
- low cost;
- consume little energy.
Flaws:
- short service life of the inverter, about 20,000 hours;
- maximum brightness occurs after a few minutes;
- Brightness is worse than LED.
Multicolor or RGB
LEDs soldered onto the base consist of three crystals (red, green, blue). Using the controller, colors are mixed, so you can get any color.
Pros:
- high brightness, therefore clearly visible even during the day;
- long service life;
- are not afraid of vibrations;
- You can change the color and glow mode.
Minuses:
- a controller is required for connection, and this increases the cost of the kit;
- If one diode fails, the entire ring must be replaced.
Cluster or COB
Luminous crystals are soldered directly onto a solid base. In a conventional LED, the crystal is still in the ceramic substrate, so the COB is smaller.
Advantages:
- best brightness;
- long service life;
- light is evenly distributed around the ring;
- vibration resistance.
Flaws:
- high price;
- If one crystal burns out, the entire ring must be replaced.
We make AG on Priora with our own hands
For those who are not looking for the easy way out, buying ready-made angel eyes for a Priora is not an option. I wish I could do everything myself from scratch! It can be done. I offer two options for the Priora, you can choose either one.
Eyes on the Priora with two LEDs
This is an option for real DIYers, but it is extremely budget-friendly. To implement this design you will need:
- 4 solid transparent plexiglass rods, 500 mm long and 8-10 mm in diameter.
- 8 super bright lead wire LEDs.
- 8 resistors of 1 kOhm each.
- Sealant.
- 2 drops of any transparent nitro varnish or nail polish.
That's all you need to make these angel eyes.
You will need several tools that are in every home:
- A hacksaw for metal or a blade from it.
- Two pliers or pliers (round nose pliers, pliers, etc.).
- 2 round mandrels according to the internal size of the rings AG*.
- Drill or screwdriver.
- Drill 5.5 mm.
* If you have a Bohs block headlight on your Prior, you will need mandrels with a diameter of 105 mm minus 2 rod diameters and 115 mm minus 2 rod diameters. If there is a Kirzhach block headlight, then 100 mm minus 2 rod diameters and 110 mm minus 2 rod diameters.
The role of mandrels can be played by a suitable sized jar or bottle, and as rods it is convenient to use a transparent cane for blinds without a hole inside. A total of 2 canes will be needed.
Cane for blinds from GARDINIA, 1 m long.
And now let's start making angel eyes for the Priora. First of all, we need to make rings of the required diameter from the rods. To do this, heat the rod in boiling water or a technical hair dryer and wrap it around the appropriate mandrel using two pliers.
Bend the rod into a ring
Make the remaining 3 rings in the same way. You should end up with 2 rings of large and 2 smaller diameters, since the diameters of the headlights on the Prior are different. Now take a hacksaw and cut off the ends of the rod so that there is a 70 mm gap in the ring. It is necessary so that the bevel at the bottom of the decorative trim on the headlights does not interfere with the installation of angel eyes.
Without such large slits, angel eyes simply won't fit into place.
Drill holes with a diameter of 5.5 mm at both ends of the ends of all rings to a depth of 7-8 mm.
Drilling holes in rings
All that remains is to cut the front side of the angel eyes on the Priora. To do this you will need a hacksaw. Groove depth – 0.5 mm, pitch – 2 mm.
Application of light-scattering notches
As a result, you should get something almost like in the photo. Almost - because the cut in the rings is clearly small and will have to be redone.
Ready-made rings for angel eyes on Priora
It's time to install the LEDs and resistors. Solder a resistor to the anodes of all LEDs, first shortening the leads to 3-5 mm. Where is the anode of the LED? Initially it is longer than the cathode. Place a drop of varnish into each of the holes and insert the LEDs into them so that the cathode leads are opposite each other. All that remains is to assemble a simple diagram that does not require comments.
Angel Eyes on a Priora with an already assembled circuit
It remains to isolate this circuit. The easiest and most reliable way to do this is with sealant. If the sealant has dried, then the angel eyes can be checked by connecting a Krona battery to them. In this case, the resistors must be connected to plus (red wire in the photo), and to the cathodes - minus.
Checking angel eyes (eyes in the photo are for a different car model)
Are they burning? Angel Eyes are ready to be installed on your Priora. It's not difficult to make. To do this, you need to dismantle the headlight from the priors and remove the glass mounted on the sealant from it. This cannot be said to be easy to do, but with the help of a technical (and some argue that with a regular hair dryer) hair dryer it is quite possible. Warm up the glass well, pry it with a screwdriver and tear it off very slowly, while continuing to heat it. In some cases, cutting the sealant with a utility knife helps.
Removing glass from a Priora headlight unit using hair dryers
After this, stick each AG onto the decorative trim and the place intended for it with sealant. Pass the wires through the holes made in the decorative plastic trim and lead them outside the headlight. Clean off the old sealant, apply new sealant and install the glass in place, pressing it firmly until it dries completely.
Important! Pay attention to the quality of glass gluing. If it is not installed properly, the headlight will fog up.
And here is the result of your work - the Priora has a completely different look
Angel eyes on a Priora from an LED tube
This option is easier to manufacture, but looks much more impressive on the Prior than the previous one. Its only drawback is the rather high cost of tuning (about 1,500 rubles).
To implement this option, you will need 4 flexible LED tubes, each 30 cm long (they are sold in different lengths).
Flexible LED Tube for Car Tuning
Let's assume that the side of the headlights from the Priora has already been removed. Remove the glass and decorative trim from it. On the desired side of the lining, make 4 holes along the diameter of the tube, form an AG using clothespins and secure the tube with sealant. After the sealant has dried, assemble the headlight and install it on the Priora. That's all.
Making angel eyes for a Priora from an LED tube (the back side of the trim is selected)
And it will look like this:
Angel eyes made from an LED tube are recessed deep into the overlay
Side glow tape
Angel eyes on Priora made from CMD LEDs
There is another option, but it is quite labor-intensive and can only be done by professional radio technicians who have the skills to design printed circuit boards. I won’t focus too much on it: anyone familiar with ironing technology will understand. Briefly it looks like this. The Sprint Layout program develops a double-sided printed circuit board for SMD LEDs and resistors according to the size of future rings. Then this board is printed on glossy paper in real scale:
Printing of the printed circuit board of future rings
Then, using ironing technology, the pattern is transferred to foil fiberglass.
Drawing of a printed circuit board on a sheet of fiberglass
Using an engraver or any other tool, you need to cut out the excess, and you will get an almost finished printed circuit board.
Cut out board
All that remains is to etch it in a ferric chloride solution, tin the tracks, and the printed circuit board is ready.
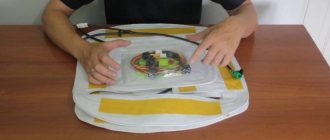
Ready-made angel eyes circuit boards
We install LEDs and resistors. Angel eyes are ready.
Mounted angel eyes
I repeat, this process is very labor-intensive and can only be done by a specialist who knows his job well. In my opinion, the production of such AGs is of purely sporting interest.
Are there any penalties for installation?
The installation of angel eyes type lights must be carried out in accordance with the requirements of Rosstandart and the UNECE International Regulations:
- in front - white lights;
- on the side - orange;
- behind - red.
Multi-colored lights can be used when tuning show cars. If a police officer encounters a car with multi-colored angel eyes, he must seize non-standard equipment and draw up a report on the driver.
There is no fine for such a violation, but in accordance with Part 3 of Art. 12.5 of the Code of Administrative Offenses provides for the confiscation of these devices and possible deprivation of the right to drive a car for a period of 6 months to 1 year.
Plexiglas products
Almost everyone can make “angel eyes” from plexiglass. To do this you need to prepare:
- 8 LEDs at 3.5V;
- 8 resistors with a nominal value of 2200 Ohms;
- Sheet plexiglass or round rods made of it.
If the rods could not be found, then bars measuring 1 cm by 1 cm are cut out of a sheet of plexiglass. To determine their length, it is enough to measure the circumference of the headlights. The resulting blanks must be given a rounded shape. To do this, it is advisable to use a grinding machine. But you can do this work manually, using a piece of sandpaper. In the end, you should end up with three round rods, not just processed, but also polished. Next, the blanks need to be bent, giving them the shape of a headlight. For this purpose, it is best to use a hair dryer. In advance, you should find a round object whose diameter matches the size of the headlights. Pre-heated blocks must be bent according to a stencil and given time to cool so that they take the given shape. All excess must be removed. At the ends of the workpieces, you need to make holes with a drill into which the diodes will be inserted. They connect to the wires that supply power to the side lights. The positive terminal of the diode is connected to the positive wire, and the negative terminal is connected to the negative wire. Ballast resistors are soldered in at a distance of about 15 cm. You can use nail polish to attach the diodes to the holes. All connections must be properly insulated. If there is a desire to make the “angel eyes” radiant, then cuts are applied along the entire length of the rods, the depth of which should not exceed 1/3 of their diameter.
Connection
It is best to connect angel eyes in parallel with the side lights of the car. You cannot do this directly to the Priora on-board network. When the engine is running, the car's electrical network is about 14.5 V, while the LEDs are designed for 12 V. Connecting directly will lead to them failing after some time. This is the reason for most of the negative reviews about this tuning.
Angel eyes must be connected through a stabilizer. You can do it yourself. In the store you need to buy an integrated voltage stabilizer KR142EN8B. It is installed on the radiator or on a metal part of the body so that it can be cooled. All eyes are connected in parallel, and then connected to the stabilizer output. Its input is connected to the power supply for the side lights.
LED angel eyes are connected via a stabilizer
Installing angel eyes allows you to make your car more visible and beautiful. They are visible when approaching 10 meters. When installing such tuning, you must follow the existing rules and then there will be no problems with the police.
Getting ready for work
In order to decorate your vase (models from 2101 to 2115 and 21099), you will need to prepare a certain set of materials and tools.
Note! It is almost impossible to find a suitable lighting and optical system for a car in stores. Therefore, you will have to make it yourself.
To make “angel eyes” for a vase, you will need the following materials:
- several plastic sticks. They must be equal in length to the dimensions of the optics on the machine. Therefore, to create tuning we will need four plastic sticks with a length of approximately 40-45 cm;
- heat-resistant sealant suitable for working with optics;
- four LED bulbs or strip. If using tape, give preference to the SMD 5050 model with 60 diodes per meter. The choice of LED glow color is determined only by your imagination. The best solution would be to match the color of the car with the color of the LEDs;
- four spare glasses for headlights. You need to buy them just in case, since it’s unlikely that you can remove the old ones intact and without chips;
- cable;
- resistors;
- 9 volt battery;
- a can or any round object that has the same diameter as the headlights;
- plexiglass with a sheet thickness of 10 mm.
The tools you will need are a glue gun, a hair dryer and pliers. You also need a drill with a set of drills and disk attachments.