Not very long ago, motorists came up with a way to make their car stand out from the crowd - installing side lights in the cornering headlights. This is a simple external tuning procedure. You can also not only exchange these headlights with each other, but also duplicate one or the other.
Before you learn how to correctly connect the lights to the turn signals yourself, you need to know that there are fines for this. This was introduced due to the fact that confusion with the lights may confuse other road users. Therefore, this procedure is prohibited by the State Automobile Inspectorate.
The traffic police fine system is as follows:
- ordinary citizens will pay 2.5 thousand rubles;
- officials will pay from 15 to 20 thousand rubles:
- Legal entities for such a violation will simply pay colossal fines - from 400 to 500 thousand rubles.
In addition to fines, equipment is confiscated. In this case, the vehicle is prohibited from operation, and the license plates are removed. Therefore, as you can see, the punishment for such tuning is quite severe. You will do this at your own peril and risk.
How to install side lights in turn signals
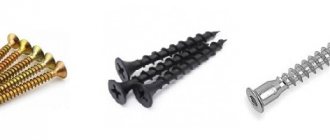
So, how to connect turn signals? To install such lights, we will need a light bulb with two filaments, a two-pin LED, a soldering iron, electrical tape and, of course, wires. Let's start the procedure:
- We lay the wires of the side lights to the base.
- We are replacing the light bulb with a new one.
- Next we will connect the wires to the light bulbs. Using a soldering iron we perform soldering:
- the first wire is one common negative for both side lights;
- the second is the positive wire for the side lights;
- the third is the positive wire of the turning lights:
- Next we need to connect the wires to the headlights themselves:
- connect the minus to the minus of the turning headlights;
- We also connect the positive wire from the paw to the positive of the turning headlights;
- We connect the second positive wire to the positive side lights.
- We wrap the insulation onto the wires and lay them down.
- We check the operation of the lights. In this case, the side lights will burn less brightly, and the turning lights will burn brighter.
If the light bulb is two-pin, then it is possible to choose a different color - not white, but, for example, yellow, so that the lights do not merge with each other. However, remember that such activity may result in a fine. But if you are ready, then your car will look original.
Manufacturing process:
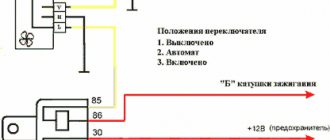
Step one. Device diagram
The system's operation scheme is very simple; there is practically nothing to describe here.
All you need to do is connect the elements in a certain order to the gap between the turn signal lamps and the power supply. When operating in size mode, power must be supplied to a single wire. The author did not connect the side markers directly with the turning lights; he made a separate button to turn on the “American” lights if necessary. For these purposes, the fog light button was used. Step two.
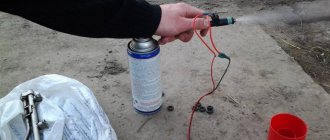
Relay connection process The relay is connected using soldering.
How to do this can be seen in detail in the photo. The most important thing in this process is careful insulation of the soldering area and exposed conductors. Step three.
We connect the button and test the system. Now all that remains is to connect the system to the on-board computer socket, connect the button, the author even connected the power indicator. Now, after pressing the button, it begins to glow, which indicates that the system is turned on. Well, you can see in more detail how everything works in the video.
Many people want to improve their front optics, because with good light, driving is much more comfortable and safer for you, as long as your light does not interfere with oncoming drivers. There are many ways to do this. But some people want to get a unique and unusual look by tuning their headlights. To do this, for example, they install additional dimensions in the turn signals or completely transfer them there, creating the so-called American style.
The American style is that the lights are constantly on, their bulbs are in the turn signals and most often they are orange.
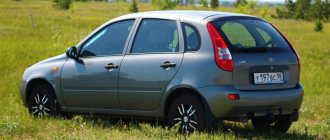
American cars on the VAZ 2114 are a very common practice, with them the car really looks more interesting, besides, in the dark, any additional light will not hurt. In poor visibility, a car with such tuning is more noticeable on the road. But you need to understand that such a change can mislead other road users and sometimes cause accidents.
The yellow lights merge with the turn signals, and some road users may misjudge the situation. Therefore, it is better to use white dimensions, then the orange turn signals will stand out clearly. .jpg" alt="Dimensions in the turn signals of the VAZ 2114″ width="700″ height="467″ class="lazy lazy-hidden aligncenter size-full wp-image-4229″ srcset="" data-srcset="https: //vazremont.com/wp-content/uploads/2017/10/foto-1-3..jpg 300w, https://vazremont.com/wp-content/uploads/2017/10/foto-1-3- 660×440.jpg 660w» sizes=»(max-width: 700px) 100vw, 700px»>
The attention of traffic police officers to a car with such modification is increased, and they may stop you to check your documents more often.
When making an American VAZ 2114, everything must be done within the law; there are clear restrictions on any changes to the front optics. For example, you definitely cannot install red lamps, reflectors and any other devices with inappropriate color and operating mode. For such violations, a fine of 2,500 rubles was imposed.
Assembly instructions
LED lamps are semiconductor elements that glow when exposed to electric current. The main element in them is silicon. Depending on what impurities are used, the color of the light bulbs changes.
Photo gallery “Possible options for dynamic direction indicators”
1. Dynamic turn signals 2. Dynamic running turn signal 3. LED tail lights
Tools and materials
To make a running turn signal with your own hands, you will need the following tools:
- soldering iron;
- side cutters or pliers;
- soldering iron and soldering material;
- tester.
You need to prepare fiberglass laminate from consumables. It is needed for the manufacture of a printed circuit board on which the semiconductor element will be placed. The required LEDs are selected. Depending on the characteristics of the LEDs and the current and voltage values of the on-board network, the characteristics of the protective resistors are calculated. Using calculations, the remaining components of the network are selected (the author of the video is Evgeny Zadvornov).
Work sequence
Before making turn signals, you need to choose a suitable scheme.
Scheme for manufacturing running turn signals
Then, based on the diagram, make a printed circuit board and apply markings on it to place future elements.
The assembly consists of a sequence of actions:
- First, you should turn off the power to the car by disconnecting the negative terminal from the battery.
- Next, you need to remove the old turn signals and carefully disassemble them.
- Old light bulbs should be unscrewed.
- The joints should be cleaned of glue, degreased, washed and allowed to dry.
- In place of each old element, a new running light turn signal is installed.
- Next, assembly and installation of the lights is done in the reverse order.
- After installation, the wires are connected.
At the next stage, an additional stabilized power source is connected to the network. Its input receives power from the intermediate relay, and the output is connected to a diode. It is better to place it in the instrument panel.
When connecting LEDs, you must ensure that the anode is connected to the plus of the power source, and the cathode to the minus. If the connection is not made correctly, the semiconductor elements will not light up and may even burn out.
Flexible LED DRL strips
How to make American cars on a VAZ 2114
There are many ways to implement American cars on the VAZ 2114, each with their own pros and cons. Depending on your skills, desires and capabilities, you can choose any of the ones presented below, or come up with your own. .jpg" alt="Americans on VAZ 2114″ width="700″ height="467″ class="lazy lazy-hidden aligncenter size-full wp-image-4230″ srcset="" data-srcset="https:/ /vazremont.com/wp-content/uploads/2017/10/foto-2-3..jpg 300w, https://vazremont.com/wp-content/uploads/2017/10/foto-2-3-660 ×440.jpg 660w" sizes="(max-width: 700px) 100vw, 700px">
Turn signal lamp with two threads.
A two-filament lamp is a relatively good way. It is quite easy to install and easy to use. The lamp contains two filaments, one dim at 5 watts, the other brighter at 25 watts. A thread with low brightness is used as side lights, and a thread with strong brightness is used for turn signals. As a result, the turn signal is quite clearly visible against the background of the side lights.
To install, you will need a base with two +, or solder the wire directly to the lamp, but you need to be careful, in this case it may burn out.
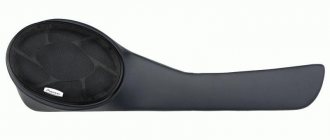
Relay
The principle of signal inversion. In this case, the turn signal lamp is constantly on when driving, and when the turn signal is turned on, it begins to blink. The lights do not differ in brightness, as in the previous case, but the signal is highlighted due to the fact that the lamp goes out completely at the moment of operation.
Installation is simple, you just need to cut the wires a little and two five-pin relays, one for each headlight.
Relay with capacitor and diode
Data-lazy-type=”image” data-src=”https://vazremont.com/wp-content/uploads/2017/10/foto-3-2.jpg” alt=”Dimensions in turn signals” width=” 700″ height=”525″ class=”lazy lazy-hidden aligncenter size-full wp-image-4231″ srcset=”” data-srcset=”https://vazremont.com/wp-content/uploads/2017/10 /foto-3-2..jpg 300w, https://vazremont.com/wp-content/uploads/2017/10/foto-3-2-660×495.jpg 660w" sizes="(max-width: 700px) 100vw, 700px">
This method is, in fact, more correct than the previous one. An IN5819 diode and a 25 volt 4700 mF capacitor are added to the five-pin relay. The principle of operation is the same, but there is a guarantee that nothing will short out anywhere and will last a long time without problems.
Short circuit of the dimensions to the turn signal lamp
There is nothing easier than closing the turn signals on a VAZ 2114. But this method is fundamentally incorrect, and using it is strictly not recommended. The turn signal lamp is directly connected to the headlights, and there is essentially no turn signal at all.
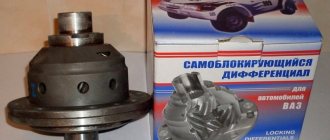
Additional socket for turning headlight
Data-lazy-type=”image” data-src=”https://vazremont.com/wp-content/uploads/2017/10/foto-4-2.jpg” alt=”Additional cartridge for turn signal” width= »420″ height=»700″ class=»lazy lazy-hidden aligncenter size-full wp-image-4232″ srcset=»» data-srcset=»https://vazremont.com/wp-content/uploads/2017/ 10/foto-4-2..jpg 180w» sizes=»(max-width: 420px) 100vw, 420px»>
The most correct, according to the majority, but at the same time the most labor-intensive method is the introduction of an additional cartridge into the headlight. The cartridges are taken from unnecessary repeaters, cut off and soldered into the headlight. If done carefully, everything looks invisible; not everyone will realize the changes made.
Installation process
Before you understand how to connect turn signals to side lights, keep in mind that there are two main colors of side light optics:
- yellow (“American”) with the same color of rotating optics will merge;
- White when turning yellow is better to stand out on the road.
Side lights are inserted into turn signals on a car as follows:
- in the rotating optics on the VAZ, cut a hole where the cartridge will be inserted. It is acceptable to use the w5w cartridge type. It will fit into a standard 5W incandescent light bulb or LED strip;
- secure the cartridge in the optic for rotation to avoid moisture, dirt and for durable fastening;
- To transfer lighting from headlights to a VAZ 2107 or 2109, switch the wires to the newly installed socket. When connecting additional lights without transfer, it is necessary to close the contact in the block that goes to the headlight in a parallel manner.
After such modifications, the car acquires a special charm.
Despite the apparent convenience for the driver, according to the Administrative Code, such a change in configuration leads to confusion among other drivers and even causes accidents.
Also keep in mind that if you install lighting devices equipped with red lights or reflectors in front of the car, as well as devices with operating modes and colors that do not comply with the law, you will face a fine in the following amounts:
- 2500 rubles if you are a civilian;
- 15,000-20,000 rubles - official;
- 40,000-50,000 rubles - legal.
Penalties are regulated by the regulations on the admission of vehicles to operation.
Recently, motorists have resorted to the possibility of equipping side lighting in corners using bulbs with two contacts. But this measure can also interfere with other road users. Thus, manipulating the headlights, no matter how useful they may be for you, may impair your safety. Therefore, do not be surprised by the increasing attention to your car from traffic police officers.
Useful video
You can get additional information on installing dimensions in turn signals from the video below:
There are many tuning methods, the cheapest of which is modifying the headlights.
In addition to the basic replacement of low and high beam bulbs, car enthusiasts are often interested in how to make dimensions in turn signals. Some drivers even duplicate the side lights on a VAZ 2110 or VAZ 2114. This is done because the visibility of the lighting on the road surface is not very good, which is very important at night and in bad weather to prevent accidents.
Types of jobs
You can modify turn signals on your car in the following ways:
- supplement the illuminated turn signals with dimensions by moving them from the headlights;
- insert additional side lamps into the front optics;
- change the color of the side lamps to yellow or white;
- use flexible DRLs with a turn signal function.
If the dimensions are yellow, then the light from the turn signals will merge with it, if the color is white, then the turn signals will stand out against the background of the main dimensions
LED DRL lamps for turn signals 2 in 1 base 1156 PY21W BAU15S 42 LED 2835 - 2 pcs
LED turn signal lamps with DRLs will be an excellent solution for those who want to install daytime running lights without changing the design of the car. These bulbs are installed instead of standard ones with a BAU15S (aka PY21W) socket in front turn signals with transparent glasses. They have a constant white glow, in accordance with GOST, and when the turn is turned on, they begin to blink orange.
Advantages of 2-in-1 turn signal lamps over other running lights:
- Does not change the appearance of the car.
- Connect without interfering with the wiring.
- Does not require expensive disassembly of headlights.
- Makes the turn signal brighter and more noticeable.
- They consume much less electricity compared to low or high beams.
- Daytime running lights with turn signals have efficient light distribution.
- Thanks to the load resistor, they blink at the same frequency as regular lamps. Installing a set of lamps does not take much time and is comparable in complexity to replacing conventional light bulbs.
Attention! The use of lamps in cars with a constant yellow glow is strictly prohibited! With this use, yellow LEDs quickly fail; in this case, the warranty is void, because The lamps were not installed according to the instructions!
Please note that the lamps may not fit on some vehicles due to the design of the holder.
The DRL system and turn signal in one lamp are manufactured using advanced automotive lighting technologies.
- Powerful Samsung 2835 LEDs - 21 white and 21 yellow in each lamp;
- Special focusing lens at the end;
- The lamp housing is made of aluminum;
- Universal rubber base for installation in almost any car;
- Stabilizers and relays integrated into the lamp body;
- Silicone wiring, resistant to temperature fluctuations.
Characteristics:
- Marking: P21W - PY21W
- Base: 1156 - BAU15S
- Type of light sources - Samsung SMD 2835 LEDs
- Number of LEDs - 42 (21 white and 21 orange) in each lamp
- Operating voltage - 10 - 16 Volts
- Power consumption - 6/21 Watt
- Luminous flux - 670 Lumens
- DRL glow temperature - 6000 Kelvin
- Presence of decoy - yes
- Built-in stabilizer and relay
- Operating temperature - from -50 to +70°С
- Lamp size - 70 x 17 mm
- Seat diameter - 25 - 27 mm
- Resistor size - 50 x 17 x 15 mm
- Material - aluminum
- Warranty - 6 months
This is what the DRLs look like on a classic, customer review:
Equipment:
- 2 x LED DRL lamps for turn signals
- 2 x Load resistors
- Set of wiring and clamps for connection
Before purchasing, pay attention to the diagram:
If the car uses socket 7440 - W21W, then you can find a set of lamps at the link: DRL lamps for turn signals 2 in 1 socket 7440