Replacing the VAZ 2109 starter bushing is necessary when there is excessive axial runout of the rotor. Because of this, contact is lost and there is no mass on the rotor winding. Problems arise when starting the car engine, starter power and speed decrease.
When replacing the bushing, it is necessary to completely disassemble the starter, since it is otherwise impossible to check the suitability of all its parts. All the work can be done in a garage with your own hands, without the help of a partner, without using special tools. You will need a new bushing, new brushes if maintenance has not been done in a while.
What removal tools might be useful?
This work is best done in a garage; there must be a pit. The ideal option would be to remove the box on an overpass. But if there is no hole in the garage, you can use a jack instead. Also, you need to stock up on stands to secure the machine, since this must happen at some height. This is why the process is very difficult to complete alone. It is worth asking a friend for help, or if there is no such person, you can hire him in a special company.
To change the bushings, you need the following tools:
- The most important tool that may come in handy is a basic set of keys. They can be of different sizes, this will greatly simplify the work.
- Equally important is the mounting. Without it, it is impossible to perform high-quality work that will last a very long time.
- Also, in order to change the bushings, you will need a rag.
- And the last, mandatory tool on this list is a large container, which will be designed to drain all the oil.
These tools, which are contained in this list, must be carefully prepared in advance. In your work, you can use not only wrenches, but also ring wrenches. Because there is a rotating head, the process of removing the transmission can be very quick and easy. The main thing to remember is to fix the machine; it is necessary in order to have access to the casing, which is located below.
Replacing the starter bushing on an Oka car
Despite the fact that the design of the starter on the Oka is implemented on a principle similar to the VAZ-2109 (the front bushing is also located in the clutch housing), the execution of the engine starting mechanism turned out to be extremely unsuccessful, as were most other components of this car. The main reason for this is the desire of designers to reduce the cost of the production process as much as possible. It is for this reason that bushings are manufactured using technology taken from powder metallurgy, and a combination of graphite chips and bronze is used as the starting material. Because of this, these parts have a very small margin of safety, which negatively affects their service life.
For those car enthusiasts who are interested in how to replace the starter bushing on the Oka, you need to know about one more drawback of the engine of this car. We are talking about a seat in the clutch housing itself, which breaks down unevenly during long-term operation. Therefore, if you buy a standard size product (external diameter 13.03 mm) to replace it, then most likely it will fit into place too loosely and even begin to dangle. This should not be allowed, as the part will very soon become unusable. Knowing this feature, experts recommend using a repair size bushing (external diameter 14 mm), but it often turns out that its diameter does not correspond to the size and even shape of the seat.
In the case where the development of the socket is relatively the same around the entire circumference, the problem is solved by simply adjusting the outer diameter of the sleeve using sandpaper. If, during replacement, you find that the seat is unevenly divided (for example, in the form of an ellipse), in this case it will have to be leveled. At the same time, experts do not recommend trying to unscrew the front bushing socket yourself using hand tools, since in this case it will not be possible to maintain alignment with the starter shaft, which is fraught with problems in its operation. If you find yourself in such a situation, it is better to contact specialists who, using special equipment, will turn the hole in the right direction. By the way, many car service centers manufacture repair-size starter bushings from bronze.
How to change bushings on a VAZ 2109 starter?
The car box itself can weigh more than 30 kilograms, it’s worth knowing this in advance in order to install a winch for a small fixation of all the parts present. Also, do not forget that there should be a lot of light in the room, because there are small details, and due to the presence of dirt, it may seem that they have disappeared.
Consequences of using worn bushings
Bushing wear is a very serious malfunction, the consequences of which affect the operation of the entire mechanism. Operating a car with a starter with worn bushings leads to tragic consequences, which include:
· High heating of the armature and stator windings, as a result of which the starter refuses to work.
· Melting of the insulating bakelite due to high temperature causes an interturn short circuit in the winding wires or a short circuit.
· The increased load caused by worn bushings, which is present when the shaft rotates, causes wear of the brushes and the commutator plates in contact with them, which leads to premature wear of the brushes.
What is the algorithm of actions?
- It is necessary to very carefully and carefully disconnect the entire negative terminal, which should be located on the battery itself.
- Then, you will need to drain the pre-prepared oil into a completely different, deep container.
- Next, you need to remove the mudguard, as well as all kinds of crankcase protection.
- Then, you need to dismantle all the nuts, and then the wheels. After completing this process, you will need to slightly raise the engine itself, and then slightly fix it in this position. This can be done using stands, which can be made from various materials.
- After completing the previous processes, you can move on to the main ones - remove the entire cable.
- Next, you can remove the starter. It’s also better to dismantle it entirely, then secure it to the wires that are located next to it.
- After this, you need to remove all kinds of ground wires. Also, do not forget about the bolts that need to be unscrewed.
- And the last, final stage will be removing the food stretcher from the machine, which is located on the left side of it.
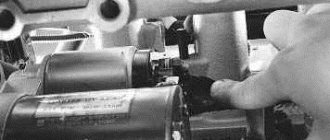
Removing the starter
Before removing the starter, you need to prepare two keys, 10 and 13, they will be needed in order to remove the terminal from the battery. To avoid short circuit, first remove the negative terminal. If your car has an injector, you will have to remove the air filter located above the starter.
The VAZ-2109 starter can be dismantled in two ways: through the top or through the bottom. If the second option is chosen, then you need to temporarily remove the crankcase protection so that it does not interfere. Next, you need to disconnect the solenoid relay from the two wires. First, we disconnect the power (thick) wire through which voltage is supplied to the starter, then the thin wire needed to power the relay winding.
The thin wire can simply be pulled out by hand. To turn off the power, you need to use a 13 key to unscrew the nut from the contact of the solenoid relay. After disconnecting the wires, move them aside.
Next, you need to unscrew the three nuts securing the starter to the clutch block. To do this, use the key number 13.
After unscrewing the nuts, you need to pull the body to the right and move it away from the studs. Now you can pull the starter out through the top or bottom and start repairing it.
Place the dismantled starter on a workbench and remove all dirt from it. Disconnect the solenoid relay, which is secured by two screwdriver-head bolts. Next, remove the anchor from the metal bendix plates. Take a 10mm wrench and unscrew the rear starter cover. After removing the cover, you will have a view of the starter axis, from which you need to remove the locking ring. It can be removed using a flathead screwdriver.
The starter housing on the “nine” consists of three parts, which is held in place by three studs that tighten it. In the process of unscrewing the nuts on the studs, all parts of the unit are disconnected, so disassembling the starter will not be accompanied by difficulties. There are two types of starters: with and without a planetary gearbox, the collectors of which are slightly different.
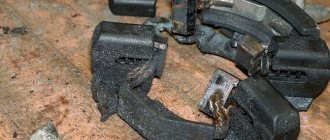
If a planetary gearbox is installed in the VAZ-2109 starter, its brushes will be located parallel to the body, in the second option - perpendicular to the starter axis. The old bushing is securely pressed into the starter housing, so you will have to try hard to remove it. To get rid of the old bushing, take a hammer, a piece of pipe of a suitable diameter, or a mandrel. Place it against the bushing and use sharp, short blows of a hammer to knock it out of its seat. The main thing is not to overdo it in the process, since the starter cover can burst at any moment, and there will be nothing to replace it with.
To avoid having to look for a similar starter from which you can remove the cover, be extremely careful. Before pressing in a new bushing, it is advisable to go over the installation site with fine-grained sandpaper. To press in a new bushing, it is best to use the old one, since it is made of soft metal and will soften the impact force during installation, this will prevent cracks from appearing on the cover body. While the starter is disassembled, inspect the brushes; they may need to be replaced. Reassembling the starter is done in reverse order.
To check the starter's operation, connect it to the battery. Smooth, quiet operation will confirm that the process of replacing the bushings and assembling the starter was completed correctly. Then you can install it in its place.
Design and operating principle
To understand the features of the repair, you must first study the design of the starter and understand how it works for the benefit of your car.
Let's start with the design. It includes four main nodes.
| Knot | Peculiarities |
| Electric motor | It transmits direct current through four brushes |
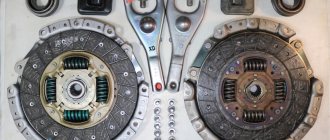
| Freewheel with gear | A clutch or bendix drives the flywheel of your car's engine. |
| Traction relay | Serves to extend the bendix with gear when turning on the electrical appliance |
| Bushings | Ensure easy rotation of the clutch, rotor, and gear. One bushing is located inside the starter, and the second is in the clutch housing. |
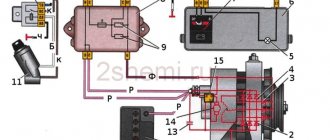
Device diagram
Having familiarized yourself with the starter diagram, you can discuss the principle of its operation.
The operating principle is to convert an electrical signal into the rotational movement of a drive gear. Current is transmitted through the brushes to the poles of the electric motor. At the same time, the clutch extends and the gear is connected to the flywheel ring. To start the engine you need a quick but easy rotation of the starter. When the engine starts, the clutch returns to its original position.
We recommend: How to set timing marks yourself
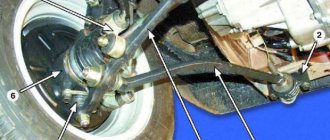
Replacement technology
First of all, you need to disconnect at least one of the wires from the battery, as well as all the wires from the starter. Then you need to unscrew the bottom bolt that secures the starter and screw it in on the reverse side to secure the engine to its front mount. Otherwise, the motor may move forward. After this, you need to unscrew the remaining two bolts that secure the starter and remove it from the car.
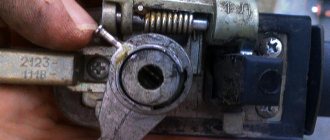
As mentioned earlier, the bushing is built into the clutch housing. To remove it, you need an M12 tap, as well as a drill chuck. The tap will have to be inserted into the chuck, then clamped, after which it must be carefully screwed into the sleeve, thereby cutting the thread. Great care is required due to the fact that the steel of the tap is very fragile and even a slight misalignment with the applied force can lead to its breakage. In this case, the shank will remain in your hands, and the cutting part will remain inside the sleeve.
It would seem that the situation is hopeless. However, it is not. The length of the sleeve is approximately 14 millimeters, which means that there is approximately 10 or 20 mm of the cutting part of the tap on the hands. You need to take a regular nut with exactly the same M12 thread and screw it onto the broken tap. In a situation where the tap is broken off so that it is impossible to screw a nut onto it, you can take a bolt with a corresponding thread about 10 centimeters long and grind grooves on it similar to the grooves of the tap. Or you can do it more radically, but at the same time simpler.
Go to the store for a new tap. The tap is equipped with three grooves into which you need to insert nails of the appropriate size. This must be done in such a way that their ends protrude beyond the end of the tap by about 10 mm. Try to insert the resulting structure into the sleeve with the broken end of the tap. It may not work out right away, but with the right amount of persistence the operation can be easily accomplished. After this, you can try to unscrew the piece and try to unscrew the bushing again.
We recommend: How to replace the radiator of a VAZ 2107 stove
As a rule, after a few turns the bushing will begin to rotate and can be carefully unscrewed. If the bushing is very stuck, you will have to cut the thread in it approximately 6 or 8 turns. After this, remove the tap, and in its place screw in a bolt of a suitable size and use it to remove the sleeve. When a new one is inserted in its place, it is slightly pressed in.
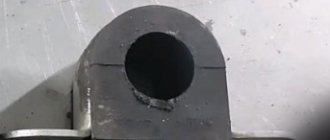
Bushings
If the replacement is not happening for the first time, then the bushing can be inserted quite easily by hand. But during long-term operation, this can lead to it turning in the mounting hole. Over time, the mounting hole will break up, forming the so-called eccentricity, and the starter shaft may become misaligned. This means that the starter will stick and the engine will not be able to start. However, this is quite easy to fix. To do this, it is necessary to determine the size of the so-called eccentricity. Then you need to machine or order from a specialist a bushing with a larger outer diameter just to fit the eccentricity. You should solder some solder on the side of this bushing. After this, the bushing will fit in with a slight interference fit.