Starter problems and their elimination
If the traction relay clicks and the car does not start, then the culprit of the situation is most often not the starter, but a discharged battery. Its charge is not enough to start the power plant. In addition, the problem may be hidden in oxidized contacts or damaged wires.
The weak point of the unit is the power wire loop connecting the electric motor and the traction relay. It does not connect securely to the terminal and is prone to oxidation and rot. If it breaks, the starter does not turn, despite the fact that a characteristic click of the traction relay is heard from the engine compartment.
To fix the problem, it is recommended to solder a new copper conductor to replace the damaged one. Some car owners resort to welding. To increase the reliability of the unit, some drivers add an additional connection between the relay and the electric motor even before installing a new starter.
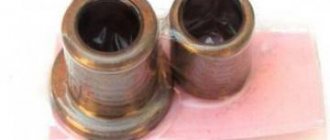
The weak link in the electrical circuit of the VAZ 2121 starter is the brushes. They are the most susceptible to wear, so the unit often loses its functionality due to their insufficient length. To determine the remaining life, you need to take out the brushes and measure their size. It must exceed 4 mm.
A large current flows through the brush assembly. This causes heating and thermal destruction of the elements. Upon visual inspection, you can often detect melting of the brushes and the appearance of chips. Minor defects can be eliminated by grinding. In case of serious damage, the brush must be replaced.
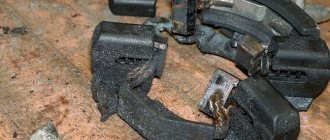
Damage to the armature is also found in VAZ 2121 starters. Among the most popular breakdowns is a breakdown of the winding to the housing. The malfunction can be identified by “continuous testing” with a multimeter or ohmmeter. If the specified devices are not available, the breakdown should be checked with a regular lamp. You need to assemble a circuit as shown in the image below. Its ends should be connected to the commutator plate and the armature core. If the light comes on, it means that there is a breakdown in the winding. It is extremely difficult to repair insulation damage, so such an anchor must be replaced.
The collector is also subject to wear. If there is minor damage, the defects can be removed by grinding. If the collector plates are seriously worn or burned out, the armature must be replaced.
Starter replacement or repair
Algorithm of actions:
- use a key set to “thirteen” to loosen the fastening of the conductor connected to the traction relay. Discard the tip;
- to check the VAZ-2121 relay, apply a voltage of 12 volts to the relay output, and apply “-” to the body;
- connect the resistance meter to the contacts;
- if the relay is intact, then the armature pushes out the overrunning clutch, and the contacts close;
- If a part is found to be faulty, replace it;
- to remove the traction relay, tighten the three screws using a slotted screwdriver;
- pull the rod with the spring out of the device casing, and install the new traction relay according to the reverse algorithm.
If the problem persists, continue repairs:
- take a Phillips screwdriver and twist a couple of screws, then remove the casing;
- To check the integrity of the brushes, twist the fastening screw of the contact conductor, and then use a screwdriver to press out the spring. Next, it remains to remove the brush;
- In the same way, remove the other three brushes and inspect them. If at least one of the brushes is up to 1.2 centimeters high, then it must be replaced (further use of the part is not recommended).
- connect a multimeter to the starter windings (one at a time) and check them for a short circuit. The task is to make sure that there is no short circuit between the turns and on the housing;
- use a screwdriver to lift the locking ring, remove the washer from the shaft and use a ten-key wrench to tighten a pair of tightening bolts;
- separate the starter elements and remove the insulating tubes;
- inspect the appearance of the windings and commutator. Remove burn marks from the collector using sandpaper. If this part is severely worn or charred, then repair is useless - the device is replaced. Remove burrs using fine-grained sandpaper, then polish the product;
- use a multimeter to check the armature for a short circuit. If a problem is found, change the unit;
- remove the rubber seal from the drive cover and remove the washer to adjust the armature;
- remove the cotter pin of the lever axle and select the last one. Next you need to remove the armature along with the drive.
Article number and approximate price for the original VAZ 2121 starter
The original starters for the VAZ 2121 can be either independently started units or purchased from third-party manufacturers. The starter with the factory number 35.3708 is widely popular in cars. It has a rated power of 1.3 kW. The unit goes on retail sale with article numbers 2213708000 and 57223708. The price for the product starts from 2400 rubles.
Also, a more powerful 1.55 kW starter is installed on the VAZ 2121 car. It has the factory number 5722.3708. It is quite difficult to find this starter in retail sales. The cost of the unit is from 3400 rubles.
On export versions of the VAZ 2121, a diesel power unit is installed, which comes with a 2.2 kW starter. The VAZ company does not produce this unit independently. The branded original product is the products of the VALEO PHC and HC Parts brands. In free sale, these units are found with article numbers 436068 and D9R122. The price for a native 2.2 kW starter starts at 5,600 rubles.
Selection of components
The original starter is produced by LADA and comes in the original blue packaging. It is marked with article number 21214-3708010-01. The cost of this part is from four to five thousand rubles, depending on the store.
To avoid stumbling upon a fake, carefully examine the box. The presence of extraneous logos, absence of an article number on the box, or color mismatch is unacceptable. The low price should alert you.
Alternative options are produced by companies such as Fenox, Krauf, Valeo. The listed brands are distinguished by high quality products and fairly affordable prices. The price for starters varies from 2200 to 4700 rubles.
What original or analogue can I supply?
If the starter does not turn, you can simply replace it. Typically, in a store, the buyer has a choice between two options:
- original;
- analogue
They differ not only in their quality, but also in their durability. The easiest way to study visual differences is in the photo.
But the cost of the original starter is usually at least 3.5 thousand rubles. That’s why many people opt for analogues. There are many other manufacturers on the Russian market that are not certified by AvtoVAZ. If possible, you should choose well-established brands.
It is important to remember: all starters have different resources and may differ in size. It is advisable to arm yourself with a ruler and tape measure before going to the store. This will allow you to avoid purchasing a device that is not suitable in size. Some manufacturers produce equipment that can be installed on various vehicle models. The price depends significantly on the manufacturer.
Before purchasing an analogue, you need to familiarize yourself with the brand. For example, Bosch has proven itself to be good. The equipment he produces is durable and does not cause difficulties in repair. There is a list of manufacturing companies recommended by AvtoVAZ itself. It is advisable to familiarize yourself with all the nuances and subtleties of installation in advance. This will allow you to select it at the start and install it later yourself.
This is interesting: Step-by-step replacement of the Chery Amulet timing belt: instructions, tags
Catalog number and cost of a good starter for VAZ 2121
Original VAZ 2121 starters are of unstable quality, so experienced car owners do not recommend installing them. It is more advisable to purchase an analogue from a third-party manufacturer. The table below presents brands that produce decent starters at an attractive price.
Table - Good analogues of the original VAZ 2121 starter
| Manufacturer | vendor code | Approximate cost, ruble |
| Startvolt | LST0101 | 2600-3400 |
| Krauf | STB0139 | 2400-3100 |
| As-pl | S0128 | 3500-4900 |
| Bosch | 986011910 | 3900-5500 |
| Unit | 1100352 | 3000-4100 |
Dismantling and connecting the generator on Niva 2121: step-by-step instructions
On Niva 21214 cars there is a generator of type 9412.3701, on VAZ 21213 - type 371.3701, on Niva Chevrolet there is a generator 2123.
All of them are alternating current electric machines with electromagnetic excitation, having a built-in rectifier unit with silicon diodes and an electronic voltage regulator.
The maximum current produced by the generator unit type 9412.3701 is 80 A, voltage - 13.2 - 14.7 V, rotation - right.
Design of unit 21214
The unit covers are attached to the stator using 4 bolts. The covers have bearings installed. They rotate the rotor shaft. In the front bearing, the inner race is clamped with a nut along with a thrust ring and washer. The 2nd bearing is also pressed into the back cover.
The stator has a 3-phase winding, one of the ends of which is connected to a rectifier unit consisting of 6 diodes. Of these, 3 diodes are negative, 3 are positive. According to the polarity, they are pressed into the plates. The entire structure consists of a rectifier unit, which is located on the back cover of the generator unit covered with a protective casing.
The design of the unit also includes contact rings and brushes. On the back side of the back cover there is a brush holder, which is structurally connected to the voltage regulator. The rectifier contains a capacitor that protects the electrical network from power surges.
Basic malfunctions and ways to eliminate them
Checking the health of the unit is done using a multimeter. After the engine is started, the voltage at the battery terminals should be 13.6 V. If the value is higher or lower, this indicates a break or short circuit of the windings, oxidation of the slip rings, a malfunction in the brush assembly, or voltage regulator.
The generator unit may not work well due to weak belt tension or its breakage. In this case, you need to adjust the tension or replace the belt. Faulty voltage regulator, needs to be replaced.
If a breakdown, short circuit, or damage to the rotor windings is detected, it should be replaced. If there is a break or short circuit in the stator windings, it requires replacement. If the diodes are damaged, the rectifier unit is replaced.
Nuances of moving a generator
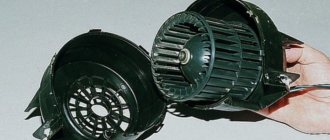
The disadvantage of domestic Niva SUVs is the location of the generator unit - at the bottom of the engine compartment. It constantly gets contaminated when driving off-road, and coolant constantly drips. The problem is solved by moving the generator upstairs (the author of the video is SARTANETS).
To transfer, you will need a set of keys, a bracket, mounting bolts, and a V-belt. You can make a generator transfer bracket with your own hands according to the drawing below.
Drawing of a homemade bracket
Sequence of actions during transfer:
- We dismantle the propeller, pump and remove the belt.
- By unscrewing the standard bracket, you can remove the generator.
- We cut off the bead around the side of the cylinder head and on the cylinder block.
- Then you should unscrew the two bolts and two studs.
- Next, the assembly is installed on a new bracket and final assembly is performed.
1. Schematic illustration of unscrewing the fastening material2. Car with belt removed3. The unit is in a new location
Thus, moving the generator unit upstairs is not difficult.
Guide to removing and connecting the generator
To remove the unit, you need to prepare a set of tools: keys “10” and “19”, ratchets with heads, a hammer and a small extension.
The process consists of the following steps:
- First of all, remove the negative terminal from the battery.
- Next, you need to remove the engine protection and the right mudguard.
- Then, using a hammer, carefully knock out the mounting bolt and remove it.
- At the next stage, you need to disconnect all the wires going to the generator: the plug and the wires secured with a nut.
- Then the fastening on which the belt tensioner is located is unscrewed.
- By removing the belt, the assembly can be dismantled through the hole that was formed after removing the protection.
- After replacement or repair, install the unit in reverse order.
Electrical connection diagram
Price issue
The VAZ 21214 generator has good repairability, which allows you to significantly save money if worn or broken parts are replaced in a timely manner.
If you change the complete unit, the cost of replacement will be as follows:
- generator 21214 – 3125 rub.;
- lower mount – 133 RUR;
- fastening bolt - 53 rub.;
- tension bar - 55 rub.;
- relay RS-527 – 57 rub.
Required Tools
In order to remove or install the starter on a VAZ 2121, you need tools, the list of which is presented in the table below. Table - Tools required to replace the front strut
| Name | Note |
| open-end wrench | "at 13" |
| Head | "at 15" |
| Ratchet | With extension |
| Penetrating lubricant | For example, WD-40 |
| Metal brush and rags | For cleaning fasteners |
Possible breakdowns and malfunctions
It is worth thinking about replacing the starter if the car owner notices that:
If severe external defects appear, you cannot do without purchasing a new starter.
Specific problems and methods for solving them
If it is difficult to turn on the VAZ 21214 engine, there is a possibility that the problem lies in the starter. The most common breakdown is that the starter may not turn, even when the ignition is started. Note that the starter relay is located very close to the ignition relay, under the additional. fuse block.
Let's get acquainted with the typical malfunctions of the Niva starter:
| Breaking | Testing and diagnostics | How to get rid of the problem |
| The starter solenoid relay is inoperative | There is no clicking sound under the hood when turning the key. If you close the circuit with a handy tool, the starter begins to turn. The starter does not turn when the engine is warm (hot). | Complete replacement of the part (retractor relay). |
| The battery is low. | Despite the click, the starter does not move. When consumers are turned on, the voltage at the battery terminals does not exceed 12V. | Replace/charge the battery. |
| The starter armature winding is damaged and a short circuit has occurred. | To check the serviceability of the mechanism, use an ohmmeter. Also pay attention to places where the insulation has changed color. Darkening indicates problems. | Complete replacement of components (starter). |
| The battery terminals are oxidized and poorly connected. | Even though the starter clicks, it does not turn over. If you turn it on, the voltage at the starter/battery terminals varies greatly. | The contact connections must be thoroughly cleaned, coated with Vaseline or other lubricant, and then tightened tightly. |
| The ground contact is broken, the relay contacts are oxidized. | The starter does not turn even after a click. The car won't start. For diagnostics, it is necessary to measure the resistance in the circuit, as well as the performance of the relay as a whole. | 1) Completely replace the solenoid relay with a new one. 2) Clean the contacts well, lubricate them with a protective compound and tighten tightly. |
| Flywheel ring teeth/drive gear are damaged. | It is enough to conduct a visual inspection of the components to notice a malfunction. | Flywheel replacement, starter replacement or repair. |
| The freewheel slips. | The starter continues to move, but the flywheel remains in place. | Complete replacement of starter/clutch. |
| Rotating the ring gear on the flywheel. | The starter turns, but the flywheel/crankshaft does not. The clutch housing makes unnatural sounds. | Buying a new flywheel and replacing it completely. |
| The starter commutator is burnt, the brushes are very worn/stuck. | Remove the starter and make sure how tightly the commutator is pressed against the brushes. Determine commutator wear and remaining brush height. | If the commutator is worn out as much as possible, the starter will have to be replaced. The damage is minor - just have it repaired or go to a salon. |
| The ignition contacts (50 and 30) cannot close and the solenoid relay wiring is inoperative. | The relay does not operate when the key is turned. The car owner must measure the voltage at the relay control contact. | Replacing the ignition switch, cleaning contacts. |
| Attachments/engine jams. | Visual check of the coolant pump, as well as the crankshaft and power steering pump. | If problems are detected, the attachments/engine itself will need to be repaired. |
Starter replacement process
In order for the replacement of the starter on a VAZ 2121 to be successful, it is recommended to use the step-by-step instructions given below.
- Secure the vehicle by applying the parking brake to the rear wheels.
- To gain access to the place where the starter is located, you must open the hood.
- The starter is located under the exhaust manifold. Use a ratchet with an extension to unscrew the nuts securing the terminals.
- Remove the wires from the stud.
- Remove the bolts that secure the starter to the gearbox, as shown in the photo below.
- Remove the starter from the engine compartment.
- Install the new starter in the reverse order of removal.
- Check operation by starting the power unit.
How to remove the starter of a VAZ-21213 car
Disconnect the negative cable from the battery. We dismantle the air filter housing (see Removing the air filter housing).
Remove the front support bracket securing the intake pipe to the engine support bracket, disconnect the starter heat shield from the exhaust manifold and from the engine support bracket (see Replacing the gasket of the intake pipe and exhaust manifold of an injection engine).
1. Using a 13mm wrench, unscrew the bolt of the upper fastening of the starter to the clutch housing (this bolt also secures the rear support bracket of the intake pipe to the clutch housing). Similarly, unscrew the bolts of the middle and lower fastenings of the starter and move the starter forward.
2. Disconnect the traction relay control wire.
3. Using a 13mm socket, unscrew the nut of the positive wire of the starter.
4. Remove the wire. In photo 1, for clarity, the receiver is removed, and in photos 2, 3, 4 - the inlet pipe and exhaust manifold.
5. Move the starter back along the cylinder block
6. Remove the starter.
Removing the starter from a carburetor engine is easier due to the lack of intake pipe support brackets. Install the starter in reverse order