repair of the front wheel brake caliper on a VAZ 2108, VAZ 2109, VAZ 21099
To repair or replace the front wheel brake caliper on a VAZ 2108, VAZ 2109, VAZ 21099, do the following: 1. Remove the corresponding wheel from the vehicle.
2. Remove the brake hose seal from the bracket on the rack. 3. Loosen the brake hose connector on the caliper.
4. Use a screwdriver to bend the antennae of the lock washers and unscrew the two bolts securing the brake caliper, holding the guide pins by the hexagons with a second wrench. 5. Remove the bolts and remove the brake caliper and wheel cylinder assembly.
6. Holding the tip of the brake hose by the hexagon with a wrench, unscrew the brake caliper from the tip. Be careful, brake fluid will leak from the brake hose. Please note that the tip has a copper O-ring. Replace the heavily crimped copper ring.
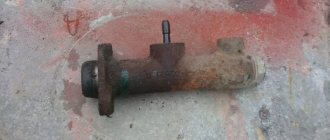
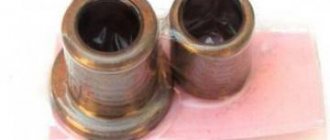
7. Clamp the brake caliper in a vice and remove the two Allen bolts securing the brake cylinder to the caliper. Remove the wheel brake cylinder from the caliper.
8. Carefully, so as not to tear the boot, remove the retaining ring.
9. Remove the boot from the brake cylinder
10. After applying compressed air through the brake fluid supply holes, remove the piston from the brake cylinder.
11. Carefully, so as not to damage the brake cylinder mirror, remove the rubber O-ring.
12. If it is necessary to replace the wheel brake cylinder or the valve itself, unscrew the brake bleeder fitting. 13. Carefully inspect the brake cylinder mirror and the working surface of the piston. If signs of wear, damage or severe corrosion are found on them, it is necessary to replace the brake cylinder and piston. 14. Replace damaged, swollen or loose cuffs. It is recommended to replace the cuff every time the brake cylinder is disassembled, regardless of its condition. 15. Install a new cuff into the bore of the brake cylinder, having previously lubricated the cuff with fresh brake fluid.
16. Insert the edge of the boot into the piston groove.
17. Lubricate the brake cylinder mirror and the working surface of the piston with fresh brake fluid. Insert the piston into the brake cylinder and install the outer edge of the boot into the groove of the cylinder body. Install the retaining ring.
18. Install a caliper with a wheel brake cylinder on a VAZ 2108, VAZ 2109, VAZ 21099 car in the reverse order of removal. Before installing the guide pins, lubricate them with UNIOL-1 grease. Bleed the brake system on a VAZ 2108, VAZ 2109, VAZ 21099 car.
Examples of prices for current items
When buying a caliper for a VAZ 2109-2115, you can operate with the available amount, since there are quite a lot of good quality analogues to choose from, namely:
- Caliper assembly, R13 TRIALLI – RUB 1,880.
- ATE assembled with a ventilated moving bracket – RUB 2,480.
- LUCAS with an extended hose (without adapter) – RUB 4,050.
- LADA (standard set for R13 wheel) – 4,270 rub.
The choice of calipers is represented by more than 17 analogues, 2 original brands and 3 brands operating under AvtoVAZ license. Consequently, the price may change based on the financial policy of the manufacturer, as well as the final cost of the caliper.
How to remove the caliper VAZ 2108, 2109, 21099
The caliper (front wheel brake mechanism) will have to be removed when replacing its brake cylinder, replacing damaged parts, replacing the front wheel hub bearing, or painting.
Let's look at two ways to remove the caliper: “fast” and “slow”.
Required Tools
— Open-end wrenches for “13”, “14”, “15”, “17”
Preparatory work
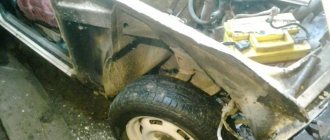
— We hang and remove the front wheel of the car
— We clean the front wheel brake mechanism from contamination
We remove the caliper (front wheel brake mechanism) VAZ 2108, 2109, 21099
"Quick" way to remove the caliper
If you plan to disconnect the brake hose from the caliper, before removing it, use an open-end wrench to “14” (in some cases to “15”) to loosen the tightening of the hose tip on the brake cylinder. Place a container under the caliper to collect the brake fluid.
— Through the inspection hole of the caliper, use a slotted screwdriver to slightly move the brake pads apart (so that they move away from the brake disc)
See photo at the beginning of the article.
— Using a socket wrench set to “17”, unscrew the two bolts securing the caliper to the steering knuckle
We unscrew the two bolts securing the caliper to the steering knuckle.
It is better to access the lower bolt from below, and access to the upper bolt from above.
— Remove the caliper by sliding it up the brake disc
We remove the caliper assembly by lifting it up.
If the brake disc does not have much wear, it is not difficult to move it.
— Holding the tip of the brake hose with a key at “14”, rotate the caliper until the tip is completely turned out
VAZ 2108, 2109, 21099 caliper removed
"Slow" method of removing the caliper
— Disconnect the floating caliper bracket
Using a screwdriver, bend the edges of the locking plates of the guide pin bolts. Holding the guide pin with an open-end wrench set to “17”, use a wrench set to “13” to unscrew the lower bolt. We lift up the floating bracket by prying it with a screwdriver. We remove the brake pads. We lower the bracket. Similarly to the lower one, unscrew the upper bolt and remove the bracket along with the brake cylinder. We remove the guide pins from the holes in the fixed bracket.
Unscrew the bolts securing the guide pins
— Disconnect the brake hose
The brake hose will have to be disconnected when the caliper is completely removed. In another case, for example, when replacing a wheel bearing, the brake hose is not disconnected, but the removed caliper is moved to the side and suspended on a wire. The hose tip is turned off with an open-end wrench to “14”. You can hold the tip with a key and rotate the brake cylinder until the hose tip is completely unscrewed from it. There is a copper O-ring underneath. We bend the brake hose and secure it with wire so that the brake fluid does not leak out.
— Disconnect the fixed caliper bracket
Using a 17" socket wrench, unscrew the two bolts securing the fixed bracket to the steering knuckle. Remove the fixed bracket.
We unscrew the two bolts securing the fixed guide of the caliper pads to the steering knuckle
— Disconnect the brake (wheel) cylinder
It is better not to remove the brake cylinder unless necessary. We clamp the floating caliper bracket in a vice and with a 10-point socket, unscrew the two screws securing the brake cylinder and separate it from the bracket.
That's it, the VAZ 2108, 2109, 21099 caliper is completely removed and disassembled.
We assemble and install the caliper in the reverse order. The tightening torques of the fixed bracket mounting bolts are 29-36 N.m, the guide pin bolts are 31-38 N.m, the brake cylinder mounting screws are 115-150 N.m.
If the brake hose was disconnected when removing the caliper, then after assembly and installation it is necessary to remove air from the brake system (“bleed” the brakes).
Notes and additions
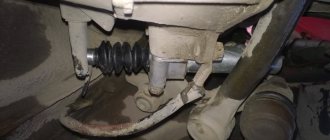
— The front wheel brake mechanism (caliper) on VAZ 2108, 2109, 21099 cars consists of a fixed bracket (brake pad guide) attached to the steering knuckle with two 17-point key bolts and a floating bracket consisting of two screws fastened together under edge on “10” of the brake cylinder and the caliper itself. The brake cylinder is fastened with two bolts with a wrench set at “13” to the guide pins (wrench set at “17”) installed in a fixed bracket. A brake hose is connected to the brake cylinder.
TWOKARBURATORS VK -More information on the topic in our VKontakte group
Caliper for VAZ-2108: device, types, repair
Effective braking is one of the components of safe driving. The majority of modern cars use a brake disc and caliper in their design. VAZ-2108 is no exception.
The situation when a car begins to stop with a bias on one side due to the fault of this device is a frequent occurrence. The article will discuss the causes of uneven braking and troubleshooting methods.
What function does the caliper perform?
In a brake system where the main component of braking is the disc, the caliper plays the role of the basis on which the brake linings and the elements that drive them are attached.
While the car is moving, the pistons and pushing linings are inside the caliper. They are held in this position by a spring. When you press the brake pedal, hydraulic fluid begins to flow into the inside of the pistons. They, in turn, push out the brake pads. Since they are located on both sides of the brake disc, they begin to tightly grip it, thereby dampening the torque of the wheel, reducing the speed of the car.
The front calipers of the VAZ-2108 are rigidly fixed with 2 bolts on the steering knuckle. Therefore, they not only absorb the braking force, but also transmit it to the vehicle's chassis.
Caliper device
In the family of front-wheel drive VAZ cars, disc brakes and, accordingly, calipers are installed only on the front axle. There are drum brakes at the rear.
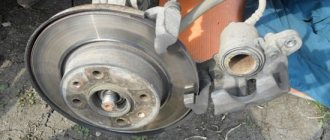
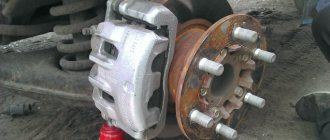
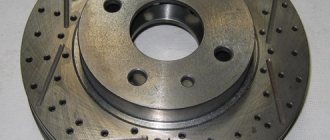
The VAZ-2108 caliper is clearly visible if the steering wheel is turned all the way and the wheels are at an angle to the car’s axis. It is also clearly visible with the front wheels removed. The massive part that fits the brake disc is the caliper. It consists of the following elements:
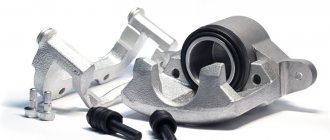
- Fixed metal bracket. It plays the role of a frame on which the entire structure is assembled. Attached to the steering knuckle.
- Movable bracket. It moves relatively movably with the help of connecting fingers that serve as guides.
- Working cylinder. It is an oblong part that houses a hydraulic piston. It is fixed to the movable bracket of the brake caliper - VAZ 2108. The working cylinder has a fitting for pumping and bleeding air. As well as connection to the hydraulic brake system.
- Brake linings. Using cotter pins, they are fixed in a movable bracket.
In addition to the listed parts, there are several bolts that are used to secure the caliper.
What problems occur
When the VAZ 2108 caliper starts to malfunction, the braking behavior of the car changes. She may skid instead of moving straight. This is especially noticeable in winter - the car begins to turn when braking.
The next sign is that the master cylinder piston is stuck in the working position. In this case, there will be a constant sound of the brake linings rubbing and a very high temperature of the brake disc. Moreover, such a malfunction can lead to its deformation. This happens when a car with a hot brake disc drives into a puddle. A sharp change in temperature leads to warping of the surface. As a result, a beating sensation begins to be felt when braking. The foot on the brake pedal will feel a jolt.
The reasons leading to malfunction can be of two types:
- Rust. Due to deep corrosion, the brake piston stops working normally. It either gets stuck in the initial position, which leads to weak braking, or does not return to its original position, which is why the brake linings constantly rub against the disc.
- Caliper deformation due to impact. In this case, the piston jams due to the incorrect position of the parts in the assembly unit.
In the case of corrosion, you can try to restore the performance using a VAZ-2108 caliper repair kit. Deformation resulting from an impact cannot be eliminated by repair - only replacement of parts.
Restoring an old device
The VAZ-2108 caliper works in difficult conditions. Constant dust and dirt flying from the wheels, freezing cycles in winter, lead to premature failure. However, the worst performing caliper can be restored.
First, you need to establish for sure that the braking problems are caused by the caliper. To do this, you need to put the car on a jack and ask to press the brake pedal several times. At this moment, you should watch how the brake linings move in the direction of the brake disc: is there any jamming, how freely do they return back. In this case, you can try to rotate the wheel, observing how it stops under the action of the brake. The fuzzy operation of the overlays will be immediately noticeable. In addition, you can see the runout of the brake disc. If it has irregularities, then in addition to repairing the caliper, you need to turn the disc on a lathe. Otherwise, braking will remain ineffective.
Necessary tools for repair
To remove the brake caliper VAZ 2108, and then disassemble and restore it, you will need the following tools and materials:
- Balloon wrench.
- Open-end wrenches or heads with a knob for 8, 13, 15, socket wrench for 17.
- Internal Torx for a 15 or 16 bolt, wrench for removing brake hoses. It differs from a conventional open-end nut in that it covers the nut more completely.
- Vise.
- Repair kit for calipers. Suitable for VAZ 2108 - 21099, VAZ 2113 - 2115, Kalina, Grants. The only thing you need to pay attention to is the diameter of the wheels. The VAZ-2108 requires a repair kit for models with 13-inch wheels.
- New guide pins. Often after use they have slight deformations, as well as traces of deep corrosion, which prevents the floating bracket from moving freely. Therefore it is better to replace.
- New bleeder fittings.
- Drill with wire attachment for cleaning rust.
- Solvent, paint, corrosion converter, rags.
- Compressor. Not required, but recommended.
How to remove and disassemble a VAZ caliper
To dismantle the caliper, you need to hang the car on a jack and remove the front wheel. Then unscrew the nut connecting the flexible hose of the brake system to the brass tube. Brake fluid will leak from the front circuit, so you should prepare a container for it in advance.
Using a 17 mm socket wrench or a socket wrench, unscrew the bolts that secure the caliper to the steering knuckle. They are located on the inside and are located next to the grenade boot.
Then, by sliding up the brake rotor, the caliper can be completely removed. The remaining disassembly work is carried out in a vice. If they are not available, then disassembly is carried out right on the spot, without disconnecting the caliper from the steering knuckle.
Further dismantling
Holding the caliper in a vice, unscrew the two bolts under the Torx head and remove the guide pins. After this, the assembly unit splits into three parts: a movable bracket, a brake cylinder and a fixed bracket.
All these three parts must first be cleaned with a brush clamped into a drill. Then you need to proceed to the main part of the repair - restoring the mobility of the piston. To remove it from the brake cylinder, do the following:
- Using a flathead screwdriver, remove the retaining ring that secures the boot. Thanks to it, dirt does not get inside the mechanism.
- Remove the VAZ-2108 caliper boot.
- Remove the piston. Ideally, it is removed using compressed air, which is supplied to the brake fluid supply hole. If the compressor is not available, then the piston is removed using pliers. It is necessary to apply efforts alternately to opposite sides so that there is no distortion, which will complicate dismantling.
- Remove the bleeder fitting.
- Remove the sealing ring between the piston and the cylinder walls.
Repair
After preliminary cleaning of the caliper parts, they need to be degreased and painted. Before applying paint, all holes are sealed with masking tape. You need to paint in several layers. To completely destroy traces of corrosion remaining after brushing, parts can be etched with phosphoric acid before painting.
The removed piston of the VAZ-2108 caliper should be carefully inspected for scoring. Then you need to polish the interface between this part and the cylinder with water using 2000-3000 grit sandpaper.
After drying, the piston, lubricated with brake fluid, is installed in place. At the same time, a new bleeder fitting is installed.
The repair kit contains new rubber seals, including rubber bands that protect the guides of the VAZ 2108 caliper. During assembly, all boots, O-rings, and cuffs are installed with new ones.
What to pay attention to when assembling
Before installing the piston, an O-ring is installed. The protective cover is installed in two steps: first, one edge is put into the piston groove, then, after installing it, the second edge is pulled onto the brake cylinder. After which the locking ring is put on.
The guide pins must be lubricated. Uniol-1 or an analogue is suitable for these purposes.
After assembly, you not only need to fill the brake fluid level into the reservoir, but also bleed the brakes.
Caliper repair for VAZ 2108, VAZ 2109, VAZ 21099
Welcome! Caliper - due to it, the car stops, and if we talk in more detail, in the caliper there is a brake piston and two brake pads, due to which braking is carried out when you press the pedal, but sometimes this same piston sours or jams due to which you need to brake the wheel on which the brake caliper is installed with a jammed piston starts either constantly and you can’t do anything about it, or the wheel stops braking altogether and in the end you have only three wheels that stop the car at speed.
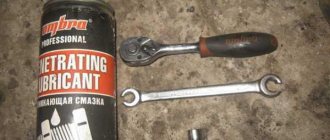
Note! In order to repair the caliper and replace all the faulty parts that are in it, you will need to take with you: A basic set of wrenches, a hexagon, as well as a screwdriver, you also need a little new brake fluid and you will also need a vice since the work will be done with them much faster and easier!
Summary:
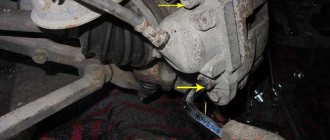
Where is the brake caliper located? There are only two brake calipers in the car of the ninth family, and they are located only on the front wheels of the car, it will be difficult to see this unit without removing the wheel unless, of course, you have discs through which the entire braking system of the car is clearly visible, so if you there are ordinary stamped discs, then you will need to first remove the wheel from the car and only after that you will see the brake caliper in front of you, which is also indicated by an arrow in the photo below for clarity.
When should a caliper be repaired? In general, in some cases, the caliper needs to not only be repaired but also replaced completely with a new one, but this is only if it was deformed due to an impact with something, or even if it is covered with rust, which will corrode it over time and as a result, it and the piston thanks to which braking occurs can generally jam.
Well, the caliper itself needs to be repaired if, as mentioned earlier, the piston is jammed (In this case, you need to change the piston and the brake caliper’s operation will be restored again), and it also needs to be repaired if the bleeder fitting is damaged (This can be treated by replacing the bleeder fitting with new), because if it is damaged, then you will no longer be able to bleed the brakes, for example, after replacing the brake fluid, and if you cannot bleed the brakes, then this caliper will not work for you either.
Note! When the caliper becomes unusable or some of the parts that are inside it fail, the first thing that will happen is that the car will brake worse or it will brake constantly even though you don’t press the brake pedal, so if you have If the car has such symptoms, then they can be blamed on the caliper itself and the parts that are installed in it!
How to repair a caliper on a VAZ 2108-VAZ 21099?
Disassembly: 1) At the very beginning of the operation, you will need to remove the caliper itself from the car in order, firstly, to check its condition, and secondly, to replace everything that does not work on it. (For information on how to remove the caliper, see the article entitled: “Replacing the brake caliper on a VAZ”)
Note! Before removing this unit, make sure 100% that it is not working, to do this, first just look at its condition; no defects are allowed, after which you can ask another person (if you have one) to get into the car and press the button several times brake pedal, and at this time you will have to observe the work of the very piston that is inside the caliper, it will have to move and therefore the brake pads (Indicated by green arrows) will have to tightly grip the brake disc, which is indicated by blue arrows (This is by the way it will be possible to look through the gap in the caliper, which is indicated by a red arrow in the photo below), and when the pedal is released, they will definitely have to unclench and, as a result, move away from the brake disc without interfering with its rotation!
2) Now when the caliper is removed, install it together with the bracket that is on it in a vice, in exactly the same way as shown in the photo below, and when the brake caliper is clamped using a hexagon, unscrew the two hexagonal bolts that secure the brake cylinder (Inside this cylinder there is the same piston mentioned above), and after the bolts are unscrewed, pull the cylinder itself and disconnect it from the brake caliper bracket.
3) Then, when the brake cylinder is removed, take it in your hands and use a screwdriver to remove the retaining ring from it, but only when you remove it, be careful not to tear the protective cover that is located on the piston and cylinder (It is also indicated by the arrow), in otherwise you will have to replace the case with a new one.
Note! When the retaining ring that holds the protective cover is removed, move the screwdriver aside and use your hands to remove the protective cover from the cylinder!
4) Next, you will need to remove the piston itself from the brake cylinder and if it is deformed or if there is rust on it, then you will have to replace it with a new one, although if there is not enough rust, the piston can still be polished, here is how to do this see the article entitled: “The pistons of the brake cylinders are jammed, what should I do?”, in this article to which a link is given there will be a section in which there will be two videos, so you will need to open the second video in which an excellent method will be shown polishing brake cylinder pistons.
Note! So, we have already told you what to do if the piston turns out to be rusty, but not a word was said about how to remove this piston from the cylinder, so it can be removed very simply, for this you will need some kind of special tool, inside of which there will be a compressed air and with its help, supplying compressed air through the hole where the brake hose is inserted, remove the piston from the cylinder, for clarity, watch the video below, but only in the video everything is done more carefully, a stick is placed there so that the piston does not fly out and is not deformed, but compressed air is also supplied through the brake hose so that the piston does not fly out abruptly, but is gradually squeezed out, but in fact you don’t have to do all this!
5) Next, use the screwdriver again, and use it to carefully pry and remove the sealing ring from the brake cylinder, but when you remove it, try not to damage the mirror part of the cylinder.
Note! In fact, it is recommended to replace this ring immediately after removing the piston, but still, if you do not have a new sealing ring with you, then take a look at the old one and if no defects are found on it, for example, such as: Cracks, swelling, loss of elasticity rings, then this sealing ring does not need to be replaced with a new one!
6) And finally, if you need to remove the bleeder fitting and replace it with a new one, then simply use a spanner to unscrew it and screw the new one in its place.
Assembly: The brake caliper itself is assembled in the same way as it is disassembled, but only when assembling you need to know a few details, namely:
1. Before installing the piston into the cylinder, you will first need to install a new o-ring inside the cylinder itself in its place, and before installation we recommend that you also lubricate it with a little new brake fluid
2. Then take the piston in your hands and you will need to insert it into the inside of the cylinder, but before installation, install a protective cover in two stages, to do this, first insert the edge of the protective cover into the groove on the piston itself (see photo 1), and then lubricate it with new brake fluid to the cylinder mirror and the working surface of the piston, recess the piston into the cylinder itself and then put the edge of the protective cover into the groove on the brake cylinder body (see photo 2) and finally install the locking ring in its place so that the protective cover holds.
3. Something else, but this no longer concerns the caliper, but concerns the guide pins that hold the caliper bracket, so before putting both guide pins back in their places, you need to lubricate them with Uniol-1 grease, or some other don't be like her.
Note! When the caliper is installed in its place, be sure to bleed the brakes on the car, otherwise the car will brake very poorly, which will lead to an emergency in the future. For information on how to bleed the brake system, see the article entitled: “Bleeding the brakes on VAZ cars”!
Additional video: If you want to see clearly how to replace a brake cylinder, and also if you want to hear some practical advice, then watch the video below, which shows everything in detail:
Causes of jamming and creaking
Now directly about how to determine the presence of a problem.
The primary sign indicating a malfunction in the calipers of a car brake system is squeaking.
How to restore rights if lost: choose the quick method
It is the creaking that indicates that the element is seriously worn out. In the near future, the unit must be replaced without fail, which the car literally and figuratively screams about. It is extremely difficult not to hear such a creak. But for some reason, thousands of motorists still stubbornly ignore it. As a result, they pay a rather high price. Sometimes even to the point of road accidents resulting from brake failure while driving. To prevent this, you need to understand the issue and understand the essence of what is happening.
The first step is to look at the possible causes. In fact, there are several potential problems to look for. Some of them arise due to the fault of the motorist, others are caused by the natural process of wear and tear.
In any case, the appearance of a squeak as a symptom is a harbinger that at the most inopportune moment the caliper may simply jam.
If you know the reasons, you can prevent them and troubleshoot them by contacting a car service center or solving the problem yourself.
The reasons are:
- The brake pads were initially installed incorrectly. As a result, they are not strictly parallel to the response drives. Because of this, creaking often appears;
- The brake discs are seriously worn out. The reasons are natural wear and tear and aggressive use of the car;
- There is no lubrication in the unit. Initially there was little of it, or it was used up;
- The lubricant was selected incorrectly. Many people skimp on lubricant intended for calipers, hence the consequences.
The most undesirable and dangerous situation is rightly considered when the piston does not return and the unit begins to jam during operation.
Imagine that you are driving a car, press the brake, and then accelerate again. But at the same time, the calipers do not release the front brakes. Additional resistance arises, the car tries to move, but cannot. The result is uncontrolled braking, extremely intense wear and serious overheating of the entire system.
Replacing pins and boots of a VAZ 2114 caliper
All cars of the tenth family, including VAZ 2114, 2115 and 2113, have problems with the brake system such as wear of the caliper guide pins. As a result, the following problems may occur:
- Knocking and rattling noise from the caliper on rough roads (especially on dirt or gravel)
- Uneven wear on the front brake pads, with more wear on one side than the other
- Jamming of the caliper bracket, which can lead to an emergency situation
- Reduced braking efficiency of VAZ 2113-2115
To solve this problem, it is necessary to inspect the caliper, namely, replace the anthers and guide pins. Also, it is imperative to lubricate your fingers with a special compound.
So, to perform this repair you will need:
- 17 and 13 mm wrench
- Brake cleaner
- Caliper Lubricant
- Flat screwdriver
If you want to see a step-by-step video and photo review, you can watch it on the website remont-vaz2110.ru in the material: Revision of the VAZ 2110 caliper. The main points on this repair can be found in the article below.
Replacing caliper guide pins and their boots on VAZ 2114-2115
The first step is to jack up the front of the car. Then remove the wheel and use a flat-blade screwdriver to bend the locking washers of the caliper bolts.
Then unscrew the two fastening bolts at the top and bottom, as shown in the photo.
Next, compress the brake cylinder using a screwdriver by inserting it between the bracket and one of the pads.
Next, you can lift the cylinder with the bracket up, as shown below, and move it to the side so that it is out of the way.
And now you can easily remove the caliper pins, both from above and from below, with minimal effort.
Then we clean the fingers from the old grease with a special product or buy a new one. Also, it is necessary to install a new boot if the old one is damaged.
Apply special caliper grease to the pin and under the boot, as shown in the photo. Then we put the finger in its place all the way so that the boot is securely fixed.
Now you can assemble the entire structure in reverse order, and do not forget to press the brake pedal several times before leaving the repair site so that the pads take their position in the guide.
Guide faulty
The main problem if the brake does not work can be jamming and souring of the caliper guides.
Repairing this malfunction with your own hands will not be difficult. By the way, in this case there is no difference when disassembling both the front and rear calipers. To do this, you need to unscrew and pull out both guides. Clean them from dirt or poor-quality lubricant, remove and replace the torn boots with new ones, after filling them with special grease for calipers.
Then put them in place, insert and screw the guides back. Then you should try how freely the pressure bar moves along them. This can be seen visually in the attached video at the end of the article.
We should not forget about the housing of this brake element. If significant rust, dents, sagging or other mechanical damage is found on it, it should be replaced completely.
If the repair had to be done on a removed caliper, then after installing it in place, the brake system should be bled.
How to correctly replace the caliper guides of VAZ 2109-2115. How to replace caliper pins
Show Control Panel
- Published: 2 Aug 2021 veröffentlicht
- #STO #car repair #ivanovs #car repair #caliper guides When driving a VAZ car, you often hear some kind of creaking noise from the front wheels. Where the brake pads are located. After inspecting everything, lifting the wheel with a jack, and turning it, they determined that it was the pads rubbing against the brake disc. After removing the wheel we discovered the reason! Torn boots on the guide calipers, it became clear that the guides were jammed when the brake pedal was released. I had to change them. Watch the video where I explained and showed everything in detail! When driving a VAZ car, you often hear some creaking noise from the front wheels. Where the brake pads are located. After examining everything, lifting the wheel with the help of a Jack, twirling it, we found that it was the pads rubbing against the brake disc. Removing the wheel found the reason! Torn anther guides calipers, it became clear that the guides jammed when releasing the brake pedal. I had to change them. Watch the video in it all the details I told and showed! Al conducir un automóvil VAZ, a menudo se escucha algún ruido de chirrido desde las ruedas delanteras. Donde están las pastillas de freno. Después de inspecciónar todo, levantando la rueda con un gato , girándola, se estableció que se trataba de pastillas que se frotaban contra el disco de freno. Quitando la rueda descubrieron la causa! Las anteras rasgadas de las pinzas de guía, todo quedó claro que las guías se atascaron al soltar el pedal del freno. Tuve que cambiarlos. ¡Mira el video en él todos los detalles que conté y mostré! VAZ avtokoligimen zhurgende, aldyngy dөңgelekterі zhagynan kanday da bir shu estіledi. Tezhegіsh kalyptary bar perch. By lifting the bottom of the brake pads, turning the cylinders, the pads rub against the same disc. Clearingtik dongelegi tauyp, sebebin! The brake calipers are the same as the brake pedals and the bolts. olardy ozgertuge tour keldi. Onda beineni korip, barlygyn aityp, corsetti! All rights reserved. That's it. All rights reserved. Yes, no matter what. Well done! All rights reserved. اج دواسة الفرامل. No matter what isez une voiture VAZ, vous entendez souvent un bruit de grincement des roues avant. Où sont les plaquettes de frein. Après avoir examiné tout, soulevant la roue à l'aide d'un cric, en la tournant, il a été établi que ces plaquettes frottent contre le disque de frein. Enlever la roue a trouvé la cause! Les anthères déchirés des étriers de guidage, il est devenu clair que les guides étaient coincés lorsque la pédale de frein était relâchée. j'ai dû les changer. Regardez la vidéo en elle tous les détails que j'ai dit et montré! VAZ ,在千斤顶的帮助下抬起车轮,旋转它,我们发现它是摩擦制动盘的垫片。 删除轮找到了原因! 撕裂花药指南卡钳,很显然,导向卡住释放制动踏板时。 我Please note: ?????? ??? cords Drum drive. ?????? pollen pollen Yes, no jammed սրանց փոխել. cordial. Avtomobil VAZ sürərkən, tez-tez ön təkərlərdən bir səs-küy eşidilir. Harada yerləşir əyləc yastiqciqlar. Home page di. Təkər aradan qaldırılması səbəb aşkar! Bir əyləc pedalı azad zaman cırıq polen rəhbər superport, bu təlimatlar bütün aydın oldu. oldum, onları dəyişdirmək. Mən Bağlı və aşkar bütün ətraflı bu video baxın! Our names are Yuri and Larisa. This is a channel about our life! Briefly about everything! We are open people! I want to share my joys and sorrows. Write comments, we will try to answer everyone. All coincidences are random, we do not want to offend anyone. Personally, you can find us HERE: FACEBOOK: ttrakktorr My VK: id54653901 INSTAGRAM: ttrakktorr TWITTER: Yuriyivanovtt Odnoklassniki: ok.ru/profile/338361227198 My mail (for questions and suggestions) YANDEX WALLET: 410014655019767
- The science