Cars admin26.02.2020
Today, the article will talk about procedures such as replacing and adjusting the 2106 clutch with your own hands. As we like to repeat, everything can be done without the help of car service specialists; there are no difficulties in repairing VAZ cars and there cannot be any. Often, drivers try to solve all the problems with the car on their own, because the cost of maintenance is absurdly high.
Even despite the fact that the VAZ 2106 has not been produced for ten years. And we will try to help as much as possible with the repair. If you have any questions, leave comments, share your experience, and describe unusual situations. After all, the topic is quite interesting and rich.
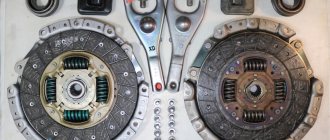
Clutch mechanism of a VAZ 2106 car
Description of design
You all know that the driver's feet have a clutch pedal. For some, this is enough and they don’t go any further. But if you’ve already decided to take on the repair, you’ll have to study the entire rest of the chain. On the VAZ 2106, like on all other classics, the clutch drive is hydraulic. The pedal drives the master cylinder rod, which moves a small piston inside it.
An expansion tank is connected to this cylinder. On 2106 and similar VAZ models it is located on the partition between the engine compartment and the passenger compartment. It is worth noting that on nines and newer cars the expansion tank was installed directly on the cylinder body - a significant saving in space and a slight increase in reliability. After all, rubber tubes tend to wear out and leak brake fluid.
Clutch failure
The clutch can fail for several reasons:
- Resource development.
- Presence of a manufacturing defect.
- Harsh operation.
- Mechanical damage during operation.
Very often, the cause of premature failure of VAZ 2106 clutch elements is the presence of manufacturing defects and increased loads. In particular, traffic jams in the city make themselves felt quite quickly.
Symptoms of malfunctions
Depending on the type of breakdown, the following symptoms may appear:
- The clutch pedal fails, the engine and gearbox shafts do not open.
- The clutch works, but there is an extraneous sound.
- The engine picks up speed, but the speed does not increase - the clutch slips.
- Shifting gears is difficult, the clutch “leads” and does not disengage completely.
- The appearance of leaks from the expansion tank, pipes, cylinders.
It has already been said that the master cylinder is mechanically connected to the pedal. But the clutch fork and slave cylinder are mounted directly on the gearbox. With the help of these mechanisms, the release bearing moves along the axis of the input shaft.
How does the clutch drive work?
The operating principle of the entire clutch drive mechanism on a VAZ 2106 car is as follows:
- The driver presses the pedal.
- The rod moves and along with it the piston in the cylinder.
- The pressure in the pipeline between the main and working cylinders increases.
- Due to the increased pressure in the working cylinder, the piston and rod move, which drives the clutch fork.
After all this, the VAZ 2106 clutch disc and the basket move away from each other, the crankshaft does not rotate the primary one. Therefore, the car does not move. And now about the repair procedure.
Tips and tricks
As the main advice when choosing this unit, you should mention the quality of materials when purchasing. The purchased parts must have the manufacturer's markings and series and batch numbers. Many enterprises have their own information resources where you can check the originality of a part by simply checking the batch numbers and the specific part.
Warning! Otherwise, the counterfeit unit has unstable quality and may fail at any time.
Also, in the process of replacing the VAZ 2104 clutch slave cylinder, it is necessary to strictly follow the sequence of actions and accurately calculate the tightening torque of the hoses and pipes from the fluid tank to the main part in order to avoid cracking of the rubber and plastic parts of the body.
Also, once every few thousand kilometers, it is necessary to carry out an inspection of the entire assembly, since the vast majority of cars of these models have significant mileage, the likelihood of unexpected breakdowns is quite high.
Preparing for repairs
Before putting the car in a pit and removing the box to replace the clutch, you need to visit the store and buy all the necessary spare parts:
- Clutch disc.
- Basket (drive disk).
- Release bearing.
- If necessary, clutch fork.
- If there is significant wear, the crown on the flywheel will also need to be replaced.
- Bolts securing the basket to the flywheel.
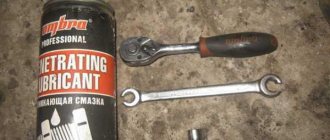
It is also important to have a good set of tools on hand, WD-40 penetrating lubricant, sometimes even a gas torch is necessary (if the bolts and nuts are very rusty).
It is advisable to carry out all the work in an inspection pit or overpass (it is unlikely that the average driver of a six will have a lift in the garage, so we do not mention it). If everything goes smoothly and the nuts unscrew well, you will complete all the work very quickly.
Place the car on the pit, fix it in one position by placing stops under the wheels. All work is divided into two stages: under the car and above it. Please note that there is no need to drain the oil, since if you dismantle it carefully, you will not spill a drop.
And don't forget about the alignment of the clutch disc. The price of a special device is quite high - about 500 rubles. but you can use a small piece of pipe without any problems, as long as the diameter is suitable.
Why do you need to change the clutch?
To replace the clutch you will need to stock up on: A 13mm wrench, and in addition to all this you will also need to take two different types of screwdrivers (Flat and Phillips in this case), and you also need to stock up on a mandrel for centering the clutch disc which in a car store it costs literally 100 rubles! (You can see what this mandrel looks like, which is discussed in the article, just below in the section: “For beginners!”)
When should you change the clutch?
During operation, the clutch of any car wears out over time, and the first signs of a worn clutch that a car will show are:
- Increased noise that begins to appear very clearly when changing gears in the car.
- Jerks can also occur when starting a car, and they can also occur while driving when you depress the clutch pedal, then engage a gear, and then when you release the pedal, the car jerks forward slightly.
- In addition to all this, if the clutch malfunctions, the effect that the clutch “slips” may occur. This is when you are driving a car and at the same time you press the gas pedal, let’s say to the floor, and your car does not accelerate, but the engine speed increases sharply and even reaches the red zone, this effect is popularly called the clutch “Slipping”.
- And in conclusion, we note one more effect, called the “Leads” clutch. The first signs of this effect are as follows: let’s say you engage first gear and at this time the clutch pedal is still fully depressed, but even despite this the car starts to roll. This effect is called the “Leads” clutch.
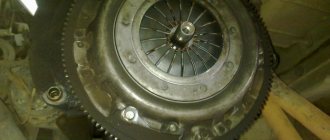
Work on top of the car
So, a start has been made, the goal is to remove the gearbox to replace the clutch. On VAZ 2106 and similar cars this is done quite quickly, it is only important to follow a certain sequence:
- Inside the car, remove the gear shift knob. It is attached using plastic latches. Sometimes difficulties arise with dismantling, and it gets to the point where the latches break off. The price of a new set of fastenings is no more than one hundred rubles, and you can purchase it even after repairs have been carried out. Therefore, do not be afraid if you suddenly break the plastic antennae.
- Go to the engine compartment, unscrew the four nuts that secure the exhaust pipe to the manifold. The fact is that the exhaust pipe will interfere with the removal of the box, but it is enough to move it a little to the side.
- Disconnect the battery and remove it from the car.
- Unscrew the two top bolts of the starter, disconnect the power wires for the windings and the solenoid relay from it.
- Disconnect the ground wire that goes to the gearbox.
Selection of GVC for VAZ 2107
The best option for replacement is to purchase a GCS designed specifically for classic VAZ models. Clutch master cylinders from UAZ, GAZ and AZLK vehicles are not suitable. The same applies to foreign analogues - foreign cars with rear-wheel drive are equipped with GVCs, which only highly qualified specialists can adapt to the VAZ 2107 (different sizes, different threads for pipelines, different pipe configurations). However, you can easily replace the original cylinder with a GCS from a VAZ 2121 and from a Niva-Chevrolet.
Manufacturer's choice
When purchasing a new GVC, you should focus on products from trusted Russian manufacturers (AvtoVAZ JSC, Brik LLC, Kedr LLC), the Belarusian company Fenox, which is adapted to our conditions and is affordable. The average cost of GVC is 600–800 rubles.
Table: comparative characteristics of GVCs from different manufacturers
| Manufacturer, country | Trademark | Cost, rub. | Reviews |
| Russia, Tolyatti | AvtoVAZ | 625 | Original GVCs are made with high quality and are more expensive than analogues |
| Belarus | Fenox | 510 | Original GVCs are inexpensive, made with high quality, and are popular among drivers |
| Russia, Miass | Brick Basalt | 490 | Improved design: the absence of a technological plug at the end of the cylinder and the presence of an anti-vacuum cuff increases the reliability of the product |
| Germany | AND THOSE | 1740 | The originals are of the highest quality. The price is tied to the EURO exchange rate |
| Germany | HORT | 1680 | Original GCS are reliable and durable in operation. The price is tied to the EURO exchange rate |
| Russia, Miass | Cedar | 540 | The original GVCs do not cause any particular complaints |
Work under the car
This is perhaps the most difficult part of the entire repair, since there are many more steps to be taken here. So make yourself comfortable and proceed to the following operations:
- Unscrew the last (lower) nut securing the starter and remove it. This nut is the nastiest, since it is difficult to get to it using simple wrenches; you will need to use a socket, a ratchet and a cardan. True, it was possible to work with an ordinary open-end wrench installed in the end.
- Unscrew the suspension bearing mount.
- Disconnect the cardan and rear axle flange. Hold the bolt head from turning with a 12mm open end wrench.
- Apply sharp blows to the driveshaft to dislodge it from the rubber coupling on the transmission shaft. Move the cardan to the side.
- Unscrew the mounting of the pillow, install a support under the gearbox.
- Remove the slave cylinder from the clutch fork. Be careful not to lose the bar underneath and the spring.
- Remove the speedometer cable.
- That's all, now all that remains is to unscrew the four bolts that secure the box to the engine block.
Remove the gearbox carefully, try to move it as far as possible from the engine block. The fact is that you can damage the VAZ 2106 clutch drive disc. And this is quite easy to do.
If we take nines and newer VAZs as an example, then the clutch drive discs on them are more reliable and durable. It is advisable to set the gearshift lever to the position corresponding to the third speed.
How to repair a VAZ hydraulic drive
The main thing to remember is that in all cases of such repairs, after it has been carried out, it will most likely be necessary to pump the hydraulic system. It must be done according to the instructions for this car model.
So, to replace the clutch master cylinder in a VAZ 2107 we will need:
- wrenches;
- syringe, container;
- screwdriver, pliers.
- Use a syringe to pump out the fluid from the master cylinder reservoir.
- Having loosened the clamp, pull the tube off the tank and drain the liquid from it into a substitute container.
- We unscrew the fastenings of the pipe connecting the first and second hydraulic drive units.
- By pressing the pedal, we remove the broken link of the system.
- We install the new spare part in the reverse order.
- Add the missing liquid to the reservoir.
Changing the master cylinder of a VAZ 2106 is carried out in the same way. But the work of replacing the working cylinder of a VAZ 2107 will have to be carried out using a slightly different method. True, we’ll take the same tools.
Clutch replacement
Please note that it is imperative to install new clutch basket mounting bolts. On old ones, the threads already have minor deformations, therefore, the connection will be very unreliable. The price of all elements will be approximately 2000-2500 rubles.
If you prefer foreign-made units, it will be more expensive. However, it is worth wondering about a simple truth: the service life of imported ones is sometimes shorter than domestic ones, and the price can be twice as high. Why pay extra money? And in general, if the price of a car is 20-40 thousand rubles, why invest a lot of money in it?
But let's return to the replacement procedure. Unscrew all the bolts from the basket, remove it and the clutch driven disc. Install new elements in the same way, but tighten the bolts, do not tighten them. It is advisable to look at the condition of the crown before installation. If it is deplorable, then you should immediately install a new one.
In stores, its price is about 200-250 rubles, which is not very expensive. But you can reduce the cost of repairs by simply removing the crown, heating it and installing it on the reverse side. But you will have to buy a new one if this procedure was previously performed.
Pay attention to the VAZ 2106 clutch fork; if it is damaged, be sure to replace it. A new release bearing is installed in any case. You can apply CV joint grease to it, for example. This can slightly increase its resource.
Almost finished, all that remains is to take the guide sleeve and install it in the hole of the clutch disc. Without removing the shaft, tighten all the basket mounting bolts crosswise. Do not allow distortions, otherwise the clutch will not work correctly and its service life will decrease.
That's all, the clutch replacement was completed successfully, now all that remains is to assemble the car. But here no difficulties will arise, since all the actions are the opposite of those that were described in detail in this article. If you also need to replace the brake fluid in the drive system, then read on.
Major breakdowns
Despite the high cost of the design, the VAZ-2106 clutch breaks quite often. The clutch cylinder fails and leaks appear. This happens for the following reasons:
- Excessive wear on the slave and master cylinder parts.
- Using brake fluid not recommended by the vehicle manufacturer.
- A decrease in the liquid level in the expansion tank due to its damage or loosening of the pipe clamps.
The price of the VAZ-2106 clutch master cylinder is 400-600 rubles, depending on the manufacturer. But you can also find more expensive parts. The repair kit is a little cheaper - about 300 rubles.
Bleeding the system
Draining fluid from the clutch drive system is very simple:
- Using a blower, pump out the liquid from the expansion tank.
- Unscrew the fitting on the working cylinder and wait until all the fluid is gone.
- Press the clutch pedal several times to remove any remaining brake fluid.
- Change tubes if necessary.
- Tighten the fitting.
- Fill the reservoir with fresh brake fluid.
- Place a transparent tube onto the fitting.
- Have an assistant press the clutch pedal several times. With the last press, you need to hold it in the extreme position.
- Unscrew the fitting half a turn, allowing fluid and air to escape.
- Repeat the procedure until liquid begins to flow without air bubbles. Don't forget to monitor the level in the expansion tank.
In fact, two or three passes are enough to get rid of air in the system. As you understand, pumping the clutch on a VAZ 2106 is not difficult. The procedure is very similar to bleeding the brakes, only it is much faster - the line is very short.
After replacing the clutch, it will need to be adjusted. Pay attention to the working cylinder rod - it has a thread along which you can move the nut. It is by moving it that the clutch is adjusted on VAZ 2106 cars and the rest of the classic series. It is also possible to adjust the free play of the clutch pedal; for this purpose, a special bolt is provided directly above it.
You will need: 8 key, screwdriver.
Monitoring the brake fluid
One of the main signs of failure of the clutch slave cylinder in VAZ 2106, 2101, 2107 cars is partial or complete failure of the pedal inside the car when pressed. This indicates a lack of tightness in the system - gradually the amount of brake fluid decreases, and the harder and more often you press the pedal, the more fluid will leave at a time.
This will cause the clutch to stop working and changing gears will be difficult or impossible. If you do not monitor the level of brake fluid in the reservoir and do not eliminate leaks in a timely manner, then consequences may arise - the clutch basket and release bearing will fail, not to mention the creation of emergency situations.
To eliminate the cause of the breakdown or completely replace the working cylinder, depending on the nature of the breakdown, you will need a new working cylinder, brake fluid and a standard set of tools. It is best to replace the working cylinder in a VAZ 2106, 2101, 2107 car from an inspection hole or on a lift. Before starting work, it is necessary to drain the brake fluid that is in the clutch system. Having all the necessary tools at hand, the procedure for removing the cylinder is very easy.
The first step is to pull out the pusher clamp, then remove the tension spring. Next, slowly unscrew the nut on the hose with the liquid, after placing a container to collect it. Then proceed to unscrew the cylinder mounting bolts, after first pulling out the pusher with the clutch fork. Move the fork with the pusher so that it does not interfere with you. Between the working cylinder and the rubber hose there is a rubber gasket with a sealing washer. It is very important not to lose it, because it is not included in the repair kit.
Replace the clutch slave cylinder and proceed with reassembly in reverse order. If necessary, you can adjust the depth of pedal pressing on the cylinder fitting. After completing all the work, fill the brake fluid into the clutch reservoir. Filling will help to completely flush the entire hydraulic clutch system of a VAZ car. Bleeding is performed to clear your system of air that is in the brake fluid.
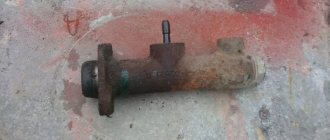
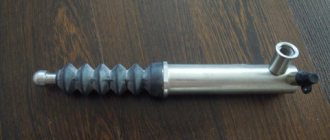
Purpose and operation of the VAZ 2106 clutch slave cylinder
In short, the working cylinder in the VAZ 2106 clutch system performs the function of an ordinary converter. It translates the driver's foot force into high brake fluid pressure in the vehicle's hydraulics.
However, the clutch slave cylinder should not be confused with the main one, because these devices are located in different places on the machine. The main cylinder is located in the passenger compartment, and the working cylinder is attached to the clutch housing with two bolts. Getting to the working cylinder is easy: just open the car hood.
Working cylinder device
The clutch slave cylinder consists of the following elements:
- cast body;
- hydraulic piston;
- pusher rod;
- working spring;
- a pair of ring-shaped sealing cuffs;
- washer and retaining ring;
- air valves;
- protective cap.
Operating principle
The operation of the cylinder begins the moment the car owner presses the clutch pedal connected to the push rod:
- The rod moves and presses on the piston located in the main clutch cylinder. This cylinder constantly contains brake fluid.
- Under the influence of the piston, the fluid pressure increases; it rushes sharply through the hose system to the clutch working cylinder and begins to put pressure on its rod.
- The rod quickly extends from the cast cylinder body and presses on a special fork, which moves sharply and puts pressure on the release bearing.
- After this, the clutch discs disengage, resulting in a complete disconnection of the transmission from the engine. At this moment the driver has the opportunity to engage the required gear.
- When the driver takes his foot off the pedal, everything happens in reverse. The pressure in all cylinders drops sharply, and the return spring pulls the working cylinder rod back into the cast housing.
- The fork is released and goes down.
- With nothing else in the way of the clutch discs, they engage again, connecting the transmission to the engine. The car then moves further in the new gear.
Signs of breakdown
Every owner of a VAZ 2106 should know several important signs that indicate that something is wrong with the clutch cylinder:
- the clutch pedal began to be pressed unusually easily;
- the pedal began to fail (this can occur either from time to time or constantly);
- the brake fluid level in the reservoir has dropped significantly;
- noticeable leaks of brake fluid appeared on the bottom of the car in the area where the gearbox was located;
Fortunately, the clutch cylinder is easy to repair. It is quite rare to change the working cylinder on sixes, and repair kits for them can be found in almost any auto parts store.
Technical parameters of the “seven” clutch: classification and parameters
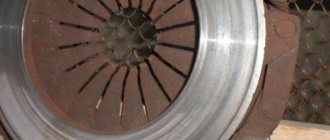
VAZ models are equipped with a single-disc clutch with a central spring. Motorists interested in which clutch is best to install on a VAZ 2107 should take into account that its type depends on the power of the power unit. The units differ in the parameters of the pressure spring, casing and dimensions of the driven disk, and the entire set consists of three elements:
- Pressure disk.
- Slave disk.
- Release bearing.
Pressure plate
On VAZ classics, two types of such mechanisms are used:
- 2103 – for cars with engines up to 1.5 liters.
- 2121 – for cars with engines up to 1.7 liters.
Externally, they are almost identical, they can easily be confused - the diameter of the disk in both cases is 200 mm. However, there are still distinctive signs:
- On product 2121 there is a mark in the form of a six-millimeter hole in one of the slots in the diaphragm spring blade.
- The width of friction linings 2103 is 29 mm, and 2121 – 35 mm.
Driven disk
To decide which clutch is best to install on a VAZ 2107, it doesn’t hurt to know that a “classic” disc is quite easy to distinguish from a “front-wheel drive” one by the bends that partially cover the damper springs. Driven disks are available in two sizes:
- 200x140 – for engines up to 1.5 liters; There are two brands: 2103 and 2107, the latter has asbestos-free linings.
- 200x130 - according to the documentation, the disk is brand 2121 and is designed for the Niva, but installation on the “seven” is also possible. In addition to its size, it features a reinforced damper with reinforced diaphragm springs.
Another noticeable factor is that the 2121 driven disc has a larger number of rivets on the linings than its 2103 counterpart.
Release bearing
The part is supplied complete and has an additional name - release clutch. For “classics”, its marking also begins with a set of numbers 2101. The bearing is visually distinguished by the presence of wire brackets, which is familiar to car enthusiasts who have replaced the working cylinder on a Lada.
A set of clutch parts for Niva can be installed on any classic car. Such parts are designed to withstand heavy loads, and therefore will last longer. The only inconvenience is that the “Nivov” basket will require a lot of effort on the clutch pedal.
This is interesting: Injector for VAZ 21099 - all the features of the device
How to remove the clutch slave cylinder
Before you begin repairing the clutch cylinder, it will have to be removed from the vehicle. Here's what you need for this:
- pliers;
- set of spanners;
- set of socket heads;
- empty container for brake fluid;
- rags.
Sequence of operations
It is most convenient to remove the clutch cylinder in the inspection hole. As an option, an overpass is also suitable. If the driver has neither one nor the other, it will not be possible to remove the cylinder. The work is performed in the following order:
- The cylinder return spring is removed manually.
Video: removing the clutch cylinder on a “classic”
Clutch repair
Now let's consider another option - using a repair kit for the clutch cylinders - main and working.
Master cylinder
So, we have removed the main cylinder and now we begin to disassemble it.
VAZ 2107 clutch master cylinder repair
- We start by removing the fitting. Use a screwdriver to remove the retaining ring.
- After which you can easily remove the fitting with the gasket.
- Now remove the rubber boot (protective cap) by simply prying it with a screwdriver or other convenient object.
- Now, using a 22 key on the other side, you need to unscrew the plug of the VAZ 2107 clutch master cylinder.
- You also need to remove the retaining ring from the boot side. This can be done using two screwdrivers, or special pliers. It is more convenient to use expansion pliers.
- Now you can easily remove all the insides of the cylinder.
Now about damaged parts and their replacement:
Clutch master cylinder of VAZ 2107 disassembled
- All rubber seals should be replaced. 2 rubber rings - on the piston and pusher rod, one on the fitting, and we also replace the protective cap if necessary.
- If necessary, replace the spring. If it is deformed or damaged.
- Also pay attention to the internal mirror of the cylinder. It should not have burrs or chips.
- If the piston is damaged or the pusher is bent, then it is better to replace the cylinder with a new one.
- When assembling, all parts should be washed very thoroughly.
Note! Never wash parts in gasoline or oil and do not allow these liquids to get inside the cylinder. Lubrication is carried out only with brake fluid!
- Put all retaining rings back.
- Tighten the clutch master cylinder plug tightly!
Then install the cylinder back on the car. This is how the clutch master cylinder is repaired on a VAZ 2107 car.
Working cylinder
VAZ 2107 clutch slave cylinder repair
- Clamp the VAZ 2107 clutch slave cylinder in a vice and unscrew the rear plug.
- Remove the protective rubber cap.
- Remove the retaining ring from the plug side and remove all internal parts of the working cylinder.
- Using a 10mm wrench, unscrew the bleeder fitting.
- Check the condition of the spring.
- Replace all rubber seals of the VAZ 2107 working cylinder.
- Check the condition of the working cylinder mirror.
- Wipe the inside with a clean cloth if necessary.
- Clean the bleeder fitting. If the edges on it are “licked”, replace it.
- Wash all parts in brake fluid.
- Lubricate each part with brake fluid during assembly.
- Reassemble all parts in reverse order.
- Install the retaining ring, protective cap and plug.
Install the VAZ 2107 clutch slave cylinder on the car (see above).
Bleeding the clutch of a VAZ 2106 with the help of a partner
Replacing the cylinder or any other manipulations with the clutch inevitably leads to depressurization of the hydraulic drive and air getting into the clutch hoses. To normalize clutch operation, this air will have to be removed by bleeding . Here's what's required:
- 0.5 liters of new brake fluid;
- a piece of rubber hose 30 cm long;
- open-end wrench 8 mm;
- empty brake fluid container.
Sequence of work
For normal pumping you will have to use the help of a partner. It is simply impossible to do everything alone.
- When the clutch slave cylinder is repaired and installed in its original place, brake fluid is added to the reservoir. Its level should reach the upper mark located near the neck of the tank.
Clutch drive device VAZ 2107
We dealt with the clutch mechanism of the classic VAZ 2101-2107 not so long ago. There is nothing complicated there either and you can refresh your knowledge here. In all rear-wheel drive VAZ cars, the clutch release drive is hydraulic. The clutch master cylinder is installed in the engine compartment on the shield, the cylinder is located coaxially with the clutch pedal rod. A pusher is attached to the pedal itself through a hinge, which presses directly on the master cylinder piston. The VAZ clutch drive diagram is presented below.
Clutch drive diagram VAZ 2101-2107
Thus, the rod, through the pusher piston, acts on the incompressible brake fluid in the master cylinder, which transmits force to the piston of the working cylinder, already installed on the gearbox housing through the hydraulic hoses.
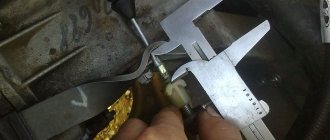
How to adjust the clutch rod on a VAZ 2106
After bleeding the working cylinder, it is necessary to adjust the clutch rod. To do this you will need:
- set of open-end wrenches;
- medium-sized caliper;
- pliers.
Adjustment sequence
Before you begin making adjustments, you should look at the machine's operating instructions . It is there that you can clarify all the necessary tolerances for the clutch rod and pedal.
- First, the clutch pedal play (also known as free play) is measured. The most convenient way to measure it is with a caliper. Normally it is 1–2 mm.
- If the free play exceeds two millimeters, then use a 10 mm open-end wrench to unscrew the nut located on the free play limiter. After this, you can turn the limiter itself and set the required free play of the pedal.
Video: how to adjust the clutch drive
We perform pumping correctly
Bleeding the clutch must be done immediately after replacing the working cylinder, as well as when the level of brake fluid in the reservoir is low. Work is carried out on bleeding in VAZ 2106, 2101, 2107 cars through a fitting located on the working cylinder.
First, fill the brake fluid reservoir full. Find a partner for this job who will press the clutch pedal inside the car. Take the hose and put it on the fitting of the slave cylinder, then tell your partner to depress the clutch pedal several times. After this, let him press the pedal all the way and do not let go, at this time you should slightly loosen the nut on the fitting to release some liquid and air.
This procedure must be repeated until there are no air bubbles in the liquid flowing out of the hose. After that, add it to the middle mark in the tank and check from time to time to see if it goes away.
Expert opinion
Ruslan Konstantinov
Automotive expert. Graduated from Izhevsk State Technical University named after M.T. Kalashnikov, specializing in “Operation of transport and technological machines and complexes.” More than 10 years of professional car repair experience.
After repairing the clutch drive or replacing individual elements, it is recommended not only to bleed the system, but also to adjust it. To work, you will need a caliper, a set of wrenches and pliers. Depending on whether the engine is fuel-injected or not, the procedure may differ. In the first case, you will need to adjust the free play of the clutch pedal, in the second, the stroke of the piston rod in the working cylinder. How to set up is described in detail in the relevant articles with step-by-step instructions.
Home →
Device →
Clutch →
Checking and replacing the hose on the clutch cylinder
The hose on the clutch slave cylinder is an extremely critical part that is exposed to high brake fluid pressure. Therefore, the car owner must monitor its condition especially carefully.
Here are signs that indicate that the hose should be changed urgently:
- cracks and other mechanical damage visible to the naked eye have appeared on the hose;
- the hose looks intact, but there are visible leaks of brake fluid on it (this means that it is still damaged and microcracks have appeared on it, which the driver simply cannot see);
- The threads on the hose ends are partially or completely stripped.
If you notice any of the above, the hose should be replaced immediately. It is better to install standard VAZ clutch hoses, their catalog number is 2101–16–025–90, and the cost is about 80 rubles.
Hose replacement sequence
Before starting work, you should stock up on an empty plastic bottle and two open-end wrenches: 17 and 14 mm.
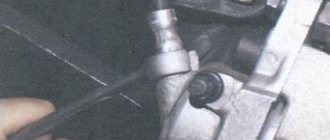
- The car is driven into the pit and secured with wheel chocks. Open the hood and find the place where the slave cylinder hose is screwed to the clutch hydraulic tube.
- The main hose nut is held firmly with a 17 mm wrench, and the fitting on the hydraulic tube is unscrewed with a second wrench - 14 mm. After unscrewing the fitting, brake fluid will flow out of it. Therefore, there should be a container in the inspection hole to collect it (a small basin would be the best option).
- The second end of the hose is unscrewed from the working cylinder body using the same 17 mm wrench. There is a thin O-ring in the cylinder under the hose nut, which is very often lost when removing the hose . This ring should also be changed (as a rule, new seals come with new clutch hoses).
- A new hose is installed in place of the old one, after which a new portion of brake fluid is added to the hydraulic system.
So, even a novice driver can change the working cylinder on a six. All you need to do for this is to carefully prepare the necessary tools and strictly follow the above recommendations.
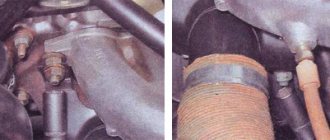
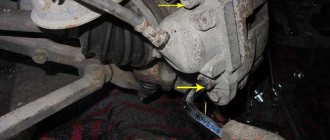
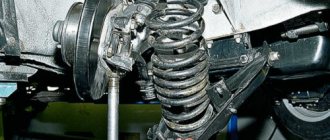
Device location
To find the clutch slave cylinder on a VAZ classic, you need to look for it directly in the area where the gearbox is located. The device is attached with two bolts to the gearbox housing.
The mechanism can only be seen from below or in the very depths of the engine compartment on the driver’s side. Repair work related to dismantling and replacing the clutch slave cylinder can be carried out “from under the hood,” but it is much more convenient from an inspection hole or on an overpass. The video below shows the location of this unit. What function does this product perform and is it possible to do without it? We'll find out more about this later.
Features of operation
The operating principle is very simple. Below is a diagram where the slave cylinder is indicated by a green arrow.
According to this diagram, we can say that the RCS performs an important function, or rather, it activates the fork, which is connected to the clutch drum. The main element of the RCS, or rather the piston, is activated by the resulting fluid pressure coming from the main cylinder through the hose when the clutch pedal is pressed. The brake fluid pushes the piston, which in turn drives the fork, which acts on the drum, pushing the disc away from the flywheel. Many people wonder why brake fluid is used in the system? The reason is that brake fluid is incompressible, which is why it is used in such important systems as brakes and clutches.
When to replace the RCS
During the use of the unit, which happens very often, the product tends to fail. The main causes of breakdowns are chafing and wear of the cuffs, the appearance of cracks in them, which entails the leakage of liquid. Significant loss of fluid will cause the clutch system to malfunction. It is possible to repair a DCS that has become unusable, but it is easier and more efficient to replace it with a new one.
In order not to wait until the pressure in the clutch pedal disappears, you need to periodically inspect the unit. If there is a leak in the fuel fluid, it is necessary to immediately carry out the appropriate repairs on the VAZ 2107. Before carrying out repairs, you need to make sure that this particular element is faulty, since the main circulation system may also fail. The main signs of failure of the RCS are:
- decrease in the level of fuel fluid in the tank;
- visible brake fluid leaks from the device body or from under the rubber boot;
- “failures” of the clutch pedal, which can be periodic or constant;
- difficulty changing gears.
But most often the malfunction is determined by detecting a brake fluid leak.
Features of replacing the RCS
Replacing the VAZ 2107 clutch slave cylinder begins with the need to remove all fluid from the reservoir. Further actions are carried out in order:
- First you need to loosen the fastening nut that connects the hose to the cylinder. There is no need to unscrew the nut completely, just loosen it at this stage.
- Using pliers, you need to remove the tension spring.
- After this, you should unclench the cotter pin and remove it from the tip of the pusher.
- Using a key set to “12”, you need to unscrew the two bolts that secure the product to the gearbox housing.
- After unscrewing the bolts, you can disconnect the bracket from the cylinder, which is intended to secure the spring.
- Holding the working cylinder body, you should dismantle it. During dismantling, pay attention to the pusher, which is located in the fork.
- After disconnecting the product from the crankcase, you can continue unscrewing the nut connecting the hose to the device. After unscrewing the nut, brake fluid will begin to flow out of the hose, so you should prepare a special container in advance.
After the device is dismantled, it should be replaced with a new one, since repairing it is irrational. The cost of the product is insignificant, so it is easier to replace it with a new one than to try to carry out repairs. Installation of the product is carried out in the reverse order of removal. After installation, it is necessary to carry out the system bleeding procedure. In conclusion, it should be recalled that regular car maintenance helps prevent various unforeseen consequences along the way, such as the “disappearance” of the clutch.
What is needed for repair?
If the master or slave cylinder has become unusable, you will need to make repairs. On sale you can find special kits consisting of pistons, sealing rings, and springs. But installing them on old worn-out cylinders is unlikely to be advisable. Pistons and rings have standard sizes, but the inner surface of the cylinder wears out over the years, and in most cases this happens unevenly.
Therefore, when installing new, almost perfect pistons, you will not get the desired effect. When making repairs, you must purchase brake fluid. In general, its resource is no more than two years. Only in this case will the liquid work as efficiently as possible; if this period is exceeded, the additives that are added to the liquid will volatilize.
Before starting repairs, be sure to drain all fluid from the system. To do this, you need to pump it out of the expansion tank using a bulb. Then, unscrew the bleeder fitting on the working cylinder and get rid of the residue.