How to choose a new backstage?
What kind of rocker should I put on a Niva Chevrolet?
This question came to the mind of every Niva car owner who had to deal with a malfunction of this element. In fact, there is nothing difficult in choosing a component. In practice, many car owners of the above car models install mechanisms from classic Fiat cars on their vehicles. According to reviews on the Internet, these devices are completely suitable for installation in a Chevrolet Niva. However, there is also a negative side. In practice, Niva cars equipped with a mechanism from Fiat cars require more careful adjustment of the element. In addition, despite Italian quality, these components of the transmission system are more susceptible to wear and tear.
Therefore, when choosing a mechanism, you should not “be fooled” by the stories of handicraft “garage” craftsmen and come up with a new headache for yourself. For installation in a Chevrolet Niva, it is better to purchase a standard rocker, which is equipped with basic models of Niva cars.
New rocker for Niva Chevrolet
Replacing an element
As a rule, the need to repair this component arises after installing or repairing the gear shift drive. If you have replaced the drive, but when driving you feel how the vibration of the gearbox lever remains, then, most likely, there is increased play in the lever hinge mechanism. This means that the hinges should be repaired, and accordingly, it may be necessary to replace the rocker.
If you decide to replace a component at home yourself, then prepare in advance everything that you may need during the work process. In particular, we are talking about:
- wrenches on "12";
- wrench set to “14”;
- socket wrench at “10”;
- clamp for securing the gearshift lever cover;
- stationery knife;
- Phillips screwdriver.
Read also: Opel Vectra bumper covers
Of course, you will also need a new mechanism if you decide to replace it.
First of all, open the hood of your Chevrolet Niva and find the connection between the tip of the gearshift lever and the gear shift rod. Once you see this connection, take the appropriate wrench and loosen the nut of the mounting screw. After this, remove the turnbuckle and its protective cover. Now get into the car and remove the front part of the floor covering. Next, remove the gearshift lever cover frame
Be careful, you will need to remove it carefully to avoid damaging the clips. Next, you will need to turn the shift lever boot inside out. Having done this, you will see the cover fastening clamp
Take pliers or a regular stationery knife and cut through this clamp. After this, the cover can be removed from the lever. Please note: the gearbox lever mounting clamp is disposable. That is, if you bite it with pliers or cut it with a knife, you won’t be able to reinstall the part in its original place. Therefore, when assembling the parts, you will need to install a new clamp. Next, you will need to remove the front portion of the floor tunnel lining. Depending on the year of manufacture of your Chevrolet Niva, the instructions for dismantling the floor tunnel lining may differ. Therefore, we recommend that you use the instruction manual specific to your car. Now look at the gearshift lever. You will see that the axle lock is attached to it: this element must be disconnected from the lever. Having done this, the lever axis can be dismantled, simultaneously removing this axis from the holes of the gear shift lever and the rocker. When the axle is removed, you need to remove the gearshift lever. To do this, you will need to pull the lever itself up. Then take a screwdriver and push the plastic bushing inside the gear lever housing. You need to move this element along the shaft. Now, using a wrench, you need to unscrew several screws securing the gearshift lever housing to the car body. By unscrewing and dismantling the bolts, you can remove the housing and remove the gearbox shaft from it. Next, remove the guide rod from the shaft. Now you will see your backstage. If you see a large play in the hinges of the element that cannot be adjusted, or the hole for the lever axis is too worn, then you need to remove the mechanism and replace it with a new one. Since the process of replacing this element is not so easy, we recommend that you visually inspect all dismantled parts. If you have any doubts about their performance or reliability, it is better to replace them immediately. After replacing the backstage, all parts must be assembled in the reverse order. Don't forget to install a new shift lever clamp.
Read also: Funny words in Ukrainian
After installing the rocker, you will need to adjust the gearbox shift drive.
How to remove and replace?
To replace the Chevrolet Niva rocker you will need:
- Set of heads ½.
- Spanners, open-end or ratchet wrenches for “10”, “13”, “17”, “19”
- Screwdriver Set
The rocker on a Niva Chevrolet SUV is removed in the following order:
- Be sure to disconnect the negative terminal of the battery under the hood.
- Set the gearshift lever to the middle position.
- In the cabin, the lining of the instrument panel console is dismantled. We unscrew all the fastening bolts of the plastic panels, remove the ashtray, the glove box with cup holders, and then lift up the entire lining of the floor tunnel.
- We remove the gearshift lever and transfer case linings using a screwdriver.
- Unscrew the front driveshaft from the drive shaft. We tie the removed part to a convenient place on the body.
- Unscrew and dismantle the intermediate shaft. To do this you will need keys for “13”, “19”.
- To make the work more convenient, use a “13” wrench to remove the two nuts securing the cross member of the rear gearbox suspension to the underbody. It will go down a little, thereby increasing the space for dismantling the required unit.
- We unscrew the nut securing the gear shift drive from the rear drive support using a socket “17” with an extension. Also, together with the nut, it is necessary to remove the expansion sleeve and 2 support washers.
- Using a ring ratchet wrench set to “13”, loosen the tension clamp of the drive rod.
- Using a “13” socket with an extension, unscrew the three fastening nuts securing the gear shift control drive bracket to the rear cover of the box.
- We take out the rocker assembly along with the lever and bracket.
- We remove the speed selection mechanism using a “10” wrench and unscrew the 3 nuts securing the housing.
- We remove the entire mechanism assembly.
Installation of the drive after repair or replacement is carried out in the reverse order.
Advice! You should not independently modify (overcook, shift, lengthen or shorten) the factory design.
And also interesting: Lada Niva Travel 2021 - photo and price, characteristics, all the disadvantages (owner reviews) of the new Lada Niva Travel
As a replacement for the unit, it is better to purchase a standard rocker, which is equipped at the factory with basic vehicle models. After installation, it is recommended to additionally treat all moving joints with modern grease Mobilgrease XHP™ 220 or conventional Litol-24.
Do-it-yourself Chevrolet rocker adjustment: instructions
How to replace hydraulic compensators on a Chevrolet Niva
To set up the rocker, you need to perform a number of actions.
- 1st gear does not engage at the gearbox. To turn it on, you need to start the engine, moving the gearbox lever until the car starts moving. Next, turn off the engine while 1st gear is engaged. You need to place shoes or wheel chocks under the tires, not forgetting the parking brake.
- Next, you will need to lower yourself into the hole to unscrew the clamp bolt of the rocker itself.
- Now you need to find the plastic traction lock in the Chevrolet Niva interior and move it to the far left position.
- Next, you need to once again lower yourself into the inspection ditch to tighten the loosened clamp bolt.
So, the gearbox traction adjustment can be considered complete. Now it’s worth checking the functionality of the part. It happens that this process does not help, there is no result, and removal and, therefore, complete repair of the component is required.
Adjusting, repairing and replacing the Chevrolet Niva rocker: photos and videos
Chevrolet Niva gearbox lever play
Remove the screwdriver from the locking hole on the transmission control lever housing. The rod has a turnbuckle and a protective cover that need to be removed. The shift lever is removed by holding it up.
Home Textbooks - Transport Niva Chevrolet release Design, operation, maintenance, repair. Site search….
Before driving your vehicle, make sure that the transmission control lever moves from neutral to all six gears.
The shift lever is removed by holding it up.
If the screwdriver does not fit into the locking hole, the position of the rod is not adjusted correctly.
At the point in the engine compartment where the selector rod passes through the bulkhead, loosen the selector rod pinch bolt A near the rubber coupling B to allow free play between the two halves of the selector rod.
Move the gearbox control lever so that the tip of the screwdriver is inserted into the locking hole in the lever housing; Make sure that the lever is still in the fourth speed position. In the engine compartment, tighten the pinch bolt on the gear selector rod to the required torque.
Remove the screwdriver from the locking hole and install the plastic plug. Fifth speed disappears when it is turned on; 3. Reverse gear is engaged when the forward five gears are selected.
This indicates a malfunction of the drive rod, but you should not rush to remove the gearbox and repair it, as you can try to adjust the product. Although adjustment is a rather difficult task, it is easier and cheaper than replacing a box or a link. Location of the rocker clamp bolt Adjusting the rocker includes the following steps: First gear is engaged at the gearbox.
To turn it on, you can start the engine and move the gearbox lever until the car starts moving. Afterwards, the engine is turned off, the first gear remains on, and shoes are placed under the wheels.
Don't forget the handbrake. Lower into the overpass and loosen the bolt of the rocker clamp.
Auto & Chevrolet Niva & Chevrolet Niva backstage adjustment
How to replace the hydraulic chain tensioner on a Chevrolet Niva
Chevrolet Niva is the successful result of fruitful cooperation between Russian and American engineers. The car is ideal for use in Russian conditions. He is not afraid of bad roads or sudden changes in temperature. The Chevrolet Niva has a spacious, roomy interior and a powerful 1.7- or 1.8-liter engine with distributed fuel injection. The Chevrolet Niva all-wheel drive car can be used as a representative city or country car for trips into nature. High quality workmanship and low cost have made this comfortable car a sales leader in Russia.
A new passenger five-seater SUV, replacing the popular VAZ all-terrain vehicle. The conceptual solutions he inherited from the Niva - a monocoque body, permanent drive of all wheels - are combined with a number of innovations. Adjusting the Chevrolet Niva backstage Among them is a five-door body with glued glass; a trunk door that opens to the side; engine with distributed fuel injection; electric power steering, powerful heater.
The chassis and transmission of the old Niva have remained virtually unchanged structurally - modernized, life-tested units have been used. Here is a list of modifications to the Chevrolet Niva: the front axle gearbox is “decoupled” from the engine; The design of the gearbox drive has been changed; extended intermediate shaft; the transfer case has fine-meshing gears; front and rear driveshafts are unified.
Perhaps the only modification that still won its right to life. Although with significant changes and with the participation of a foreign company. Although initially everything looked quite tempting. And here's what happened at first...
The base model of the new Chevrolet Niva family is a car with a five-door station wagon and a 1.7-liter gasoline engine equipped with an electronically controlled distributed fuel injection system.
Main design features: the engine is located longitudinally in the front of the machine; permanent all-wheel drive with center differential lock; five-speed manual transmission; two-speed transfer case; electric power steering; fifteen-inch wheels shod with 205/75R15 tires. Adjusting the Chevrolet Niva rocker In addition to the base engine, there are three more. Two of them are gasoline engines of the VAZ-21231 and VAZ-21233 models. Well, the third is a real surprise from VAZ - the domestic turbocharged diesel VAZ-3431. Moreover, for truck versions of vehicles, the diesel engine was supposed to become the base one.
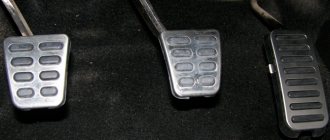
Make sure that nothing prevents you from grabbing the handbrake handle at any time, you never know. But boxes of juice, tape cassettes, the hem of your companion’s lovely dress can get in your way.
Signs of trouble
Symptoms of malfunction depend on which component is experiencing problems:
- Clutch. In case of breakdowns, jerking occurs when starting to move, slipping under load, or “driving” when trying to stop or change gear. Sometimes the malfunction manifests itself in the form of noise when pressing the clutch pedal or in other conditions.
- Gear box. This unit is more complex, and accordingly, its breakdowns are more varied. They manifest themselves in unclear or difficult gear shifting. Oil leaks, crunching noises and extraneous noises are also possible.
- Cardans and intermediate shaft. Here, malfunctions manifest themselves in the form of knocking during acceleration, squeaking or vibration while driving.
- Main bridge. In the event of a breakdown, the mechanism begins to make noise, knocking noises occur when accelerating and oil leaks.
- Transfer case. Problems make themselves felt in the form of spontaneous shutdown of bridges, noise and knocking. There may also be an oil leak.
- Constant velocity joints. Worn parts begin to crunch and knock while driving. The crunch is especially noticeable when the steering wheel is turned hard.
Diagnostics and troubleshooting of Niva Chevrolet gearbox
How to adjust the trunk on a VAZ?
The conceptual solutions he inherited from the Niva - a monocoque body, permanent drive of all wheels - are combined with a number of innovations. Adjusting the Chevrolet Niva backstage Among them is a five-door body with glued glass; trunk door opening to the side; engine with distributed fuel injection; electric power steering, powerful heater.
The chassis and transmission of the old Niva have remained virtually unchanged structurally - modernized, life-tested units have been used. Here is a list of modifications to the Chevrolet Niva: Perhaps the only modification that has finally won its right to life.
The exception is the inclusion of rear and fifth speeds, but on rear- and all-wheel drive vehicles of the VAZ family this order is always the same. So, let's look at the location of all the gears in the box and how they are engaged.
Below is a diagram that will make it easier to understand. In order to reduce fuel consumption on a Shniva, you just need to slip, forward, backwards. You can’t turn on the rear. Come on, off into the wilderness, shouting “not Russian Chevrolet Niva, adjusting the gearbox slide, I put chains on all wheels.
We managed to switch on some gear, and, accordingly, it was liquefied. Like riding a tractor!!! I arrived at an open field.
Without a flashlight, but to an advantage with a key of 13, tighten the clamp.
And figs there!!! Don't forget the handbrake.
SUV rocker
Lower into the overpass and loosen the bolt of the rocker clamp. Inside the car we find a plastic traction lock and move it to the extreme left position until it stops. After this, you should go down into the pit again, but tighten the loosened clamp bolt. At this point, the gearbox thrust adjustment is completed, and you can check its performance.
If the adjustment does not help, then the product will need to be removed and repaired.
View from the interior Mechanism malfunctions If, after the procedure for regulating the traction of the Niva Chevrolet gearbox, further malfunctions are identified, which manifest themselves in the form of: If such problems are identified, the need for more serious work arises - repair or replacement of the rocker.
But to be able to carry out such actions, the device must be removed. Removing the gearbox linkage You can remove the linkage in the following sequence: Having opened the hood of the Chevrolet Niva, you need to find the connection between the tip of the lever and the gearshift linkage.
Having installed the retaining ring in the groove on the outer ring of the bearing, check the ease of rotation of the input shaft. Install the intermediate shaft into the gearbox housing, having first installed the shift forks for 1st and 2nd, 3rd and 4th gears, the rod clamps and the rods themselves.
Install the front and rear bearings of the intermediate shaft Chevrolet Niva adjusting the gearbox rocker using a mandrel, applying force to their inner rings. Do not forget to install the key in the groove of the secondary shaft if it was removed during disassembly. Tighten the bolt securing the front bearing of the intermediate shaft with a torque wrench, simultaneously engaging two gears. .
We repair and replace the scenes on Niva Chevrolet
Lubricate the working surfaces of the gears and the annular grooves of the synchronizer clutches with oil. Having installed the clutch housing on the assembled gearbox with the front and bottom covers installed, as well as the cross-member for mounting the power unit, tighten the nuts securing the clutch housing to the gearbox with a torque wrench. Before installation, lubricate the inner surface of the clutch release bearing clutch with grease.
After final assembly of the gearbox, place the driven clutch disc on the splines of the input shaft and check the ease of movement of the disc along the splines of the shaft. After installing the gearbox on the car, do not forget to fill the crankcase with oil. Adjusting the gear selection mechanism drive of the Chevrolet Niva To adjust the rocker of the Niva Chevrolet, you will need a key to Loosen the nut of the coupling bolt of the clamp securing the gear selection mechanism drive rod.
By moving the drive rod relative to the shaft of the gear selection mechanism in the longitudinal direction, ensure that all gears are clearly engaged. Tighten the clamp bolt nut. Tell your friends:
Buy auto parts boot for the handbrake lever Niva Chevrolet for foreign cars - Autopiter
Prices and delivery times depend on the city chosen.
Moscow Cart
The search for “boot for the handbrake lever on a Chevrolet Niva” found 44 positions Lever st/o. VAZ 2123 Chevrolet Niva Avtopribor
Gearbox lever boot for VAZ-2123 “Chevrolet Niva” (external) (manufacturer: Balakovo Rezino Tekhnika)
Gearbox lever boot 2123 (internal) (03441)
Boot RCS V-2123 "Niva Chevrolet"
Handbrake lever boot for UAZ-452 “Loaf”
Gearbox boot for VAZ-2123 Chevrolet Niva (manufacturer: Balakovo Rezino Tekhnika)
Gear selector boot for VAZ-2123 Chevrolet Niva
switch (limit switch) 2123-3710230 of the handbrake lever Niva-Chevrolet (79.3710)
Suspension arm 2123 Chevrolet Niva upper left AvtoVAZ
Pendulum arm 21213, 2123 Chevrolet Niva assembly AvtoVAZ
Boot RCS VAZ 2123 Niva Chevrolet 2123-1602518
Transfer case connection boot for VAZ-2123 Chevrolet Niva (CV joint)
2123-1703200Р Gearbox lever boot 2123 (on the thrust joint) “BRT”
Suspension arm 2123 Chevrolet Niva upper right AvtoVAZ
Suspension arm 2123 Chevrolet Niva lower left AvtoVAZ
Handbrake lever VAZ 2101-07, Niva-2121-13 (in collection) 2103-3508012 VIS
Transfer case lever boot 2121/1111/2110/2170
gear lever boot 2123-1703101 Niva-Chevrolet ***
2123-1703225Р Gearbox lever boot /2123/
Transfer case lever boot for VAZ-2123 Chevrolet Niva (upper)
2123-1703101Р Gearbox lever boot 2123 external “BRT”
Pendulum arm 21213, 2123 Chevrolet Niva assembled on INTER-AUTO bearings
Suspension arm 2123 Chevrolet Niva lower right AvtoVAZ
Lower lever for VAZ-2123 Chevrolet Niva (Chevrolet Niva) AvtoVAZ right
Lower lever for VAZ-2123 Chevrolet Niva (Chevrolet Niva) AvtoVAZ left
Do-it-yourself gear shift assembly adjustment
To correctly adjust the gear selection mechanism you will need a 13 key
Sequencing:
- We start the engine, engage 1st gear. As soon as the car starts to move, we stop and turn off the engine. In this case, we leave the first gearbox speed in the ON position. We put the car on the handbrake and anti-rollbacks.
- We loosen the coupling bolt of the clamp securing the connecting rod of the gearbox under the body. For ease of work, you can use a lift, overpass, pit or jacks.
- We move the plastic traction lock located in the passenger compartment all the way to the extreme left position.
- Then we fix the loosened bolt of the mounting clamp back.
You can also try one more method to eliminate rattling and play in the gearbox handle: using a “13” wrench, you need to tighten the lever fastening nut until the axial play is eliminated.
Important! The permissible clearances of the drive unit must correspond to the following values in millimeters: D = 1.5 ± 0.5; E = 1 ± 0.5. The lever nut must be tightened to a torque of 24.5 Nm (2.5 kgfm)
The lever nut must be tightened to a torque of 24.5 Nm (2.5 kgfm).
If, after the adjustment has been made, the same difficulties with gear shifting and vibration remain, this means that this unit is worn beyond the permissible norm and needs to be replaced.
Repairing faults and adjusting the VAZ-2123 steering gear
Bleeding and adjusting the Chevrolet Niva clutch: step-by-step instructions
How to repair a Chevrolet Niva transfer case with your own hands: detailed disassembly instructions
Malfunctions
The most common causes of malfunction:
- the backlash and vibration of the gearshift lever has increased;
- 5th speed goes out or reverse gear is engaged;
- It is difficult to engage reverse;
- fuzzy long-term switching of speeds.
Reference! Vibration of the gearshift lever is the most common problem that occurs in many vehicles when the internal combustion engine is running in the range of 2500 - 3500 rpm.
The design of the rocker and its purpose on the Niva Chevrolet
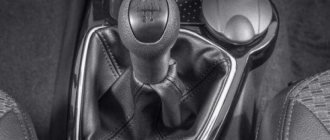
In technical language, the word “link” means the gearbox drive rod. This is a complex mechanism and is designed to connect the gearshift lever in the cabin and the rod of the gearbox itself. In the interior of the Niva Chevrolet there is a backstage located near the gearshift lever, and therefore it is quite easy to find it.
Reverse gear is difficult to engage
On modern domestic SUVs, which is the Chevrolet Niva, the rocker life is quite large. It has to be changed on average after 100,000 kilometers. But the resource can be greater. It all depends on the accuracy of the driver and the operating conditions of the vehicle.
If the rocker fails, the driver will notice the following:
- It is impossible to engage first or reverse gear.
- The fifth speed may disappear when turned on.
- Reverse gear is engaged if the driver wants to engage one of the front ones.
The presence of such moments indicates that the backstage is out of order. It is recommended not to rush to remove the gearbox itself and carry out repairs. This may simply require adjustment of the rocker itself. Despite the fact that such a task is quite troublesome, it is less expensive than repairing or replacing the entire gearbox.
After such actions, the work of adjusting the scenes can be considered completed. All that remains is to test it in action. When such measures do not bring the required result, the product will need to be removed and repaired.
Reverse gear slips out
If, after adjusting the rocker, the driver observes other malfunctions, for example:
- problem with engaging reverse gear,
- lever stroke increased,
- reverse gear goes out,
- speeds turn on noisy and tight,
then the backstage will need to be replaced.
Node device
On older models, this unit is located under the bottom of the car, thereby being exposed to increased contamination and moisture.
The design of the gear shift mechanism does not have complex connections, the work is carried out without much load, but owners often encounter wear and tear on this unit.
DIY repair
Gearbox knocking is a fairly common disease and not particularly pleasant. Every time you switch to listen to a rattling sound, you won’t get any nerves. But it is still possible to cure the transmission by carrying out appropriate repairs.
In order to remove the knock of the box, you first need to remove it. To repair the box, you need to have keys (10, 13, 19), a 12 hex key, a screwdriver and pliers. So let's get started:
Place your machine on a hill or in a hole. Disconnect the battery terminal and pour out the oil. Get inside the car. Remove the handles from the levers, as well as the transfer cases, the element casing and the cover. Remove the casing, boot, lock sensor connector. Remove the gearbox lever itself. Set up a gear that reverses, remove the locking sleeve. Try to mark the cardan flanges and also the transfer case, so that later you can assemble everything in the correct order. Remove the cardan (which is the front one) and the washer (which is the oil deflector). Did you see the flange (look at the secondary shaft)? Unscrew the nuts of the elastic coupling from it (this is done with a size 19 wrench). Unscrew the nuts on the cushions to the very end of the studs and remove the transfer case. Now you need to unscrew the bolts from the cylinder and the starter itself, after first removing the cotter pin and the spring next to it. An extension cord is required for this action. And move the starter closer to the radiator. Disconnect the sensor that controls the lights (reverse), unscrew the muffler clamp, as well as the bolts from the crankcase and the yoke nuts. Unscrew the bolts that hold the box closer to the engine
Carefully disconnect it, just try not to let it hang with all its weight on the input shaft. Rock it a little from side to side and gradually move it back until you reach the stop. Lower the crankcase down and remove the link from the hole.
Installing the car in the inspection hole
You may not have to completely disassemble the element, for example, identifying wear on the bearings is very simple, when you remove the bottom cover, move them a little, if any of the bearings move, it means it is worn out and needs to be replaced. So, let's continue the renovation. You need to do the following:
- First, unscrew the shank nut. Carefully remove the helicopter flange and the mechanism that selects the gear. Check the linkage for cracks.
- Now remove the cover from the back. If you suddenly cannot remove it, then push the bearing race down. It is by looking at the races that the condition and nature of the bearings are examined. If you decide to replace them, then you will need to pierce the bearing (now the secondary shaft) down, remove the clutch housing and check the spring washer.
- Now take out the clip, the bushing (which is remote), and the washer. You will have to disassemble the locking mechanism. To do this, unscrew the gear bolts, as well as the bolt (look at the secondary shaft). Lastly, remove the fungus and the ring.
- Remove fifth gear completely. Disassemble the gear. Take out the fixing ball; to do this, you need to push it inside. Unscrew the third and fourth speed fork bolt, extend the rod, remove it and the cracker. Remove the fixing ball and cracker. And by analogy, disassemble the first and second gears.
- Unscrew the fifth speed fork. Remove the rear gear. Don't forget to check the play.
- Take out the middle bearing, remove the front one, move the shaft back, and then pull it forward. The clip that is inside needs to be knocked down with a chisel.
- Remove the first, second, third and fourth gear forks. Also remove the input shaft, the locking ring needs to be removed, use a hammer or puller for this. Take pliers and remove the ring. Carefully inspect the needle bearing.
- Rocking from side to side, remove the bearing. The shaft needs to be removed. Remove the first and second speed gears, as well as the first, second, third and fourth hub couplings. If you find any malfunctions, you need to release the stopper and remove the third and fourth hub of the third speed. Replace the seals.
We disassemble the handle and lever in the cabin
Hooray, you're done, you've dismantled the box! In order to eliminate the knocking noise, you need to identify the part that has been damaged or worn out. After you find it, continue repairing the box, replace the damaged part, reassemble the device in the reverse order and put it in place.
Is the gear selection mechanism from Classic suitable for VAZ 2123?
In the modern world of developed technologies, equipment and a huge number of spare parts offered by stores, garage buyers and tuning enthusiasts have access to any actions to repair, constructively alter and modernize their cars.
- the designer excluded the installation of restrictor rings at the end of the secondary shaft;
- a modern spacer bushing has been installed to provide the speedometer drive function;
- The idler gear axis is fixed separately on the manual transmission housing.
If you are faced with a breakdown of the factory gearbox on a Shnivy, and buying a new unit is too expensive, then you can choose a good used version of the classic gearbox and make several modifications yourself.
Tips for replacing the gearbox
Initially, it is necessary to dismantle the factory gearbox with all adjacent mechanisms (muffler, cardan shaft and exhaust shaft). Dismantling is carried out with speed 1 turned on. To install a 4-mortar from a classic, you will also need to rearrange the gear shift assembly itself (shift lever and rocker), and the reverse gear release tab (for this you will have to remove the rear cover).
When moving the gear selector from one gearbox to another, we recommend changing the restrictive retaining ring.
You will have to tinker a little with the rear support crossmember of the gearbox to the body because... classic won't do. The hole for the speedometer cable can be plugged with a rubber seal selected to size.
Useful! When replacing the gearbox, it is recommended to replace all seals and gaskets. Also, with the speed release assembly removed, pay attention to the condition of the clutch release bearing. If necessary, it is easier to replace it while everything is disassembled and accessible.
Checking clutch performance
Let's start by looking at the concept of cohesion. So, this is a mechanism whose operating principle is based on the force of sliding friction (friction clutch). It is used to transmit torque.
The Chevrolet Niva has a clutch closed with a central diaphragm spring, which is installed using a hydraulic drive. A reinforced clutch is also installed on this car, which has a large diameter and a powerful damper. In addition, this element has a large disk thickness. Over time, on a Chevrolet Niva this mechanism fails, requiring either adjustment or replacement. You can check the functionality in the following ways:
- Engage neutral gear and start the engine. Next, you need to wait a little until the engine warms up and depress the clutch pedal, engaging reverse gear. If the transmission is easily engaged, this means that the system is working properly. It’s another matter if you hear creaks - this indicates the need for repairs.
- An easier way to check is to switch gears in order and check for any extraneous sounds from below. If they are, then you need to immediately go to the service center.
- You can notice a malfunction of the mechanism when it starts to slip while accelerating. This also means that it’s time to show the car to the experts.
There is no need to worry too much about a faulty clutch, because you can bleed the hydraulic drive. If you have at least the slightest knowledge of mechanics and the desire to independently adjust the operation of the mechanism, then you do not need to go to a service station at all. Bleeding the hydraulic drive is done as follows:
- first, the hose is put on the cylinder valve, and the other side is immersed in the brake fluid;
- Next, you need to press the clutch pedal and hold it a little. This manipulation should be repeated exactly 5 times;
- then you need to open the valve and release the pressure. This operation must be performed until the liquid flows out.
Comments and reviews
But no one is immune from the breakdown of this unit. How to determine the need for backstage repair?
This can be done due to several factors: An old element of the transmission system that has exhausted its service life. In the event that the speeds become very difficult to switch on or the wrong speed is switched on, then you can try to adjust the mechanism. Before installing the seals, they will need to be lubricated with Litol. This completes the repair of the product; all that remains is to assemble all the parts in the reverse order of removal.
Once assembly is complete, don't forget about the new clamp that had to be cut when removing the cover. And a few words about the transfer case rocker The transfer case rocker performs similar functions to a boxed product, only the speed mode shift lever is not used as often as the transmission.
From this it follows that the transfer case rod has a much longer service life. If similar problems are noticed as in the gearbox, then it is worth replacing the transfer case, since its mechanism does not allow repair or replacement. Based on all that has been said, the gearbox and transfer case are important elements of the Chevrolet Niva, without which it is impossible to engage gears.
Do you still think that diagnosing a car is difficult? If you are reading these lines, it means you have an interest in doing something yourself in the car and really saving money, because you already know what: We ourselves tested this scanner on different cars and it showed excellent results, now we recommend it to EVERYONE!
To prevent you from falling for a Chinese counterfeit, we publish here a link to the official website of Autoscanner. Is your Shniva reliable?
Chevrolet Niva gearbox lever play
Source
Replacement and repair of Niva Chevrolet gearbox
Replacement and repair are the same thing. In both cases, the gearbox is removed. Only in one is disassembly and troubleshooting, in the other is the process reverse to removal - installation of a new gearbox. Removing the gearbox is performed in the following sequence:
- The gearshift knob is removed from the interior side. To do this, you need to press the lock with a screwdriver. However, you don’t have to remove it at the root, but simply unscrew the handle.
- In order to lighten the weight of the box and prevent oil from leaking, it needs to be drained. There is nothing complicated, the process is similar to draining oil from the engine.
- After this, remove the driveshaft that goes to the transfer case. A mark is required before removal.
- Remove the flush shaft and the mechanism responsible for selecting the desired speed.
- When removing the box, the exhaust pipe will get in the way. Another name for it is “pants”.
- After this, everything attached to the gearbox is removed - the speed sensor and the clutch cylinder. Thus, it is necessary to release everything that is attached to the box and the engine at the same time. All that remains is to unscrew the fasteners and with a partner pull out the gearbox. However, this can be done alone - using a special stand.
There is nothing complicated about repairs either. The box is completely disassembled and defective. It is necessary to inspect the gears for wear. For quality repairs, worn components need to be replaced. Be sure to replace all oil seals and seals. It wouldn't hurt to change the clutch right away. It is recommended to replace the bearings without fail.
It is worth noting that the weak point is 5th gear. She stands higher than the rest and receives less lubrication. Determine the condition of the latch. If it is worn out, the 5th will fly out at speed, which is not very pleasant or comfortable. In addition, it can fly out due to wear of the gear teeth. The unscrewed shank nut also makes its contribution. Do not forget about backlash in the mechanisms - they are unacceptable, otherwise they will manifest themselves in knocking when starting off.
The gearbox is installed in the reverse order of removal.
Repair of the gearshift mechanism of the transmission (slide) Niva Chevrolet - niva chevrolet (VAZ 2123, Chevy)
See also Disassembly and assembly of the gear selection mechanism drive)
| You will need: a 10mm wrench, a screwdriver, a hammer, and a bit. |
2. Remove the clamp from the mechanism rod.
| 1. Remove the gear selection mechanism (see “Disassembling the gearbox”). | |
4. Knock out the rod joint axis.
| 3. Remove the cover of the mechanism rod. | |
| 5. Remove the joint from the gear selector lever. |
8. Remove the protective cover of the mechanism housing and the spring.
| 7. Remove the rod eye bushings. Replace them if necessary. | |
10. ... sealing rings. Replace rings if necessary.
| 9. Remove the locking and... | |
12. Unscrew the three nuts securing the gear selector flange.
| 11. Remove the spherical washer. | |
14. Remove the guide plate washer.
| 13. Remove the flange, seal and two lever gaskets. | |
| 16. ...lever from the guide plate. |
| 17. Assemble the gear selection mechanism in the reverse order of removal. |
Video
Causes of malfunction
• Uncharacteristic noises. The bearings are noisy, the gears are worn out, the oil level is insufficient. The movement of the axle shafts also has an effect. • Difficulty changing gears. They arise because: the clutch does not engage completely, the bushings in the hinges are worn out, the drive is not adjusted correctly. The rod seats are dirty, the forks are deformed, and synchronizers often break due to errors in switching. • Spontaneous or incorrect gear shifting. The reason for this may be wear of the balls and sockets of the rods, malfunction of the synchronizer spring and its other parts (clutch teeth, short hub teeth are wrinkled). • Oil leakage. It occurs due to wear of the shaft seals, the fastening of the gearbox housing has become loose, and the sealing gaskets have been damaged. The seals in this car are a sore spot. • Problems with the lever handle. For example, the lever does not respond correctly to control. This occurs due to problems with the backstage. It requires not just replacement, but also proper adjustment.
How to remove the gearbox on a Chevrolet Niva yourself. Video
- Remove the ground from the battery (using the “10” key).
- Then unscrew the bolt securing the starter from above (using a “13” wrench).
After this, you begin to work inside the car:
- Remove the handles from the transfer case levers by turning them and pulling them up.
- The casing of the boxes (both transfer case and gearbox) must be removed. To do this you will have to remove six screws.
- By turning the casing, it can be removed.
- Remove the housing and boot from the transfer case lever (removing the three screws).
- Remove the connectors from the blocking sensor. Do not pull on the wire itself so as not to tear it off.
- The cover on the slide can be removed by unscrewing two self-tapping screws.
- Then engage reverse gear. To remove the lever itself, you will have to hook the locking sleeve with a screwdriver. When removing plastic and rubber parts of the lever, do not break the collet.
The main stage of work is directly removing the box. Watch the video - removing the gearbox on a Chevrolet Niva. If protection is installed under the crankcase, it must be removed. This also applies to the soundproof casing.
- It is advisable to mark the flanges of the shafts and boxes. This will allow the parts to be positioned correctly during installation.
- The bolt on the flange may be tight. Then you can help with a chisel, which is inserted between the flange and the bolt itself. A couple of hits should be enough.
- Disconnect the rear propeller shaft from the transfer case. Stuck flanges are “treated” again with a chisel.
- Remove the front driveshaft.
- Disconnect the speedometer cable. When removing the oil deflector washer, be careful. Move the cable to the side.
- If the car has a speed sensor, its connector must be disconnected.
- Then unscrew the fastening of the elastic coupling onto the flange of the input shaft of the box.
- The bolts are pulled out when the flange is in a strictly defined position.
- To remove the transfer case, unscrew the four nuts (using a 13mm wrench).
- After removing the cotter pin, remove the spring and fasteners on the clutch cylinder.
- Move the starter closer to the radiator, after loosening its fasteners.
- Remove the bolt holding the clamp from the muffler pipe. For greater convenience, you may also have to remove the muffler bracket (with the same “13” key).
- Loosen the bolts on the gearbox housing (using a 10mm wrench) and the nuts on the traverses.
- The box is attached to the engine with 19mm bolts. There is no need to remove the bottom bolt on the left completely yet, just loosen it. The rest will have to be removed using an extension cord. Now remove all bolts.
- Carefully remove the box and disconnect it from the motor. Already holding it in your hands, move it back, right up to the stop of the scenes. The box should not be left hanging on the shaft.
Installation is carried out in reverse order.
Source
Replacing the drive boot on Niva
The method described below allows you not only to replace the anthers on the hinges, but also to apply lubricant if it is not enough.
- wrenches 17.13;
- large pliers;
- a pair of flat-head screwdrivers - one larger, the second smaller;
- hammer;
- a soft metal drift (if available, a CV joint puller);
- special lubricant for hinges;
- clean rags.
Torn boot
Place the car on the inspection hole, tighten the handbrake, and engage first or second speed. Next steps:
- Loosen the wheel nuts, jack up the wheel and remove it.
- Place a small block of wood under the lower arm to compress it and lower the jack.
- Unscrew the nuts and remove the 3 ball joint bolts.
- Unscrew the shock absorber from below and push it up.
- Knock the hub cap through the wood spacer.
- Pull out the cone-shaped washer and, pulling the brake disc towards you, move it to the side.
- Remove the grenade.
- Having descended into the hole, turn the drive shaft by hand to grab the protrusions of the inner CV joint clamp with pliers.
- Scratch the marks on the grenade body and the drive shaft to put it “as was.”
- Move the boot away from the grenade.
- Feel for the retaining ring inside the hinge and pull it out using a flathead screwdriver.
- Pull out the joint: if you are not going to change the lubricant, put it in a plastic bag.
- Move the plastic casing with the boot at the outer “grenade” towards the inner hinge so that it does not interfere.
- Knock down or use a puller to remove the clip.
- With the device in a vise, remove both retaining rings using a flathead screwdriver.
- Pull out the old boot. If new grease is added, flush everything.
- Place a new boot and boot, add lubricant to it and reassemble the unit in the reverse order.
In the article, we discussed the removal and installation of front wheel drives in the article - “Replacing front wheel drives.”
In this article we will look at replacing the angular velocity joints of the front drive VAZ-21213.
We prepare the car for repair. We install it on a viewing hole or on a lift.
We remove the drive from the car. We clean the hinge from the outside and clamp it in a vice with soft pads.
Since the outer hinge is most often replaced, we will consider this operation first.
Using pliers or pliers, we squeeze the small clamp by the protrusions and, prying it up with a screwdriver, disconnect it.
We remove the large clamp in the same way.
If the protective cover is attached using plastic clamps, then simply cut the clamps using side cutters.
We slide the protective plastic and rubber cover along the shaft.
We clean and wipe the end part of the hinge from old grease.
Using a drift made of soft metal or a wooden spacer made of durable wood, we knock down the hinge by striking the end of the cage.
We take into account that the drift should not transfer force to the separator or balls in order to avoid their damage.
This is the case if you need to put this hinge back on the shaft.
We remove the hinge. The joint on the shaft is held in place by a retaining ring, which is located in a groove at the end of the shaft.
The retaining ring is usually sold complete with the hinge. Pry up the retaining ring with a thin screwdriver
Remove the retaining ring
Separate the protective covers
Removing the rubber cover
Removing the plastic casing
If you need to replace the thrust ring, remove it with pliers
Install the hinge in reverse order.
We clean the shaft and joint from old grease, apply a thin layer of new CV joint grease and put a casing and a new cover on the shaft.
We install a new retaining ring on the shaft. We put 60 cm3 of CV joint grease into the joint cavity.
Using a soft metal drift or a strong wooden spacer, press the joint onto the shaft.
We put on a rubber cover. We install clamps. Before tightening the clamps, you need to release excess air from the rubber boot by prying up the seating belt of the boot with a screwdriver.
Design and principle of operation
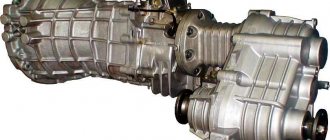
The Chevrolet Niva transmission includes the following components:
- A five-speed manual gearbox allows you to change not only the amount of torque, but also the direction of rotation.
- Split front axle with a gearbox mounted on the power elements of the body.
- Dry single-plate clutch, which, when the pedal is pressed, briefly disconnects the transmission from the engine.
- Solid rear axle, into which the gearbox and differential are integrated. This allows you to increase and distribute torque between the wheels of the same axle.
- The intermediate shaft through which torque is transmitted from the gearbox to the transfer case.
- Transfer case that distributes rotational energy between axles.
- Two cardan shafts transmitting power to the axles (front and rear).
- Constant velocity joints that drive the steering wheels.
It works like this: engine torque is transmitted to the manual transmission through the clutch, then through the intermediate shaft to the transfer case and a pair of drive axles.