July 29, 2015 Lada.Online 299 338 183
Owners of Lada Priora have to periodically deal with malfunctions of power windows (ESP). In some cases, the problem lies in some small detail that can be easily fixed with your own hands; in other cases, you will have to contact a service center to repair the ESP. We decided to look into the main reasons why power windows do not work.
Completeness
Power window R153-02 rear right
Power window R153-03 rear left
Car owners of the model of the same name would do well to know what it means to install rear windows on a Lada Priora
– more precisely, to have at least general information about the complex of works united by this concept. We will try to clearly describe the process, noting some related points that will undoubtedly bring practical benefits to domestic motorists.
Installing rear windows on a Priora has a number of specific features. But first things first.
Replacing the window regulator and its motor
This article will consider this type of Priora repair, such as replacing the electric window mechanism assembled with the motor. Of course, if your electric motor has failed, then there is no need to change the entire mechanism. Regarding the motor, it will be shown below how to change it.
Necessary tool for replacing the window regulator on a Priora
- 10 mm head
- Extension
- Ratchet or crank
How to remove the front window lift mechanism assembly
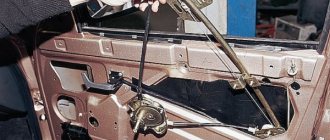
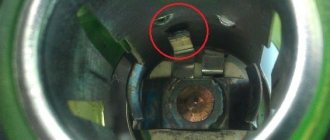
The first step is to perform a procedure such as removing the front door trim. After this, unscrew the two bolts securing the glass to the bracket on the lift. The bolts will only be accessible when the glass is raised up. This is clearly shown in the photo below.
To prevent the glass from falling down during this repair, it is necessary to fix it by placing something between it and the inside of the door. Next, you can unscrew all the power window mounting nuts.
This mechanism is attached in several places:
- from above, in the place where the glass is fixed, and also a little higher in the very corner of the structure
- below also in the corner
- and closer to the center of the door where the motor is installed - there are three nuts
Then disconnect the plug with the power wires by simply pulling both ends to the sides with a little force.
Next, we lower the structure so that the motor appears in a special opening:
It is through this that the entire structure should be removed from the door, which will be clearly shown in the photo.
And we remove it completely out so that further manipulations can be carried out.
Replacing the window lift motor of Lada Priora
As mentioned above, the most common reason is the failure of the electric motor. And in this paragraph we will consider the procedure for replacing it. First, you need to turn the mechanism over so that the pins are facing us.
- Turn out all three studs
- Using a flat-head screwdriver, unscrew the screws securing the motor housing to the window regulator.
- We separate the two parts of the structure and install the new electric motor in place
Video review of replacing front electric windows on a Priora
This video is embedded from my YouTube channel.
I hope that the replacement process is shown in the most accessible and understandable way!
The price of the motor is from 600 rubles, but for the entire assembled mechanism you will have to pay at least 1000 rubles. The Priora has lifts from the VAZ 2110, so you shouldn’t look for “Prior” ones.
Removing the heater fan
We remove the heater fan if it fails. We remove the throttle assembly and move it to the side without disconnecting the hoses from it (see “Removing the throttle assembly”). We remove the wind window trims (see “Removing the wind window trims”). Remove the front panel upholstery (see “Removing the front panel upholstery”). Bend upward the end of the brake pedal bracket (see “Removing the micromotor-reducer of the heater damper”).
Unfasten or cut the clamp securing the fan motor wire block. Having released the latch...
...disconnect the wiring harness block from the electric motor block. Disconnect the wire block from the additional resistor (see “Removing the additional heater fan resistor”). Having unscrewed the self-tapping screw and nuts securing the heater, we move it forward so that the fan can be removed (see “Removing the heater”).
Disconnect the electric motor ventilation hose from the pipe.
Using a Phillips screwdriver, unscrew the three screws securing the fan. Using a screwdriver, pry off the fan flange...
...we remove the electric motor with the impeller from the heater housing. The fan flange is attached to the heater through rubber pads. To replace them, remove the plastic bushings and then remove the cushions from the holes in the fan flange. Install the heater fan in reverse order.
When installing the fan, we orient it so that the electric motor pipe is opposite the electric motor ventilation hose.
Replacing the Priora stove motor with PanSonyk air conditioning
This replacement method may not be correct, but it’s fast!
According to the repair manual, I had a very difficult job ahead of me.
with the removal of the vacuum and the halving of the entire stove together with the evaporator and subsequent
refilling with freon. In short, only with freon for 2 rubles is not enough work for 5-6 hours.
Naturally, my hand didn’t rise to shred and cut my car, but what can you do.
There is no way without this. Priora ept)) Thanks to AvtoVAZ for their foresight in the next repair. All that was necessary was to make the upper part of the heater in the area of the motor removable. But no, we are not looking for easy ways; the right way is to remove everything))
Therefore, I did it much simpler and first cut off the upper part of the heater motor casing with a hacksaw blade. So that nothing would interfere with its removal. Cut only as shown in my photo so as not to disturb the rigidity of the entire casing. And it is this half that I cut off that only plays the role of an anther.
READ How to change radiator pipes Niva Chevrolet
But this turned out to be not enough... The motor rested against the place where the engine mount was mounted on the glass. This was done specifically so that no one could remove the motor in this way without completely disassembling the heater. But we move on))
In general, we cut the fan casing itself, but so that the 2 motor fasteners are outside the cut (this will not affect its rigidity). You can see in the photo where to cut.
Well, now that the engine is in front of us, we see its Chinese origin and the savory price for it. But in terms of mounting, it is completely identical to the 10 Mu and Kalinovsky. It only differs in the location of the breather, but this is not a hindrance for us.
We put the motor in place and check everything works. This means we can assemble it.
I then coated the incision sites with Poxypol and everything was fine. The integrity was not compromised and the appearance was not damaged at all; it is not visible there.
But it made it easier for me to disassemble and maintain this unit in the future.
Instead of introducing
Window lifters (or, to use a more familiar word, “window lifters”), as the name suggests, are designed to raise/lower windows.
The option under consideration refers to the electric window lifter
(although in a number of models only mechanical ones are provided for rear windows), i.e. manipulations with the side windows are carried out using electrical energy.
It is convenient and practical, creating additional comfort for the driver and passengers
It is pleasant to note that domestic manufacturers paid due attention to this indicator
Troubleshooting control buttons
A fairly common malfunction is the failure of the window lift control buttons. Most often, the Priora power window buttons become oxidized, or their contacts begin to come off. To eliminate faults of this kind, you will need to clean the contacts from oxide or re-solder the buttons. When re-soldering, the contacts will fit snugly against each other, thereby ensuring uninterrupted operation of the power window.
Removal and installation instructions
To carry out the work you will need a “10” wrench and plastic or wooden wedges
It is important to know how to remove the window regulator on the front doors; dismantling and installation of the rear window regulators on the Priora is carried out in the same way
The procedure consists of the following steps:
- First of all, for safety reasons, it is necessary to de-energize the car by removing the negative terminal from the battery.
- Next, the door trim is removed.
- Then you need to raise or lower the glass so that there is access through the upper door opening to the bolts with which the glass frame is attached to the device slide. These bolts should be unscrewed.
- At the next stage, you should lift the glass up to the end with your hands and secure its position with the help of prepared wedges.
- Then you need to disconnect the block with the wiring harness from the window lifting mechanism.
- After this, the nuts are unscrewed, thanks to which the gearmotor is held in place.
- Then the fastening nuts of the device guide are unscrewed.
- When all the nuts are unscrewed, the window regulator is removed through the technological hole. When removing the glass lifting mechanism, you need to ensure that the glass is securely fixed.
- Installation of the device is carried out in the reverse order.
1. Window lifting mechanism Lada
2. Front door without trim
3. Unscrewing the gearmotor mounting nuts
Installing a glass closer
The power windows available on the Lada Priora are limited in their functions. They are inconvenient because they raise or lower the windows only when you hold down the security mode button. This creates some inconvenience when you turn off the ignition in a hurry, get out of the car and suddenly remember that you didn’t close the windows in the car.
Again, you need to do all the procedures in reverse order: insert the key into the ignition, press the power window buttons. Or you can completely forget that the windows are left open, and then uninvited guests can get into the car.
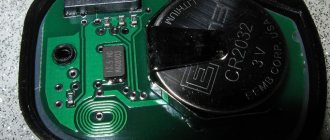
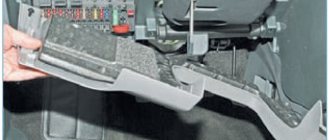
First, remove 2 nuts on the door trim near the driver. Then we lift the plastic clips and free the car threshold from the lining. Carefully remove the noise and temperature insulating materials and get to the power window connector shown in the figure. Be sure to ensure that all openings in the car, on the side of the body, are closed. Next, you need to disconnect the existing connector and install the connector of our new device.. Read more: How to replace the fuel filter on a Renault Sandero yourself
Read more: How to replace the fuel filter on a Renault Sandero yourself
This is all that needs to be done to install the power window closer on the Lada Priora. Now you don’t have to worry that when you turn off the ignition in your car, the window glass will remain down. The closer will do his job.
By the way, according to experts, it is not necessary to start replacing the control unit. Simple testing will help determine the real reason:
- See if the lock that controls how the power window control unit works in the Lada Priora is functioning correctly. If the lock is acting up, you need to check the plus or minus on the wire.
- It would be a good idea to check the condition of the fuse. To do this, connect the adjustment bulb to the body of the Lada Priora and see how the windows move in different directions. The same actions are carried out with a positively charged wire, and then with wiring numbers 1, 5, 11, 13. If the light always lights up, the fault is not in the unit. Most likely, some wire has been crushed or the electric drive has failed.
How to replace the heater fan on a VAZ 2170-VAZ 2172?
Removal: 1) There are two ways by which you can remove the stove fan, we will tell you both, but before we start describing them, let’s talk about them briefly, and which one you will use during the work is up to you to decide, the first method is in removing the throttle assembly, in removing the front panel upholstery and in removing the cooling expansion tank, the second method does not imply this; when choosing the second method, you will only need to unscrew the screws and nuts securing the fan and then remove it from the car.
Note! It would seem that the second method is much more convenient and faster, in fact it is, it is done much faster but is very inconvenient, because in this case you will have to get to hard-to-reach nuts, as well as hard-to-reach screws, etc. etc., while when carrying out the second method, you will no longer need to crawl to hard-to-reach places, all the nuts and screws will be before your eyes, but you will still spend more time, because you will remove other parts that are in the first way and you won’t need to touch it!
2) After you have decided and made your choice, go to work; at the beginning of the operation, in any case, you will need to remove the windshield lining (How to remove the lining, read the article: “Replacing the cabin filter on a LADA Priore”), then the block Disconnect the wires and the connector from each other (They are indicated by a red arrow) and remove the wire block from the additional resistor (It is connected to it, this block is indicated in both photographs by a blue arrow), these are all general operations and will need to be carried out in any case.
3) Read this point only if you are carrying out the second method, but if you don’t want to remove anything unnecessary and if you are not going to do the work using the second method, then in this case go straight to point 4, so about the second method, if it First, you will need to remove the throttle assembly (How to do this, read the article: “Replacing the throttle assembly on a car”), but only when you remove it, do not disconnect any hoses, but simply unscrew the nuts that secure the assembly to the receiver and then remove it, and as soon as the assembly is removed, proceed to removing the dashboard upholstery, to do this, use a screwdriver to loosen the screw that secures the steam removal hose to the cooling expansion tank (This is the tank into which coolant needs to be poured, you will immediately find it), loosening the screw, disconnect the hose from the tank and lead it through the hole in the upholstery (see photo 1), then lift the expansion tank and without disconnecting any other hoses from it, carefully move it, otherwise it will interfere with removing the upholstery, then again, use a screwdriver to unscrew it but this once the lower screw, which secures the upholstery (see. photo 2) and the left part of the upholstery (look as the car is moving) remove from the car, then find three clamps that are attached to the clamps and secure the vacuum brake booster hose so that it does not dangle, and so, overcoming the force of the clamps, remove them from the brackets ( see photo 3), immediately after which, using a socket wrench or wrench, unscrew the nut that secures the steering rack screen in the upper part (see photo 4), as soon as the nut is unscrewed, pull this metal screen and remove it from the top the studs and finally the right (last part) of the upholstery (see photo 5) from the car and bend up the end of the brake pedal bracket (see photo 6).
READ How to change the clutch cable on a VAZ 2112
4) Now unscrew the three screws and one side nut securing the heater on the right; if your upholstery has been removed, then it will be very convenient for you, after unscrewing, pull the heater out of the place where it is installed outward so that you can remove the heater fan.
5) After the heater has been removed a sufficient distance, unscrew the three screws securing the fan (Two of them are indicated by red arrows in the photo and they are already almost unscrewed), disconnect the electric motor ventilation hose from it (Indicated by a blue arrow) and then remove the fan (If if necessary, then use a flat screwdriver to pry it up from the bottom), as shown in the small photo, but just keep in mind one fact: when you put a new or old (It doesn’t matter) fan in its place, install it in such a way that the ventilation hose of the electric motor which is indicated by the blue arrow, looked towards the branch pipe that is present on the stove fan; if you install the fan on the wrong side, then simply do not connect this hose to the branch pipe, but it must be put on the stove fan branch pipe.
Note! If you have not removed the throttle assembly and the front panel upholstery, then it will simply not be very convenient for you to unscrew the screws and nuts securing the heater and you will also have to work hard to remove the heater to a sufficient distance, thanks to which you can replace the fan, but this is possible for some people So they replace the stove fan with a new one!
Installation: Reinstallation is carried out in the reverse order of removal, do not forget about the cabin filter, if it is too dirty, replace it with a new one.
Additionally It’s better to watch it so that all unnecessary doubts and questions disappear.
AutoNews / Reviews / Tests
Replacing the heater motor on a Lada Priora with Pan Sonyk air conditioning
Replacing the heater motor on a Lada Priora with Pan Sonyk air conditioning.
What is the cause of the problem
Sometimes there is no malfunction as such. For example, window regulators may fail in severe frost, but other electrics also suffer from similar problems. Therefore, experts advise not to save on buying/renting and heating a garage. But mechanical failures are much more common.
If you suspect a breakdown, you first need to check the TsBKE - this is AvtoVAZ’s personal innovation, which operates the electrical package. First you need to make sure the fuse is working. If everything is fine, we disassemble the doors, arm ourselves with a multimeter and measure the voltage at the terminals of the window lift motor. If there is no voltage, then:
- There may be a malfunction of the power window control unit (the button for opening and closing the window located on the door).
- The problem lies in the connection of the wire connectors.
- CBKE refused.
- The window lift motor is stuck or stuck.
- The window lift cable has already outlived its usefulness and needs to be replaced.
- Distortion of the glass itself, while the rest of the system is in full working order.
All of the above breakdowns occur with approximately equal frequency, with the exception of glass distortion, which occurs much less frequently.
Self-detecting a broken power window can be seriously difficult. First, it is difficult to diagnose a CBCE problem. The device is designed in such a way that one of the cables is multifunctional. It could be:
- X1-4.
- X1-6.
The essence of multifunctionality lies in the fact that some conductors are capable of independently changing polarity if the appropriate command is received from the CBKE. These pairs can simultaneously control side mirrors, central locking, provide power, etc.
To diagnose a malfunction of the CBKE, it is necessary to perform the X1-4 or X1-6 test, which is multifunctional on a specific vehicle. In this case, you should also press the window up/down button. If the multimeter detects the presence of electricity when the button is activated, then everything is fine. You also need to check sockets No. 1, No. 5, No. 11 and No. 13. If in all cases the presence of current and correct operation of the system are noted, it means that the reason does not lie in the CBKE.
As for the power window control unit, you most likely will not be able to identify the fault yourself. The fact is that it ensures the operation of all such devices in the car, which means you can call it as much as you like, but it will be very difficult to confirm the fact of its failure and find out where exactly it failed. The only real way out in such a situation is to contact specialists at a service station. With a high probability, it will not be possible to do without diagnostic equipment.
Repair is determined by the specific malfunction and is not always possible at home. If we are talking about skewed glass or poor conductor contact, this is not a problem. You can also replace a worn-out window lift cable yourself; you just need to purchase a new one at the nearest car market. If the problem lies in the power window control unit or in the CBKE, then you cannot do without contacting a service center. In this case, independent electronic repair is impossible.
July 29, 2015 219,652
Owners of Lada Priora have to periodically deal with malfunctions of power windows (ESP). In some cases, the problem lies in some small detail that can be easily fixed with your own hands; in other cases, you will have to contact a service center to repair the ESP. We decided to look into the main reasons why power windows do not work.
Common faults
Malfunctions of the mechanism that raises the windows can be electrical or mechanical in nature. Regardless of the nature of the breakdown, you can do the repair yourself (video author: Xie Dan).
Mechanical failures can be detected without ignition.
The following are typical mechanical problems:
- wear of the teeth on the device gear;
- sunken shield;
- a defective cable mechanism can stretch or deteriorate, and later during operation it will come off the guide rollers;
- jamming of mechanisms due to oxidation of moving parts;
- gearbox bearing wear.
Mechanical defects of the device
Among the electrical reasons why the window regulator does not work on a Priora, the following can be identified:
- If all four power windows do not work, the first thing you should check is fuse number F31. It is located in the power management mounting block. If the element burns out as a result of a short circuit, it should be replaced. In this case, it is advisable to check all wiring.
- Sticking or sticking of the brushes of the electric drive motor. This happens due to overheating of the graphite brushes, which melts the plastic nest in which they are located. Thus, the brushes stick to their nest and lose mobility.
- No voltage at the motor terminals. The cause may be an open circuit. The fault must be looked for in the relay or control unit. In addition, the contacts should be cleaned.
Fuse block
If the mechanism itself that raises the windows is faulty, then it needs to be replaced.
Why is everything so difficult?
It would seem that we only need to manage the locks. Why then connect to the window lift motors?
The opening of the passenger doors is carried out by the second impulse (relay K1 is activated). And elements K2 and K3 at this moment block the power windows. If they are not blocked, the windows in the doors will lower during the entire control pulse. And even in 0.8 seconds they will open noticeably.
Of course, connecting the signaling system in a Priora is more difficult than in many domestic cars. At the same time, the “Grant” in the “Norma” configuration uses a similar scheme. Be that as it may, the Lada Priora is the flagship of VAZ. And probably, difficulties with the electrical part should not confuse a competent car owner. It is also known that the standard control unit can be reprogrammed, and then unlocking occurs in one step. In this case, the connection is made according to “Scheme 1”.
Relay and fuse diagram for Lada Priora » Lada.Online
Fuse No. Current strength, A “Standard” and “Normal” “Normal” with air conditioning and “luxury” F1 25 Radiator fan of the engine cooling system Reserve F2 25 Heated rear window Mounting block, relay for turning on the heated rear window (contacts). Electrical package controller, contact “10” of XP2 block. Rear window heating element. F3 10 Right headlight, high beam Right headlight, high beam. Instrument cluster, headlight high beam indicator. F4 10 Left headlight, high beam F5 10 Horn Mounting block, horn relay. Sound signal. F6 7.5 Left headlight, low beam F7 7.5 Right headlight, low beam F8 10 Alarm signal Mounting block, relay for turning on the alarm sound signal. Alarm sound. F9 25 Heater fuse Priora Reserve F10 7.5/10* Interior lighting, instrument panels, brake light Instrument cluster, contact “20”. Brake light switch. Brake light bulbs. Interior lighting unit. Interior lighting. The door sill light on the right front door. Additional brake signal. F11 10/20* Wiper Mounting block, high speed windshield wiper relay. Switch for wipers and washers, contact “53a”. Wiper and washer switch, contact “53ah”. Heated rear window switch. Mounting block, rear window heating relay (winding). Windshield wiper motor. Rear window wiper motor (2171,2172). Windshield washer motor. Rear window washer motor (2171,2172). Airbag control unit, pin “25”. F12 20/10* Instrument terminal 15 Instrument cluster, pin “21”. Electrical package controller, contact “9” of block X2. Electromechanical power steering control unit, contact “1” of block X2. Reversing light switch. Reversing lamps. Parking system control unit, contacts “11” and “14”. F13 15 Cigarette lighter fuse Priora F14 5 Left headlight, side light, license plate light, trunk light Side light bulbs (left side) Instrument cluster, main light indicator License plate lights Trunk light Electrical accessories controller, pin “12” of block X2 F15 5 Right headlight, side light Side light bulbs (right side) Glove box light F16 10 Terminal 15 ABS Hydraulic unit, contact “18” F17 10 Left fog light F18 10 Right fog light F19 15 Heated seats Heated seat switch, contact “1” Heaters front seats F20 5/10* Immobilizer control unit Recirculation switch (switch on) Mounting block, relay for low beam headlights and parking lights (automatic lighting control system) Heater electric fan relay Automatic lighting control switch Windshield wiper and external lighting control unit, contacts “3 ”, “11” Automatic climate control system controller, pin “1” Automatic window cleaning system sensor (rain sensor), pin “1” F21 7.5/5* Rear fog lights Light signaling switch, pin “30” Diagnostic block, pin “16” Clock Automatic climate control system controller, pin “14” F22 -/20* Reserved Windshield wiper motor (automatic mode) Mounting block, windshield wiper relay and high speed windshield wiper relay, (contacts) F23 -/7.5* Reserve Windshield wipers and external lighting control unit, pin “20” F24-F30 Reserve F31 30 Electrical package control unit Electrical package controller, terminal “2” of block X1 Electrical package controller, terminal “3” of block X1 Driver’s door module, terminal “6” "Light front door sill lamp
Priora window lift diagram
Priora window lift diagram, connection features
Despite the fact that the window lifters are controlled in the same way as on previous models, the design of the Priora's window lifters is somewhat different. There is no power window unit on the Priora. The power windows are controlled by the electrical package controller. This was done for ease of control of electric windows.
To completely open and close the glass, you no longer need to hold down the key, but simply press it briefly. If you hold the button for a while, the window lifter will work until the button is released. The buttons in this case do not switch the circuit, as on previous models, but are a kind of sensors for the electronic unit.
Connecting the driver's door power windows is somewhat different from the connection in the passenger doors. This is due to the use of an all control module in the driver's door.
When you turn on any button on the block, a corresponding signal is generated from it, which is transmitted to the electrical package control controller via the wire connecting pin 5 of the driver's door block with pin 5 of block 3 of the double-glazed window control unit.
When troubleshooting without using diagnostic equipment, you can check the integrity or short to ground of the wire through which the signal passes and the presence of power on the driver's door module unit.
In addition to the use of electronic units in the Priora window lifter circuit, there is a feature of supplying power to the electric drive. One of the wires is multifunctional and is involved in supplying power to the heating and mirror control, as well as to the door lock solenoid.
Therefore, this wire can have either a plus or a minus, depending on which consumer is turned on. The value is controlled by the electrical package controller. On the right and left sides of the wire, pins 4 and 6 are connected separately to connector X1, respectively.
This property can be used to troubleshoot a circuit.
Priora power window diagram troubleshooting
How to find a fault in the Priora power window diagram if the passenger door power windows do not work? A malfunction of the power windows of all doors is unlikely and the reason for this will most likely be a malfunction of the electronic control unit for the power accessories.
A malfunction of the electric lifter in one of the doors is a very common breakdown, especially on early cars. And it is again associated with a malfunction of the unit, and in particular the burnout of the microcircuits that control the operation of the electric drive. The reason was a flaw in the circuit design by the manufacturer.
For the same reason, the window lifts could work jerkily. Subsequently, the block manufacturer corrected the defect, but failure of the block is still the main malfunction at the moment.
It is best to start troubleshooting by checking the functionality of the door lock on which the lift does not work. If the lock also does not work, then you need to check the presence of power or negative on the wire from the glass unit control unit, connector X1, pin 4 or 6, depending on which side you are looking for the fault.
To do this, connect the test lamp to the car body and turn on the power window in one direction or the other. Then connect the test lamp to the positive wire and repeat the operation. It is also worth checking conclusions 1, 5, 11, 13.
If the control lamp lights up in all cases, then the control unit is working properly and most likely there is a broken wire on the door or a malfunction of the electric drive. To check, you need to remove the door trim and connect a test lamp between the wires going to the electric drive.
If the foot lights up when you turn on the lift, then the electric drive is faulty, otherwise the wire is broken. If the unit malfunctions, it is necessary to find out the cause. This could be not only a manufacturing defect, but also a short circuit between the wires or to the housing.
Design and types of window lifters
The Lada Priora has tempered glass on the front and rear doors. A window lifting mechanism is used to raise and lower them. The power windows are controlled using a button on the car door module. The driver can control the movement of the glass of all doors, and the passenger can only control the glass of his door. According to the principle of operation, the devices are divided into rack and cable.
Despite the fact that the Priora's window lifting mechanism is similar to other models, its difference lies in the absence of a window lifter block. Its function is performed by the built-in electrical package control controller (CBKE), located near the ECU.
In addition, power is supplied to the drive in a specific way. One of the wires is multifunctional. It changes polarity depending on the function performed: it controls the central locking, mirrors, and power supply. This makes it difficult to troubleshoot and repair the window regulator.
Priora window lift diagram
Replacing power windows on a Priora
| Why doesn't the power window work on the Priora? In fact, there are many reasons for this malfunction, ranging from a blown fuse to failure of the electric motor itself. In some cases it can be repaired, but everything must be dismantled first. Do you know how to remove the window regulator on a Priora with your own hands? |
Removing the front power windows
You will need: remove the door trim and prepare the head “at 10”. Procedure:
- Fix the glass so that you can access the glass fastening bolts through the top hole of the door. Unscrew these two bolts with a 10mm socket.
- Disconnect the block with the Priora ESP wires.
- Unscrew the seven nuts securing the window regulator to the door using a 10mm socket.
- Remove the power window through the upper access hole.
Installation of window regulators on Priora is carried out in the reverse order.
Removing rear power windows
You will need: remove the door trims and prepare the “10” and “8” heads. Procedure:
- Fix the glass so that you can access the glass fastening bolts through the top hole of the door. Unscrew these two bolts with a 10mm socket.
- Unscrew the three nuts securing the window regulator to the door using a 8mm socket.
- Unscrew the two nuts securing the window lifter guide using a 10mm socket.
- Remove the Priora window regulator through the technological hole.
Installation of the rear window regulators is carried out in the reverse order. By the way, do you know how to install a window closer on a Priora?
Keywords:
- priors doors
- Priors window regulators
Similar materials
- Replacing power windows on Kalina
- Replacing a muffler on a Priora
- Replacing the cabin filter on a Priora
- Replacing the fuel filter on a Priora
- Replacing the steering rack on a Priora
- Replacing the speed sensor on a Priora
- Changing the oil on a Priora (engine)
- Replacing spark plugs on Priora/Kalina/Grant
- Replacing the air filter on Priora/Kalina1-2/Grant
- Removal and installation of window regulators Grants
xn—-8sbabr6ahc3e.xn--p1ai
How to replace the heater fan on a VAZ 2170-VAZ 2172?
Removal: 1) There are two ways by which you can remove the stove fan, we will tell you both, but before we start describing them, let’s talk about them briefly, and which one you will use during the work is up to you to decide, the first method is in removing the throttle assembly, in removing the front panel upholstery and in removing the cooling expansion tank, the second method does not imply this; when choosing the second method, you will only need to unscrew the screws and nuts securing the fan and then remove it from the car.
Note! It would seem that the second method is much more convenient and faster, in fact it is, it is done much faster but is very inconvenient, because in this case you will have to get to hard-to-reach nuts, as well as hard-to-reach screws, etc. etc., while when carrying out the second method, you will no longer need to crawl to hard-to-reach places, all the nuts and screws will be before your eyes, but you will still spend more time, because you will remove other parts that are in the first way and you won’t need to touch it!
2) After you have decided and made your choice, go to work; at the beginning of the operation, in any case, you will need to remove the windshield lining (How to remove the lining, read the article: “Replacing the cabin filter on a LADA Priore”), then the block Disconnect the wires and the connector from each other (They are indicated by a red arrow) and remove the wire block from the additional resistor (It is connected to it, this block is indicated in both photographs by a blue arrow), these are all general operations and will need to be carried out in any case.
3) Read this point only if you are carrying out the second method, but if you don’t want to remove anything unnecessary and if you are not going to do the work using the second method, then in this case go straight to point 4, so about the second method, if it First, you will need to remove the throttle assembly (How to do this, read the article: “Replacing the throttle assembly on a car”), but only when you remove it, do not disconnect any hoses, but simply unscrew the nuts that secure the assembly to the receiver and then remove it, and as soon as the assembly is removed, proceed to removing the dashboard upholstery, to do this, use a screwdriver to loosen the screw that secures the steam removal hose to the cooling expansion tank (This is the tank into which coolant needs to be poured, you will immediately find it), loosening the screw, disconnect the hose from the tank and lead it through the hole in the upholstery (see photo 1), then lift the expansion tank and without disconnecting any other hoses from it, carefully move it, otherwise it will interfere with removing the upholstery, then again, use a screwdriver to unscrew it but this once the lower screw, which secures the upholstery (see. photo 2) and the left part of the upholstery (look as the car is moving) remove from the car, then find three clamps that are attached to the clamps and secure the vacuum brake booster hose so that it does not dangle, and so, overcoming the force of the clamps, remove them from the brackets ( see photo 3), immediately after which, using a socket wrench or wrench, unscrew the nut that secures the steering rack screen in the upper part (see photo 4), as soon as the nut is unscrewed, pull this metal screen and remove it from the top the studs and finally the right (last part) of the upholstery (see photo 5) from the car and bend up the end of the brake pedal bracket (see photo 6).
4) Now unscrew the three screws and one side nut securing the heater on the right; if your upholstery has been removed, then it will be very convenient for you, after unscrewing, pull the heater out of the place where it is installed outward so that you can remove the heater fan.
5) After the heater has been removed a sufficient distance, unscrew the three screws securing the fan (Two of them are indicated by red arrows in the photo and they are already almost unscrewed), disconnect the electric motor ventilation hose from it (Indicated by a blue arrow) and then remove the fan (If if necessary, then use a flat screwdriver to pry it up from the bottom), as shown in the small photo, but just keep in mind one fact: when you put a new or old (It doesn’t matter) fan in its place, install it in such a way that the ventilation hose of the electric motor which is indicated by the blue arrow, looked towards the branch pipe that is present on the stove fan; if you install the fan on the wrong side, then simply do not connect this hose to the branch pipe, but it must be put on the stove fan branch pipe.
Note! If you have not removed the throttle assembly and the front panel upholstery, then it will simply not be very convenient for you to unscrew the screws and nuts securing the heater and you will also have to work hard to remove the heater to a sufficient distance, thanks to which you can replace the fan, but this is possible for some people So they replace the stove fan with a new one!
Installation: Reinstallation is carried out in the reverse order of removal, do not forget about the cabin filter, if it is too dirty, replace it with a new one.
Additionally It’s better to watch it so that all unnecessary doubts and questions disappear.
Replacing the heater radiator on a LADA Priora (with and without air conditioning)
One of the reasons why the heater does not work well is the heater radiator. During the operation of the car, it begins to leak and is no longer able to transfer the required amount of heat to the interior. Depending on the year of manufacture and configuration of the LADA Priora, the process of removing the heater (radiator) can vary greatly.
Removing and installing the Priora stove motor.
how to remove the interior heater motor Priora 217230 1 part.
READ How to change the antenna on a Ford Focus 2
The whole procedure took several hours. This is shown in more detail in
There is another way to replace it. To gain access to the heater radiator, instead of the heater housing, it is necessary to remove the vacuum brake booster along with the brake pedal. This allows access to the left side of the heater (in the direction of travel) and to the radiator itself.
Replacing the Priora stove motor
Replacing the heater fan on a VAZ Priora with your own hands.
Causes of malfunction
Minor malfunctions or breakdowns can occur for various reasons:
- After an accident. If the blow hit the side door. It can manifest itself either in the incorrect operation of the window regulator or in the complete failure of this unit.
- If exposed to moisture or dampness. Of course, the car door is sufficiently sealed. But in some cases, the electrical components of the power window short out due to condensation or the car being in deep water for a long time.
- Installation of low-quality or defective components.
Let's look at the most common problems.
Electrical faults
Electrical faults are the simplest because they are the easiest to fix. Electrical failures can occur due to:
- Poor contact on the opening control button/relay. Most often this is observed when there is insufficient contact in the switching device. Oxidized or erased power pads on the board do not conduct current in the circuit. The window regulator begins to twitch or fails altogether.
- Wire shorts. The door has moving elements. The wiring in these places may fray or break. The power goes out and the glass stops going up and down.
- Fuse blown. If there is a sudden jump in the car's circuit, the fuse located in the window regulator circuit may burn out.
- Motor/gearbox malfunction. There can be many reasons for this: from burnout and sticking of the brushes, to oxidation of the contact group on the motor.
For any type of malfunction, it is worth carrying out diagnostics at a specialized service station. But first you should check the power window fuses. Most often, the cause of the breakdown lies in this place.
Mechanical defects of the mechanism
Mechanical defects occur much more often than electrical ones. They can also cause the window regulator to break. The most common mechanical failures:
- Broken cable. A rare malfunction. With such a defect, the glass “falls” into the door frame and does not rise from the button.
- Bent arms or guides. In this case, the work jams or the button is completely ignored.
- Reducer gear failure. Modern cars are often equipped with plastic gears that quickly wear out, crack or crumble. The teeth begin to slip. The glass jerks or rises jerkily.
- Sticking or jamming of the mechanism due to lack of lubrication. A common “sore” on old cars. The resource of mechanics is not infinite; it also requires careful treatment and timely maintenance. Over the years of operation, machine lubricant on moving parts dries out. The parts begin to rub against each other and jam together.
The listed defects can only be repaired on a disassembled door. In this case, you will need to purchase additional damaged or broken components.
Other causes of power window failure
Sometimes the glass stops opening normally for reasons that are unclear at first glance. This may happen due to:
- Severe frost. Condensation forms in a warm interior. At night the car cools down, and in frosty weather the accumulated moisture forms ice where the glass meets the door. An ice crust may also form inside the lifting mechanism. All this leads to difficulties in the operation of the window regulators.
- A foreign object gets into the gap between the glass and the door. In this case, the window regulator becomes stuck.
In 80% of cases, any mechanical or electrical malfunction is eliminated with a disassembled door.
Reasons for handle breakage
Often, replacing the power window handle will only temporarily fix the problem. Soon the new handle also fails. The reason is that the glass goes down and up too tightly, so you have to put excessive stress on the rather fragile plastic part. In this case, you must first eliminate the cause of the stuck glass or window regulator, and then change the handle.
It’s easy to check the operation of the mechanism - just raise and lower the window.
There are several reasons for the mechanism to jam:
- twisted drive cable;
- glass distortion;
- poor lubrication in the mechanism;
- freezing of ice (in winter).
If the window regulator works hard, you need to remove the door trim, find and eliminate the cause: change the lubricant, melt the ice or replace the faulty mechanism.
Another reason for handle breakage is worn-out window drive splines. In this case, it is necessary to replace the window lifter mechanism with a new one and only then change the handle.
Wiring diagram of power windows of Lada Priora
The search for the problem should begin by checking the correct operation of the door lock, inside which the lift has stopped working. If the lock also refuses to work, you need to check whether there is a minus or power from the glass unit control module, connector X1, pin 4 and (or) 6, depending on the malfunction of the board. Connect the warning lamp to the car body while simultaneously pressing any button on the power window. Repeat the operation again, but with the positive wire. Make sure that pins 1, 13, 5 and 11 are working correctly. If the control lamp lights up in all cases, it means there are no problems with the operation of the control unit. Most likely, there is a problem in the electric drive, or a break in the wiring. After removing the casing, connect the control ramp between the two wires that go to the electric drive. If the lamp starts to light when the up/down button is turned on, this means that there is a problem with the electric drive. Otherwise, you are dealing with a broken wire.
Compared to the passenger windows, the driver's window uses a slightly different scheme. This is due to the fact that the driver can control all modules in the cabin at once. Without using diagnostic equipment, the driver can check the short or continuity to ground of the wire that supplies the signal, as well as power to the driver's door module.
The control panel is located on the interior handle
The window regulator on the Priora is used to raise or lower the windows in the car. The mechanism is installed inside the car doors either in a special subframe or by attaching it to the car body.
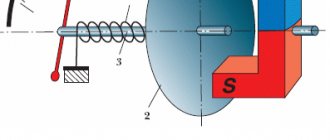
The design of the window regulator includes:
- drive (combined electric motor unit, worm, gear);
- window lifting mechanism;
- Control block.
How to identify a malfunction
To determine the malfunction, follow the instructions:
- Connect the light bulb located under the door trim with the wiring coming from the electric drive. If the last one is broken, the light is on, which means the problem is in the wire.
- If the operation of the power window control unit leaves much to be desired, the main reason is the contact of the wire with the box or another wire.
If a breakdown in the Lada Priora needs to be repaired with your own hands, without having special tools, first rule out the possibility of a wiring break or short circuit that falls on the ground of the wire responsible for controlling and powering the door structure module unit near the driver’s seat.
There is a special offer on our website. You can get a free consultation with our corporate lawyer by simply submitting your question in the form below.