A three-phase voltage regulator (charging relay) is installed on the generator. Responsible for maintaining the voltage of the on-board network within a given limit in all operating modes.
The output voltage may be affected by changes in rotor speed, electrical load, and ambient temperature.
Failure is considered one of the most common problems associated with the operation of the generator. Replacing an element does not require practical skills.
The generator must always be in good working order
Any modern car is equipped with electrical equipment that is absolutely necessary for the vehicle:
- without a starter it is impossible to start the engine;
- a car cannot be driven without lighting at night;
- The heater motor creates heat in the cabin;
- The wiper motor clears the windshield of rain and snow;
- FM radio makes it possible for the driver not to get bored on the road.
But all these devices cannot work without electricity, so the car must have a power source.
The current from which all consumers in the car are powered is produced by the generator, and the performance of the entire electrical circuit of the vehicle depends on its condition.
Therefore, the generator must always be in good working order, and if any breakdowns occur with it, they must be eliminated in a short time.
Generator Lada Kalina
Lada Kalina cars are equipped with three-phase generators that produce alternating current; to produce direct current, a rectifier unit is included in the generator circuit.
AvtoVAZ equips VAZ 1118 cars with generators of the type 5132.3771
or
9402.3701-06
, there are many different manufacturers producing spare parts for VAZ cars.
The generator for the Lada Kalina can be of different power; the industry produces current sources of 85, 100, 90, 115, 120, 135 Amperes.
Among the most famous manufacturers of VAZ parts are:
- Pramo;
- StartVOLT;
- KZATE;
- LKD (China);
- Eldix (Bulgaria);
- ISKRA (Slovenia);
- BATE (Belarus);
- Bosch.
Device
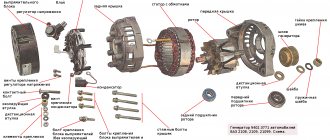
The Lada Kalina generator consists of the following parts:
- housing (front and back cover);
- pulley;
- stator windings;
- armatures (rotor);
- voltage regulator relay (charging relay);
- diode bridge (rectifier unit);
- two armature bearings;
- rear plastic casing.
Inside the generator housing, along its walls there is a stator with a winding, and a rotor is located in the center.
At the back of the case there is a diode bridge and a voltage regulator relay; the diode bridge is covered with a plastic casing to prevent dirt and dust from entering.
There is a pulley in front of the housing; it is put on the rotor shaft and secured with a nut.
The generator is driven by a drive belt placed on a pulley.
About the principle of operation of a car generator
The operation of the Lada Kalina generator unit is based on the following principle: an alternating current is induced in the stator winding, which is subsequently transformed into direct current through a rectifier module located on the body of the unit. The generator cover is also equipped with an electronic voltage regulator and a brush holder. The rotor of the device receives torque from the crankshaft pulley. The transmission link is a poly V-belt.
The basic characteristics of the generator set include the following parameters:
- maximum generated current – 85-90 Amperes;
- operating range of on-board voltage – 14.4-15.1 Volts;
- rotation ratio of the motor and rotor – 1:2.4;
- right-hand direction of rotation.
Malfunctions
All generator malfunctions can be divided into two categories:
- lack of charging (or undercharging);
- increased noise.
A whistling or grinding noise may be caused by bearings or tension belts.
The reason for poor charging or its complete absence may be:
- break or short circuit in the rotor or stator winding;
- wear of the brushes (they are located in the same housing with the relay regulator);
- charging relay malfunction;
- breakdown of the diode bridge;
- loose belt.
Installation and repair features
Installation occurs in reverse order. If necessary, the generator is replaced or repaired. In some cases, repair will be impractical, since there are many unusable components, including stator and rotor windings. Restoration will be expensive; it will be much easier to completely replace the generator on Kalina. The cost of a new generator in stores is 4-5 thousand rubles. At "showdown" you can buy it 2-3 times cheaper.
As already mentioned in previous articles, the main malfunctions of the generator are failure of the diode bridge, brushes with a voltage regulator, or even an open circuit in the winding of the device. Below I will give some of the types of diagnostics using a multimeter that anyone can perform independently if they have this device.
Vehicle voltage
For normal operation of all consumers in the car, the generator must maintain a certain voltage; for the Lada Kalina on-board network, with a working generator, it must be in the range from 13 to 14.8 volts.
Within specified limits, the voltage is provided by a relay regulator, and with any deviation from the specified norm, various problems arise:
- At high voltage, the electrolyte in the battery banks boils, and the battery quickly fails;
- If there is insufficient charging, there is not enough current for consumers, as a result the battery quickly discharges.
The voltage generated by the current source is measured in the following way:
- On a digital multimeter (voltmeter), set the limit to 20 volts;
- We connect the probes of the measuring device to the battery and start the internal combustion engine, the voltmeter should show a voltage of about 14 volts;
- Without turning off the engine, we turn on the load - headlights (high beam), heater motor at maximum speed, windshield wipers, radio, etc. If the generator is in good condition, when the engine is idling, the voltage should not fall below 13.2V, optimal The voltage is considered to be 13.7-13.9 V.
Checking the rectifier unit (diode bridge)
To perform this diagnostic, it is necessary to remove the diode bridge from the Kalina generator; this was described in more detail in previous articles in this section.
Then we connect the tester with the black wire to the negative plate of the block, and the red one in turn to the three contact terminals of the diodes. This way we check all the rectifiers in the block. The values on the device should be in the range from 400 to 800 Ohms. Personally, on my Kalina, during this test, all diodes showed a resistance within 535 Ohms. But the repair instructions from the Third Rome publishing house talk about numbers of 580-620 Ohms. I will say right away that when I rang two serviceable generators, the values specified in the manual were not achieved, although there were no problems with charging, so I personally doubt the accuracy of the data in this instruction.
Then we carry out the same operation, only swapping the contact wires of the multimeter. In this case, the device, with working diodes, will show infinity, that is, its readings will not change:
Brush wear
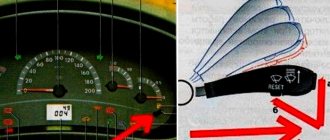
As the generator brushes wear out on the Lada Kalina, charging begins to disappear - the indicator of insufficient battery charging periodically lights up (blinks) on the instrument panel.
The brush assembly of the VAZ 1118 generator is located in the relay-regulator, so the entire part is changed entirely.
The wear of the brushes can be easily measured - they must have a minimum length of at least 5 mm.
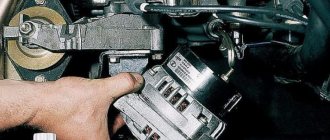
Replacing the charging relay
If the charging relay is faulty, the voltage in the car's network can be too high or too low, and the voltage can also “jump”.
To eliminate the malfunction, it is necessary to change the relay regulator. On the Lada Kalina, this part is easy to replace with your own hands; the replacement can be made without removing the generator itself:
- turn off the engine, open the hood and remove the negative terminal from the battery;
- on the back side of the generator, pull off the top chip with the wire, unscrew the nut securing the supply wires and disconnect the wires themselves;
- remove the plastic casing, the cover can be removed easily - you need to unclip three hooks. If the casing is difficult to remove, it can be removed by hooking it with a screwdriver between the generator body and the plastic cover;
- unscrew the two bolts securing the relay regulator (key 8), disconnect the chip with the wire and dismantle the part;
- install the new charging relay in place and assemble everything in the reverse order.
Checking the serviceability of the voltage regulator with brushes
To do this, you need to connect a 12 Volt light bulb to the two ends of the brushes, and apply 12 Volt voltage to the regulator contacts. If this device is working properly, the light should light up. When the voltage supplied to the regulator increases to 15-16 V, the light should go out.
In case of detected malfunctions in various devices, we replace them. More details about this are written in previous articles from the “Generator” section.
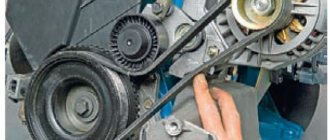
Generator replacement
In cases where the damage to the generator is serious (for example, the stator and rotor burned out at the same time), sometimes it is easier to replace the entire assembly than to repair the device.
Replacing the Lada Kalina generator is not difficult, almost any driver can do it, but it is better to do the work on an inspection pit or a car lift.
We make the replacement as follows:
- we stop the engine, remove the terminal from the battery (ground);
- if there is protection under the engine, remove it;
- Disconnect all wires from the generator;
- Use the tensioner bolt to loosen the generator belt and remove it;
- we unscrew the generator itself, it is attached to two bolts - one of them is unscrewed from above, the other from below;
- We take out the old generator and install a new one, putting everything back together in reverse order.
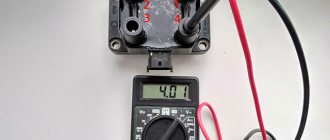
Checking relay type 591.3702-01
Relay test diagram type 591.3702-01
You can also still find a voltage regulator of type 591.3702-01, which was installed on rear-wheel drive VAZs (from VAZ 2101 to VAZ 2107), GAZ and Moskvich. The device is mounted separately and installed on the body. In general, the test is similar to that described above, but the differences are in the contacts used.
In particular, it has two main contacts - “67” and “15”. The first of them is a minus, and the second is a plus. Accordingly, to check it is necessary to assemble the circuit shown in the figure. The verification principle remains the same. In normal condition, at a voltage of 12 V, the light bulb lights up, and when the corresponding value increases to 14.5 V, it goes out. When the value returns to its original value, the light comes on again.
A classic regulator of this type is a device of the PP-380 brand, installed on VAZ 2101 and VAZ 2102 cars. We provide reference data regarding this regulator.
| Adjustable voltage at regulator and ambient temperature (50±3)° C, V: | |
| at the first stage | no more than 0.7 |
| on the second stage | 14,2 ± 0,3 |
| Resistance between plug “15” and ground, Ohm | 17,7 ± 2 |
| Resistance between plug “15” and plug “67” with open contacts, Ohm | 5,65 ± 0,3 |
| Air gap between armature and core, mm | 1,4 ± 0,07 |
| Distance between second stage contacts, mm | 0,45 ± 0,1 |