How to remove the center console on a Priora? But you never know why you need it
Download PDF
For motorists, knowing how to remove the center console on a Priora will be useful for carrying out repair work or replacing the part in question with a more modern version. This manipulation should sometimes be carried out when installing the DVR. To do the work yourself, you will need a basic set of tools: a screwdriver and wrenches. We'll look at how to remove the center console on a Priora below. The dismantling procedure consists of the following operations:
- The first step is to deactivate the rear window heating button;
Manufacturers (analogues of armrests) and prices
There are some good suggestions that can be used to replace these stock seat parts. There are copies with any coating - even eco-leather and any design. Among them:
- Varta – 1500 rubles. The base is wood, the covering is eco-leather. With a gray stripe in the middle, which is emphasized by black stripes on the sides.
- Azard bar10013 – 1500 – 1,700 rubles. The covering is strictly black, made of eco-leather.
- Autochecly models RR-01 - RR-05, RR-20, RR-26. Made of eco-leather, the central insert of the backing can be made in several colors. Cost – 2,200 – 2,400 rubles.
Some craftsmen make the armrest on the Priora themselves - but this is a dubious activity for those who do not seriously engage in this. It’s very easy to become a collective farmer, I think you understand this very well yourself!
Removing and installing the panel (dashboard) Priora
If you decide to install sound insulation for the engine shield, or paint or reupholster the panel, then carefully study the instructions on how to remove and install the Lada Priora dashboard yourself.
Necessary tool . Phillips and flathead screwdrivers, 10mm head, pliers with narrow jaws.
Before starting work, you should disconnect the negative terminal from the battery. Then remove the steering column switches.
Remove the fuse box cover:
- Turn the three locks of the mounting block cover 90°.
- Unclip the fuse box cover.
Disconnect the wires from the ignition switch. Then remove the instrument cluster. and remove the central floor tunnel. Disconnect the wires from the electric power steering:
Then in order:
- Unclip the plastic clips and remove the left A-pillar trim. Remove the right A-pillar trim in the same way.
- Pry off the left door glass blower nozzle using a flat-head screwdriver with soft material underneath to avoid scratching. Similarly, remove the blower nozzle on the right side.
- Unscrew the nut of the upper fastening of the Priora panel, it is located in the cavity under the door glass blower nozzle, using a “10” socket. Unscrew the nut on the right side in the same way.
- Unscrew the bolt securing the ends of the ground wires of the dashboard using the same key.
- Disconnect the connectors with the instrument panel wires from the connectors located on the bracket above the fuse block.
- Disconnect the wire block located on the right end of the bracket.
- Disconnect the engine control wiring connector from the instrument panel connector.
- Unscrew the nut securing the ground wire terminal using a 10mm socket.
Standard armrest - article number and price
Lada Priora was equipped with this small box with a pillow (and the catalog records this detail as a “floor tunnel lining box”) only for versions “Norma” and higher. Such a small addition can be purchased without any problems to ensure comfortable travel for yourself and your passengers. This will make you feel comfortable and relax a little on the road.
Armrest repair kit for Priora car - consists of the following parts:
- cover (21700-5109504-10);
- buffer(2183-5303044-00);
- drawer body (2170-5109514);
- cover button (2170-5109542);
- button spring (21700-5109544-00);
- front drawer lock (21700-5109548-00);
- rear clamp (21700-5109536-00);
- cover axis (21700-5109534-00);
- drawer holder (21700-5109530-00);
- drawer hinge (21700-519522-00);
- hinge axis springs (21700-5109528-00 and 21700-5109529-00).
Priora 1
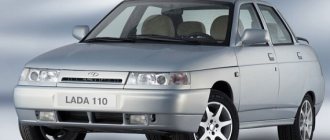
The pre-restyling VAZ-2170 was equipped with an armrest with a cushion, which was covered with gray textile fabric. Catalog number – 21700-5109502-10. Price – from 1,000 to 1,500 rubles. You can purchase a lid or a box separately; smaller parts are less common - springs, axles, buttons.
Priora 2
The restyled VAZ-2170 received a more complex box design. This change comes as the 2013 facelift brought significant improvements to the interior with modern details. The catalog number of the armrest for 2 Priora is 21720-5109504-00. The price is also from 1,000 to 1,500 rubles.
For the restyled VAZ-2170, a part from Lada Vesta is suitable. The original received catalog number 8450-0312-30. Its price is about 10,000 rubles. Everyone is here. Its design is more complex, but the pad is quite soft. It is easier to change it because the cover closes with a zipper.
Characteristics
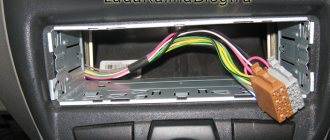
Although removing this item is a fairly simple process, there are a few things you should be aware of. You need to disassemble it by dismantling the radio. This procedure uses special pullers that are inserted into the sides of the radio until it clicks into place. Then you just need to pull the item towards you and then disconnect all the connectors that appear. The metal alcove where the radio was located has been removed. Then unscrew the two latches facing the console.
To make sure you don't miss all the fasteners, keep in mind that the console is secured with two hidden screws under the open cover and four similar screws under the ashtray and radio. At the top of the cladding it is secured with additional metal brackets. It will take some work to remove it.
If the center console is dismantled, in order to eliminate an unpleasant squeak, after dismantling the cladding, it is necessary to glue the edges of the panel with a special insulator that protects against extraneous noise. In addition, it is necessary to similarly treat all areas with which the console interacts, and ensure that the element is securely fixed and does not shake after assembly.
How to replace the cooling radiator on a VAZ 2170-VAZ 2172?
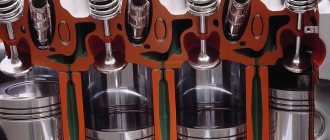
1) Before you start work, drain all the coolant from the radiator (read “here” for how to drain the liquid) and proceed to removing the electric fan (If you don’t remove it, you simply won’t remove the radiator), to do this, first reset the negative terminal with the battery by loosening the bolt that secures it, then remove the air filter housing since it will get in the way very much (Read “here” how to do this), and you can start removing the electric fan, first disconnect the wiring from each other, wiring the electric fan has a connector and block on the side (see photo 1), then unscrew (it’s most convenient to use a wrench) two bolts that secure the electric fan to the casing on the left and four nuts, two of which are located on the top and two bottom (see photos 2 and 3 below) and later remove the electric fan by pulling it to the top and putting it aside.
Read:
2) Next, remove the sound signal, since it will not allow you to remove the radiator (For information on how to do this, read the article: “Replacing the signal on a Lada Priora”) and then loosen all the clamps that secure all the supply pipes to the radiator (see. photos 1 and 2, pay your attention to photo 1, there is another pipe indicated by an arrow, so don’t miss it) and disconnect them, immediately after that unscrew the two nuts that secure the radiator to the body (see photo 3) and then pull out the holder , which holds the hose so that it does not dangle from the hole in the cross member of the engine compartment (see photo 4), and that’s it, you can then safely tilt the radiator towards the car engine and then pull it out of the engine compartment.
Removing the Console
The upper part of the console contains several mounting screws that need to be unscrewed. Two of them are at the top of the console. These screws are used to install the audio system. If the car was purchased factory equipped, then these screws are located under the cover itself.
As soon as the screws are unscrewed, you can slowly remove the console. To do this, you need to carefully move it to the side and thread all the wires that went to the buttons and were previously disconnected.
After which you need to disconnect several more connectors, one of which is the heater control unit connector, and the second is the connector for the standard quartz clock.
And finally, the outermost detachable connector belongs to the button for activating the additional alarm in case of an accident. It is better to disconnect it when the button is already removed from the console.
What lamps are installed in the Priora dashboard
Depending on the year of manufacture, both lamps with a conventional socket and a VDO socket can be installed. To accurately determine the lamps, you must first remove the shield and determine the type of socket. The lamps in the sockets are the same, however, from the factory, the lamp mustaches are soldered to the socket and to replace the lamp, you need to unsolder or pull out the old one and install a new lamp in its place, while soldering the mustaches.
However, you can take a simpler route by purchasing ready-made lamps with sockets. Note that the lamps are installed in them without soldering the mustaches. That is, if the lamps burn out further, you simply change the lamp and that’s it.
Regular cartridge
with the lamp it looks like this
This is what a lamp with a VDO socket
Preparing to remove the console
Before removing the console on the Priora, you need to remove the radio. This is where differences may arise between trim levels. Namely: the difference in luxury and standard cars is in the size of the connector for the radio. As for everything else, there is no difference in fastenings. To remove the radio, special tools (keys) that come with it are suitable.
Having freed the niche, you need to press on the connectors for the buttons, then take them out and disconnect the block with wires from them. It is better not to damage these wires, as they go to the console. Then the ashtray is removed. To do this, you need to pull it towards yourself with a certain amount of force. As soon as the ashtray is removed, the fastening screws will be visible: there are two of them and both need to be unscrewed. Only now we begin to answer the question: “How to remove the center console on a Priora?”
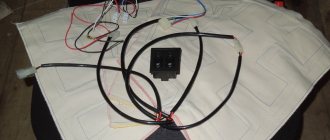
Connecting a voltmeter to the on-board network
A digital voltmeter in a car must meet two main requirements:
- show the voltage on the battery as accurately as possible;
- turn off when the engine is not running so as not to discharge the battery while parked.
Accurate data on the voltage on the battery can be taken directly from its terminals. To do this, you need to connect the wire from the positive terminal to the installation location of the voltmeter. To prevent conductor resistance from causing a voltage drop across the device, the wire cross-section must be at least 0.5 mm.
The wire must have strong, good insulation so that a short circuit does not occur over time.
It is important that this way of connecting the wire bypasses the standard fuse box, so care should be taken to protect the circuit from overload. For safety, install a fuse between the battery and the wire going to the voltmeter
Otherwise, the wiring may even catch fire in the event of a short circuit.
It is best to lay the wire into the cabin to the place where the voltmeter is installed in the general wiring harness of the Priora. To do this, you will have to bring it into the cabin and stretch it under the dashboard.
It is ideal to dismantle the entire torpedo for this, but this is a complex and time-consuming job. The problem is solved by partial disassembly: removing the dashboard or center console. To do this, there is no need to disconnect the wiring harnesses; you just need to move the “tidy” a little to be able to pull the wire to the right place.
It is enough to connect the second wire of the voltmeter to ground where it is convenient. When connecting a voltmeter to the wires of the ignition switch, tape recorder or other wires located in the dashboard area, its readings will be lower due to the voltage drop across the contacts and connections.
In order for the voltmeter to turn off when the ignition is turned off, an electromagnetic relay must be inserted into the gap in the wire between it and the battery terminal. The relay winding should be powered from any wire on the ignition switch, on which voltage appears after turning the key.
If you have no experience or desire to tinker with laying the wire from the positive terminal of the battery to the car voltmeter
The first step, of course, is to dismantle them. This is quite easy to do on a VAZ classic, but not so much on a Priora. In order to remove the watch, you need to remove the plastic decorative panel. Then remove two screws, and we will find a couple more under the ashtray.
But it doesn’t end there, there are still screws waiting for us, we will find them after we remove the radio. And only then can you remove the panel by gently pulling it towards you. Take a knife or flat screwdriver and press on a fairly tight latch.
Now we need to disassemble the watch, and this is easier than removing it. We see four latches on the sides; we snap them off. Now carefully remove the arrows. If desired, the arrows can be replaced, if, of course, there are other more elegant ones at hand. But you don’t have to do this, since we are annoyed by the shade of the arrows, and not by the elements themselves. Therefore, they can simply be repainted, but this must be done carefully and efficiently. To do this, we degrease the hands, and at the same time remove the annoying orange color with a solvent. Then everything is simple: as paint, you can use ordinary office putty, or, as it is also called, a touch, because buying a can of white enamel for two arrows is not constructive. In addition, moisture will not get inside the watch anyway, so the touch will fit perfectly - it gives an even white color and dries instantly.
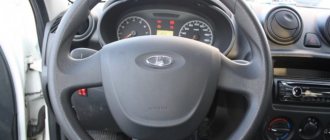
How to remove the dashboard on a Lada Priora?
During the operation of the car, Lada Priora owners may be faced with the need to remove the instrument cluster.
For example, to eliminate damage caused by mechanical shocks, scratches or abrasions, to replace light bulbs, arrows and the instrument itself, to “overexpose” the backlight, to install tuning visors, etc.
It is not difficult to do this yourself and the step-by-step instructions provided will help you with this.
For dismantling you will need a Phillips and flathead screwdriver.
Remove the cover of the mounting block by turning the 3 locks at the bottom of the cover by 90 degrees.
We press the lock and release the steering column to its lowest position.
Unscrew the 2 screws of the facing frame from above.
Then unscrew 1 screw on the left and right of the steering column.
Remove the frame and unscrew the 2 screws holding the tidy. Pull the device towards you to get to the connector. The connecting wires are short, so she comes out reluctantly.
We put our hand into the opening between the panel and the instrument cluster and, using a thin screwdriver, carefully move the connector lock up and to the right.
We remove the instrument panel. We see that the glass is fixed using latches, which must be released to gain access to the arrows.
To replace light bulbs, the instrument cluster itself does not need to be disassembled. The bulbs can be unscrewed by turning them 90 degrees.
Installation of the instrument cluster is carried out in reverse order.
Basic faults
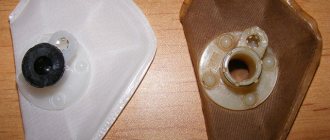
The armrest of the Lada Priora has a fairly simple structure, but nevertheless, with use it wears out and has to be replaced or repaired. The main malfunctions of this part are the following:
- It gets very dirty from the elbows of the driver and passenger. The fabric absorbs absolutely everything - sweat, water, and other drinks. It’s even worse when it’s washed – it looks very untidy. Corrected by re-upholstering the fabric. It is not at all necessary to change the box or install a new one in its place - if the other parts are in good order, this is not advisable;
- The lid lock is faulty. This manifests itself in the fact that when you open the box, the lid immediately falls on your hand, thereby preventing you from calmly moving any things. The latch can be changed if the situation is “not critical” - when other elements are not damaged.
- The lid button spring is faulty. She might just fly off. To lift the soft element under your elbow, you will have to pry it off.
How to remove the speedometer on a Priora. How to remove the instrument panel on a Lada Priora yourself
So, for this we need the following tools:
- short Phillips screwdriver;
- flat screwdriver.
If you have all the tools, you can start disassembling. To do this you will need to do the following:
- Set the steering wheel to its lowest position. After this, remove the trim from the dashboard. Note that it is secured with four screws, which can be unscrewed with a regular Phillips screwdriver.
- Unscrew the two screws that are located on top. And in order to gain access to the lower screws, you need to remove the plastic at the bottom of the steering wheel. To do this, turn the 3 clamps counterclockwise by 90°. Next, pry the plastic with your hand or something else and remove it.
- Unscrew the last 2 screws that were under the plastic.
- Next, remove the cover with both hands. Note that you need to start from the top. You must be extremely careful not to break the latches.
- Remove the two screws that will hold the dashboard in place. This is done with a Phillips screwdriver.
- After this, to disassemble it, you need to pull it towards you a little. Next you need to remove the connector in the shield that goes to the dashboard. Note that it is secured with a tricky latch that needs to be pryed off with a flat screwdriver.
- Next, use the same screwdriver to pull the lock back.
- And perform the last operation - remove the instrument panel.
After this, you can perform any operations, for example, make beautiful lighting for a new sample. To do this, you need to carefully remove the hands and the backing of the numbers.
Note that the backing is made of thick polyethylene tape, so it is recommended to perform all operations with a stationery knife, prying up the corner of the backing and pulling the knife along the edge of the shield. Let us remind you that the backing is glued with glue, but with the right approach it can be easily removed.
Next, connect the LEDs directly and enjoy the result. But that's not all, some car enthusiasts make the dashboard arrows change color. It looks really amazing, but the main thing is that it is easy to implement.
Reassembling the dashboard must be done in the reverse order.
Note that in the “luxury” configuration the car has two airbags and air conditioning, which can also be disassembled and modified.
How it's done
The disassembly procedure itself is not so complicated as it is troublesome. Indeed, you will have to spend a lot of time to get to the last bolt on the panel. Let's look at step-by-step instructions on how to properly disassemble the console on a Lada Priora:
Tighten the fasteners of the air deflector, and then remove it from the console. Next, you will need to unscrew the left heating nozzle, which is secured with 2 screws. Repeat the procedure for the right side. Next in line will be the rear window defogger activation button. To remove it, you just need to pry it with a minus screwdriver and pull it out. The button must be disabled immediately. After this, the ashtray is removed. The glove compartment lid is secured to the panel using special pins that must be removed from the gaps. The console cover is secured with 4 fasteners. They need to be twisted, after which the cover can be easily picked up with a screwdriver with a minus blade and removed. If your vehicle has a radio, it should be disconnected from the cable harness. The radio is dismantled by unscrewing two fasteners located on the sides of the slot. Next, you can remove the lining itself, which is fixed on special springs. The alarm button is removed, then it must also be turned off. Since you have already moved on to the harness, it would be a good idea to immediately turn off the clock, the heating button and the heating system control unit. Now all the above elements should be removed
The clock is simply carefully squeezed out of the panel, and the control unit is fixed with 4 screws. Let's move on to the nozzle of the ventilation system. It is held in place by eight latches that must be opened sequentially
First we remove the top ones, and then the bottom ones. Now it's the turn of the fuse box. It is held on by a single screw, so it won't take much time. It's time to turn off the glove compartment light, just pull out the block. Then twist and remove the switch. Let's move on to the glove box lighting. It is hooked and carefully removed. The lighting fixture is mounted on clips that need to be opened. The air ducts on the Lada Priora are secured with two screws. We unscrew and put them away, the order does not matter. Now let's move on to the air flow distributor gear motor. Unscrew the 2 screws and set the device aside. We proceed in the same way with the air duct for heating the feet and the distributor itself.
That's all, actually. Now the panel of your Lada Priora has been dismantled, and you can perform any manipulations. If any points remain unclear, we suggest watching the video instructions on our website. Assembly is carried out in reverse order.
Lada Priora Sedan › Logbook › Removing the center console of the Priora
I’ll just tell you this for those who don’t know.
To remove the center console you need a Phillips screwdriver.
1. Remove the cover "*** Open ***" and the ashtray below. 2. Take out the buttons (they come out from the front, just pry them off with a flat-head screwdriver)
3. Take out the “emergency lights” button (the same as those buttons)
4. We take out the radio along with its box.
5. 2 bolts in place of the radio (they will be at an angle towards you)
6. 2 bolts in the pocket where the cover was *** Open *** 7. 2 bolts in the ashtray 8. Now pull the console towards you, smoothly without jerking (resistance is possible)
9. The console will not come out completely, because... the clock and control unit for the stove are connected there. The clock connector is located between the air ducts
Now turn off the control unit of the stove.
Well, that's all, we have the console in our hands, congratulations!
By the way, I want to “hoard up” a little. To remove the watch, unfasten the latches on the console
, and to remove the used stove, unscrew 4 screws from the console.
Do-it-yourself armrest reupholstery for a Priora car
There is no need to throw away the old box - re-upholstering the soft backing under the elbow is easier than re-upholstering the steering wheel. Fabrics wear out over time and need to be replaced on time. The new covering of the elbow box on a car can be completely different - eco-leather, fabric, genuine leather. Before covering the substrate, prepare:
- textile;
- glue “Moment” (it works great);
- hair dryer;
- clips, clothespins;
- knife.
First you need to remove the box assembly. The new reupholstery can be made on top of the standard fabric or under it. Do the work like this:
- Measure the required length for the covering, leaving a gap of two centimeters.
- Fill the working surface with glue - this is necessary so that the new fabric does not crawl over the lid, and also wrinkles do not collect on it.
- Push the ends of the fabric under the plastic frame and secure them with clothespins. You can put old plastic cards under the clothespins so that the iron parts of the clips do not leave their mark on the sheathing. You can also use other methods of fixing the tissue.
- Wait 15 minutes. Warm the surface with a hairdryer and work for 4-5 minutes.
- Set the finished covered box aside for 10-15 minutes.
- Remove the clamps. Check your work. Install in place of the old backing, a part with a new covering for the lid.