Original corrector
The VAZ 2110 model cannot be called modern and advanced, and therefore a hydraulic corrector is used here instead of a modern electric corrector for head optics. Today we will talk about how to identify a breakdown and replace the hydraulic corrector, and whether it is possible to install an electric version instead of the standard device.
Why does it fail
The reasons for hydraulic corrector failure are standard:
- Temperature changes that damage the hydraulic component of the unit;
- The use of rubber for seals is not of the highest quality, which causes leaks of working fluid.
If a leak occurs, you cannot avoid replacing the unit.
Design
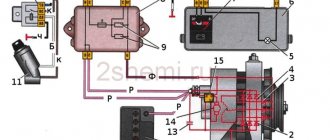
Structurally, the headlight hydrocorrector is a set of the following components.
| Component | Characteristic |
| Master cylinder | It is mounted on the dashboard |
| Actuator cylinders | They are located on the headlight unit and ensure their turning |
| Connecting pipeline | Its fixation is carried out with clamps |
| Working fluid | They have increased resistance to low air temperatures |
What is a headlight hydrocorrector?
Light control is carried out from the cabin by changing the position of a special switch. Similar devices are installed on classic VAZ 2105-2107 models, front-wheel drive 2108-2109, and more modern 2110-2115. Structurally, an auto-corrector operating on hydraulics is a series of connections where the main cylinder, controlled by an adjusting bolt from the passenger compartment, is connected to the worker through a tube. The last one is on the headlight. The entire structure is non-demountable.
How to find a breakdown
Repair of the VAZ 2110 headlight hydraulic corrector
Many people, when headlight adjustment fails, immediately blame the hydraulic corrector for everything and rush to replace it as quickly as possible. But don't rush to conclusions. There may be other causes of the malfunction.
- Pay attention to any leaks of working fluid. If they are not there, check the stroke of the rod.
- To check the stroke of the rod, the actuator cylinders are dismantled. The normal value is between 6.5 and 7.5 millimeters.
- It is impossible to repair the hydraulic type corrector provided by the factory for the VAZ 2110, since the design of the device is not dismountable.
- If malfunctions occur, the entire assembly must be replaced, including cylinders and pipes.
Replacing the hydraulic corrector
First, let's consider a situation in which a failed headlight hydraulic corrector is replaced with a similar device. The replacement procedure is not as complicated as many people think. Follow the instructions and you will succeed.
- Disconnect all existing fasteners and pipe clamps. The device must be disconnected from the body of your car.
- Now we head to the salon. It is easy to remove the corrector control knob. To do this, she reaches out to herself. It is located, if anything, in the cabin on the dashboard.
- Give yourself the space you need to renovate. Replacing a hydraulic corrector on a “ten” is difficult, largely due to the fact that the holes for the passage of the device’s tubes are located very inconveniently. This is where most beginners have difficulties; they prefer to take the car to a service station. But don’t rush to prepare a tidy sum of money.
- To gain access to the unit, remove the reservoir containing the coolant. That is, antifreeze. Having cleared the passage from above, you can continue to carry out the procedure for replacing the hydraulic corrector without any problems.
- Remove the cylinder. This part of the work is done from the salon. Pull the corrector handle towards you to remove it. Now remove the cylinder with a 22 mm head.
- There you will see a fuse cover that you need to open and pull. This way the cylinder will be in a hanging position, and the hoses will hold it.
- Now you can remove the corrector. Press the latch on the slave cylinder and turn it clockwise until it stops. This way the device will easily come out of its seat. A similar operation is performed with the second headlight.
- The hydraulic corrector from your car is pushed inside the cabin and removed.
- Installation of a new device is carried out in exactly the reverse order of dismantling.
- Be sure to first make sure that the new hydraulic corrector effectively copes with its tasks, so that you do not have to re-disassemble the far from the most accessible unit.
How to replace the hydraulic headlight leveler on a VAZ 2108-VAZ 21099?
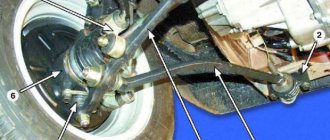
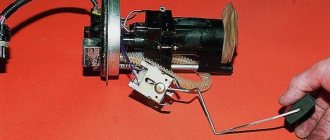
Removal: 1) At the very beginning of the operation, start with the hood, namely, first open it and then look for the headlight range control actuator cylinders on the back side of each headlight (One of these cylinders is indicated by number 2) and after finding them (For example, after finding this cylinder on the left headlight) grab it with your hand as shown in the small photo below, and pressing the latch, turn it counterclockwise until it stops and after that you will hear a click, after which you will need to remove this slave cylinder from the hole.
Note! In exactly the same way, remove the actuator cylinder from the headlight fool and then move into the interior of your car!
2) Now, sitting in the car, take a flat-head screwdriver in your hands and use it to pry up the handle that adjusts the headlight range control.
Note! Pry up the handle carefully, do not break it off!
3) Then, when the handle that is shown in the photo a little above is pryed up and as a result is removed, take the extension with a union head in your hands and, with its help, unscrew the nut in this hole that you will have after removing the headlight range control handle, and after the nut is completely unscrewed (This nut holds the headlight range control master cylinder), reach into the lower part of the panel with your hand and remove the headlight hydraulic range control master cylinder from there.
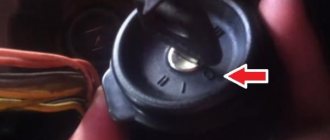
4) After you have this corrector in your hands, simply pull it towards you until it and the two actuator cylinders are completely removed, be sure when you are still pulling, pay attention to the hole in the front of the car (This hole is on small and indicated by arrows in the main photo below), so only one actuator cylinder can pass through this hole, so they will need to be removed one at a time, and if necessary, push both cylinders from the engine compartment and thereby you will completely remove the hydraulic headlight leveler from car.
Installation: The headlight range control is installed in the reverse order of removal, but when installing, always remember one thing, namely, you need to install the headlight range control first from the actuator cylinders, that is, take them in your hands and push the hole that leads into the engine compartment, then approach the engine compartment and there you already find both actuator cylinders and then install them in the headlights, and after that get into the car and continue installing the corrector there.
Note! If something is not clear to you, or if you want to see a video on replacing this headlight range control, then in this case go to the article: “Replacing the headlight range control on a VAZ 2110”, which describes everything in detail and also has a video clip in this article with instructions for replacement, and by the way, this corrector on VAZ 2108-VAZ 2115 cars is replaced absolutely identically, only the whole difference in the instrument panel is different for each car, that's all!
Replacing headlight hydraulic corrector on VAZ 2108, VAZ 2109, VAZ 21099
Replacing a hydraulic corrector with an electric corrector
From the name it becomes clear that the electric corrector operates using electricity, that is, it requires connection to a battery.
There is no need to spend a long time looking for reasons for such decisions from the owners of the domestic “ten”, since the electric corrector is reliable and highly efficient. Its breakdown occurs much less frequently compared to a hydraulic corrector.
The procedure itself requires several successive steps.
- Disconnect the negative cable from the battery.
- Remove the hydraulic corrector cylinder from the headlight, as we described in the previous section.
- Be sure to install a new O-ring during the replacement process.
- Once inside your car, remove the control knob for the hydraulic corrector master cylinder. It is held on by a 21 mm nut.
- The positive wiring harness is connected to the 20th socket of the Ш2 block in the mounting block of your car.
- The minus of the electric corrector is mounted on a body stud. There are several of them and they are located under the dashboard.
- The harness of the new regulator can be laid along the previously used tubes of the old hydraulic corrector.
- The harness pads are connected to the actuators.
- Return the negative cable to the battery and check how the new device works.
Purpose of VAZ headlight hydraulic corrector and how it works
Good afternoon dear friends. Today we are talking about one mechanism that not all motorists use, but it is important for proper lighting of the road at night. People think about it when they try to adjust the headlights with their own hands, but they cannot raise the light beam as high as possible. This can be prevented by a hydraulic assistant, which is designed to help the driver control the angle of inclination of the optics. Its name is headlight hydrocorrector . It will be discussed in this article.
Let's get acquainted with its purpose, where it is located and how it regulates the angle of the headlight reflector. Let's talk about its breakdowns and methods of repair or replacement. Let's look at the types of headlight correctors used in cars and which ones are best installed in your car. Let's start with the most important thing - what it is needed for, where it is located and how it works.
Purpose
The headlight hydraulic corrector is used not only in VAZ models, but also in foreign cars of older years of production. Therefore, this material will be useful not only to owners of “classic” Zhiguli cars, but also to foreign-made cars. It's a shame that it breaks down most often on domestic cars; its service life is no more than 3-5 years maximum.
What is it for? It adjusts the angle of incidence of the light beam on the road surface depending on the vehicle load. If you are driving alone in the car and your trunk is empty, then the headlights will shine at one angle, relative to the road; if you load the car completely, its front part will rise up. Accordingly, the position of the headlights will change relative to the horizon, and the light beam will rise upward.
Consequences:
- The light spot on the road will become more blurred, since the light will not concentrate at a certain distance from the car, the level of illumination of the road will drop significantly
- Dazzle oncoming drivers
In a word - shine into the sky with all the ensuing consequences. Therefore, the hydraulic corrector allows the driver, without leaving the car, to adjust the position of the headlights , depending on the degree of load of the vehicle.
Has several provisions:
- “0”—the headlights are raised as high as possible. From this point you need to start adjusting the angle of incidence of the light using the adjusting bolts on the headlamp under the hood. This position corresponds to one person in the cabin and an empty trunk.
- "I" - Four people in the car
- “II” - Full cabin of people and up to 75 kg of luggage
- “III” - Maximum vehicle load, five people in the cabin and maximum loaded trunk
Knowing this, the driver can use the hydraulic corrector adjustment knob to control the position of the headlights while driving. It is convenient and safe on an overnight trip.
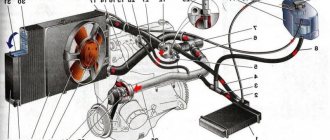
How does he work
It consists of:
- Regulator with control knob. It is installed in a sealed container with liquid
- There are two tubes for each headlight. They transmit pressure from the regulator to the actuators on the reflectors
- Working pistons. They are also the mechanisms responsible for changing the position of the reflector. The change in pressure from the regulator is transmitted to them through tubes and, depending on it, the rod extends or recesses into the depths of the corrector piston.
Let's look at the principle of operation in more detail.
This entire system is sealed. Antifreeze or liquids based on it are poured into the headlight hydrocorrector. This is necessary so that during frosts it does not freeze and the system does not lose its tightness, breaking the plastic tubes.
The driver, turning the regulator in the cabin clockwise, sets in motion the piston, which is located in the main cylinder of the hydraulic corrector. It has a threaded part. By rotating, the corrector rod is screwed into the cylinder cavity, creating excess pressure in it. In simple words, it begins to put pressure on the liquid poured into it.
This pressure is transmitted through the tubes to the working cylinders located in both headlights. The excess pressure that is created in them pushes the pistons out. This raises the reflectors upward. To understand how this works, let’s look at the design of the headlight unit in more detail.
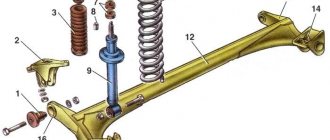
Inside the headlight consists of:
- Reflector
- Top holder
- Adjustment lever
- Return spring
- Vertical adjustment screw
- Hydrocorrector rod
- Bottom support
The upper headlight reflector holder is attached to the reflector. It is connected to a lever, the upper end of which rests against the vertical adjustment screw, and the other end against the corrector rod. The return spring presses the lever against the rear headlight cover, lowering the reflector as far as possible.
The piston of the hydraulic corrector working cylinder moves forward, pushing the lever. It, having an upper fulcrum on the adjusting screw, pulls the reflector back with its upper part. The reflector changes its angle of inclination relative to the horizontal line and the headlight begins to shine upward.
Malfunctions and why it breaks
- Loss of tightness in tubes, places where they are attached to the cylinders, leaks in the cuffs of the main or working cylinders;
- Jamming of working pistons
The main problem in the system for hydraulic adjustment of the reflector position is depressurization. Since it uses liquid as a working medium, its leaks lead to the fact that pressure is not transmitted from the master cylinder in the car interior to the workers on the headlights. No matter how much you turn the regulator, the position of the light beam will not change.
The second reason is souring of the pistons of the hydraulic corrector cylinders in certain positions. For example, if the piston is “stuck” in the maximally extended position, then the light will shine upward, while in a recessed position it will shine downward. When rotating the handle of the regulator, a lot of tension will be felt and when it is released, it will return to its original position and will not be fixed as necessary.
This happens because the pressure changes as the regulator rotates and the pistons cannot move. When you release the handle, the system tries to return to its initial state, equalize the pressure, the handle returns to the position from which you started turning it.
The listed types of breakdowns are prone only to the hydraulic drive of the corrector. Let the manufacturer claim that it is not repairable, but this is not so. There are examples of self-repair of a hydraulic corrector, which we will discuss in the following articles. In order not to bother with restoring it or replacing it with a new one, it is recommended to install alternative types of headlight range control units.
Video about the device and main breakdowns of the VAZ headlight hydraulic corrector:
Where is it located and what does it look like
If we take the VAZ 2114 headlight hydraulic corrector as an example, the working cylinders are located under the headlights. The master cylinder is located under the adjustment knob in the passenger compartment. It turns manually. In the lower position, the light flux is directed downward (the pressure in the system is greatest), in the upper position it is directed upward. The cylinders are connected to each other by plastic tubes containing a non-freezing liquid (most often it is antifreeze or “anti-freeze”). The hydraulic corrector is sold as a kit: everything is assembled - plastic cylinders along with tubes.
An alternative to the VAZ hydraulic corrector
There are several replacements on the market for the “stock” hydraulic headlight range adjustment. Namely:
- Mechanical
- Electrical
Mechanical
They are a blank of the working cylinder of a classic hydraulic corrector. Instead of a hose and piston, a long screw is used. One end of which goes into the engine compartment, the other rests on the headlight reflector lever.
To install it, simply disconnect the factory hydraulic corrector cylinder and insert a mechanical one into the seat. To do this, you need to press the latch and turn it counterclockwise a quarter turn. This latch will come out of the grooves, the hydraulic cylinder will be disconnected from the headlight housing.
Electric corrector
It is a separate system. Wires are used instead of liquid-filled tubes. The control unit is located in the handle of the regulator, which is placed in the cabin in its standard place. Actuators are electric. They fit freely into the mounting locations of the factory hydraulic corrector.
A clear advantage of an electric corrector over a hydraulic one is the absence of working fluid. It will not leak, the pistons will not jam. Before the mechanical one, there is the possibility of remote adjustment of the headlight angle from the interior.
How the Hydrocorrector of the Far VAZ 2109 works
Welcome! Hydrocorrection of headlights. thanks to this the headlights are adjustable in height, for example, a very large load is placed in the trunk, due to which the car sinks very much, and as a result, its front part rises up and for oncoming drivers it will be very inconvenient because you are just flickering, and thanks to This headlight level adjustment, by turning it on, you can easily and quickly lower the headlights so that they shine down and do not blind oncoming drivers, so this range of headlights The control is very convenient, but when it does not work, it stops adjusting the headlights, and many are thinking about replacing it with rhinestones.
The note! To replace the headlight hydraulic leveler you will need: a flat head screwdriver and an extension cap!
Where is the headlight range control located? Its location starts from the inside of the car, but specifically, the master cylinder is located in the cabin, and there are two wires running from it to two slave cylinders, which are currently connected to both headlights, in other words, two slave cylinders to the headlight.
When should I change my headlight range control? In this case, it needs to be replaced if the light beam does not start to move through the adjustment knob as it should be done up and down, but also due to the malfunction of this corrector, the light beam may fall to the very bottom or to the top, but this is rare, and even your headlights can remain raised at different heights, for example, this leveler is sent to each headlight, if one of the actuators (for example, the left one) fails, then the left headlight also stops adjusting and falls on its own, but the right Indre actuator works fine, and the right the headlight shines at the level at which it is installed, and the right headlight should be adjusted, and the left one. No.
READ Headlight Adjustment Chevrolet Aveo T200
The note! The fact that this corrector works as a single unit and is not subject to immediate repair will be immediately noted, because if you only have the left slave cylinder out of order, and the right one is working, you will need to completely replace the entire corrector, since It was previously said that this cannot be restored!
How to replace the hydraulic controller headlight on a VAZ 2108-VAZ 21099?
Removal: 1) At the very beginning, start from the hood and in particular, first open it, and then find the headlight range adjustment cylinders on the back side of each headlight (one of these cylinders is designated number 2) and after they are located (for example, finding this cylinder is on the left light), take it by the hand as shown in the small photo below, and after pressing the latch, turn it counter-clockwise until it stops, and then you will hear a click, after which you will need to pull this drive cylinder out of the holes .
The note! Likewise, remove the slave cylinder with the fool's headlight and then head to your car!
READ How to Correctly Charge AA Batteries
2) Now, while sitting in the car, take a flat head screwdriver and use it to remove the knob that adjusts the headlight range.
The note! Pull the handle carefully, do not break it!
3) Then, with the handle shown in the photo just above broken and therefore removed, take the cap head extension and use it to unscrew the nut into the hole you will have after removing the headlight. the range adjustment knob, and after the nut is completely disengaged (this nut holds the headlight adjustment cylinder), lift your hand to the bottom of the panel and remove the headlight adjustment cylinder from there.
4) Once this concealer is in your hands, simply pull it towards you until it is fully extended, and the two slave cylinders are sure to look at the hole in the front of the car (this is the hole on the small and main one in the picture below, the arrows are shown), so Only one slave cylinder can fit through this hole, so they will need to be removed one at a time, and if necessary, push both cylinders out of the engine bay towards the core and you have a 100% clean hydro corrector with the car's headlights.
READ How to Change a Light Bulb in a Niva 2121 Headlight
Installation: The headlight range control is mounted in the reverse order of removal, but always remember this during installation, namely: first you need to install the headlight range control from the cylinders, in other words, take them in your hands and push the hole leading to the engine. compartment, then go to the engine compartment and find both cylinders there, then place them in the headlights, get into the car and continue installing the concealer there.
The note! If you don't understand or want to watch a video clip about replacing this headlight leveler, go to the article: "Replacing the headlight leveler on a VAZ 2110", which explains everything and still has a video clip in this article. with an annotated replacement, and by the way, this concealer on VAZ 2108-VAZ 2115 cars was replaced in exactly the same way, only the whole difference in the instrument panel of each car is different, that's all!
Source
Conclusion
The idea of domestic engineers is good. Manually adjusting the headlight range depending on the vehicle load is a great idea. But as usual, the execution let us down. The design turned out to be too delicate, the service life does not exceed 3-5 years, all it takes is a fluid leak somewhere and the VAZ hydraulic corrector refuses to work.
There are alternatives to it, which were mentioned above, they also have their own advantages and disadvantages, but their lifespan is longer, especially for mechanical correctors. There are automatic regulators with body position sensors, where driver intervention is not required. If you are interested, then write about it in the comments, I will devote a separate topic to this device.
Good luck to everyone on the roads! Please like or write negative opinions under this article.
Hydrocorrector for VAZ headlights - do-it-yourself repair
Depending on how loaded the vehicle is, the headlights can be directed higher or lower. To adjust the light flux, special devices are used - hydrocorrectors. If the car is loaded, the headlights should be turned down so that the flow of light is directed not upward, but onto the road. This ensures the necessary illumination of the road surface and prevents the driver of an oncoming car from being dazzled. In the case of a minimal vehicle load, when the rear part of the frame is raised, the headlights should be turned upward.
Hydrocorrector of headlights: design and principle of operation, instructions for repair and replacement with your own hands
The direction of the light stream that the car's head optics emits is directly related to the mass of the cargo that the car is carrying. If there is a lot of it, the rear part of the body sags, the headlights begin to rise up, poorly illuminating the road and blinding oncoming drivers. As a result, the motorist has uncertain control of the situation, where an accident is not far away. The necessary change in the angle of light flow is provided by the headlight hydraulic corrector. And you can do this without leaving your car. According to European standards, the corrector must be on all cars manufactured after 1999. What is this device and how does it work?
Design of headlight hydraulic correctors
As a rule, the following components are included in the design of a hydraulic corrector:
- master cylinder mounted on the dashboard;
- actuator cylinders mounted on the headlights;
- connecting pipelines that are fixed with clamps;
- working fluid with increased frost resistance.
Typically, hydraulic correctors are made in the form of a non-removable structure that cannot be repaired. Therefore, if, for example, the hydraulic corrector of the VAZ-2114 headlights fails, it is repaired by replacing it with a new set.
The manufacturer provides a maximum operating pressure in the normal state of the corrector. To direct the luminous flux of the headlight downwards, the pressure in the system is reduced, as a result of which the actuator cylinder rod is retracted and the optics are rotated downwards. Thus, most of the time the device is under increased pressure.
How to change the headlight hydraulic corrector on a VAZ 2113-15
I show you how I changed the headlight hydrocorrector
for
VAZ
2115.
Welcome! Hydrocorrector of headlights - thanks to it, the headlights are adjusted in height, for example, you put a very heavy load back in the trunk, from which the car sank very much and as a result of which its front part lifted high up and for oncoming drivers it will be very inconvenient, because you you will simply shine in your eyes, and thanks to this headlight leveler, by turning it, you can very easily and quickly lower the headlights so that they shine down and thus do not blind oncoming drivers, so this headlight leveler is very convenient, but when it fails, it stops adjusting the beam of light headlights and therefore many people immediately think about replacing it.
Note! In order to replace the hydraulic headlight leveler, you will need to stock up on: A flat-head screwdriver and an extension cord with a socket head!
Where is the hydraulic headlight leveler located? Its location starts from the car interior itself, namely, in the cabin there is a master cylinder and two wires go from it to two actuator cylinders, which at this moment are connected to both headlights, that is, two actuator cylinders per headlight.
When do you need to change the hydraulic headlight leveler? It needs to be replaced if the beam of light, due to the adjustment knob, has stopped moving, as it should do up and down, but also due to the failure of this corrector, the beam of light may fall to the very bottom, or rise to the the very top, but this rarely happens, and your headlights may remain raised to different heights, for example, this corrector comes to each headlight; if one of the actuator cylinders (for example, the left one) fails, then the left headlight, accordingly, also ceases to be adjusted and falls to the very bottom, but the right slave cylinder works normally and thus the right headlight shines at the level where you set it and thus the right headlight is subject to adjustment but the left one is not.
Note! You will immediately note the fact that this corrector comes as one whole and cannot be repaired, so if only the left slave cylinder is out of order, and the right one is working, then you will need to replace the entire corrector, since it already happened It was said earlier that it is not repairable!
How to repair a hydraulic corrector on a VAZ 2110 - 2115
Repair of the VAZ-2110 headlight hydraulic corrector is not provided by the manufacturer. Therefore, if it fails, the entire device, complete with pipelines and cylinders, is replaced.
If the angle of inclination of the optics is not adjustable when the vehicle load changes and it is not possible to achieve the optimal luminous flux using the adjusting screws on the headlights, you should check the functionality of the corrector as follows:
- First of all, it is necessary to inspect the device for the integrity of the pipelines and the absence of liquid leakage.
- If after these measures no malfunction is detected, we proceed to checking the performance of the actuator cylinders. To do this, remove them from the headlight unit and measure the stroke of the rods. Normal operation of the cylinders is ensured when the rod stroke is within the range of 6.5-7.5 mm.
- Since repair of the VAZ-2110 headlight range control is not structurally provided for, we replace the non-working device with a new device included in the kit.
Design and principle of operation using the example of the VAZ 2114
The usual standard design, installed, for example, on a VAZ 2114, includes:
- the main block (the place under the “torpedo”), where the hydraulic cylinder with the switch is located;
- hydraulic drive with plastic tubes;
- working cylinders with mechanisms that regulate the headlight reflector;
- non-freezing liquid.
If it is necessary to redirect the light flux at the desired angle, a low-pressure hydraulic system is activated, which can be changed manually. The driver turns the handle, and the rod of the actuator cylinders moves by 6-7.5 mm, which is quite enough to achieve the desired lighting angle.
Adjusting the headlight range control rod
Sometimes a malfunction of the headlight adjustment system can be caused by a misalignment of the adjustment lever with the lampshade rod. Therefore, if, for example, the hydrocorrector of the VAZ-2112 headlights does not work, do not rush to repair it by replacing it. First, make sure that the connection between the lever and the rod matches the operating position.
The rod of the corrector actuator cylinder rests on the lever, which, in turn, acts on a similar rod rigidly fixed to the headlight dome. The lever passes through the adjusting bolt, which is its fulcrum. The adjustment mechanism works on the principle of a swing. The corrector swings the lampshade, and the adjusting bolt allows you to raise or lower the support point of this swing. If the bolt is turned to the maximum position, the reverse end of the lever in the form of a ball may slip out of engagement with the lampshade rod.
In order for the VAZ-2115 headlight hydraulic corrector to work again, the device must be repaired by returning the lever to a special recess on the rod. To do this, first tighten the adjusting bolt until it stops, then press the lampshade down and insert the lever ball into the desired position.
How to replace the hydraulic headlight leveler on a VAZ 2108-VAZ 21099?
Removal: 1) At the very beginning of the operation, start with the hood, namely, first open it and then look for the headlight range control actuator cylinders on the back side of each headlight (One of these cylinders is indicated by number 2) and after finding them (For example, after finding this cylinder on the left headlight) grab it with your hand as shown in the small photo below, and pressing the latch, turn it counterclockwise until it stops and after that you will hear a click, after which you will need to remove this slave cylinder from the hole.
Note! In exactly the same way, remove the actuator cylinder from the headlight fool and then move into the interior of your car!
2) Now, sitting in the car, take a flat-head screwdriver in your hands and use it to pry up the handle that adjusts the headlight range control.
Replacing the hydraulic corrector for VAZ 2110, 2111, 2112 headlights
Replacing a faulty corrector yourself is not difficult. The replacement sequence is as follows:
- unscrew the screws securing the pipeline clamps to the mounting brackets;
- remove the handle from the master cylinder;
- Unscrew the nut securing the master cylinder to the dashboard;
- We disconnect the actuator cylinders from the headlamp;
- we push the actuator cylinders together with the seals inside the cabin;
- install the new unit in reverse order.
Many car enthusiasts, instead of the standard hydraulic corrector provided by the manufacturer, install a more practical and efficient electric headlight corrector. Its difference from a hydraulic device is that electric motors are used as a drive. For VAZ cars, a standard electrical corrector of the Silich-Zenit series is provided. It is easily mounted in the same places as a conventional hydraulic corrector. The installation procedure for the electrical corrector is as follows:
- disconnect the negative terminal from the AC;
- turn the master cylinder counterclockwise and remove it;
- replace the o-ring;
- install the electric corrector in place of the main cylinder;
- dismantle the master cylinder lever in the cabin;
- We connect the positive terminal of the corrector to the socket of block No. 20;
- We attach the negative terminal to one of the body studs under the dashboard;
- we lay the corrector wiring instead of pipelines or along the power supply harness;
- connect the corrector's electrical wiring to the actuators;
- connect the negative terminal to the battery;
- We check the functionality of the corrector.
After installing the corrector yourself, you will have an idea of how this device works. If necessary, repairing the electrical corrector will not be difficult.
Replacing headlight hydraulic corrector
If you decide to install a hydraulic corrector, which is installed standard on Lada cars of previous years of production, you can do the work yourself. On more modern cars (Priora, Kalina, Granta, etc.) electrical systems can be installed.
Parsing and removing old
Algorithm of actions for dismantling the hydraulic corrector:
- unscrew the screws on the clamps securing the tubes to the corrector parts;
- disconnect the actuators attached to the snap-on latches from the headlight units;
- from the passenger compartment, remove the rotating handle of the hydraulic regulator from its place (it is located directly on the main cylinder);
- unscrew the plastic nut with which the main cylinder is screwed to the “torpedo”;
- pull it out (after pushing the rubber seal into the cabin) complete with plastic tubes and actuators.
Installation and connection of a new
Installation of a hydraulic corrector instead of a faulty one is carried out in the reverse order of dismantling - nothing complicated is observed here.
If you decide to install an electric device (it is ideal instead of a hydraulic one), the algorithm of actions will be slightly different:
- remove the negative terminal from the battery;
- dismantle the old hydraulic corrector along with the pipes, main and working cylinders;
- replace it with an electrical device;
- dismantle the lever of the old mechanism in the cabin;
- connect the “plus” of the electrical corrector to the 20th contact of the block, the “minus” can be “found” under any body stud in contact with the metal;
- instead of plastic tubes, lay the wires from the kit and, for reliability, secure them with dielectric clamps to the common wiring harness;
- attach the actuators to the headlight housings;
- Replace the removed negative battery terminal and check the operation of the system.
During the installation of the electric corrector, it makes sense to simultaneously check the efficiency of the optics. If you notice condensation inside the headlamp, it is better to replace it, because in the future the level of road illumination will only worsen.
- a black coating inside indicates that the light bulb does not have long to “live”, so it needs to be replaced and it is better to do this in advance, and not on the way;
- if you notice peeling of the reflective layer, you will also have to buy a new headlight (it is better to change both units together);
- inspect the block lens - if the scratches and chips are serious, it is recommended to replace the old glass, using a special sealant when installing a new one;
- Before installation, clean the protective caps from dirt.
The best and most expensive option is to install an automatic correction system. In this case, the driver does not need to do anything: the device will automatically adjust the beam of light. The design includes sensors installed at the front and rear. Their task is to determine the ground clearance on both axles of the car. This allows you to “calculate” the tilt of the body and send the necessary information to the electronic control unit. He gives a command to the actuators, and, taking into account the speed of movement, the latter, through a gear motor, change the angle of inclination of the head optics. The system is quite complex and requires a professional approach during installation.
A simpler option involves installing one ultrasonic sensor at the rear. It is suspended on a hinge and secured. The shortest distance to the road surface is 25 cm. You can install the system yourself.
Light adjustment
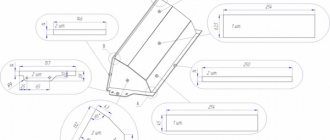
After installing a new corrector (no matter hydraulic or electric), it makes sense to adjust the light beam. To do this, you need a flat wall, which must be marked in accordance with the manufacturer’s recommendations (see the car’s operating instructions). The marking can be done independently, in accordance with the figure below.
- stop the car five meters from the marked wall;
- use the hydraulic corrector handle to set the correct light beam;
- Each headlight can be adjusted individually;
- if the “efforts” of the hydraulic corrector are not enough, use the mechanical levers located on the headlight unit.
Features of restoration of hydraulic correctors for VAZ 2107—2109
As a rule, on cars of the VAZ 2107-2108 series, a manual hydraulic headlight leveler is installed. With it, the driver can manually change the direction of the light flux depending on the load of the car, moving the headlights up or down within small limits.
The design does not provide for repair of the VAZ-2107 headlight hydraulic corrector, therefore, if it fails, it is replaced with a new device. The only thing you can try to do if it is impossible to adjust the angle of the headlights is to adjust the operation of the corrector in the order indicated above.
There are no fundamental differences in the optics adjustment device in the “nine” compared to other models. Therefore, the VAZ-2109 headlight hydraulic corrector is repaired using the replacement method.
Choosing fog lights
Fog lamps on the VAZ-2109 are represented by models from several manufacturers. The highest quality and brightest are fog lights from Osram and Philips. Such headlights provide increased light output, have a long service life and are considered the best.
If you want to focus not so much on the brightness of your fog lights, but on their long-term service, feel free to choose the Philips EcoVision model. This model has an ideal price-quality ratio and is rightfully called the optimal choice in the class of fog lights for the VAZ-2109. Chinese fog lights have one advantage - low cost, but their build quality leaves much to be desired.
Remember that when choosing headlights for your car, you are responsible not only for your safety on the road, but also for the health and lives of other road users.
Removal of the front headlight units on a VAZ 2109 car is carried out either for their complete replacement or repair in case of failure, or for carrying out other repairs in which their presence will interfere with the progress of its implementation. To perform dismantling work, prepare a standard set of tools and perform the following sequence of actions:
- First of all, you need to de-energize the car by disconnecting the minus terminal from the battery.
- Next, disconnect the blocks with power wires from the headlight and turn signal unit.
- Press the clamps and remove the headlight hydraulic corrector.
- Now you can remove the block itself. To do this, use a socket wrench to unscrew two fastening nuts on each side, and then remove the block together with the turn signal housing.
- And at the final stage, all that remains is to disconnect the turn signal housing from the headlight unit by unscrewing the two screws that secure it.
At this point, the repair work to remove the headlight unit on the VAZ 2109 has been completed. Replace or repair it, then install it in the reverse order.