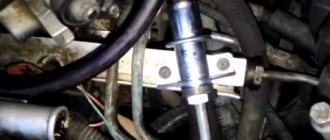
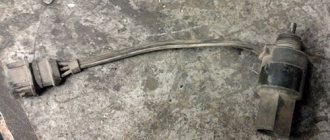
Gasoline sensor for VAZ 2109 (carburetor, injector)
If suddenly the fuel gauge needle drops down or behaves somewhat inappropriately, there is no need to worry too much. You can easily fix the problem yourself if it is a faulty sensor.
Appearance of the device
You should not ignore a breakdown of the fuel level sensor (FLS), because in the absence of information about the remaining amount of fuel, you run a high risk of not getting to the gas station, but stopping somewhere in the middle of nowhere.
Reasons for replacement
You will definitely have to replace the sensor if the car starts to produce the following:
- The fuel level indicator needle “dances” or has fallen dead to the zero position;
- The indicator is constantly on, indicating a critical fuel level, although you have just filled the tank full.
FLS diagram
FLS on high and low panels
The differences in the sensors on the injectors and carburetors are minimal. Also, the fuel level sensors on VAZ 2109 cars equipped with a low and high panel are slightly different.
The difference lies in the resistance indicators. These parameters must be known when checking the condition of the sensor resistor.
Panel type
Resistance readings
In this regard, when buying a new fuel level sensor, be sure to ask for a controller for a high or low panel, depending on what kind of car you have. It is also important to note that in the case of injection engines, the sensor is located inside the fuel pump, but it is based on the same operating principle as a carburetor one.
Functionality check
Do not rush to throw out the old sensor and replace it with a new regulator. First you can try to check if it really doesn't work.
To check, you will have to extract the “suspect” in any case.
- Inside the car, remove the lower part of the rear seat, remove the soundproofing material, if any. This will give you access to the inspection hatch in the floor of the car.
- Using a Phillips screwdriver, unscrew the four mounting screws that hold the hatch in place. Take it off. Under the hatch you will find a sealing gasket made of rubber. In any case, even if the old sensor works again for the benefit of your car, this gasket should be replaced.
- Disconnect the power supply block with wires from the sensor, and then unscrew the fastening nuts around the perimeter that hold the desired fuel level sensor on the tank body. Usually there are 6 of these nuts, and to dismantle them you will need an 8 socket socket or a regular wrench.
- Under one of the nuts there is a ground wire attached to a stud. Remove the wiring and put it aside for now. He shouldn't interfere.
- Carefully remove the sensor and do not forget to remove the rubber sealing gasket, which is located directly under the regulator. If there are signs of damage or defects on it, be sure to replace this component.
- When the sensor is removed, visually check its current condition. If there are mechanical damages, there is no point in further trying to repair it or restore its functionality. Change it right away.
- If there is no visual damage, check the condition of the float. It can be depressurized, that is, there is fuel inside it, cracks and various defects through which fuel has leaked are visible on the surface of the element. If all of this is present at the float, replace the entire sensor.
- Be sure to blow out the fuel filter with compressed air. A useful event that definitely will not harm your fuel system. Especially if the quality of gasoline with which you fill your VAZ 2109 leaves much to be desired.
- Check the condition of the resistor. To do this, you will need a multimeter in ohmmeter mode. Connect a measuring device to the sensor terminals and take readings. In the lowest position (empty tank), the resistance should be about 315-345 Ohms. If the tank is half full, the resistance will be 108-128 ohms. And when the tank is empty, the ohmmeter should show no more than 7 ohms. If the parameters differ from those specified, or there is no resistance at all, this indicates a malfunction of the controller. It must be replaced.
Checking status
Reassembly
It is necessary to follow the reverse principle of dismantling. But there are some nuances here.
- Install the gas tank gasket onto the studs.
- Replace the new or repaired old sensor.
- Place the ground wire from the fuel level regulator onto one of the studs, after which you can tighten all six removed sensor mounting nuts.
- Place the fuel outlet and supply hoses onto both tubes. You can then tighten the screws of the fuel hose clamps all the way.
- Connect the power supply wire to the fuel level regulator and return the hatch cover to its place. Just don't forget about the gaskets. All of them are replaced in most cases with new ones. Even if the condition of the old ones is satisfactory.
Alas, replacing the FLS does not always give the desired result. After the work has been done, it may turn out that everything is fine with the sensor, but the fuel level indicator on the dashboard stubbornly continues to behave inadequately or does not respond at all.
Disable and change
The FLS is working properly. What to do?
Try the following activities.
- The sensor connector has a pair of wires - pink and blue;
- The pink one controls the arrow of the fuel level indicator in the tank, and the blue one is responsible for the critically low fuel level indicator;
- Take any jumper at hand, that is, a piece of any wire, and then use the jumper to short the pink wire to ground, while turning on the ignition. At this moment the arrow should be in the full tank position;
- Now, similarly, using a jumper, we connect the blue wire to ground. This should turn on a light that indicates on the dashboard that the fuel level inside the gas tank is low;
- If, when the jumper is shorted to ground, the indicator or lamp does not work, this indicates that the indicator itself is “covered”, or there is a problem with the condition of the wiring.
There is absolutely nothing complicated about replacing the sensor. Dismantling work can be completed in 30-60 minutes with even a little experience. As for the FLS itself, it does not fail very often, but every owner of a VAZ 2109 and more should know about the features of its replacement.
The design of the “nine” carburetor
Experienced, and even more so, novice car enthusiasts should learn the design of the carburetor of their car - this will help solve problems that are inevitable during long-term use of the car.
The user manual describes in sufficient detail the diagram of the carburetor, the purpose of its components and systems, describes operating modes and methods for eliminating the most common problems. In other words, this manual can be called your first and main textbook, allowing you to learn the basics of repairing car parts, including the carburetor.
The only thing worth mentioning is that in this manual you will not see any detailed information and nuances regarding carburetor disassembly that you may encounter. You will have to deal with them along the way, on your own or by turning to the World Wide Web for help - on the Internet you can find answers to almost any automotive questions, especially regarding the VAZ 2109.
Cars of this family were equipped with a Solex carburetor, a domestic development adapted for VAZ classics and later production models. For this reason, if the carburetor fails, it will not be easy to find a suitable analogue - the auto-choke system is rarely present in carburetors of other brands. However, Solexes are still produced, despite the fact that the era of carburetor cars has sunk into oblivion.
Design features of the VAZ carburetor:
- it is two-chamber, between the chambers there are fuel and air jets;
- Solex has a main part and a cover connected with screws. The lid contains floats, an air damper, a starting device is located here, and a solenoid valve is installed;
- The main part includes diffusers, an exhaust system, gasoline dosages, and an accelerator pump. There was also a place for both the economizer and the heating system;
- At the top of the lid there is a fuel supply pipe, as well as a pipe for returning excess fuel to the gas tank.
The design of the carburetor was constantly improved, but the improvements did not affect the principle of operation of the main units and systems.
moz775 › Blog › Checking the fuel level sensor VAZ 2108 - 2109
If the fuel gauge does not work on VAZ 2108 2109 21099, the fuel level sensor must be checked. DUT — the fuel level sensor is located in the gas tank and is a lever on which the float is fixed. Depending on the level of fuel in the tank, the float moves up and down, while the lever moves along the rheostat of the sensor, changing its resistance. The fuel gauge for the high and low panels does not look any different, but they have a slightly different resistance. At the high panel of devices — resistance from 238 to 262 Ohm the level arrow should be located at the beginning of the scale. Then, when the resistance decreases and approaches it to a value of 59-71 ohms, the arrow is in the middle of the scale. At 17-23 ohm, the arrow moves to the beginning of the scale, which corresponds to the full tank of fuel VAZ 2108 2109 21099. For a pointer to the low instrument panel, the resistance values are slightly different: Resistance 285- 335 ohm - the arrow is at the beginning of the scale. The resistance of 100-135 ohms is in the middle of the scale, which corresponds to half the tank. The resistance is 7-25 ohm — at the end of the scale, the fuel tank is full. Therefore, fuel level sensors are available for high and low panels. In injector models, the fuel sensor is located in the gasoline pump, but the principle of operation is the same. Proceeding from the above, the very first thing to do if the fuel level gauge
does not work is to check the resistance of the sensor: 1) Remove the rear seat and unscrew the protective cover. 2) Disconnect the wires from the fuel sensor. 3) Unscrew the fuel level sensor and gently remove it from the gas tank. 4) Now, using a multimeter in ohmmeter mode, measure the resistance of the sensor at different positions of the float: the float hanging under its own weight — the resistance should be about 280-330 Ohm. Raise the float all the way up — resistance should be 7-20 Ohm. The figures are for a low instrument panel. 5) If, while moving the float, the sensor does not change its resistance or it differs significantly from the required one, then such a sensor must be replaced. 6) If the sensor is OK, we carefully inspect the sensor connector, the wire to the ground from the sensor. There should be no oxides and rust. Since the fuel level sensor VAZ 2108 2109 21099 is an alternating resistance, oxide and poor contact interfere with its proper operation.
Replacing the fuel level sensor on a VAZ 2108, VAZ 2109, VAZ 21099
Welcome! Today we will discuss in detail the replacement of the fuel level sensor in the tank. The entire replacement process will be supported by pictures for your convenience, and at the very end of the article you can see a video that will describe in detail the replacement of the sensor and its configuration.
Note! The replacement process, as you have already seen from the title of this entry, will take place on cars of the “Samara” family!
Summary:
Where is the fuel level sensor located? Its location is very simple, and all because it is located in the floor of the car body under the rear seat. But in order to get to it, you will first need to lift the rear seat cushion and after that, lifting up the noise-insulating material, you will be able to see the fuel level sensor installed in the floor of the car.
Note! In the photo above, the arrow indicates where this sensor is located, but as you can see in the photo, it is invisible, and all because the noise-insulating material is not bent back!
When do you need to change the fuel level sensor? It must be replaced with a new one if:
• The fuel level needle, which is shown in the bottom photo, is not working properly. For example, if the sensor fails, the fuel level needle may begin to work incorrectly or may even stop showing the state of gasoline in the tank.
• Also, if the sensor does not work correctly, the indicator indicating the end of gasoline in the tank may also give incorrect readings. For example, the tank is full, but the indicator is already on.
Note! It is not always necessary to replace the sensor with a new one; in some cases it can simply be adjusted correctly and that’s it.
You can find how to adjust the sensor in the video located at the bottom of the article!
The principle of operation of the fuel level sensor, why it does not show and how to check
The fuel level sensor (FLS), as the name suggests, performs a single function - it determines the amount of fuel in the vehicle’s fuel tank. It is placed directly inside the tank, and the readings are transmitted to the fuel level indicator located on the dashboard, which shows the remaining fuel.
There are several types of FLS, the most modern is ultrasonic, the most widespread is potentiometric. Domestic cars, in particular, VAZ-2107, VAZ-2109, VAZ-2110 and VAZ-2115, are equipped with potentiometric float-type fuel injection systems.
- Fuel level sensor device
- Other fuel level sensor options
- Description of the fuel level sensor operation
- Sensor malfunctions
- How to check the functionality of the sensor?
How to replace the fuel level sensor on a VAZ 2108-VAZ 21099?
Removal: 1) First, lift up the rear seat cushion. (How to raise the pillow, see the article: “Useful information about seats”, in paragraph “1-2”)
2) Next, above the hatch cover, slightly bend a small cut piece of the noise-insulating floor covering. And after bending it, use a screwdriver to unscrew the two screws securing the gas tank flap cover.
3) Next, by hand, disconnect the wire block from the fuel level sensor.
4) Next, picking up a screwdriver, use it to loosen the two screws that secure the fuel outlet and supply hose clamps.
5) Now put the wrench on “10”, alternately on each tube in front of both hoses.
6) And then move the hoses from both tubes and, as a result, remove them.
7) Then, using an extension with a socket head, unscrew the six nuts that secure the sensor to the tank.
Note! Please note that under one of the nuts there is a ground wire, which also needs to be removed from the stud located on the gas tank!
 Next, carefully remove the sensor from the tank.
Note! When you remove the sensor, try not to damage its float, which is installed on the tip! (Indicated by red arrow)
9) When the sensor is removed, also remove the gasket underneath it.
Note! If the gas tank gasket is damaged, then replace it with a new one!
Installation: The fuel level sensor is installed in the gas tank in the reverse order of removal, that is:
1) First, the gas tank gasket is placed on the studs.
2) Next, the sensor is installed in its place.
3) Next, the ground wire of the sensor is placed under one of the studs, and then the six nuts securing this sensor are tightened.
Errors on the panel
VAZ versions of on-board computers have a self-diagnosis option, which allows you to read codes yourself without the use of additional equipment. The following is a list of common problems encountered on cars.
| Number | Decoding |
| 1 | Motor control unit malfunction. |
| 2 | The voltage in the on-board circuit is too high. Usually occurs during short circuit. |
| 3 | Fuel level sensor - open circuit or damaged wiring. |
| 4 | The antifreeze level controller is faulty. |
| 5 | The external temperature controller is faulty. |
| 6 | The engine has overheated, you should stop and let the engine cool. |
| 7 | Engine oil pressure is less than minimum. There may be two reasons for this. Loss of lubricant level or pump failure. |
| 8 | Critical voltage drop in the on-board network. |
| 9 | The battery is low. The serviceability of the generator and its mains should be checked. |
| E | EEPROM data packet error |
| 12 | The diagnostic lamp is faulty. |
| 13 | Lambda probe circuit open. |
| 14 | Increased signal coming from the antirfiz temperature sensor. |
| 15 | The coolant temperature controller is faulty. |
| 16/17 | Incorrect voltage in the on-board network. |
| 19 | DPKV refused. |
| 21 | The throttle position control is faulty. |
| 24 | The speed sensor is faulty. |
| 27/28 | The exhaust gas system sensors are sending incorrect signals. |
| 35 | Idle speed is set incorrectly. |
| 41 | The phase regulator is not working correctly. |
| 44/45 | Excessively lean or rich mixture in the cylinders. |
| 49 | Loss of tightness in engine lines. |
| 61 | Lambda probe is faulty. |
Sensor Features
The VAZ fuel level sensor in most models has virtually no different design features. The FLS is a device with a float mounted in the gas tank of a car. Thanks to the position of the float, we get an idea of the amount of gasoline in stock - the lower it goes, the less the amount of fuel will be. The operating features of this device have minor differences depending on the type of engine. It doesn’t matter the carburetor or injector in your system - the principle of operation and location of the sensor remain the same.
The measuring device, as mentioned earlier, is located in the tank, and can be accessed by tilting the rear passenger seat. This will come in handy if you need to check the sensor for functionality or replace it.
When it becomes necessary to check it:
Carburetor design
Today there are many different carburetor models, including the one shown in the photo above. This device serves to prepare and supply a mixture of air and gasoline to the engine. However, in all carburetor engines that are used in domestic and even imported cars, it is possible to reduce gasoline consumption and make any carburetor a little more economical. Instructions for increasing efficiency:
- Even the simplest carburetor has in its design: a throttle valve, a diffuser, a float chamber with a float, a nozzle with a spray. Gasoline flows through the line from the tank into the float chamber
- This chamber contains a brass float (it is hollow) and the shut-off needle rests on it
- If the level of gasoline in the chamber reaches a certain level, then the float floats up, presses on the needle, forcing the supply tube to close, and after that the supply of gasoline to the carburetor stops
- When the engine is running, the fuel is consumed, and accordingly its level inside the chamber decreases, while the float drops, stops affecting the needle and the needle opens the pipe again, resuming the fuel supply
- Thanks to the operation of such a system, the required level of fuel is maintained inside the float chamber, which is very important for the engine to work correctly and for regulating gasoline consumption
- To reduce gasoline consumption with your own hands on a car with a carburetor engine, you will need to purchase a special repair kit from a store specializing in automobile spare parts, in which the jet size will be smaller than those found in a standard carburetor.
- At the same time, the price of a repair kit for a domestic car, as a rule, will be an order of magnitude lower than for an imported one.
- The fuel nozzle is designed to supply gasoline to the atomizer from the float chamber
- Moreover, the amount of fuel supplied depends directly on the type of this nozzle, or more precisely on its size and shape
- And, therefore, the smaller the engine volume for which the nozzle was designed, which means the less gasoline will flow through it into the atomizer, which means that its consumption will be less
- Therefore, in order to reduce carburetor consumption, you will only need to purchase a repair kit with suitable jets, but designed for a reduced engine size
- For example, for a VAZ 21011 carburetor designed for a 1.3-liter engine, you will need to purchase a repair kit for Tavria. Engine capacity, which is 1.1 liters
- After purchasing a suitable repair kit, remove the carburetor and disassemble it
- Change its standard jets, with new holes designed for a smaller engine
- Then assemble the carburetor and return it to its place
- After proper disassembly and proper assembly, as well as installation of such jets, gasoline consumption should decrease
Disassembly of the unit, its reassembly
To check the functionality of the VAZ 2108, VAZ 2109 sensor, it is necessary to disassemble the unit. You will need the following set of tools:
- screwdriver;
- key to 7;
- replaceable head for 10.
The following actions are performed sequentially:
- We recline the back seat and see the lid. Use a Phillips screwdriver to unscrew the fasteners and remove the compartment cover.
- There are a bunch of wires in the compartment, all of them must be carefully disconnected one by one so as not to damage them. This is where the 7 head comes in handy.
- Next, use a 10mm head to unscrew the fuel sensor itself, and then remove it from the gas tank. This should be done carefully, without jerking.
This completes all manipulations to disassemble the sensor assembly. Now the device can be cleaned, resistance checked or replaced. If there is external mechanical damage on the device body, you don’t even have to check it, but it is better to immediately replace it with a new one. The sensor cannot be repaired, just like its spare parts. Assembly is carried out in the reverse order, without any changes. Before connecting the wires, it is advisable to check their integrity. This is all that may be needed when dismantling the unit.
Functionality check
The VAZ 2109 fuel sensor can be checked for functionality using an ohmmeter or multimeter. After the device is removed from the gas tank, its contacts should be connected to the tester. We fix the float in one position and look at the indicators. The result should be 275-320 Ohms in the upper position of the float or 5-20 Ohms in the lower position. In the middle the resistance indicator is 100-130 Ohms. These figures are for a low instrument panel.
For a high panel these values are different:
If the device’s performance corresponds to the examples given, the device is working, everything is in order with the sensor, and it does not need repair or replacement. When significant deviations are present, it is worth checking the integrity of the wires. If they are ok, the sensor itself is faulty and needs to be replaced.
Causes of errors
The main reason why the fuel level may be displayed incorrectly on the instrument panel is long-term operation of the sensor.
Most often, the device is replaced with a similar one from another car model, for example, VAZ 21099, 2110. After the replacement, some drivers notice that the data is displayed incorrectly. Most often this happens if the sensor was removed from an earlier version of the car and installed on a later one, for example, from 2109 to 2110 model. In addition, incorrect data may also appear after installing the Europanel.
The reason may be in the contacts, but there is no exact solution, so if you want to change the sensor, then look for a similar model.
Another reason is a littered float. When this part of the device is left in gasoline for a long time without cleaning, it can become covered with a rather unpleasant coating. As a result, the structure becomes heavier, which leads to constantly overestimated performance, as well as to rapid breakdown of the lever and float. The float can be replaced, but only with exactly the same one, not a similar one.
Causes of malfunction
The reasons why the fuel level sensor does not work or it shows incorrectly are the following faults:
- The float has lost its seal. This situation is relevant when a ball made of fragile plastic is used as a float, which can crack as a result of mechanical stress or as a result of operating the car in severe frosts. In this case, the float will be inside the liquid or, more often, it will simply sink and fall to the bottom. The result will be a constant reading from the device that there is no fuel in the tank. Repair measures include replacing the float or the entire assembly. Another rare option is that the float can simply detach from the lever on which it is attached and “go off on its own.”
- Deformation of the lever that holds the float. As a result, the float may lose mobility or reflect incorrect information. Often this situation occurs when the fuel module is inaccurately removed from the tank, but sometimes even as a result of long-term operation of the car on roads with uneven surfaces, that is, with constant vibrations while driving. You can try to return the lever to its original shape, but most often the corresponding lever is simply replaced with a new one.
- Damage to the sensor housing. As a result, the readings of the resistive elements may change or the lever that takes the corresponding readings may be damaged. In this case, the reason why the sensor does not show the fuel level correctly is the use of low-quality gasoline or mechanical shock loads on the part.
- Failure of resistive elements. This is a fairly common reason why the fuel level sensor does not work. Elements on the rheostat fail for natural reasons, that is, as a result of abrasion during long-term use. It is possible that the wear is partial, for example, in the middle. In this case, the instrument needle will twitch. It is also possible that there is no contact between the sliding element and the resistive track due to damage or wear of the resistive coating or loosening of the slider foot pressure. With such a malfunction, the arrow will lie at zero.
- Lack of electrical contact in a certain section of the circuit. As a rule, on contacts that are oxidized either by moisture or fuel. The wires, their insulation, or breakage may be damaged. There are also sometimes problems with electrical connectors.
- The signal wire has a short to ground. In this case, the value of its resistance will be distorted and tend to zero. With such a malfunction, the level sensor incorrectly displays the level, transmitting information that the tank is completely filled.
- The fuse responsible for the operation of the fuel level sensor has blown. The fuse number must be found in the electrical diagram of the specific vehicle.
- Failure to secure the sensor on the fuel tank body. For example, with a skew. As a rule, in such a situation, the smell of fuel spreads outwards, in particular, the smell of gasoline will be heard in the cabin.
- There are cases when the resistive board on which the slider moves simply falls off the fastening solder.
- Tubular fuel level sensors may have a broken signal wire. In this case, the arrow will constantly show an empty tank.
- Also, tubular sensors are characterized by a coating that can form on the guide post. This will naturally make it difficult (and even impossible) for the float to move. Plaque is usually formed as a result of using low-quality fuel (with a large amount of paraffin, gasoline instead of gasoline). In this case, the instrument needle will freeze in one position, and not necessarily in one of the extreme ones.
- For non-contact sensors, the magnetic sensor and/or its wiring may be damaged. Some of them have a special control and control board installed. The problem may be with her too. In this case, the sensor usually fails completely, that is, it does not indicate the fuel level at all.
Most often, problems arise with floats or resistive elements, which wear out over time and stop transmitting correct data. But note that when the fuel level is not displayed, it is not always the sensor that is to blame. Often the arrow does not work, and here the device on the panel, which, in fact, is a potentiometer, is to blame. Therefore, if the fuel sensor does not indicate the fuel correctly, then you need to remove it and check it with a multimeter and make a visual inspection.
Replacing the fuel sensor VAZ 2109
If the fuel level gauge begins to show incorrect data that differs from the actual volume of gasoline in the tank, the most likely reason for this is a problem with the fuel level sensors. It is located directly in the gas tank and to get to it we need the following tool:
- flat and Phillips screwdriver
- pliers
- head for 7
- ratchet with extension
So, the first thing you need to do is recline the rear seat by pulling the cord, and under it, closer to the right side of the floor, you can see this hatch:
Unscrew the two screws and lift the cover:
Next, you need to disconnect the power plug from the sensor, as clearly demonstrated in the photo below:
Then unscrew the hose clamps with a screwdriver and remove them from the FLS fittings. If the hoses have not been removed for a long time and you have never looked there, then it is possible that everything there may rust, as is the case with my experimental 2109, then you will have to pull them off with pliers:
After that, all that remains is to unscrew all the nuts in a circle that secure the VAZ 2109-2108 fuel level sensor to the gas tank:
And carefully remove it from the tank, turning it in such a way as to find a convenient position for removal without damaging the float:
Replacement is carried out in the event of a malfunction of this device and is carried out in the reverse order. The price of the sensor is about 300 rubles for VAZ 2109, 2108, 21099 cars. After installation, be sure to check all connections so that the hose clamps are tightened thoroughly, otherwise the smell of gasoline will be constantly present in the cabin due to poor tightness of the connection.
Also, it is worth paying attention to the rubber sealing gasket, which is installed between the tank and the FLS. And if it is cracked or has other signs of wear, it should be replaced with a new one.
Replacing the VAZ 2109 fuel level sensor (carburetor)
Difficulty: 1 out of 10
Number of workers: 1 person.
Repair location: In the yard
It will take time: An unskilled worker can do it within 30 minutes.
We will need: 1. Phillips screwdriver PH2 - 1 pc.; 2. Ratchet 14″ - 1 pc.; 3. Socket head 6 mm - 1 pc.; 4. Pliers - 1 pc.; 5. You may need a 6mm open-end wrench.
Adjusting the fuel level of carburetors VAZ 2108, 2109, 21099, 2110
Remove the air filter housing. Using two “8” wrenches, we loosen the fastening of the drive rod to the air damper control lever.
Using a screwdriver, unscrew the screw and remove the bracket for fastening the rod shell together with the drive rod.
Having loosened the clamps, remove the fuel supply and fuel discharge hoses from the carburetor fittings.
A small amount of fuel may remain in the hoses.
Remove the wire tip from the terminal of the EPHH solenoid valve.
Using a screwdriver, unscrew the five screws securing the carburetor cover.
Carefully, trying not to damage the floats and gasket, remove the cover.
To avoid losing the fastening screws, turn the cover upside down above the table or air filter housing cover.
It is unacceptable to place the cover with the floats down to avoid damage to the float bracket.
Before adjusting the fuel level, you should check the relative position of the floats, as well as their position relative to the walls of the float chamber.
It is convenient to check the position of the floats by the imprint of the mating plane of the carburetor body on the cover gasket.
The floats should be located at the centers of the prints, and the side surfaces of the floats should be parallel to the walls of the float chamber. We change the position of the floats by bending their holders. If the gasket is damaged, then prints on a new one can be obtained by painting the mating surface of the float chamber with a thin layer of used oil, a marker or felt-tip pen and pressing the cover with screws to the carburetor body. Holding the cover horizontally with the floats up, we check that the supporting surface of the float bracket tongue is perpendicular to the axis of the needle valve. If necessary, use pliers or a screwdriver to bend the tongue. If the bearing surface of the tongue is deformed or has burrs, for example after careless repairs, the floats should be removed. You can level the surface using pliers and a file. If the tongue is severely damaged, replace the floats with the bracket. To adjust the fuel level, turn the lid over with the floats up and place it on a horizontal surface. The damper ball must be recessed into the valve needle under the weight of the floats. Using the shank of a drill or a piece of wire with a diameter of 1 mm, we check the gap between the protrusion of each float and the cover gasket.
The gaps must be the same and equal to 1±0.25 mm. The size of the gap is adjusted by bending the float holders. The position of the floats can be more accurately adjusted using a depth gauge. To do this, measure 5.7 mm from the outer edge of the gasket on the side of the air damper control lever and make a mark with a sharpened pencil.
We set the caliper scale to 70.6 mm. By placing one jaw of the caliper on the mark, we check the position of the floats. There should be a gap of no more than 1 mm between the jaws and the side surfaces of the floats.
To adjust the fuel level using a caliper, set its scale to 34 mm. Using a depth gauge ruler, we check the distance from the cover gasket to the top edge of each float.
By bending the holder, we ensure that the edges of the floats are at the level of the end of the caliper. Lifting the floats by the bracket, we check their stroke, which, when measured along the lower corner of the float, should be 15 mm.
To adjust the stroke, bend the limiting protrusion on the bracket.
By adjusting the position of the floats. turn the cover vertically (the damper ball should not be recessed into the valve needle) and make sure that the line from the mold on the side surface of the floats is parallel to the mating plane of the cover.
A significant deviation from parallelism when correctly adjusting the fuel level indicates a malfunction of the float mechanism: most often due to a stuck damper ball.
Reasons for replacement
You will definitely have to replace the sensor if the car starts to produce the following:
- The fuel level indicator needle “dances” or has fallen dead to the zero position;
- The indicator is constantly on, indicating a critical fuel level, although you have just filled the tank full.
FLS diagram
FLS on high and low panels
The differences in the sensors on the injectors and carburetors are minimal. Also, the fuel level sensors on VAZ 2109 cars equipped with a low and high panel are slightly different.
The difference lies in the resistance indicators. These parameters must be known when checking the condition of the sensor resistor.
Panel type
Resistance readings
In this regard, when buying a new fuel level sensor, be sure to ask for a controller for a high or low panel, depending on what kind of car you have. It is also important to note that in the case of injection engines, the sensor is located inside the fuel pump, but it is based on the same operating principle as a carburetor one.
Place 21093 in the AvtoVAZ model line
The prototype for the VAZ 21093 was the front-wheel drive hatchback VAZ 2109 “Sputnik”, with a 1.3 liter carburetor engine, produced in Togliatti since 1987. Its engine power was 64 horsepower. Externally, the 21093 Samara, which appeared in 1990, was not much different from the 2109. Dimensions, design, design - everything was almost like the nine. The main differences were hidden under the hood.
Modification 21093 received a new engine. The designers of the Volzhsky Automobile Plant increased the cylinder diameter from 78 to 82 mm with the previous piston stroke of 71 mm. This resulted in an increase in the working volume from 1288 cubic cm to 1499. The car's power increased, its performance characteristics improved (speed and acceleration dynamics), and fuel consumption decreased slightly. In general, the VAZ 21093 car has acquired noticeable liveliness.
Functionality check
Do not rush to throw out the old sensor and replace it with a new regulator. First you can try to check if it really doesn't work.
To check, you will have to extract the “suspect” in any case.
- Inside the car, remove the lower part of the rear seat, remove the soundproofing material, if any. This will give you access to the inspection hatch in the floor of the car.
- Using a Phillips screwdriver, unscrew the four mounting screws that hold the hatch in place. Take it off. Under the hatch you will find a sealing gasket made of rubber. In any case, even if the old sensor works again for the benefit of your car, this gasket should be replaced.
- Disconnect the power supply block with wires from the sensor, and then unscrew the fastening nuts around the perimeter that hold the desired fuel level sensor on the tank body. Usually there are 6 of these nuts, and to dismantle them you will need an 8 socket socket or a regular wrench.
- Under one of the nuts there is a ground wire attached to a stud. Remove the wiring and put it aside for now. He shouldn't interfere.
- Carefully remove the sensor and do not forget to remove the rubber sealing gasket, which is located directly under the regulator. If there are signs of damage or defects on it, be sure to replace this component.
- When the sensor is removed, visually check its current condition. If there are mechanical damages, there is no point in further trying to repair it or restore its functionality. Change it right away.
- If there is no visual damage, check the condition of the float. It can be depressurized, that is, there is fuel inside it, cracks and various defects through which fuel has leaked are visible on the surface of the element. If all of this is present at the float, replace the entire sensor.
- Be sure to blow out the fuel filter with compressed air. A useful event that definitely will not harm your fuel system. Especially if the quality of gasoline with which you fill your VAZ 2109 leaves much to be desired.
- Check the condition of the resistor. To do this, you will need a multimeter in ohmmeter mode. Connect a measuring device to the sensor terminals and take readings. In the lowest position (empty tank), the resistance should be about 315-345 Ohms. If the tank is half full, the resistance will be 108-128 ohms. And when the tank is empty, the ohmmeter should show no more than 7 ohms. If the parameters differ from those specified, or there is no resistance at all, this indicates a malfunction of the controller. It must be replaced.
Checking status
Reassembly
It is necessary to follow the reverse principle of dismantling. But there are some nuances here.
- Install the gas tank gasket onto the studs.
- Replace the new or repaired old sensor.
- Place the ground wire from the fuel level regulator onto one of the studs, after which you can tighten all six removed sensor mounting nuts.
- Place the fuel outlet and supply hoses onto both tubes. You can then tighten the screws of the fuel hose clamps all the way.
- Connect the power supply wire to the fuel level regulator and return the hatch cover to its place. Just don't forget about the gaskets. All of them are replaced in most cases with new ones. Even if the condition of the old ones is satisfactory.
Alas, replacing the FLS does not always give the desired result. After the work has been done, it may turn out that everything is fine with the sensor, but the fuel level indicator on the dashboard stubbornly continues to behave inadequately or does not respond at all.
Disable and change
The FLS is working properly. What to do?
Try the following activities.
- The sensor connector has a pair of wires - pink and blue;
- The pink one controls the arrow of the fuel level indicator in the tank, and the blue one is responsible for the critically low fuel level indicator;
- Take any jumper at hand, that is, a piece of any wire, and then use the jumper to short the pink wire to ground, while turning on the ignition. At this moment the arrow should be in the full tank position;
- Now, similarly, using a jumper, we connect the blue wire to ground. This should turn on a light that indicates on the dashboard that the fuel level inside the gas tank is low;
- If, when the jumper is shorted to ground, the indicator or lamp does not work, this indicates that the indicator itself is “covered”, or there is a problem with the condition of the wiring.
There is absolutely nothing complicated about replacing the sensor. Dismantling work can be completed in 30-60 minutes with even a little experience. As for the FLS itself, it does not fail very often, but every owner of a VAZ 2109 and more should know about the features of its replacement.
|
|
|
|
Operating principle of FLS
The principle of operation of fuel level sensors is classic and simple - changes in the position of the float are “read” by the control device and transmits the information via a digital or analog signal to visual control devices. The accuracy of the data determines the type and design features of the control equipment.
Lever type
The interaction of sensor elements of this type is presented as follows:
- the float constantly occupies the upper fuel level;
- a potentiometer connected to the car’s electrical network through an indicator on the dashboard, when the gas tank is completely filled, creates a resistance of about 7 Ohms, which corresponds to the “P” mark on the control device;
- when the engine is running, gasoline is consumed, reducing the amount of fuel in the tank - the float drops along with the drop in level, moving the potentiometer slider;
- the movement of the latter along the resistive plates smoothly increases the resistance to 230 - 340 Ohms (depending on the characteristics of the car), where the maximum value informs about a completely empty tank.
The reliability of this design has been proven over years of use. At the same time, the accuracy of the readings deteriorates over time due to wear of the resistive plates and the slider.
Tubular type
The operation of a tubular type sensor uses a control principle similar to the acquisition of information by lever systems, but there are fundamental design differences. Its main elements are presented:
- Housing with guide post and resistive wire.
- Float equipped with slip rings.
- Device mounting flange with a contact group for connecting control wires.
Fuel level control is carried out in the following order:
- fuel enters through a hole in the lower part of the body;
- as the tank fills, the float mechanism moves and will remain at the top point;
- its movement changes the resistance and, therefore, the tank fullness indicator on the indicator;
- at the top point, a small section of the contact wire is involved, and the resistance has a minimum value, at the bottom - the length increases, with a corresponding increase in the final indicators.
Placing the float in a limited space that smoothes out vehicle vibrations provides information about the fuel level more accurately than lever-type units. But the possibility of installation on cars is limited by the design features of fuel tanks.
Electronic (contactless)
Electronic fuel level sensors are installed in the tank when using modern types of ethanol-based, methanol-based gasoline or biodiesel, since the installation of contact units for level determination is not effective - the readings are inaccurate, and the wear of parts is high. In turn, the inactive magnetic fluid position sensor copes with the task successfully and has the following features:
- The executive part is located in a sealed housing; only the magnetic float and lever come into contact with the fuel.
- Fuel height measurements are carried out by a signal generated by a magnetic field.
- Changes are recorded by predetermined segments, the passage of which changes the amplitude of the feedback signal. So, when filling the tank “to full”, the sensor will change readings only after passing the next mark, and the driver will not be able to observe the smooth drop in level.
In order not to be left without fuel in the middle of the journey, you need to know the amount of fuel in the tank. Thanks to the device, you can understand whether or not you need to visit a gas station, how much gasoline is in the tank, and whether you can continue driving. This is not just a useful device, but a device responsible for the level of safety on the road. Modern legislation requires the presence of such a sensor and its good condition.