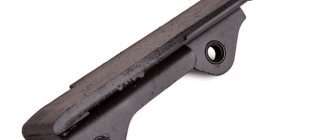
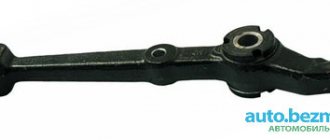
The domestic VAZ 2110 sedan has a transverse engine and is driven by the front wheels. The drive of the front wheels of the VAZ 2110 is arranged as follows: on the left and right, drive shafts are attached to the gearbox using internal constant velocity joints (CV joints), which, in turn, drive the wheels of the car through external CV joints inserted into the hubs.
The left shaft is short, the right one is longer. The outer CV joint has a housing in which a cage with an internal race and 6 balls is located. Thanks to the radial longitudinal grooves in its cage, the rotation angle of the external hinge reaches 42°. The internal CV joint has a similar structure, the only difference being that the grooves in its cage are not radius, but straight.
In addition, there is a retaining ring on its shank, which is inserted into the gearbox. Drive malfunctions are mainly associated with transmission oil leaks, rupture of dirt covers, or wear of metal parts. You can repair the main drive components yourself.
Do-it-yourself removal and replacement of front-wheel drive VAZ 2110, 2111, 2112
Since our roads are not yet impeccable and in some places are simply unrecognizable, we recommend checking the suspension more often for faults and damage.
If you suddenly begin to notice a crunching sound when hitting bumps in the road, then it will be useful for you to learn how to remove and replace the front drives of a VAZ 2110, 2111, 2112 with your own hands. You will need: new front drives (drive shaft assembly), a set of keys, a pry bar, a hammer, a wooden block, lubricant, a lift, gearbox oil.
It is important to know! Before starting work, it is necessary to drain the oil from the gearbox.
After the gearbox oil has been completely drained, loosen the hub nut.
Then we remove the wheel, then remove and hang the brake caliper.
Completely unscrew the hub nut and steering knuckle. Next, we take out the outer CV joint.
Let's pry at the inner CV joint with a pry bar and pull it out.
We recommend replacing a couple of drives at once, so we will replace the old CV joint to secure the shafts.
We take a new drive and install the retaining ring.
We drive the new drive into the gearbox. For convenience, we use a hammer and a wooden block. Repeat with the opposite wheel. We assemble the suspension, fill the gearbox with oil and do not forget to do the wheel alignment upon completion of the work.
Removal and installation of VAZ front wheel drives
Step-by-step procedure for removing and reinstalling front wheel drives on a VAZ 2110. Step-by-step procedure for removing and reinstalling front wheel drives on a VAZ 2110.
The front wheel drives consist of two joints (CV joints) and a shaft that connect the joints. The cause of drive failure may be worn-out spare parts in the hinge, a torn or damaged cover that is needed to seal it, or if the wheel drive shafts are deformed.
If there is any malfunction of a spare part, it should be replaced. To do this, remove and then install the front wheel drives.
First you need to remove the protection on the crankcase and drain the oil in the gearbox. And then proceed to the next steps.
Procedure for removing and installing front wheel drives:
1. Unlock the hub nut, which is located under the protective cap, and remove it.
2. Slightly unscrew the bolts on the wheel mounts and the nuts on the hub. Moreover, in order to unscrew the nut on the hub, you will have to acquire a lever, for example, a piece of pipe. Because it is very well twisted.
3. Put the car on the parking brake, put chocks under the rear wheels, and lift the front part. Then remove the front wheel and unscrew the nut on the hub.4. The brake caliper and brake pads must be removed. And the bracket must be hung on the front suspension spring. You also need to watch the brake hose, which should not be kinked or overtightened.
5. The steering knuckle is connected to the strut. They need to be disconnected and unscrewed. To do this, unscrew the two nuts and remove the bolts.
6. The shank of the outer hinge, which is located in the hub, must be removed by pressing the fist down.
7. Take the mounting blade and remove the second corner of the part from the gearbox.
8. When removing two drives at once, instead of the first drive removed from the gearbox, insert some kind of plug (a plug in the form of an old internal joint will do). Only after all these procedures remove the second part. This is all done to ensure that the differential side gears do not move, and when you assemble the front wheel drives, they will go well.
9. After replacing all faulty parts, install the front wheel drive, proceeding in reverse order. Don't forget to install a new snap ring in the inner joint housing. This is done so that while the machine is moving, the drive does not jump out of the semi-axial gear. When assembling, remember that the left shaft of the car part is shorter than the right one.
10. Connect the part to the gearbox. This should be done with a hammer, and you shouldn’t hit it too hard, hitting the outer end of the drive along its axis. Do not hit the drive itself, but through a wooden plank. Drive in until the shank of the internal joint is fixed in the side gear.VAZ
Removing the axle shafts
It should be noted that if for one reason or another it is necessary to remove both front axle shafts of a VAZ 2110 at the same time, then it is necessary to prepare the old internal joint in advance. It must be inserted into the technological hole in the gearbox instead of one of the drives immediately after dismantling, because after simultaneously removing both axle shafts from the box, the differential gears shift. As a result, it becomes simply impossible to install the drives in their proper places without disassembling the gearbox.
Before removing the axle shafts, you must drive into a pit or lift. If the work will be carried out in a pit, then you should secure the VAZ 2110 with the hand brake, place stops under the rear wheels and engage neutral gear. After this, you need to disconnect the terminals from the battery, remove the crankcase protection and drain the transmission oil from the gearbox. Then you can begin the main work. Algorithm of actions.
- First, while the car is on the ground, you need to loosen the hub nut, and then loosen it and the bolts securing the wheels.
- Next, you need to lift the desired side of the car with a jack, unscrew the wheel bolts, remove the wheel and only then unscrew the wheel nut.
- Then you need to disconnect the wire going to the pad wear sensor, remove the brake hose seal from the bracket, loosen the hose tip on the working cylinder, bend back the lock washers, unscrew the caliper mounting bolts and remove it together with the pads.
- Next, unscrew and remove 2 bolts securing the shock absorber strut to the steering knuckle, or 2 bolts securing the ball joint.
- After this, you need to release the fist and pull the shank of the outer hinge out of the hub.
- All that remains is to remove the opposite end of the axle shaft from the gearbox; this is easiest to do using a pry bar.
It is worth noting that you need to pull out the drive smoothly, without strong jerks, holding it with one hand. Installation of the axle shaft is performed in reverse order. After completion of the work, the wheel alignment should be re-set.
How to remove the drive of a VAZ 2110 – 2110, 2111, 2112 | ,
Wear of the hinges is caused by sand and dirt getting into the internal parts of the CV joint, when the rubber boots rupture.
We carry out the work on an inspection ditch or a lift.
To do this, remove the engine splash guard:
Using a 10mm socket, unscrew the five nuts for the front fastening of the mudguard to the body.
Use a 10mm wrench to unscrew the screws on the front plastic shield.
Using a 10mm wrench, unscrew the screws for the rear fastening of the plastic shield
Using a 10mm wrench, unscrew the two bolts securing the mudguard to the side members
To do this, drain the oil from the gearbox, use a 17 key to unscrew the plug and drain the oil into a container (volume - 4 l).
After draining the oil, screw the plug back in
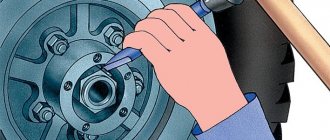
We unscrew the front hub bearing nut, to do this we remove the hub cap
Use a narrow chisel to straighten the dented collar of the nut.
We lock the rear wheels with the handbrake, engage first gear and place shoes under the wheels.
Use a 30mm socket to loosen the hub bearing nut.
Loosen the wheel mounting bolts.
We hang up the front of the car and remove the wheel.
Unscrew the two ball joint mounting bolts
We move the steering knuckle with the stand to the side and remove the drive from the hub.
Having placed the drive on the stretch...
Resting the mounting blade on the clutch housing boss, we push the inner joint housing out of the gearbox.
Be careful not to damage the protective ring on the inner joint housing.
Remove the right drive.
Use a screwdriver to pry up the retaining ring, which secures the drive in the gearbox.
...and remove it from the splined end of the inner joint housing.
If you need to dismantle the second drive or remove the gearbox, you must install a plug in the hole that approximately follows the shape of the shank of the internal joint housing.
To do this, you can use a wooden plug.
We dismantle the left drive in the same way as the right one.
In this case, it is convenient to rest the mounting blade on the wheel mounting bolt inserted into the recess of the gearbox housing.
Press out the inner joint housing and remove the left drive.
When installing the drive, it is advisable to replace the retaining ring on the shank of the internal hinge housing with a new one.
We insert the shank of the inner joint housing into the hole in the gearbox and drive it to its place by pushing the entire drive or tapping the end of the outer joint with a copper hammer.
Tightening torques for main threaded connections when replacing drives:
— hub bearing nut 225.6–247.2 Nm (23–25.2 kgf∙m);
— bolt securing the ball joint to the steering knuckle 49–61.74 Nm (5.0–6.3 kgf∙m);
— wheel mounting bolt 65.2–92.6 Nm (6.65–9.45 kgf∙m).
Removal and replacement of VAZ 2110, 2111, 2112 drives
Good afternoon. Today a VAZ 2110 pulled into our pits with a terrible crunch. According to the owner, this started after he ran into a hole. After we raised the car on a lift, we noticed that the drive was bent. And from the bent drive, both CV joints, internal and external, were broken. It was decided to buy the drive assembly and replace it. In this article we will tell you how to replace the front wheel drives of VAZ 2110, 2111, 2112. These instructions are suitable for cars of all years of manufacture.
Functionality check
The condition of the inner and outer CV joints should be examined separately, since the procedures and signs are somewhat different.
External grenade
Grenade If you want to verify that the outer CV joint is faulty, do the following:
- When starting from a standstill, deliberately create jerks, but not strong ones;
- Try to accelerate sharply and slow down;
- Move the shaft transversely between the CV joints. If you feel any play, then the grenade is definitely worn out.
Internal grenade
But to understand whether an element really needs to be replaced, do this:
- Raise the drive wheels, which will allow you to bring the inner CV joint to its maximum angle;
- Start the engine;
- Turn on first speed;
- If the hinge is at the limit of wear, you will hear a characteristic crunch. This is a signal that you need to change the grenade.
Inner CV joint VAZ 2110 - step-by-step do-it-yourself replacement instructions
Before you begin work on replacing the internal CV joint of the VAZ 2110 yourself, you need to prepare everything.
To do this, you need to secure the car, turn on 4th gear, and tighten the handbrake. Secure the rear wheels with wheel chocks. If they are not available, use bars of a similar shape. Remove the protective cap, unscrew the hub nut using an “arm” (extension) - a pipe or a pry bar. After the hub nut is removed, unscrew the wheel mounting bolts.
Let's move on to step-by-step instructions:
- Using a jack, hang up the wheel on which the CV joint is supposed to be replaced.
- Unscrew the bolts to remove the thrust washer of the hub nut.
Using a pry bar, remove the inner joint from the gearbox.
Removing the front wheel drives of a VAZ-2110 car
We remove the drives to replace them or when dismantling the gearbox. Repair or replacement of the drive is required if there are knocking noises when cornering or increased vibration that occurs when the joints wear out. Wear of the hinges is caused by sand and dirt getting into the internal parts of the CV joint, when the rubber boots rupture.
We carry out the work on an inspection ditch or a lift.
To do this, remove the engine splash guard:
Using a 10mm socket, unscrew the five nuts for the front fastening of the mudguard to the body.
Use a 10mm wrench to unscrew the screws on the front plastic shield.
Using a 10mm wrench, unscrew the screws for the rear fastening of the plastic shield
Using a 10mm wrench, unscrew the two bolts securing the mudguard to the side members
To do this, drain the oil from the gearbox, use a 17 key to unscrew the plug and drain the oil into a container (volume - 4 l).
After draining the oil, screw the plug back in
We unscrew the front hub bearing nut, to do this we remove the hub cap
Use a narrow chisel to straighten the dented collar of the nut.
We lock the rear wheels with the handbrake, engage first gear and place shoes under the wheels.
Use a 30mm socket to loosen the hub bearing nut.
Loosen the wheel mounting bolts.
We hang up the front of the car and remove the wheel.
Unscrew the two ball joint mounting bolts
Replacing the VAZ 2110 drive with your own hands
Wear of the hinges is caused by sand and dirt getting into the internal parts of the CV joint, when the rubber boots rupture.
We carry out the work on an inspection ditch or a lift.
To do this, remove the engine splash guard:
Using a 10mm socket, unscrew the five nuts for the front fastening of the mudguard to the body.
Use a 10mm wrench to unscrew the screws on the front plastic shield.
Using a 10mm wrench, unscrew the screws for the rear fastening of the plastic shield
Using a 10mm wrench, unscrew the two bolts securing the mudguard to the side members
To do this, drain the oil from the gearbox, use a 17 key to unscrew the plug and drain the oil into a container (volume - 4 l).
After draining the oil, screw the plug back in
We unscrew the front hub bearing nut, to do this we remove the hub cap
Use a narrow chisel to straighten the dented collar of the nut.
We lock the rear wheels with the handbrake, engage first gear and place shoes under the wheels.
Use a 30mm socket to loosen the hub bearing nut.
Loosen the wheel mounting bolts.
We hang up the front of the car and remove the wheel.
Unscrew the two ball joint mounting bolts
We move the steering knuckle with the stand to the side and remove the drive from the hub.
Having placed the drive on the stretch...
Resting the mounting blade on the clutch housing boss, we push the inner joint housing out of the gearbox.
Be careful not to damage the protective ring on the inner joint housing.
Remove the right drive.
Use a screwdriver to pry up the retaining ring, which secures the drive in the gearbox.
...and remove it from the splined end of the inner joint housing.
If you need to dismantle the second drive or remove the gearbox, you must install a plug in the hole that approximately follows the shape of the shank of the internal joint housing.
To do this, you can use a wooden plug.
We dismantle the left drive in the same way as the right one.
In this case, it is convenient to rest the mounting blade on the wheel mounting bolt inserted into the recess of the gearbox housing.
Press out the inner joint housing and remove the left drive.
When installing the drive, it is advisable to replace the retaining ring on the shank of the internal hinge housing with a new one.
We insert the shank of the inner joint housing into the hole in the gearbox and drive it to its place by pushing the entire drive or tapping the end of the outer joint with a copper hammer.
Tightening torques for main threaded connections when replacing drives:
— hub bearing nut 225.6–247.2 Nm (23–25.2 kgf∙m);
— bolt securing the ball joint to the steering knuckle 49–61.74 Nm (5.0–6.3 kgf∙m);
— wheel mounting bolt 65.2–92.6 Nm (6.65–9.45 kgf∙m).
We remove the shift drive when repairing it and dismantling the gearbox.
We carry out the work on an inspection ditch or a lift.
1. Using a 13mm socket, unscrew the two nuts securing the buffer bracket
2. and remove the bracket.
3. Using a socket and a 13mm wrench, unscrew the two bolts securing the reaction rod to the ball joint race of the gear shift drive
4. We move the jet thrust down.
5. Using two 13mm wrenches, loosen the coupling bolt of the torque clamp and move the clamp back
6. Removing jet thrust
7. If it is necessary to replace the thrust damper, use a “13” wrench to unscrew the nut securing the eyelet
8. Remove the eyelet with the damper.
9. The jet thrust damper can be replaced without removing the thrust itself.
To do this, loosen the linkage clamp, and then use a 13mm wrench to unscrew the two bolts securing the damper bracket to the gearbox housing.
10. Remove the bracket with the damper, removing the splined shank of the eye from the hole in the rod
To disconnect the gear shift drive in the cabin, remove the housing of the floor tunnel lining (see article - “Removing the instrument panel of a VAZ-2110 car”) and the decorative cover of the gear shift lever.
For clarity, the seat has been removed.
11. Using a “10” wrench, unscrew the two nuts of the upper fastening of the reverse lock bracket lining
12. and one bolt at the bottom.
13. Remove the bracket cover.
14. Using a 10mm wrench, unscrew the six nuts securing the drive pressure plate to the body.
15. Remove the pressure plate.
Remove the protective cover of the drive from the mounting studs of the pressure plate
16. From the bottom of the car, using two “13” keys, unscrew the coupling bolt of the drive rod clamp.
We remove the jet thrust.
17. Move the drive rod from the splined tip of the gear selector rod hinge
18. remove the drive rod with the gear shift lever
We install the jet thrust and gear shift drive in the reverse order.
We adjust the gear shift drive in the following order.
Set the gear selector rod to the reverse position.
To do this, use pliers to turn the splined tip of the hinge counterclockwise (looking in the direction of the car) until it stops, overcoming the resistance of the spring, and press the tip inward until it locks.
We put the drive rod on the tip of the hinge (do not tighten the clamp) and set the gear shift lever to the reverse position.
In this case, the stop of the lever axis must enter the groove of the lining of the reverse locking bracket all the way to the extreme forward position.
In this position of the drive rod and the gear selection rod, tighten the tie rod clamp.
Signs of a faulty VAZ 2110 gearbox
Characteristic symptoms that require replacement of the VAZ 2110 gearbox are the following:
- appearance of noise. The cause of this defect may be worn gear parts. Also, if the bearings are damaged, knocking and grinding noises appear.
- spontaneous switching off of gears or the gear does not engage completely. This is due to wear and tear on the forks and selector mechanism.
In some cases, when this transmission unit cannot be repaired due to objective reasons, replacing the VAZ 2110 gearbox is necessary. It is worth mentioning that the price of a new box will be 16,500 rubles, but its repair at a service station will cost 7,500 rubles (parts and the repair itself) without removal and installation. You can also “exchange” the checkpoint, the price will be 5,000 rubles. without installation or 6000 rub. with installation (prices are indicated for spring 2017 in Moscow and the region).
So it's up to you. The following is a technology for removing a VAZ 2110 gearbox and then replacing it.
Replacing the CV joint and outer boot on a VAZ 2110 with your own hands (video)
The CV joint is a constant velocity joint. People simply call it a grenade. This is due to the appearance of the device. Its task is to transmit rotational motion from one axle shaft to another, and they are at a constantly changing angle in relation to one another.
This element is always under load, which is why its failure is rather a matter of time. This is even despite the fact that high-quality carbon steel is used in the production of CV joints, which can withstand severe regular loads over a long period of time.
Replacing a grenade
Before you begin the process of replacing a grenade, you need to arm yourself with the following tools:
- lift;
- a sledgehammer or large hammer;
- an ordinary hammer;
- heads for 17 and 30;
- balloon type wrench;
- a chisel, not necessarily sharp;
- a flat screwdriver, preferably a slotted one;
- wrenches 13 and 17;
- crowbar or pry bar;
- pipe;
- a special puller designed to replace CV joints;
Special puller for CV joints
- with a rag.
And, of course, you should purchase a new CV joint kit.
New CV joint kit
Dismantling an old grenade
Let's start the replacement process:
- first you will need to unscrew the nut that sits on the shaft using a 30mm socket, a wrench and a pipe;
Replacing the external grenade of a VAZ 2110
Note. Don't worry if the nut is a little jammed, because if you apply a little force, the pipe and collar will easily unscrew it.
- After the nut is unscrewed, the lift should be installed.
Note. When installing the jack, you need to make sure that the cup coincides with the stop point on the car. This is very important and is specified in safety regulations. You should also definitely place a log or bricks under the car body, although the latter are quite fragile and can easily break.
- the wheel will now need to be lifted and then removed by unscrewing the mounting bolts;
- now you need to release the pads by retracting the brake cylinder piston;
- you will need to insert a crowbar or pry bar into the caliper slot to free the brake pads;
- it's time to remove the caliper;
- To do this, using keys 13 and 17, unscrew the caliper fastenings.
Note. After removing the caliper, it is advisable to tie it to the strut spring so that it does not interfere.
- now you need to unscrew the ball joint, again using a wrench and a socket, but this time to 17;
- take a crowbar and press it down, while simultaneously pulling the hub towards you;
- remove all the clamps and reach the boot;
- turn it away;
- the hub is completely pulled off the ball;
- the time has come to remove the grenade using a special puller (it will need to be installed behind the grenade and then squeezed out).
Note. If you don’t have a puller, you can simply use a hammer, carefully knocking off the CV joint.
Replacement of outer and inner CV joints on VAZ 2110, VAZ 2111, VAZ 2112
Note! To replace the outer and inner CV joints, you will need: Firstly, you will need special pliers with which to install the protective covers on the clamps. If you don’t have such pliers and you are not going to buy them, then instead of them you can use thin sliding pliers, and also pliers, thanks to which the retaining rings you can remove it, you will need it, as well as CV joint lubricant (Be sure to stock up, don’t even start work without it, if you don’t find just such a lubricant, then look for something like it, no matter what the name is, the main thing is that it is suitable for lubrication of CV joints), a new boot will be you need (But this is if yours is torn, if your boot is in normal condition, then you don’t need to take a new one) and a new retaining ring of the inner CV joint (It is definitely needed) and thrust rings, too, and be sure to have a new hub nut!
Summary:
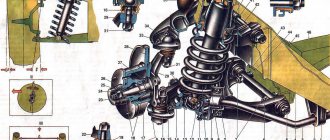
Where are the outer and inner CV joints located? It’s easiest to see it from below the car, by the way, and you’ll have to remove it by crawling under the bottom, although you can do without it (For example, you can put planks under the front wheels and lift the front part with two jacks, provided that both jacks stand on these planks, thereby in front of will be higher, this is especially convenient if the car is tall), but it’s still better to put the car on a lift and replace the CV joint you need with a new one, but we’ll immediately explain to you what outer and inner CV joints mean so that you understand this and are no longer confused (It’s just that in the article we will often talk about them and so that you can immediately understand what kind of CV joint we are talking about), so the outer one is the one that faces the car wheel and is inserted into the hub (Both outer ones are indicated by green arrows), and the inner one is the one that is inserted into the box (They are indicated by yellow arrows) and there are four total CV joints in front-wheel drive cars, two of them are located on the left side and go to the left wheel, and the other two are on the right and go to the right wheel, but here are the drives on which CV joints Only two are installed and both of them are indicated by blue arrows in the photo.
When do you need to change the outer and inner CV joints? When it starts knocking, then it needs to be replaced, in addition, you also need to monitor the condition of its boot and from time to time look under it and see if there is grease inside the boot, whether dirt or other kinds of particles have got there, sand for example, under the boot of this There absolutely shouldn’t be anything, only one lubricant should be there. To understand in more detail how you can check the CV joint for performance, you can watch the video clip which is located just below:
How to replace the outer and inner CV joints on a VAZ 2110-VAZ 2112?
Removal: 1) It doesn’t take that long to change the CV joint, but it’s just a very painstaking job that requires not only removing the CV joint itself, but also the wheels and disconnecting the ball joint, and many other small operations will have to be done, but you will need to start first with draining oil from the box, this is done so that when you get ready to remove the CV joint, the oil does not leak out of the box, but you carefully drain it yourself (For information on how to do this, read the article: “Changing the oil in the box on a VAZ”) , then remove the crankcase protection if it is present on your car (It will just get in the way) and then unscrew the hub nut a little (It is indicated by a red arrow, but only use a screwdriver to open the collars that will not allow it to be unscrewed and also do not forget to remove the plastic cover , which closes this nut from dirt getting into it), and then remove the wheel itself from the car, but just remember which side you are going to change the CV joint, and remove the wheel from the car from that side (For information on how to remove a wheel, read in article: “Correctly replacing a wheel on a car”).
2) When you’re done with the wheel, move to the top of the car and loosen the three nuts that secure the strut to the cup (Indicated by arrows), but don’t unscrew, just loosen two or three turns (If necessary, loosen more), then unscrew completely two bolts that secure the ball joint to the steering knuckle (see small photo) and once the work is done, unscrew the hub nut completely and remove the washer located behind it (Don’t lose it, by the way, it’s very convenient to pry it off with a magnetic screwdriver), and finally Turn the steering wheel all the way to the right or left.
Note! The steering wheel must be turned to the right if you are going to remove the CV joints on the left side (Look as the car is moving), and to the left if you are going to remove and change the CV joints on the right side!
3) Next, remove the brake hose (Be careful not to stretch it too much, otherwise it will break) from the bracket on the rack (see small photo below) and carefully pull out the part of the rack as shown in the large picture, At the same time, also remove the splined part of the outer CV joint (indicated by the red arrow) from the hole in the hub, pulling, as we have already said for this, part of the strut (it is most convenient to pull it by the brake disc, it is indicated by the blue arrow) towards you and lower the outer joint in such a way, so that it lies on the lever and no longer enters the hole in which it was previously located.
4) As soon as the splined part of the outer CV joint is removed from the hub, remove the inner part in exactly the same way, but although it is not even approximately removed in the same way, in general, to remove the inner part from the hole in the gearbox into which it fits, take a mounting blade , a thick chisel or something similar and insert it (the chisel is indicated by a blue arrow for clarity) between the inner CV joint and the box, thereby using the mounting blade or chisel as a lever, ensure that the splined part of the inner joint comes out of the hole in the box, but only be careful not to damage the oil seal, otherwise you will have to replace it with a new one, although if you want, inspect the oil seal just in case; if possible, if it is deformed (if there is a new one nearby), replace it with a new one.
Note! Remove the drive (this is the correct name for a design with two CV joints) through the bottom of the car in the inspection ditch, as shown in the photo below:
Installation: 1. The drive is installed in the reverse order of removal; if necessary, the outer and inner CV joints are removed from it and replaced separately with new ones, but in this article we will not tell you how to do it, because on our website there is already such an article dedicated to the outer and internal CV joint, and it is called: “Repairing the wheel drive and replacing both CV joints on a car,” so if you need to replace them separately or disassemble them, for example, then study that article in detail, but we will return to the topic again and tell you how to do it installing the drive in its place, this is not so difficult to do, to do this you will first need to change the retaining ring (Indicated by the green arrow) of the inner CV joint with a new one, after replacing, apply grease to the spline (Indicated by the red arrow) and on the smooth surface of the shank (Indicated by the red arrow) blue arrow).
2. Now you can insert the shank of the inner CV joint into the box, but just be careful not to damage the oil seal and by the way, when installing the inner CV joint, make sure that the retaining ring with the gap upwards is directed, as soon as the inner CV joint is inserted, make sure that it does not fly out and that the retaining ring holds it, well, do all further work in the reverse order of removal and do not forget to replace the hub nut with a new one, because you cannot re-tighten the old one and do not forget to lock the new one by the way.
Note! We would like to add one more thing, in order to drive the inner CV joint all the way (it just happens that it goes in very hard and not all the way), you will need to hammer it through the outer one, this is done in this way, take a hammer and a wooden plank (You can replace the plank with any other object take one in which you are sure that it will not lead to deformation of the outer CV joint) and through it (in the photo, instead of a wooden plank, another object is taken, as you have already noticed) the outer CV joint is driven inwards, thereby the inner one enters the gearbox all the way, but Just don't overdo it and don't deform the box!
Additional video clip: So that you can clearly understand how to make a replacement, watch the video clip located below, in it, using the example of a VAZ 2110 car, everything is shown and explained in detail about all this, but only the process of removing the drive is carried out in a slightly different way, it is more difficult be completed, especially if you do not have a special puller for this.
Removing and replacing front wheel drives VAZ-2110
We move the steering knuckle with the stand to the side and remove the drive from the hub.
Having placed the drive on the stretch...
...and leaning with the mounting blade on the lug of the clutch housing, we push the inner joint housing out of the gearbox.
Be careful not to damage the protective ring on the inner joint housing.
Remove the right drive.
Use a screwdriver to pry up the retaining ring, which secures the drive in the gearbox...
...and remove it from the splined end of the inner joint housing.
If you need to dismantle the second drive or remove the gearbox, you must install a plug in the hole that approximately follows the shape of the shank of the internal joint housing. To do this, you can use a wooden plug.
We dismantle the left drive in the same way as the right one. In this case, it is convenient to rest the mounting blade on the wheel mounting bolt inserted into the recess of the gearbox housing.
When installing the drive, it is advisable to replace the retaining ring on the shank of the internal hinge housing with a new one.
We insert the shank of the inner joint housing into the hole in the gearbox and drive it to its place by pushing the entire drive or tapping the end of the outer joint with a copper hammer.
Tuning and repair of VAZ 2110
In this article we will look at how to remove and reinstall the front wheel drives of a VAZ 2110.
This type of repair is more convenient to carry out in an inspection hole or overpass.
- Transmission oil needs to be drained
- Now you should remove the mudguard from the engine.
- Unscrew the bearing nut from the front hub.
- Unscrew the bolts on the ball joint (2 pcs.)
5. Move the steering knuckle and the strut slightly to the side and remove the drive from the hub.
6. Place the drive on the stretcher.
7. Use a mounting spatula to rest against the clutch housing and pull the inner joint housing out of the gearbox. Be careful not to damage the protective ring on the inner hinge.
8. We remove the right drive.
9. Use a knife or screwdriver to pry up the retaining ring on the splined end of the inner hinge housing and remove it.
10. To dismantle the second drive or to remove the gearbox, you will need to insert a plug into the hole. The plug should fit in shape, similar to the shank on the inner joint body. Such a plug can be made of wood.
11. Dismantling the left drive is similar to the right one. For convenience, the mounting blade rests on the bolt for fastening the wheel.
12. In the same way, we pull out the internal hinge housing and remove the left drive of the VAZ 2110.
It will be better if you install a new snap ring on the inner joint shank.
13. To install the drive in place, insert the inner joint housing into the gearbox and lightly tap the end of the outer joint with a copper hammer.
14. Now we insert the drive into the hub.
15. That's all, replacing the front wheel drive of the VAZ 2110 is completed.