The ODM (Oil Pressure Sensor) on the Lada Grant, like on any other car, is designed to signal the driver about the oil pressure in the engine. If it falls, the sensor will report this to the BC and the corresponding information will be visible on the dashboard display or on-board computer.
But sometimes it happens that the oil pressure warning light comes on, but the oil level and pressure are normal, and the reason is a malfunction of the oil pressure sensor.
Grant oil pressure sensor 8 valve replacement
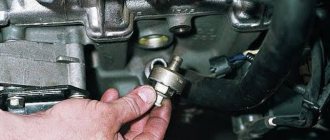
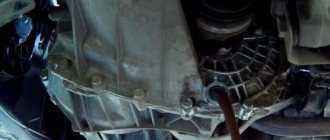
The emergency oil pressure sensor is installed on 16-valve Lada Granta engines on the right side, and is located directly on the cylinder head. To make it clear where to look for it, below is its visual location in the photo.
To make it even clearer, there is one green wire going to it.
So, the emergency oil pressure sensor itself on Grant is needed in order to signal a sound signal and the warning lamp on the instrument panel during a drop in pressure in the system.
If suddenly, while driving or idling, the warning light comes on, you must immediately turn off the engine.
You can start the engine in the future only after determining the reason for the operation of this alarm.
If the cause is a failure of the sensor itself, then everything can be fixed here as quickly and inexpensively as possible. We buy a new one and install it in its original place, replacing the faulty one. To perform this procedure, you must use the following tool:
- Ratchet handle or crank
- Extension
- 21 socket or similar spark plug
Procedure for replacing the oil pressure sensor on a 16-valve Grant
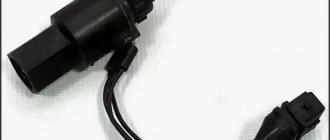
The first step is to disconnect the power wire from the sensor, as shown in the photo below, after pressing the block on both sides, thereby releasing it from the latches.
Then use a 21 mm socket to unscrew it:
When it spins freely, you can finally turn it out by hand.
As you can see, everything is done elementary and simple. Now we take a new sensor and make a replacement, installing it in its original place to replace the failed one. The price of a new part is only 118 rubles for AvtoVAZ production, and even cheaper, about 100 rubles for the Pekar brand.
The light in the interior of the VAZ 2109 does not work
The sensor must be tightened with a certain torque, which ranges from 24 to 27 Nm.
Most often, owners of a Lada Kalina with an 8-valve engine have to get acquainted with the DDM after the pressure indicator on the panel lights up and does not go out for a long time. This, of course, should alert any driver.
However, before we begin to consider the main issue, we should understand what exactly caused the indicator to light up. After all, experts say that the light actually indicates a critical oil level in the system.
But, on top of everything else, the indicator may not go out for a long time even if the sensor itself has failed.
Do not start work without finding out the reason for the indicator light. This can greatly worsen the technical condition of the car and lead to more serious problems during operation.
What elements does DDM consist of?
First of all, you need to figure out what components the sensor consists of.
So, the device in question includes the following elements:
- protective housing;
- measuring membrane;
- transmission mechanism.
Having understood the components of the device, it will be much easier to understand the principle of its operation.
What is the work of DDM based on?
After turning on the ignition, the membrane will begin to bend, occupying a certain position. Exactly what position the membrane will take depends on the pressure currently available inside the oil system. Occupying the desired position, the membrane closes the electronic contact or, on the contrary, opens it.
How to check the density of a car battery
Before you start checking the operation of the sensor, you must make sure that the oil filter and oil level are normal. It is equally important to analyze whether there are any streaks on the surface of the engine. If the above symptoms are not detected, you can begin to check the serviceability of the pressure sensor.
Step-by-step verification
Pressure-related devices are checked using a special pressure gauge. The components must be installed in place of the DDM and the car engine must be started.
If the pressure gauge displays 0.65 kgf/cm 2 at idle, we can safely say that the sensor is working normally and the pressure is within normal limits.
If the device displays a reduced reading, you will have to replace the oil pressure sensor.
You can check the serviceability of the DDM in another way, that is, without the help of a pressure gauge. After all, it may happen that the indicator lights up while driving. In such circumstances, car owners need to do the following:
- Initially, the sensor is unscrewed from the “socket”;
- next you need to start spinning the starter without starting the engine;
- if oil begins to appear from the “socket” when the starter rotates, this factor will indicate a sensor malfunction.
Under no circumstances should you operate a car without replacing a faulty DDM. After all, all components in the car must work properly; this is important from a safety point of view.
Self-replacement
- To work, you need to prepare a car key for 21.
- First of all, carefully remove the protective cover from the engine.
- Next, you should pay attention to the reverse side of the engine, since the sensor is screwed into the cylinder head “socket” located on the right.
- By pressing the latches, the holding pads must be disconnected from the pad.
- Unscrew the sensor from the “socket” using a key.
- A new sensor is installed in place of the old, failed one. Before installation, carefully wipe the surface of the “nest” with a clean cloth.
- At the last stage, check the reliability of all installed components, fix the protective cover and check whether the problem has been corrected.
DIY radio repair
If after starting the engine the indicator goes out after a few seconds, this fact will confirm that the light came on precisely because of a malfunction of the oil pressure sensor.
As you can understand, the process of replacing the DDM is quite simple and understandable, so any Lada Kalina car owner can handle such work. If difficulties arise during the replacement process, you should watch the video instructions prepared by professionals at any time.
The low oil pressure indicator sensor on a Lada Granta is removed to replace it in case of failure. The sensor is screwed into the cylinder head. To remove it you will need a twenty-one key. De-energize the car by disconnecting the minus terminal from the battery and perform the following sequence of actions:
- We disconnect the connector with the power wires from the sensor output by squeezing the plastic clamp retainer.
- We unscrew it with a key and replace it. Pay attention to the markings on the sensor so that when purchasing a new one, purchase the appropriate brand.
- Carry out installation in reverse order.
Oil pressure sensor Lada Granta location and replacement
An oil pressure sensor, or simply DDM, is a signaling device for the driver that displays the level of oil pressure in the engine. It usually turns on when the level drops noticeably. However, this element may also fail.
Replacing the Grant oil pressure sensor is a process that does not require phenomenal knowledge. You need to have a few tools and instructions on hand.
The DDM consists of three elements:
- Protective housing;
- Measuring membrane;
- Transmitting element.
Operating principle of DDM
The operating system is simple - under oil pressure, the measuring membrane changes position and, as a result, the contacts open or close. When the liquid level drops, the membrane falls, thereby disconnecting the contacts.
After which a signal is triggered and displayed on the dashboard. If the oil pressure sensor on a Lada Granta fails, but the oil level is normal and the entire system, after testing, turns out to be operational, then it is recommended to check the meter itself.
Purpose of the sensor
The oil pressure sensor is designed to promptly and accurately inform the driver about low lubricant pressure inside the internal combustion engine. So, as soon as the rapid detection of such a malfunction will allow you to avoid unnecessary problems and even greater engine breakdowns in the shortest possible time. It's no secret that dry engine operation can cause very serious damage to the engine. But on the other hand, you shouldn’t immediately panic and draw conclusions; it’s enough to first check the sensor itself.
Mistakes in hasty conclusions
When the oil pressure light comes on, many car owners sound the alarm and begin to fix this problem in all but not the most important ways, and these include:
- Oil change and fuel filter replacement.
- It is washed.
- The pressure is measured.
But after this, the result does not happen! Therefore, always check the oil pressure sensor first, as this is the most common and common cause.
Sensor check
It is necessary to check the functionality of the sensor in the following order:
- We remove the wire from the sensor and lean it against ground, possibly on the motor housing.
- Check to see if the light on the instrument panel lights up again.
- If the lamp stops burning, then the wiring is working properly and you can move on to the next stage of dismantling the faulty sensor.
- And if it continues to burn, then it is necessary to “ring” the wires at the entire stage from the sensor to the instrument panel to detect a breakdown or short circuit in the circuit.
Oil pressure sensor for Lada Granta
The oil pressure sensor is an indicating element necessary for analyzing the oil level in a vehicle engine. With a faulty PDM, the car can continue to be used, but it is important to remember that oil leakage from the crankcase shortens the service life of the power unit several times.
Timely replacement of a failed DDM with a Lada Granta will simplify car maintenance and prevent oil starvation.
Operating principle of DDM
The design part of the DDM is very simple: depending on the force of movement of the technical fluid, the indicating membrane inside the device bends and connects or breaks the contacts. When the technical fluid level decreases to a critical level, the contacts on the device open, which is indicated by a warning lamp on the car’s dashboard.
However, it happens that the control check on the device lights up, but a sufficient amount of technical fluid is indicated on the dipstick. In this case, you need to check the functionality of the oil pressure sensor - most likely the part has failed.
The part number in the manufacturer's catalog is 11180-3829010-00. The average cost of a part on the Russian market is 130-160 rubles. Remember, timely replacement of the oil pressure sensor will allow the engine to serve its entire service life without problems - do not skimp on this problem.
Checking the oil pressure sensor
Before disassembling the engine compartment to diagnose any malfunctions, it is necessary to check the oil level in the engine compartment, as well as the condition of the oil filter.
Remember, a clogged filter or insufficient volume of technical fluids are the most common causes of the check light on the vehicle’s dashboard.
You can check the oil pressure sensor on the Lada Granta yourself. The equipment check algorithm follows the following scenario:
- First you need to check the condition of the electrical circuit of the sensor and the warning lamp on the car’s dashboard. To do this, you need to disconnect the negative terminal from the sensor and apply it to the ground of the battery. If there is a break in the circuit, nothing will happen, if everything is in order, then the check mark on the device will go out;
- Next, you need to visually inspect the condition of the sensor. The presence of oil smudges or a technical film on the device body indicates its failure, however, if the sensor is dry and does not work, then the cause of the failure must be sought in the oil filter or oil pump;
- The oil pressure, and therefore the functionality of the sensor, can be checked with a pressure gauge. To do this, you need to dismantle the sensor and attach a pressure gauge to its seat. With the engine running at idle speed, the pressure on the pressure gauge should be at least 0.65 kgf/cm2 - if less, then there is a problem with the oil pump.
It is important to know! If the Grant has an on-board computer, then the serviceability of the system can be checked by checking electronic errors in the ECU unit.
How to replace DDM with your own hands
The DDM is located in the engine cylinder head on the right side of the crankcase. The procedure for removing the sensor will not present any difficulties even for inexperienced mechanics - the replacement instructions are as follows:
- First of all, it is necessary to dismantle the decorative engine cover and also remove the battery. Dismantling the battery is necessary to prevent short circuits, as well as to remove memory dumps from the electronic engine control unit;
- Then, using a Phillips screwdriver or pliers, you need to remove the fixing clamps that secure the sensor to the engine. We compress the clamps, and then remove the sensor block;
- Now we take the spanner wrench “21” and dismantle the sensor itself, having previously disconnected the main wires from it;
- To complete the part, we install a new oil pressure sensor, connect all the wiring and install the clamps back.
If the replacement is successful, after the engine is ignited, the check mark on the instrument panel should go out.
If the instrument displays insufficient oil pressure, then the cause of the malfunction must be looked for further in the system - in the oil filter or oil pump. Important to remember! Insufficient pressure or volume of technical fluid in the vehicle’s power unit leads to unstable lubrication of parts, which in turn leads to their abrasion and premature reduction of service life.
Regularly monitor the oil volume and the condition of the oil filter - this will allow the car engine to properly serve the service life declared by the manufacturers.
where is the DDM light located and why is it on?
Checking the Priora oxygen sensor The Kalina oil pressure sensor is a fairly reliable device and rarely breaks down, but sometimes it fails. The article is dedicated to this device: what it is, where it is located, how to check its serviceability. Instructions for replacement are provided.
What you need to know about DDM?
A modern car has a large amount of electronics installed, based on the readings of which the electronic control unit issues the appropriate commands. One such device is the oil pressure sensor (OPS).
Purpose and location
The purpose of the DDM is to monitor the oil level in the power unit; as soon as the amount of lubricant drops below the permissible level, the corresponding indicator light lights up on the instrument panel.
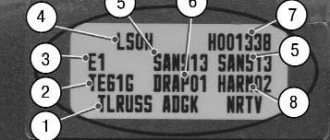
The operating principle can be described as follows. Lubricant is supplied to all components of the system under pressure. The system includes a DDM, inside of which there is a membrane indicated by arrow 4. If the pressure is low, then the membrane is not deformed, the contacts numbered 3 are closed and the lamp indicated by arrow 2 is on.
When the engine starts, the pressure increases, the membrane is deformed and acts on the pusher that is installed on it. In this case, the contacts open and the light goes out.
The DDM is located on the cylinder head on the right, when viewed in the direction of travel, on the back side of the engine. It receives power through a wire with a plastic terminal, which makes it easy to detect.
Diagnostic features
If the indicator on the dashboard is constantly on, you should first check the oil level using a dipstick and the condition of the oil filter. It is also necessary to check for oil stains on the power unit housing. If the level is normal, you should check the device itself. The simplest test option is to install a known-good device instead of the device being tested.
You don’t have to buy a new one, you can ask your neighbor in the garage. True, the sensor should be exactly the same. If, after installing a working device, the indicator stops lighting, then the removed one is faulty.
In addition, using a multimeter, the power supply to the device is checked to see if there is an open circuit. If you have a pressure gauge, you can check the oil pressure. To check, you need to screw the pressure gauge into the DDM seat and start the engine. At idle, the pressure value should be above 0.65 kgf/cm2.
If you don't have a pressure gauge, there is another way to check. To do this, the sensor is unscrewed, and then the starter is cranked without starting the engine. If, when the starter rotates, oil splashes from the seat of the removed device, we can conclude that the device is faulty.
What does a burning oil pressure light indicate?
If the DDM indicator light on the instrument panel is constantly on, this indicates that the Lada Kalina oil pressure sensor is broken or the circuit is broken.
If after diagnostics it turns out that the device is faulty, it must be replaced (the author of the video is Alexander Skripchenko).
It is recommended to unscrew the old device before purchasing and take it with you so as not to make a mistake when choosing a new one. To replace it, it is better to purchase an original or a high-quality analogue. You should not buy a cheap product trying to save money on it, since a low-quality product will quickly become unusable and will have to be replaced again. If the DDM pad is in poor condition, it is worth replacing it too.
Replacement instructions
To carry out the work, you need to prepare a key for “21”.
The replacement procedure consists of the following steps:
- First you need to open the hood and remove the protective plastic cover from the power unit.
- Having found the sensor on the cylinder head, you need to disconnect the power terminal from it by pressing the latches.
- If necessary, check the power supply.
- Next, using the key set to “21”, unscrew the old device. We check it for serviceability.
- If the old device is faulty, screw a new sensor in its place.
- We connect the terminal with the power wire to the device, and return the decorative motor cover to its place.
- Let's start the engine. The light on the instrument panel should go out.
If everything works, the DDM replacement ends here.