Repairing the rear beam of a VAZ 2109
The rear beam of the VAZ 2109 is an unreliable thing, and the owners of this car may have a large number of reasons to remove it. For example, the owner of a vehicle may hear unusual noises: grinding metal, quiet impacts, etc. These “special effects” will be heard in the rear of the VAZ 2109. The sound can be either constant or occur occasionally, for example, when there are bumps on the road.
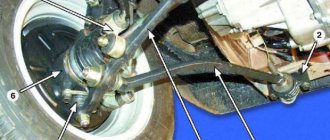
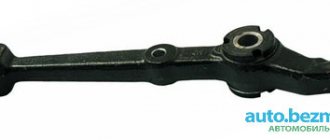
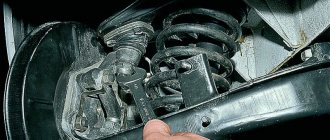
1 — rubber-metal hinge; 2 — rear suspension arm mounting bracket; 3 — shock absorber casing; 4 — compression stroke buffer; 5 — casing cover; 6 — support washer; 7 — shock absorber cushions; 8 — spacer sleeve; 9 — shock absorber; 10 - insulating gasket; 11 — rear suspension spring; 12 — lever connector; 13 — rear suspension beam arm; 14 — shock absorber mounting bracket; 15 - flange; 16 — lever bushing
It is very difficult for a person who does not have the necessary experience to determine on their own what caused new noises in a car. This is due not only to a lack of practice, but also to the large number of variants of the problem. So, for example, a knocking stabilizer can “move” the silent block to the side, the noise can often be caused by bearings on the axle shafts - in general, there are many options. Therefore, to find out the exact problem, it is recommended to go to a service center and carry out the repair yourself.
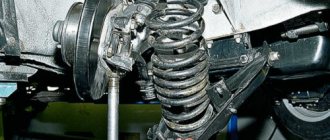
Rear suspension of VAZ 2109
The rear suspension of the VAZ 2109 and its modifications is quite simple. Its design is torsion-lever dependent, that is, the rear wheels are rigidly connected by a beam, which is the main part of the rear suspension. It is on it that all other structural elements are installed. The beam is attached to the car body using rubber-metal hinges, which ensure the movement of the suspension in the vertical plane. This is the oldest type of pendant.
The main design elements of the rear suspension of the VAZ 2109
| No. in the picture | Item name |
| 1 | Rear wheel hub |
| 2 | Rear suspension arm |
| 3 | Suspension arm mounting bracket |
| 4 | Rubber bushing for lever joint |
| 5 | Arm joint spacer |
| 6 | Rear suspension arm mounting bolt |
| 7 | Body bracket |
| 8 | Support washer for fastening the shock absorber rod |
| 9 | Upper suspension spring support |
| 10 | Spacer |
| 11 | Suspension spring insulating gasket |
| 12 | Rear suspension spring |
| 13 | Shock absorber rod mounting pads |
| 14 | Compression Progress Buffer |
| 15 | Shock absorber rod |
| 16 | Shock Absorber Protective Cover |
| 17 | Lower suspension spring support cup |
| 18 | Shock absorber |
| 19 | Lever connector |
| 20 | Hub axle |
| 21 | Cap |
| 22 | Wheel hub nut |
| 23 | Sealing ring |
| 24 | Bearing washer |
| 25 | Wheel bearing |
| 26 | Brake shield |
| 27 | Retaining ring |
| 28 | Mud deflector |
| 29 | Control arm flange |
| 30 | Shock absorber bushing |
| 31 | Lever bracket with shock absorber mounting eye |
| 32 | Rubber-metal suspension arm joint |
Looking at the figure, we can distinguish three main components of the rear suspension:
- beam with levers and fastenings
- hydraulic shock absorbers with springs
- hubs
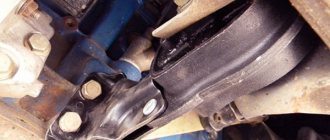
As you can see, the main element is the beam. Levers are welded to it, and brackets with eyes for attaching hydraulic shock absorbers are welded to them. The shock absorbers are fastened with one bolt in the eye of the beam bracket, and are connected to the body by fixing a nut on the shock absorber rod through bushings.
Springs are installed on shock absorbers. For the VAZ 2109 there are two types of springs: class A (hard and high) and class B (less stiff and lower). It is advisable that the car has springs of the same class installed. However, it is allowed to install class A springs on the front suspension, and class B springs on the rear suspension. If you often transport heavy loads in the trunk or in the back seat, then it is better to install class A springs on the rear suspension shock absorbers. This will allow the car to “squat” less when well loaded. It is worth noting that it is prohibited to use class A springs at the front and class B at the rear.
Hubs are attached to the flanges of the beam using four bolts, to which the rear wheels of the car are subsequently attached. The rear suspension hub of the VAZ 2109 has a double-row angular contact sliding bearing, which allows the rear wheels to rotate on their axis.
Installation and dismantling of beams
The VAZ 2109 beam is very convenient to install and dismantle when using a lift. But if your garage is not equipped with such an addition, then carefully lift the “back” of your swallow with a jack. For greater reliability, place special shoes or at least bricks under the wheels and engage the gear.
Once the vehicle is raised, the wheels can be unscrewed. Then remove the shock absorbers from the rear suspension. The parking brake cables are disconnected and the “shirts” are removed. The brackets securing the cables to the vehicle body are bent, and the cables themselves are removed from the brackets.
When dismantling the brake hoses located on both sides of the beam, be sure to plug the resulting holes with something. Otherwise, brake fluid will leak.
Unscrew the nut on both sides that serves to secure the beam to the brackets. Carefully knock out the bolts. Now you can pull out the beam. Some useful tips:
- Before you begin work on removing the beam, loosen the tension on the nuts on the hub in advance.
- If you need to replace a rubber-metal hinge, it is better to contact a specialist for this. Without a special tool and skills for such work, something good is unlikely to come of it.
- If you look at the documentation of the VAZ2109, which is given by the manufacturer, then you need to remove the rear beam from the car along with the brackets. For this manipulation you need to unscrew the 3 nuts holding the structure. But the operating time of the vehicle makes its own adjustments. After a certain period of time, the studs begin to become corroded, and in some cases they may crack. It is because of this that it is more expedient to dismantle the beam by simply disconnecting it from the bracket and leaving it suspended.
- The rear beam of the VAZ 2109 is fastened in the reverse order of removal.
- After returning the vehicle to a solid surface, all nuts must be tightened. The tightening procedure should be repeated after 80 km.
- After installing the beam, it is important to bleed the brake system, adjust the parking brake, and check the wheel alignment.
As you can see, removing and installing the rear beam of a VAZ 2109 is not at all difficult; all car owners can do this work. The main thing is time and desire.
Replacing rear beam silent blocks on a VAZ 2109
Silent blocks produced by AvtoVAZ can safely be called one of the highest quality parts. It is not surprising that other foreign manufacturers also use them for their cars.
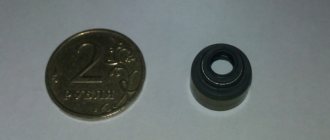
Element appearance
The durability of almost any part, including the silent block, directly depends on the driving style of the motorist. The service life of the element is more than 30 thousand kilometers.
Symptoms of a problem
There are several main signs of failure of the rear beam silent blocks, including:
- Unstable behavior of the car on the roads;
- Tires wear unevenly, which is not difficult to notice from the tread pattern;
- When driving on a bad road (that is, 95% of all our roads), unpleasant squeaks and impacts on the car body are observed.
These signs are indirect, since they may be associated with other failures of the vehicle’s chassis. For example, dull knocks are also a sign of a faulty rear pillar. Therefore, in order to make sure that there is a particular problem, you will need to fully diagnose the chassis.
Malfunctions
Often, replacing the rear beam bushings is due to the fact that defects arise in the design of the element. They are like this:
- The elasticity of the rubber element deteriorates;
- The rubber breaks;
- The central bushing is displaced;
- Rotations occur in the seat.
If problems are detected with the silent block of the rear beam, you will need to drive the car into the garage in the near future and replace the damaged components. Unlike foreign cars, changing the silent seal on a VAZ 2109 is quite simple and without outside help. Plus it costs almost pennies.
Choice
Before you start replacing the silent blocks of the rear beam, you need to decide what exactly you will replace the old, worn bushings with.
We figured out the markings and realized that for the VAZ 2109 you need to take only those that are suitable in size and diameter for the rear beam of the nine.
Today, for the VAZ 2109 they offer two types of silents, differing in the material of manufacture.
Silent block type
Peculiarities
They are not as durable, but provide greater softness when operating the car's suspension.
A more rigid modification, in which the increased rigidity is the main disadvantage. At the same time, these products are more resistant to temperature changes, do not deform so quickly, and remain operational longer.
Size difference
Replacement
To replace you will need:
- New rear silent blocks;
- A small wooden beam;
- A device for pressing in a silent block (you can do the job without it);
- Open-end wrenches;
- Socket wrenches;
- Spanners;
- Hammer.
Dismantling work
When everything is ready, you can start working.
- Place the car on a level surface in the garage above a pit or overpass. Be sure to place wheel chocks and shoes under the wheels. All for your safety.
- It is better to remove the rear wheel to make it easier to work.
- But it is not at all necessary to remove the rear beam. Just complicate your work with unnecessary dismantling processes.
- On the left side of the driver is the pressure regulator rod for the rear brakes. It will disturb you while you work, so we advise you to remove it. This is done by removing the locking bracket of the rod and the handbrake cable. You will remove the latter from the right side from the mount.
- Unscrew the nut from the bolt with a 12mm wrench that holds the rear beam to the bracket. This may cause problems. Place a socket wrench on the driver to increase leverage on the fastener. Remove the bolt, lift the car with a jack and move the beam down. It will come out of the eyelet this way. Do not overdo it to avoid damaging the nearby brake hose. If you press too hard on the pry bar while moving the eye, you risk breaking the hose.
- Take a pre-prepared wooden block and insert it between the body and the beam. This must be done so that the beam is below the eye.
- Using a hammer and a drift (regular metal tubing will do), knock out the old worn bushings. By the way, if you come across such a concept as “fungi”, don’t worry. This is what car enthusiasts often call these bushings because of their external similarity.
- Clean the seat from accumulated dirt and rust. Be sure to lubricate the areas with soapy water. Without it, it will be difficult to press in new silent blocks. Or use a simple dish detergent. Under no circumstances should you lubricate the seats with grease or oil, as these substances will soon begin to corrode the element.
- Now it presses in new elements. Ideally, you should have a special pressing tool. If you don't have one, use a regular hammer.
- Take out a wooden block.
- Armed with a second jack, lift the beam and insert the mounting bolt into place and tighten it with a nut.
- Reinstall the rear wheel and lower the car to the ground.
The main steps for replacing the silent blocks of the rear beam:
To start work, you need to drive the car into a pit or overpass and place wheel chocks under the front wheels, this is done for safety, you never know what happens. We remove the rear wheel for convenience. I would like to say right away that replacing the rear silent blocks is carried out without removing the beam.
Read:
On the driver's side, that is, on the left, there is a rod for the pressure regulator of the rear brakes, it will get in the way, so it will have to be dismantled, this can be done easily, you just need to pull out the bracket that secures it photo 1 (a), and on the right, pull out the handbrake cable from the mount photo 1 (b).
We unscrew the nineteen nut from the bolt that secures the rear beam to the bracket photo 1 (c). We remove this bolt. Next you need to lift the car with a jack and move the beam down so that it comes out of the eyelets.
Now we take a block (of course it must be made of wood) and insert it between the beam and the body so that the beam is lower than the eyelets (photo 2 (d).
Using a small sledgehammer or hammer using a drift (tube), we knock out the unusable rubber bushings; they are also popularly called fungi, photo 2 (e).
The seat must be cleaned of dirt and rust and lubricated with a solution made from water and soap. Otherwise, it will be difficult to press the bushings.
The next step will be pressing. For this you need a special device. If it is missing, press the bushing in with a hammer.
We remove the block. Using another jack, you need to lift the beam and insert the fastening bolt, tightening it with a nut. Put the rear wheel on and lower the car. Now you need to tighten all the silent block bolts until they stop.
Now the question will probably disappear and it will become clear how to replace the silent blocks of the rear beam with your own hands on a VAZ 2109 car.
Description of faults and basic information
During vehicle operation, vibrations inevitably appear, which are suppressed by silent blocks. They also prevent deformation. Failure of these parts is accompanied by:
- unstable behavior of the car on the road;
- uneven tire wear;
- squeaks in the rear beam area, impacts on the body (this is especially noticeable on bad roads).
It is worth noting that the described signs are indirect. Loud knocks occur when the rear strut is faulty. In order to accurately determine the cause of the appearance of the described symptoms, it is necessary to diagnose the chassis.
It is necessary to change silent blocks if their design has defects:
- decreased elasticity of the rubber part;
- breakage of the rubber part;
- turning the element in the seat;
- bushing displacement.
If you notice that there are problems with the chassis, you should immediately drive the car into the garage, carry out diagnostics, and then subsequently replace it.
It is worth going for repairs even after the silent blocks have exhausted their service life. It’s not difficult to do it yourself.
Purchasing a new item
So, you have found out that problems with the chassis are associated with the breakdown of silent blocks.
Before starting work, you must purchase a new spare part. First of all, look at the labeling. It is important to buy an option specifically for the VAZ-2109. If you make a mistake, it will be impossible to install the silent block. The spare part must be marked: 2109-2914054. Many auto parts sellers may recommend purchasing a spare part from the “ten”, but to install it you will have to work hard to press the rubber part. There are two types of silent blocks:
- With rubber bushings. Traditional spare part, provides softness during suspension operation. The main disadvantage is the fragility of such a spare part, especially if you often travel along sections of the road with poor asphalt surface.
- With polyurethane inserts. More rigid, which is its main drawback. Moreover, such a spare part lasts much longer, since it is resistant to temperature changes and deformations.
Choose a silent block based on material based on your budget and preferences. Manufacturers BelMag, SEVI, SS20 and Boge have earned good reviews from experts and car enthusiasts.
Features of elements
The main function of silents is to eliminate vibrations and deformations that occur during vehicle operation.
When choosing new silent blocks for the rear beam of a VAZ 2109, pay attention to the markings. It should be 2109-2914054. For VAZ 2114-15 models, the markings are different, but the elements themselves are very similar.
In principle, it is possible to install a silent block from a dozen on a VAZ 2109, but you will have to work hard with pressing in the rubber bushing due to the difference in size. The reverse procedure is not possible.
Rear beam
How is the replacement carried out?
Before starting work, place the car over a hole or drive it onto an overpass. Be sure to secure the wheels with chocks. Next, follow the instructions:
- Remove the rear wheel. It will be much easier to work without it.
- To replace the silent block you will not need to remove the rear beam, so do not rush to dismantle it.
- When working on the left side, you will need to remove the linkage associated with the pressure regulator at the rear of the brake system. To do this, you will need to remove the handbrake cable from the mount located on the right side and the rod fixing bracket.
- Using a 12mm wrench, unscrew the nut located on the rear beam mount. Here you may need to create additional leverage using a socket wrench that fits over the knob. After you remove this bolt, jack up the side of the car you are working on.
- Carefully push the beam down until it comes out of the eyelet. Watch your actions, as you risk breaking the brake hose.
- Prepare a wooden block in advance, which at this stage will need to be placed between the body and the eye. In this case, the beam should be below the eye.
- Further work can be done with a special tool, but we will tell you how to dismantle the silent block without a puller. Take a metal tube and a hammer and use them to knock out the old bushings.
- Clean the seat.
- To make crimping easier, lubricate the seats with soapy water or dishwashing liquid. In this case, it is forbidden to lubricate the seats with oil or grease, since these chemical compounds will corrode the rubber part of the part over time.
- Using a hammer or special tool, press the silent blocks into place. Reassemble the vehicle.
How to pull out body parts of a “nine” with your own hands
In conclusion of the article I would like to dwell on such a point as body deformation. If the “nine” has any deformed part of the body, then there can be no talk of any tuning until restoration is carried out.
As a rule, complete restoration of the body and elimination of deformations is carried out on a special machine. It's called a slipway. This is professional equipment on which only an experienced and knowledgeable specialist can carry out procedures.
As for restoring the body at home, it must be borne in mind that such an operation is possible only for minor components. Thus, massive body elements, such as a spar or a beam, cannot be pulled out without a slipway. But you can successfully deal with a dented threshold or fender on your own in your garage.
The algorithm for carrying out the work is not very complicated:
- The car is placed on the handbrake, stops are placed under the wheels;
- One of the ends of the cable is tied to a monolithic support, for example, to a large and strong tree;
- The other end is tied to the body part;
- By winding a metal rod around the cable, it becomes possible to gradually tighten the cable.
When carrying out this work, we must remember that accuracy is extremely important here. So, with strong dents, it is better not to rush, but to tighten the cable little by little, leaving the metal under tension for some time. Thus, the metal is given a kind of “breathing space” necessary to withstand further stretching.
Simultaneously with stretching on the cable, it is recommended to treat the surface with straightening hammers on the back side of the part where the dent is. You need to hit not the metal, but the plank carefully placed in this place.
Advice. Instead of a cable, it is better to use a strong chain, since often the cable does not hold up and breaks, which can be dangerous to life.
What did we learn from the article? The body of the “nine”, in principle, has good design features, but for its further trouble-free operation it is recommended to strengthen it. The photo materials and video review presented above will help consolidate the material presented in the article.
Forget about fines from cameras! An absolutely legal new product - Traffic Police Camera Jammer, hides your license plates from the cameras that are installed in all cities. More details at the link.
- Absolutely legal (Article 12.2);
- Hides from photo and video recording;
- Suitable for all cars;
- Works through the cigarette lighter connector;
- Does not cause interference to radios and cell phones.
The rear beam of the VAZ 2109 is an unreliable thing, and the owners of this car may have a large number of reasons to remove it. For example, the owner of a vehicle may hear unusual noises: grinding metal, quiet impacts, etc. These “special effects” will be heard in the rear of the VAZ 2109. The sound can be either constant or occur occasionally, for example, when there are bumps on the road.
1 — rubber-metal hinge; 2 — rear suspension arm mounting bracket; 3 — shock absorber casing; 4 — compression stroke buffer; 5 — casing cover; 6 — support washer; 7 — shock absorber cushions; 8 — spacer sleeve; 9 — shock absorber; 10 - insulating gasket; 11 — rear suspension spring; 12 — lever connector; 13 — rear suspension beam arm; 14 — shock absorber mounting bracket; 15 - flange; 16 — lever bushing
It is very difficult for a person who does not have the necessary experience to determine on their own what caused new noises in a car. This is due not only to a lack of practice, but also to the large number of variants of the problem. So, for example, a knocking stabilizer can “move” the silent block to the side, the noise can often be caused by bearings on the axle shafts - in general, there are many options. Therefore, to find out the exact problem, it is recommended to go to a service center and carry out the repair yourself.
replacing the rear suspension beam on a VAZ 2108, VAZ 2109, VAZ 21099
It is more convenient to remove the rear axle from a VAZ 2108, VAZ 2109, VAZ 21099 on a lift. If it is not possible to place the car on a lift, carefully raise the rear of the car by placing a jack under the beam. Then install supports under the jack sockets on the car body.
USEFUL ADVICE When removing the rear axle, it is necessary to have assistants who will hold and lower the rear suspension beam. If, after removing the rear suspension beam, you intend to disassemble the rear beam, first loosen the wheel bolts and hub nuts.
WARNING Loosen and tighten wheel bolts only with the vehicle on the ground. The tightening torque of the bolts is 65-95 Nm (6.5-9.5 kgf-m).
1. Remove the tips of both parking brake cables from the equalizer and remove the cables from the holders on the bottom of the car (see “Parking brake” in section 8 “Brake system”).
2. Disconnect the brake hoses of the rear wheels from the pipelines on both sides of the car and the elastic arm of the pressure regulator from the bracket on the rear axle beam (see “Replacing the pressure regulator” in section 8 “Brake system”)...
3. Unscrew the nuts of the lower fastening of the rear struts, remove the bolts and disconnect the rear struts from the rear axle beam brackets on both sides of the VAZ 2108, VAZ 2109, VAZ 21099. Helpers should hold the rear beam.
4. Unscrew one nut on both sides of the bolts securing the rear beam to the brackets, knock out the bolts and remove the rear axle beam from the car by rolling the beam out from under the car on wheels.
USEFUL ADVICE The manufacturer recommends removing the rear axle beam along with the brackets from the VAZ 2108, VAZ 2109, VAZ 21099 vehicle by unscrewing three nuts securing them. However, after prolonged use, rusted studs may break. Therefore, it is better to remove the rear axle beam by disconnecting the beam from the brackets that remain on the body.
5. Install the rear suspension beam on a VAZ 2108, VAZ 2109, VAZ 21099 car in the reverse order of removal. Finally tighten the nuts of the rear beam mounting bolts with the vehicle standing on the ground. After installing the rear axle beam, bleed the brake system on a VAZ 2108, VAZ 2109, VAZ 21099 and adjust the parking brake.
Rear beam on a VAZ 2109 - installation and repair of the rear beam
It is more convenient to remove the rear axle from a VAZ 2108, VAZ 2109, VAZ 21099 on a lift. If it is not possible to place the car on a lift, carefully raise the rear of the car by placing a jack under the beam. Then install supports under the jack sockets on the car body.
USEFUL ADVICE When removing the rear axle, it is necessary to have assistants who will hold and lower the rear suspension beam. If, after removing the rear suspension beam, you intend to disassemble the rear beam, first loosen the wheel bolts and hub nuts.
WARNING Loosen and tighten wheel bolts only with the vehicle on the ground. The tightening torque of the bolts is 65-95 Nm (6.5-9.5 kgf-m).
1. Remove the tips of both parking brake cables from the equalizer and remove the cables from the holders on the bottom of the car (see “Parking brake” in section 8 “Brake system”).
2. Disconnect the brake hoses of the rear wheels from the pipelines on both sides of the car and the elastic arm of the pressure regulator from the bracket on the rear axle beam (see “Replacing the pressure regulator” in section 8 “Brake system”)...
3. Unscrew the nuts of the lower fastening of the rear struts, remove the bolts and disconnect the rear struts from the rear axle beam brackets on both sides of the VAZ 2108, VAZ 2109, VAZ 21099. Helpers should hold the rear beam.
4. Unscrew one nut on both sides of the bolts securing the rear beam to the brackets, knock out the bolts and remove the rear axle beam from the car by rolling the beam out from under the car on wheels.
USEFUL ADVICE The manufacturer recommends removing the rear axle beam along with the brackets from the VAZ 2108, VAZ 2109, VAZ 21099 vehicle by unscrewing three nuts securing them. However, after prolonged use, rusted studs may break. Therefore, it is better to remove the rear axle beam by disconnecting the beam from the brackets that remain on the body.
5. Install the rear suspension beam on a VAZ 2108, VAZ 2109, VAZ 21099 car in the reverse order of removal. Finally tighten the nuts of the rear beam mounting bolts with the vehicle standing on the ground. After installing the rear axle beam, bleed the brake system on a VAZ 2108, VAZ 2109, VAZ 21099 and adjust the parking brake.
Sources
- tuningtaza.ru/replacement-beam-rear-suspension-on-car-VAZ-2108-VAZ-2109-VAZ-21099.html
- expertvaz.ru/2109/zadnyaya-balka-remont.html
- drive2.ru/l/535603451044823455/
Replacing the silent blocks of the rear beam of a VAZ 2109, VAZ 21099 with your own hands
We will show you visual photo and video instructions on how you can replace the silent blocks of the rear beam on VAZ 2109, VAZ 21099, VAZ 2108 cars with your own hands
We tear off the bolts on the rear wheels. During work, the handbrake cable will interfere with us, so we remove it from the cordon in advance. Remove the pressure regulator rod:
We have the fastening bolts installed incorrectly in this place, it should be installed with the head facing outward, unscrew it:
It is worth noting that all this work on unscrewing the bolts is carried out on a standing machine; if it is raised, the bolts will be under load and will not be easy to unscrew.
All these actions are performed on both sides. We jack up the car a little and remove the loosened bolts. Using both hands, we lower the beam on each side:
Let's try to replace the silent blocks on site without removing the wheels (although be sure to tear off the bolts on them every time, as problems can arise with stuck bushings). We press the beam on top with a board, knock out the old silent block:
If a hammer doesn’t work, you can use a clamp-puller, but as a rule, a hammer helps. There is another method with a mount, when we squeeze out the old silent block onto a fracture:
We clean the seats a little from rust with a coarse file:
We lubricate the eyelet and the silent block itself with soap so that it fits better. We bait it first with our hands, and then using a special device:
On the second side we will show it for those who do not have such a device. We also lubricate it, then bait it with our hands, and then simply hammer it in with a mallet or a large hammer from the side:
As a rule, 3 medium hits are enough. We lower the car from the jacks and tighten the silent blocks under load:
Next, we reassemble in the reverse order.
Repair of the Rear Suspension of VAZ 2109
Design, purpose and procedure for replacing the rear beam
in a VAZ 2110 car
Rear beam installed
VAZ 2110 as a
suspension is used to ensure the lateral stability of the vehicle and is a device on which all other suspension
.
back beam device
metal rear beam , a photo of which is presented on our resource, is structurally represented by two longitudinal-type levers and connection elements, which are connected by welding through reinforcing elements. At the rear of the product there are special holders with holes for attaching shock-absorbing elements. Rear suspension diagram for VAZ 2109. LuxVAZ. There are also structurally designed flanges with holes for fastening the axles to the rear wheels with rigid casings of the brake system.
In the front part of the rear axle beam of the VAZ 2110 there are levers with welded bushings, in which rubber-metal hinges are installed by pressing. rear beam mounts pass through them , which connect the suspension to the die holders. They, in turn, are fastened with bolts attached to the hull side members.
The spring elements of the suspension, one plane rests on the base of the shock absorber strut, and the other on the rubber insulator in the welded support of the secret tail arch. absorber rear suspension
VAZ 2110 is a hydraulic telescopic system with a double-sided operating principle.
Video replacement of silent blocks of the rear beam of VAZ 2109, VAZ 21099
Backup video how to replace
Sources:
https://expertvaz.ru/2109/zadnyaya-balka-remont.html https://luxvaz.ru/vaz-2109/362-zamena-saylentblokov-zadney-balki.html https://ladaautos.ru/vaz- 2109/kak-delaetsya-zamena-sajlentblokov-zadnej-balki-vaz-2109.html https://tuningtaza.ru/%D0%B7%D0%B0%D0%BC%D0%B5%D0%BD%D0% B0-%D0%B1%D0%B0%D0%BB%D0%BA%D0%B8-%D0%B7%D0%B0%D0%B4%D0%BD%D0%B5%D0%B9-%D0 %BF%D0%BE%D0%B4%D0%B2%D0%B5%D1%81%D0%BA%D0%B8-%D0%BD%D0%B0-%D0%B0%D0%B2%D1 %82%D0%BE%D0%BC%D0%BE%D0%B1%D0%B8%D0%BB%D0%B5-%D0%B2%D0%B0%D0%B7-2108-%D0%B2 %D0%B0%D0%B7-2109-%D0%B2%D0%B0%D0%B7-21099.html https://remontautohelp.ru/zamena-sajjlentblokov-zadnejj-balki-vaz-2109-vaz-21099 -svoimi-rukami/