To ensure the flawless and safe operation of any vehicle, it is necessary to maintain the ideal technical condition of all parts. Including the smallest ones, which at first glance do not seem too important.
An example of the latter is the valve stem seals, which are used in the design of VAZ engines and ensure its tightness in the contact areas of the guide bushings and valves.
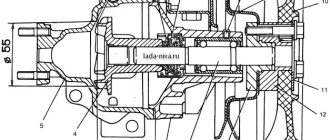
These parts consist of several elements - a powerful bushing, which is made of high-strength steel, a rubber shell that acts as a seal, and expander springs that fix the valve stem and the edge of the cap itself. The weak link of the design is the rubber body, which cannot withstand exposure to aggressive environments for a long time, gradually hardens and is subject to wear. This is what causes engine oil to leak into the combustion chamber.
The main and only symptom that indicates a malfunction of the valve stem seals is the appearance of blue smoke from the exhaust pipe. At the same time, there may be a strong increase in lubricant consumption, so it is better to immediately install new parts so as not to aggravate the problem.
How much does such a procedure cost in a car service? Its price is low, but if you frequently replace caps, your costs can increase significantly. Therefore, it is better to use the instructions below and carry out the replacement yourself. Moreover, it is not at all as difficult as it may seem to an inexperienced car enthusiast.
Device
Oil seals are a modern version of valve seals, which are equipped with a powerful steel sleeve inside and an expander spring. Springs are used to secure the edges of the caps and valve stems.
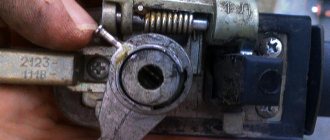
Actual size of the caps
Gaskets are made primarily of rubber, which becomes harder over time and wear occurs, so the element ceases to properly perform its functions. As a result, oil ends up inside the combustion chamber.
There is only one sign of wear on the valve stem seals - thick blue smoke begins to actively pour out of the exhaust pipe, plus oil consumption increases.
There is only one solution to this situation - replacement.
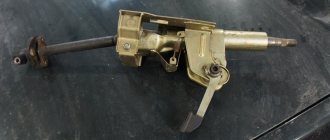
Oil seal replacement tool
So, before approaching the car, prepare everything you need:
- cap remover - if you don’t have one, you can do without it;
- valve desiccant;
- long-nose pliers or tweezers;
- new valve stem seals in the required quantity (equal to the number of valves in the engine), possibly with a small margin;
- magnetic pointer;
- valve cover gasket;
- tin rod;
- flat screwdriver.
When you have all this in your hands, you can proceed directly to the repair work.
Recommendations for troubleshooting
If, when starting the engine, the indicator of too low engine oil level in the crankcase comes on in your car (it is only present in cars with a high front panel; in cars with a low one, the indicator only has an emergency oil pressure sensor), you must first turn off the engine immediately. Then you need to inspect the power unit for leaks. If they are not there, then after 20 minutes you need to check the lubricant level in the crankcase using a dipstick. If the level is normal (between the min and max marks), you should check the oil level sensor. It is located next to the oil filter. It is always much easier and cheaper to replace a faulty sensor than to disassemble the power unit due to an imaginary breakdown.
To replace the caps you will need the following tools:
- a device used to press the caps (mandrel);
- device for compressing valve springs;
- pliers;
- tweezers;
- a tin rod with a diameter of approximately 8 mm and a length of at least 20 cm.
In addition, a standard set of keys will come in handy.
How to know when it's time to change
Worn caps of a VAZ 2109 car
It's simple: if thick bluish smoke comes out of the car's exhaust pipe, then it's time to change the caps . As a rule, this smoke appears only when the engine starts and when it stops. But if the caps are very worn, thick smoke constantly comes out of the chimney.
However, smoke is not the only sign that the caps need to be urgently replaced. Sometimes smoke is practically not visible, but oil consumption in the car increases several times, while no external oil leaks (through various oil seals and gaskets) are observed. All this also suggests that it’s time to change the caps.
Malfunctions of valve stem seals
High quality materials do not guarantee the eternal operation of valve seals; sooner or later, under the influence of negative factors (high temperatures, aggressive chemical composition of oil, etc.), slight wear of a regular nature occurs, which ultimately leads to the fact that these parts can no longer perform their functions fully. The working surface is rubber and over time the structure becomes compacted, as a result of which elasticity is lost and cracks begin to appear. Long-term operation and exposure to an aggressive environment with high temperatures does not have the best effect on the damper spring. Ultimately, all this leads to the fact that the valve stem seals no longer effectively remove oil from the valve stems, and it ends up in the combustion chambers.
When is it recommended to replace valve seals?
| Causes | Subtleties |
| Depending on mileage. | In practice, the service life of oil seals on a VAZ 2109 with an 8-valve engine rarely exceeds 100,000 km. After this, these parts should be changed, even if there is no excessive oil consumption. |
| If the car has not been used for a long time. | Lack of operation will also have a detrimental effect on the condition of the devices. |
| There are cases when replacement is necessary even when the size of the valve stem seals is reduced prematurely. | This is not uncommon for domestically produced components. |
The fact that it is necessary to change the seals is indicated by some characteristic features.
Symptoms of a problem
Since these caps are installed inside the motor, it is impossible to visually assess their serviceability. However, there are a number of signs that may indicate their poor condition.
- The engine begins to consume oil. There are motors for which consumption of 100 grams per thousand kilometers becomes the norm. If you add a liter of oil every week, your engine is definitely consuming lubricant.
- Oil consumption will certainly be accompanied by bluish smoke from the exhaust pipe. You cannot see this at idle, but if you give the engine a good load, then this phenomenon can be seen in the rearview mirror.
This is interesting: Will replacing the valve stem seals save you from oil leaks or is it a waste of money?
Causes of wear
At idle speed, the VAZ 2109 crankshaft rotates at a speed of 800 rpm, the maximum speed is 4,500–5,000 rpm. Each valve can perform from 120 to 1,200 working strokes in a period of time of one minute, i.e., lower and rise. Accordingly, each valve stem seal bears a serious load. In this case, one should take into account the aggressive environment in which they are located (high temperatures, chemically aggressive composition of oils, exhaust gases).
With use, the soft rubber part of the valve stem seals loses its original elasticity. And the diameter of the working edges on which the pressure falls decreases over time. The quality of the seals does not matter; even the best parts will need replacement.
How to know when it's time to change
Worn caps of a VAZ 2109 car
It’s simple: if thick bluish smoke comes from the exhaust pipe of the car, then it’s time to change the caps . As a rule, this smoke appears only when the engine starts and when it stops. But if the caps are very worn, thick smoke constantly comes out of the chimney. However, smoke is not the only sign that the caps need to be urgently replaced. Sometimes smoke is practically not visible, but oil consumption in the car increases several times, while no external oil leaks (through various oil seals and gaskets) are observed. All this also suggests that it’s time to change the caps.
The result of worn valve stem seals
When the first signs of wear of parts appear, it is necessary to immediately diagnose the causes of malfunction of the gas distribution mechanism. Including checking the condition of the valve seals. Experienced car enthusiasts who know the structure of the engine are aware of how to check it themselves. Beginners are advised to address this issue to qualified car repair service specialists. Operating a power plant with all signs of wear on the valve stem seals is highly not recommended for a long period of time.
The consequences of operating an engine with such malfunctions are not the most pleasant:
- engine power is significantly reduced;
- unstable operation at idle (stalls);
- “floating” engine speed;
- reduction of compression in cylinders;
- coking (carbon deposits on pistons, spark plugs and cylinder walls).
The appearance of characteristic soot is a serious symptom. Further operation without identifying and eliminating the causes of its occurrence is fraught with engine failure and major (and therefore expensive) repairs.
How to replace valve stem seals on a VAZ-2109
In order to replace the VAZ-2109 valve stem seals as quickly and accurately as possible, you will need a flat screwdriver, a special puller, duckbills, a head that allows you to quickly unscrew the spark plugs and a valve sealer. If all the tools are ready, all that remains is to proceed with the procedure, which is carried out in several stages:
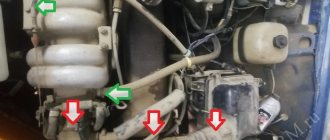
- remove the fuel pump, air filter and ignition system distributor to provide free access to the valve stem seals. This stage applies only to those cars that run on gasoline and, accordingly, have a carburetor;
- to prevent a short circuit, remove the negative terminal from the battery;
- remove the gear from the camshaft;
- dismantle the cylinder head cover by unscrewing the corresponding bolts, and also disassemble its rear part;
- disassemble the camshaft from the cylinder head side. After this, we manually rotate the crankshaft so that the piston of the cap being replaced “freezes” in the TDC position;
- Use a special head to unscrew the spark plug from the cylinder head. Instead, you need to carefully insert a tin rod with a diameter of 8 millimeters, which should fit between the piston and the valve. The use of this product makes it possible to avoid lengthy and complex dismantling of the cylinder head;
- dry out the valves, then remove their springs and plates;
- press out the valve stem seals;
- To install new parts, you need to remove the steel springs from them and carefully lubricate the product with engine oil. After this, it will be much easier to press the cap into place;
- install the springs and assemble the cylinder head.
We recommend: Why the windshield washer does not work: possible causes and methods of troubleshooting
During the assembly process, you will need to lubricate the camshaft journals and cams, and be sure to install an oil seal to prevent oil leakage.
The valve stem seals must be replaced immediately after signs of wear are detected. Otherwise, oil getting into the engine can lead to serious damage and, accordingly, to a significant increase in the cost of the repair procedure.
Replacing valve stem seals without removing the head of a VAZ 2109
The purpose of valve stem seals or oil seals is to remove excess lubricant, seal where the valves fit, and prevent oil from entering the combustion chamber.
Causes and symptoms of malfunction of valve stem seals VAZ 2109
As a rule, rubber is used as a gasket material. During operation, due to constant reciprocating motion and the action of an aggressive environment (changes in temperature, exhaust gases, overheating, etc.), the edge of the caps wears out, and the rubber itself loses its elasticity and hardens. And as a result, the valve stem seals begin to leak. As a result, engine oil enters the combustion chamber.
As a rule, on domestic cars the oil seal replacement interval is 80,000 kilometers. For modern engines, this period can be increased by 2-3 times.
The first signs of wear on the valve stem seals are the appearance of blue smoke from the exhaust pipe. Also, the “oil appetite” of the car engine increases. The engine consumes more than 1 liter per 1000 kilometers.
Of course, you don’t have to think about a major overhaul, of course, if the dynamic characteristics have not decreased and fuel consumption has not increased. It is worth remembering that leaking oil burns on hot valves, as a result of which carbon deposits build up on the internal walls of the engine, the cross-section of the intake and exhaust channels narrows, and the engine loses power. When the engine is actively throttled, carbon deposits begin to crumble, and its particles clog the valve seat and working chamfer. The seal is broken and the engine is already running intermittently and stalls. Another outcome of a breakdown is burnout of the exhaust valve, which can lead to repair of the engine block.
These problems can be solved by replacing the valve stem seals on the VAZ 2109. You can change the caps yourself in the garage.
On carburetor engines, replacing oil seals is carried out in the same way, but before starting work it is necessary to additionally remove the air filter, fuel pump, ignition distributor and auxiliary drive housing.
You will need the following repair tool:
- wrench “10”, “13”, “17”;
- standard flat and Phillips screwdriver;
- head for unscrewing spark plugs;
- cap remover;
- desiccant for valves;
- a set of new valve stem seals for VAZ 2109;
- tweezers or thin-lipped pliers.
The most necessary thing is a valve cotter remover. You can find it at an auto tools store.
What valve stem seals should I put on a VAZ 2109?
Original number 21080100702686, average price 221 rubles. You can buy an analogue of Trialli CV 537 for 181 rubles.
Replacement methods
There are a few basic options you have if the caps stop working properly.
| Option | Peculiarities |
| Let it be as it is | The most unfortunate decision, which can lead to serious consequences, engine breakdowns and huge restoration costs. Do not choose it under any circumstances |
| Contact a garage service station | There are many service stations created on the basis of a simple garage in an auto cooperative. Many people use their services, but we do not recommend that you do so. The prices are not as high as at a good car service center, but the quality of services is appropriate, there are no clear deadlines. Once you give the car away, you may not see it soon |
| Verified car service | A good option for those who do not want to do their own repairs and have enough money for high-quality car maintenance. There is only one disadvantage to this method of repair - high cost. |
| Do it yourself | The option preferred by most domestic car owners. Expenses will only be required for materials. With the right approach, you will make a replacement no worse than any good service station |
When choosing the option to replace the caps yourself, make sure you have sufficient experience and skills. Otherwise, doing the repairs yourself is strictly not recommended.
Replacement
To work on replacing oil scrapers you will need:
- Set of flat screwdrivers;
- Head for removing spark plugs;
- New caps;
- Cap puller;
- Desiccant (for valves);
- Platypuses;
- Rod with a cross section of 8 mm.
Extraction process
Having prepared everything you need, you can start working.
- First remove the air filter, fuel pump, ignition distributor. All this is relevant for carburetor VAZ 2109.
- Some argue that to replace the caps it is necessary to remove the cylinder head. Not true. To get around this step you will need a rod. Next we will talk about how to change oil scrapers without removing the head.
- Remove the negative from the battery.
- Remove the gear from the camshaft.
- When disassembling, try to preserve the key. It is located in a pair of camshafts. Pull it out carefully and there will be no problems.
- Dismantle the cylinder head cover by unscrewing all the bolts located around the perimeter.
- Remove the rear part of the cylinder head cover - the ignition distributor plug. Here you will have to unscrew the 2 nuts securing the ground wires, plus remove the conductor tips from the studs.
- On both sides of the camshaft bearing housing, unscrew the nuts, put them aside, but do not lose them.
- Remove the camshaft from the cylinder head and after that you can dismantle the oil seal.
- Rotate the crankshaft until the piston on which the oil seal needs to be replaced is not at top dead center.
- Using a special head, unscrew the spark plug from the block head, insert a rod prepared in advance with a diameter of 8 mm. Preferably made of tin. Insert the rod so that it is between the piston and the valve.
Spring
- Gently compress the valve springs using a depressurizer.
- Using a platypus or tweezers, remove the valve crackers, and then remove the element.
- Remove the upper plate and valve spring from their seats. Don't forget that there are two springs - upper and inner. Both are subject to removal.
- Press out the oil scraper cap located on the guide sleeve. To do this, you need to install a collet of a special tool on the valve, which is used to dismantle these elements. You can easily find it in any auto store or market.
- Place the bike and hit the bushing with it, then hit the bike with the handles.
- Press the cap off the sleeve and remove it from the collet. Ordinary pliers will help here if you don’t have a special tool.
- Be careful when removing as there is a risk of damaging the bushings. Pull straight up and under no circumstances rotate the element when pressing out.
Remove carefully
- Take new caps and remove the springs from them.
- Drop a little oil on the cap and insert it into its rightful place.
- Press the cap with a tool. Make sure that the element is seated all the way and as tightly as possible.
- Replace the spring you removed.
- By analogy, replacement is performed on all other pistons.
- Replace the spring and valve plate. The valve cotters are mounted into the grooves with a special tool.
- Remove the rod. To make the crackers fall into place, hit the edges of the valve with a hammer. For best effect, arm yourself with a small metal rod and strike through it.
- Be sure to lubricate the camshaft supports and washers with engine oil.
- Replace the camshaft. Don't forget to make sure that the cams of the first cylinder are directed strictly towards the tappets.
- Lubricate the camshaft cams and journals with oil.
- Return the camshaft bearing housing to its position. Also make sure that the guide bushings are in the holes in the bearing housings.
- Tighten the fastening nuts and install the camshaft oil seal.
- Reassemble the unit in reverse order.
We recommend: Car repair. When should you replace your car's brake pads?
Changing valve stem seals is not as difficult as it might seem at first glance. But if such work raises concerns, contact a trusted car service center.
Symptoms of a problem
If the valves have not been adjusted properly, a characteristic clattering sound appears when the engine starts.
This rather loud noise comes from under the block cover. You can hear it especially well when the speed increases. If the valve clearance is significantly larger than specified, the loud clatter becomes more distinct, and noise appears even at low engine speeds.
Adjustment
To adjust the gap, you must use the appropriate shims. They are installed on top of the valve tappets.
If you choose the right shim using trial and error, you can return the clearance to optimal values, thereby restoring normal engine operation.
There are certain standards regarding clearance sizes depending on the valve.
Valve type
Normal clearance
Tolerance
Adjustment process
Adjusting the gaps yourself is not difficult. Just follow the instructions provided, as well as video tips and visual demonstrations of the process.
- Remove the unit cover and clean the surfaces with a clean rag. You need to remove traces of engine oil.
- Place a device for recessing the valve tappets on the cover fastener studs. This is the most common lever with a handle.
- Set the piston of the first cylinder to the TDC position - top dead center. To do this, remove the camshaft drive belt cover and rotate the crankshaft as it rotates. The marks on the camshaft drive gear and the rear gear cover must match. If you remove a couple of spark plugs, it will be easier to turn the crankshaft.
- After aligning the marks, the crankshaft rotates about another 50 degrees, no more. This will allow you to unscrew the camshaft cam from the valve lifters.
- Using a feeler gauge, check the condition of the gaps on valves 1-3 and 5. If the gap differs from the required one, return the required parameters by replacing the adjusting washers.
- To adjust the clearances, the pushrods are recessed a little so that you can release the shims. The pushers are recessed by pressing the lever. Do not let go and lock it in the desired position. Be sure to place the clamp so that it is between the edge of the pusher and the camshaft.
Fixing the pusher
- Pry the adjusting washer off the pusher by prying it with a flat-head screwdriver. On the back of the washers there is usually a mark with the size. If not, you will have to measure it manually. Write down somewhere how thick the washer you are using is, and using the dimensions as a guide, select a new washer.
- New shims must be installed with the numbers down. By recessing the device for compressing the valve pusher, the retainer can be removed.
- Check the gap. If necessary, perform the operation again, taking a washer larger or smaller than the previous one.
- Having completed the adjustment, the crankshaft rotates 360 degrees, which provides access to valves 4, 6, 7 and 8. They are adjusted in the same way.
Do-it-yourself replacement of valve stem seals on a VAZ 2109: step-by-step instructions
- De-energize the vehicle by disconnecting the battery terminals.
- Remove the air filter housing, fuel pump and ignition distributor - read how to do this in the relevant articles.
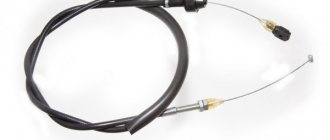
- Dismantle the cylinder head cover, to do this, first remove the clamps and hoses going to it, then, unscrewing the mounting bracket, move the accelerator damper drive cable to the side and, finally, unscrew the 2 bolts securing the cover.
- Unscrewing the necessary nuts one by one, remove the camshaft drive belt cover, and then the gear itself. It is also recommended to remove the key from the shaft to avoid its loss.
- Remove the camshaft from the cylinder head, and the oil seal from the removed camshaft.
- Take out the valve pushers one by one along with the adjusting washers and fold them in the same sequence - this will save you from errors during assembly.
- Turn the crankshaft so that the piston of the first cylinder is in the TDC position.
- Install the desiccant rail by screwing it with nuts to the outer camshaft mounting studs. Then install the desiccant itself so that it can be used to press the first valve.
- Unscrew the spark plug, and insert a tin rod into the hole for it between the piston and the valve - it will not allow the valve to fall down.
- While squeezing the valve springs with a compressor, use a magnetic pointer or tweezers to pull out the valve cotters.
- Carefully release the lever and remove the poppet and 2 valve springs.
- Using a cap puller or pliers, remove the oil seal. How to carry out this stage of work with one or another tool, it is better to look at the practice of more experienced car owners or videos on the Internet, otherwise you risk making a lot of mistakes!
- Remove the spring from the new cap (it will be more convenient to install them separately) and press it onto the valve as far as it will go with the back of the puller, not forgetting to first dip it in fresh oil. Here again, be as careful as possible so as not to damage the surface of the head or the valve itself.
- Next, place the removed spring on the installed element.
- Proceed in the same way with all other valves.
- Return the springs, plates and crackers to their places. Take out the tin rod.
- Then use a metal rod and a hammer to help the breadcrumbs settle into place.
- Apply engine oil to the camshaft bearings and pushrod adjusting washers. Install the camshaft: the cams of the first cylinder should face the direction opposite to the valve tappets.
- Also lubricate the camshaft cams and journals with engine oil. In the area of the outer camshaft supports, seal the cylinder head.
- To complete the replacement of the VAZ 2109 oil seals, assemble all remaining elements in the reverse order of removal.
Preparatory operations
We unscrew the candles. We remove the timing belt and camshaft, then remove the cups, they are also valve pushers along with adjusting washers.
Be sure to arrange them in order or mark them with numbers so as not to confuse them during assembly.
The picture should look like this. It’s unclear how the previous “masters” did the repairs, everything is dirty, so if they removed it, what should be washed?
cylinder head.
When to replace caps
It all usually starts like this: after starting the engine, the oil pressure sensor light comes on. The car owner begins to walk around the engine compartment in search of oil leaks and, finding nothing, checks the lubricant level in the engine crankcase with a dipstick. Having made sure that it is not enough, he simply adds the required amount. However, not even a week passes when the car is actively used, before the lubricant disappears again, the VAZ 2109 oil pressure sensor signals again, and adding oxol becomes as commonplace as refueling.
We recommend: How to replace antifreeze on a VAZ-2109
And the reason for increased lubricant consumption is usually that the valve stem seals (VSC), located in the cylinder head (cylinder head), have ceased to perform their function and simply began to let oil into the combustion chamber. The oil seal is designed to control the use of engine oil. The cap fits tightly to the valve, allowing as much lubricant to pass through as is required for normal engine operation. For the manufacture of valve stem seals, special rubber is used, which ages over time, loses elasticity, and its base comes off, leading to the destruction of these parts. As a result, it begins to leak more and more oil, significantly increasing its consumption.
If the vehicle's exhaust gases have a distinct bluish tint, the valve stem seals should be replaced as quickly as possible. Otherwise, subsequently repairing the cylinder head will be too expensive.
Symptoms of a problem
If the valves have not been adjusted properly, a characteristic clattering sound appears when the engine starts. This rather loud noise comes from under the block cover. You can hear it especially well when the speed increases.
If the valve clearance is significantly larger than specified, the loud clatter becomes more distinct, and noise appears even at low engine speeds.
Adjustment
To adjust the gap, you must use the appropriate shims. They are installed on top of the valve tappets.
If you choose the right shim using trial and error, you can return the clearance to optimal values, thereby restoring normal engine operation.
There are certain standards regarding clearance sizes depending on the valve.
Valve type
Normal clearance
Tolerance
Adjustment process
Adjusting the gaps yourself is not difficult. Just follow the instructions provided, as well as video tips and visual demonstrations of the process.
- Remove the unit cover and clean the surfaces with a clean rag. You need to remove traces of engine oil.
- Place a device for recessing the valve tappets on the cover fastener studs. This is the most common lever with a handle.
- Set the piston of the first cylinder to the TDC position - top dead center. To do this, remove the camshaft drive belt cover and rotate the crankshaft as it rotates. The marks on the camshaft drive gear and the rear gear cover must match. If you remove a couple of spark plugs, it will be easier to turn the crankshaft.
- After aligning the marks, the crankshaft rotates about another 50 degrees, no more. This will allow you to unscrew the camshaft cam from the valve lifters.
- Using a feeler gauge, check the condition of the gaps on valves 1-3 and 5. If the gap differs from the required one, return the required parameters by replacing the adjusting washers.
- To adjust the clearances, the pushrods are recessed a little so that you can release the shims. The pushers are recessed by pressing the lever. Do not let go and lock it in the desired position. Be sure to place the clamp so that it is between the edge of the pusher and the camshaft.
Fixing the pusher
- Pry the adjusting washer off the pusher by prying it with a flat-head screwdriver. On the back of the washers there is usually a mark with the size. If not, you will have to measure it manually. Write down somewhere how thick the washer you are using is, and using the dimensions as a guide, select a new washer.
- New shims must be installed with the numbers down. By recessing the device for compressing the valve pusher, the retainer can be removed.
- Check the gap. If necessary, perform the operation again, taking a washer larger or smaller than the previous one.
- Having completed the adjustment, the crankshaft rotates 360 degrees, which provides access to valves 4, 6, 7 and 8. They are adjusted in the same way.
What are valve stem seals and where are they located?
Valve seals for VAZ 2109
These caps are located directly on the engine valves, in the cylinder head. Another name for these caps is valve seals. Their main task is to prevent excess oil from entering the engine. These caps are made of special rubber. And rubber, even special ones, deteriorate over time and oil begins to flow directly into the combustion chamber of the engine. In this case, it is worth changing these parts.
Why are they installed in engines?
All rubbing couples in engines receive a certain portion of lubricant to reduce friction, and the task of oil seals is to reduce its entry into the combustion chamber to a minimum. Such a pair in the cylinder head is the guide sleeve and the valve stem. It is impossible to make this connection without a gap, so valve seals are used for sealing. They are made from special oil-resistant reinforced rubber. The upper part of these seals is pressed against the valve stem by a spring.
There was a time when PTFE was widely used for these, but nowadays it is rarely used in the production of these replacement parts. Instructions for car repair and operation recommend that when replacing, install only those parts that were installed by the manufacturer. Today, this recommendation is often violated, since the use of high-quality materials and modern technologies makes it possible to create products that are in no way inferior, and sometimes even superior in their characteristics, to the original caps.
Sequencing
- There is a striker on the collet. You need to hit it accurately with a hammer. This will cause the cap to crumple and it will be possible to remove it from the collet with pliers.
The oil seal is removed from the guide bushing using a collet
- Once the crackers are removed, the valve plate and its spring are removed.
When the spring is fixed, the valve nuts are removed using medical tweezers
- After this, a tool is installed to decompress the valves and, with its help, the valve spring is pressed.
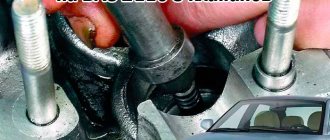
- After the piston reaches the dead center, the spark plug is unscrewed from the cylinder, and a tin rod with a diameter of 8 mm is inserted into the opened hole. The tip of the rod should be between the valve and the bottom of the piston.
- Now the crankshaft must be turned so that the piston in the cylinder where the caps are planned to be replaced reaches top dead center.
The camshaft is removed, then the oil seal is removed
- First of all, you need to remove the wires from the battery.
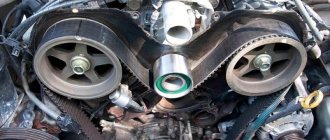
- The timing belt is removed.
- The pulley with teeth is removed from the camshaft.
- The wires are removed from the first fastening, and the nuts are unscrewed from the third fastening.
- Four nuts are unscrewed from the front cover, then the nuts from the rear cover are unscrewed (there are six of them).
- Both covers are removed.
- The camshaft is removed.
- The oil seal is removed from the camshaft.
The valve spring is pressed firmly using a collet
- After pressing the valve spring, the crackers can be removed using tweezers.
First, the valve plate is removed, and then the spring underneath it is removed.
- Now, using a collet, you need to remove the oil seal from the guide sleeve.
By hitting the handle with a hammer, the cap is compressed in the collet and removed
- The new cap is pressed into the valve plate, then a spring is installed on it.
- Similar operations are performed with all caps that need replacement.
- After replacement, the cylinder head is reassembled.
DIY video on replacing valve seals on a VAZ 2109
Important points
- After removing the worn cap, you should carefully inspect the walls of the guide sleeve, since any scratch on this wall left by the collet can lead to renewed oil leakage into the combustion chamber and will negate all efforts to replace the cap.
- Before installing new caps, you must remember to remove the springs from them.
- Before pressing in the new cap, the installation site is generously lubricated with oil. This helps to place the cap in place more accurately, without putting extra effort into it.
As can be seen from the article, it is quite possible to replace valve stem seals on a VAZ 2109 with your own hands. The main thing is to be patient, follow the sequence of operations and not make much effort when pressing the new caps into place.