Operating principle and types of parking sensors
The principle of operation of the parking sensors is that the electronic unit processes signals received from wireless transceiver sensors installed on the car’s bumper and presents them on the display in a form convenient for the driver.
In the simplest parking sensors, the information is an intermittent sound signal, the frequency of which increases as the vehicle approaches an obstacle.
In the most common parking sensors, information with an audible signal is supplemented by a monitor or display, on which the distance to the obstacle in meters is displayed in graphical or graphical and digital form. You can see the structural wiring diagram of such a radar in the photograph. Expensive models of parking sensors additionally have a video camera, the lens of which has to be constantly wiped clean of dirt, which in practice negates all its advantages.
Distance measurement sensors in parking sensors are used in two types - tape and ultrasonic. Tape sensors are a metal strip attached to the inside of the bumper; they detect an obstacle only at a distance of less than 30 cm and do not work well in a wet environment, so they are practically not used.
There are types of wireless parking radars in which the signal from the electronic unit to the monitor is transmitted using a radio signal. The price of such parking sensors is an order of magnitude higher, and the apparent ease of installation is deceptive, since it is still necessary to supply the supply voltage to the devices using wires, which practically negates the advertised advantage. In addition, such a system is susceptible to radio interference, which reduces the stability of the forging radar as a whole. I immediately refused to buy such parking sensors.
Design and principle of operation of an ultrasonic parking sensor
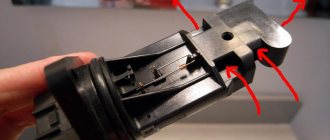
Ultrasonic parking sensors are unpretentious and can confidently detect any obstacle located at a distance from the car closer than 2 meters. The ultrasonic sensor is similar to a telephone headset, only the speaker and microphone are installed in the same housing.
The sensor works as follows. A burst of pulses with a frequency of 40 kHz is periodically supplied from the electronic unit to the sensor emitter. If an obstacle is encountered along the path of the pulse, it is reflected and picked up by the microphone. It is then transmitted to an electronic signal processing unit, which measures the time interval between the moment the pulse is emitted and the time it returns from the obstacle. The further away the obstacle is, the longer it takes for the signal to return to the sensor. The distance is determined in this simple way. The electronic unit can only convert the travel time of the pulse into meters and display the information on the display.
The distance at which the parking sensor can detect an obstacle depends on the power of the emitted pulse and the sensitivity of the microphone.
The angle of radiation of the pulses is limited, therefore, to completely cover the blind spot, at least four ultrasonic sensors must be installed on the bumper.
Types of parking sensors
It all depends on individual preferences - you can use devices with a forced switching function or give preference to models with the possibility of constant operation. If we take a closer look at the types of parking sensors, then for urban conditions it is best to choose the first option, otherwise you risk getting very tired - the parking sensor indicators will constantly remind you of a threat that in fact does not exist.
Subscribe to our Telegram channel
If we consider the indicators themselves, they are often either special video monitors or ordinary sound alerts. Today, many car enthusiasts prefer entire complexes that successfully combine monitor indicators and sound signals.
There are a huge number of sensors that can help the driver in different ways, everything will depend on his experience and skills. Manufacturers recommend installing parking sensors with several sensors - this allows you to maximally protect a potential client from unpleasant situations when parking. A video monitor with sensors has succeeded in this matter - connecting parking sensors of this type will allow the driver to always see all obstacles and make informed decisions at the time of parking.
How car parking sensors work in the video:
Wireless parking sensors: the operating principle of such devices
Wireless parking sensors are a completely electronic device that allows you to monitor the distance between the body of your car and various obstacles. If you are at risk of hitting the bumper against any obstacles or objects, the parking sensors will begin to emit warning signals.
The indicator allows the driver to understand the situation in time and take appropriate measures to avoid an unexpected collision.
This electronic system is equipped with a huge number of sensors and indicators; the more such parts, the less chance you have of crashing your car. These sensors operate using ultrasound. These devices have a fairly sensitive design. It is very important to follow certain rules when connecting parking sensors. After all, the sensor must ideally transmit and receive a signal that is reflected from a variety of objects.
Selecting parking sensors
Heated mirrors: benefits, design and installation yourself
When choosing and purchasing an ultrasonic parking sensor, you must pay attention to the instructions. The presence of a translation into the language of the country in which the device is sold is a kind of guarantee of its quality
It is also necessary to ensure that the warranty is properly issued. At the same time, you need to keep in mind that the warranty is only valid if the device is professionally installed.
Self-installation requires a detailed study of the technical features of parking sensors: installation height, sensitivity and range of sensors. In addition, for adequate operation of ultrasonic sensors, parking sensors must be connected to the on-board computer strictly according to the diagram. The control unit of the device is located in a convenient place, for example, in the trunk. At the same time, the main thing is to ensure normal access to it and the impossibility of mechanical damage.
Installation of parking sensors
To install the system yourself, you will need the following tools and materials:
- drill with a drill or cutter of the required diameter;
- screwdriver;
- key;
- roulette;
- marker or pencil;
- insulating tape;
- double-sided adhesive tape (scotch tape);
- solvent.
Let's look at the installation process using the example of installing a classic device consisting of 6 sensors (2 on the front and 4 on the rear bumper). Taking into account the required installation height, the locations for placing the sensors in the bumper are marked. It is advisable to remove the bumper itself in order to see its design from the reverse side. Using a tape measure, the length of the bumper is measured and markings for future sensors are placed at an equal distance from the corners.
Places for installing sensors are drilled with a milling cutter. The sensors themselves must be installed without any deviations to the sides, otherwise the parking sensors will give unreliable signals.
On the inside of the bumper, the sensors are fixed using specially designed rings. The wires are secured with electrical tape to other electrical wires located in the bumper. After this, the bumper is installed in place and secured accordingly. The procedure for installing sensors on the front bumper is similar to that described above.
Observing the polarity, the control unit must be connected to the wires of the reversing lamps. The placement of the device display in the cabin depends on the driver’s preferences. To install it, you can use double-sided tape. The control unit can be secured in the same way. Before installation, it is advisable to degrease the selected area with a solvent. All wires in the cabin must be routed under the floor mats to avoid damage.
First of all, you need to check the range of the sensors, as well as their response to various obstacles.
Required Tools
To install the parking radar, you need a special tool:
- ruler 50 cm;
- masking tape;
- pen-pencil);
- drill (screwdriver);
- steel wire;
- nylon ties;
- wire cutters, electrical tape;
- control light;
- Silicone Grease.
The car owner will need a lift or a garage with an inspection hole for ease of work.
Attention! The choice of parking sensors should be taken responsibly. If the parking radar is front, then you need to buy the appropriate kit. The sensor wires for the front and rear radars differ in length: the front ones are longer.
Assembling parking sensors at home
Useful tips for car enthusiasts How to choose the right parking sensors for a car
1. Glue the Arduino board to the bottom of the box using glue or silicone and connect power to the controller.
2. Connect the 5V ultrasonic sensor power supply.
3. Connect the output of the ultrasonic sensor “SIG” to the PWM pin of the Arduino (this is necessary so that we can send pulses to the sensor and then read their return). Use, for example, pin 7.
4. Before connecting a three-color LED, determine which “legs” are responsible for which color. Connect red, green and blue to pins 11, 12 and 13 of the Arduino, respectively.
5. Now it’s up to the program. After testing the software, if everything works fine, then mount the sensor on the wall of your garage, and place the LED in a place convenient for you.
Components for assembling a homemade parking sensor
DIY car blanket dimensions, materials and sewing method
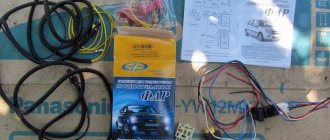
Using the example of the experience of one of the Kulibins, we will show what is needed to assemble a homemade parking sensor. More detailed parking sensor diagrams can be found on the corresponding radio-electronic network resources. So, a set of homemade parking sensors:
— The Arduino Duemilanove controller is that hardware computing platform, in fact, the brain of your homemade parking sensors.
— Ultrasonic distance sonars (sensors): Ultrasonic Range Finder.
— Plastic case (boxing).
- Bread board.
— LED, preferably three-color.
— Wires corresponding to the length of the gasket.
— Power source – 9V battery.
How to properly install parking sensors on a car
1. Preparation of the event.
Before starting the process, plating demons are produced. Much depends on the model, but most often the trunk sound insulation is attached to pistons, some of which are removed carefully when prying with a sharp object, and some require additional manipulations (for example, pressing the lock).
Clean and wash the inner trunk compartment and the lower part of the bumper surface.
3. Drawing control points when installing parking sensors.
The instructions are a guide for the entire algorithm of actions. It shows the main characteristics of the sensors: range, viewing angle, etc., and a layout diagram is attached.
The extreme points of the layout are, as a rule, the radial centers of the rear part of the bumper. A horizontal line is drawn through them and divided in such a way that all sensors are located on the same axis and at an equal distance from each other. The height from the ground is 50 cm (the exact value is indicated in the specifications).
3. Drilling holes for sensors.
Metal processing of the grooves takes place using an electric drill and a cutter included in the delivery set. Sensors are attached in place. For greater reliability, it is recommended to “plant” them with adhesive-sealant.
4. Installation of the parking sensor regulator.
The most suitable place for mounting the device is under the rear window near one of the brake lights. The light signaling device is dismantled. The sonar regulator cables are routed into the factory openings.
A separate hole is drilled for the connector and a balancer is installed. After installation is completed, the sound volume is set using a signaling device.
5. The final stage of installing parking sensors on the car.
The ECU is installed in the selected location of the luggage compartment by attaching it to the brackets. It is recommended to lay flexible material between the walls of the device and the casing to dampen vibration and noise.
The cables of the unit are connected to a group of electrical wires. So that the new gasket does not interfere, they are attached to the existing units with plastic clamps. All structures that were removed during preparation are returned to their place.
6. Carrying out tests.
After completing the work cycle, the correct installation of the parking sensors must be tested. To do this, choose a safe, quiet place. In a real situation (or with the help of obstacles artificially installed at different heights), the device is tested.
This is where the description of the algorithm for how to independently install parking sensors on a car ends.
How to install parking sensors
To install parking sensors yourself, you need to mount the sensors in the car’s bumpers and install a warning module in the car’s interior. The installation diagram includes a separate control unit, which is connected to the vehicle’s on-board network. The parts are connected to each other by cables included in the kit.
Before starting installation work, it is recommended to check the functionality of the parking assistant components. The parts are connected in accordance with the factory wiring diagram, then a 12 V DC source is switched, designed for a current of up to 1 A. To test the sensors, a sheet of cardboard is used, in which holes are drilled for installing the products. Then an obstacle is placed in front of each of the sensitive elements, and the accuracy of the distance measurement is checked with a tape measure.
When installing sensors, it is necessary to take into account the orientation of the parts in space.
On the back there is the inscription UP, which is complemented by an arrow pointer. During installation, the device is positioned with the arrow pointing upward, but it is allowed to rotate the sensor 180° if the bumper is located at a height of more than 600 mm or if the surface of the bumper is tilted upward, which impairs the sensitivity of the ultrasonic device.
Scheme
The installation diagram provides for the placement of ultrasonic sensors in the front and rear bumpers. The sensors are located on the end plane, as well as in the corners of the bumper, providing an expansion of the monitored area. The parking assistant can work in conjunction with a rear view camera, which displays the image on the radio screen or a separate display. The control unit is mounted under the trunk trim or in the passenger compartment (in an area protected from moisture). An information panel with a buzzer is placed on the instrument panel or built into the mirror.
Installing rear parking sensors
Installation of rear parking sensors begins with marking the surface of the bumper. The accuracy of the assistant’s work depends on the quality of the markings, so it is necessary to study the manufacturer’s recommendations in advance. If installed incorrectly, “dead” zones are formed in which an obstacle may appear.
Sequence of actions when installing rear ultrasonic sensors:
- Apply markings to the plastic bumper trim and stick pieces of masking tape at the sensor locations. The equipment set may contain a pattern that allows the owner to mark the surface of the bumper and install the sensitive elements himself. Equipment manufacturers recommend installing sensitive elements at a height of 550-600 mm from the ground.
- Determine the location of the centers of the holes using a tape measure and a hydraulic or laser level. Ultrasonic sensors should be located symmetrically at the same height.
- Mark the centers of the channels with a thin awl so that the cutter does not slip. For drilling, use the tool supplied by the parking aid manufacturer. The diameter of the hole must match the size of the sensor body to prevent elements from slipping out during operation.
- Secure the cutter in the chuck of the electric tool and start drilling. The cutting tool must be positioned perpendicular to the surface being processed, while the horizontal position of the cutter is controlled. Please note that under the plastic shell there is a metal beam that can break the tool.
- Install sensor housings with patch cables into the holes provided. If a foam damper is installed in the design of the machine, then it is necessary to carefully drill the part; the resulting channel is used to output connecting cords. If work is carried out on a removed plastic shell, then the cables are laid along the inner surface to the entry point into the body.
- Fix the sensors using the mounting rings from the kit; letters are printed on the body of the parts, allowing you to determine the purpose of the sensitive element. It is prohibited to swap elements, since the accuracy of the device will be impaired. On the rear of the housing there are explanatory marks (eg arrows) indicating the correct position in the bumper.
- Route the cables from the sensors through the rubber O-ring of the standard wiring or the plastic plug into the luggage compartment. If the entry was made through a plug, then the entry point is sealed with a layer of sealant. The cables are pulled through using a piece of rope or elastic wire.
The owner can install rear parking assist on any car equipped with a plastic bumper. It is allowed to paint the plastic housings of the sensors in the color of the body; this does not affect the performance of the products. If you plan to use a parking device with a towbar, then the sensitive elements are placed on the sides of the towing hook. The length of the device does not exceed 150 mm, so the tow bar does not cause false alarms of the sensors.
Installing front parking sensors
If you plan to install parking sensors with 8 sensors, you will need to drill holes in the front bumper and install sensors in them. When drilling channels, it should be taken into account that the car’s standard electrical wiring is installed inside the plastic shell, so it is recommended to carry out work on a removed bumper. After marking the centers of the holes, drilling is performed. When installing sensors, do not press on the central part of the housing.
The connection cables are routed through the engine compartment away from the cooling system radiator and exhaust manifold. It is recommended to lay the cables in a separate protective sleeve, which is secured with clamps to the standard electrical wiring harness. Entry into the cabin is made through the technological holes available in the engine panel.
Ways to activate the front assistant:
- Based on a signal from the reversing lights. When you start moving backwards, ultrasonic sensors operate in front and behind the car. The disadvantages of this method include the inability to turn on the front sensitive elements when parking the front of the car near a wall.
- Using a separate button, the owner turns on the equipment only when maneuvering in cramped conditions. The key is mounted on the instrument panel or center console; the switch design has an LED to determine the operating mode.
After installing the sensors, it is necessary to check the correct installation and laying of connecting cables.
The control unit supports automatic diagnostics; after power is applied, the sensors are polled.
When faulty elements are detected, a sound signal is given, and segments flash on the display of the information module, indicating an incorrectly operating element. The machine owner needs to check the integrity of the cable and insulation, as well as the correct connection of the wiring to the controller.
Do-it-yourself parking sensor installation
The instructions for installing parking sensors in full simply and clearly explain how to connect the parking sensors. We are talking about the instructions that are included in the kit.
If there isn’t one, or it hasn’t been translated, then don’t even look at this device, no matter how attractive its price. You will just buy yourself a flashing toy, and there is no guarantee that it will work.
The parking sensor connection diagram is, in principle, the same for all types of devices. The correct manufacturer's kit, as a rule, already contains a cutter sized to fit the sensors for making holes in the car's bumper. Therefore, the question of how to install parking sensors is not worth it.
Installing parking sensors on your car will require a small arsenal of tools and materials for proper installation yourself. When preparing for work, you need to arm yourself with a simple set of familiar tools, from screwdrivers to wrenches. You will also need an electric drill or cordless screwdriver, a tape measure and a marker. Additional materials you should buy include masking and insulating tape, as well as silicone sealant or glue.
You can start work in any order. For example, first find and make room in the trunk for installing an electronic unit. It can be mounted using a standard bracket or glued using double-sided tape, sealant, etc.
The most important and difficult stage of installing parking sensors will be the introduction of foreign bodies such as sensors into the bumper. That is why the kit should include a special attachment for an electric drill or screwdriver, the diameter of which matches the size of the sensors. To do this work as carefully as possible, it is better to dismantle the bumper and clean it of dirt.
To accurately install the sensors, you need to make markings using a tape measure and a marker pencil. It is best to stick masking tape on the surface of the bumper, and then apply the necessary marks on it.
First, marks are made in the curves of the bumper (dimensional points). After this, the distance between these two points is divided into three equal parts. Two more marks are made at the interface. As a result, we get markings for 4 sensors. When marking, it is necessary to take into account such an important parameter as the height of the sensor from the ground.
The optimal distance should be found in the instructions, but usually it is 0.5 m. The marking should also take into account the fact that the position of the sensors on the car when the bumper is finally installed in place must be strictly horizontal.
Now you have to equip a drill or screwdriver with a cutter and start drilling holes for the sensors. Work must be carried out at low speeds of the power tool.
After preliminary fitting, the sensors are installed in the holes; a layer of sealant or glue is first applied to the mounting sockets. It is necessary to mark the sensors in order to correctly connect them to the control unit in the future.
When the installation of the sensors inside the bumper is completed, the wires are assembled into one bundle and tied with electrical tape. After this, the bumper is returned to the car, and the wiring is pulled into the luggage compartment.
The installation of sensors in the front bumper is carried out in a similar way. Only the wires need to be routed through the engine compartment and into the trunk. When the wire from each sensor is connected to the corresponding ECU socket, all that remains is to connect the monitor to the control unit. The display itself is attached to the windshield or instrument panel using double-sided tape. It is usually located on the supporting part of the screen.
The installation of parking sensors can be considered complete only after testing the device in the yard. When the driver understands at what distance to the obstacle a particular signal is given, you can safely hit the road.
It should be noted that installing parking sensors yourself is not done only for the sake of saving money. When the car owner independently installs and tests the device, he will understand all its signals and will also receive real pleasure from the work done. Now he will become almost an expert in this matter and will be able to give advice to his friends or acquaintances.
Installation of front parking sensors
To install front parking sensors, you need to properly prepare for work and only then proceed with further actions.
Installing parking sensors with your own hands is quite an interesting, but at the same time, serious and responsible process. You need to prepare a wire (about 10-12 meters). The wires will be used to connect the sensors, the main unit and the parking sensor button. A potential client will be able to order a special button, but he will have to take care not to forget the corrugation for the twisted pair, electrical tape, contacts and plugs - without all these elements, the installation of parking sensors cannot be completed successfully.
If your vehicle is already equipped with rear parking sensors, this greatly simplifies the task and you will have to install much fewer sensors.
To understand how to install parking sensors without contacting specialized car services, you need to understand some of the nuances of the installation procedure for this element.
- You need to remove the trunk trim, all the bumpers, and also unscrew the headlights.
- After this, you need to remove the dashboard, the right fender liner and the main glove compartment. It is very important to do everything very carefully so as not to damage your vehicle. For this, there is a special car circuit that allows you to remove the necessary elements without harming the vehicle itself.
- We stretch the wires to the beginning of the dashboard, on the left side. Near the dashboard there will be branches to the buttons and front speakers.
- The next step will be to pull the wire directly above the glove compartment, when it is in a special plug, you will need to create a special hole in it. It will serve as an excellent socket for a twisted pair; then the wire is pulled to the headlight through the fender liner. Cotton insulating tape is best suited for wrapping wires; ordinary tape looks rather poor and ugly.
Tips for installing parking sensors with your own hands in the video:
Installation process
Specifically, before installing parking sensors, you should wash the car. Next you need to find places that are more suitable for installing sensors. For example, in an SUV, the spare wheel mount, which can fit on the rear door, is the last dimensional point.
The next step requires removing the car bumper. During the dismantling process, you should be careful not to confuse the fasteners for the front and rear bumpers. Then you need to make markings and drill holes for the parking sensors (Fig. 1). Installing parking sensors with your own How to install Sensors are installed with. But you don’t have to remove the bumper - you can drill holes anyway, only then you will need some skill and patience to route the wires into the car’s interior. To get a taste and start enjoying watching group sex, you just need to try it - and everything will work out. You will immediately have a desire to watch FF porn https://gangbang.com/jmj via a direct link around the clock, enjoying fucking several girls at once. The girls were ready to do anything for the sake of popularity, including being on several dicks at the same time, and also in front of the cameras.
When marking locations for sensors, it is important to be as careful as possible: it will be impossible to remove excess drilled holes. To better navigate when parking in the future, parking sensors are located at a similar distance from each other.
The next step is laying the wires (Fig. 2) and connecting the device’s sensors to the car’s electronic circuit. Engine ZMZ 402 repair How to install correctly How to put rings on. Before connecting the sensors and parking sensors, it is necessary to de-energize the vehicle's electronic circuit. It is necessary to lay the wires from the sensors to the parking sensors panel very carefully. Rear bumper sensors can be connected to the power supply for the reversing lights. Thus, the parking sensors will only work when you have reverse gear engaged. This is comfortable - once again there will be no squeaking in the car when, for example, in a traffic jam someone comes close from behind.
Next, the display is installed (Fig. 3) and all sensors are connected. How to properly install parking sensors. The location of the parking sensors display should be extremely favorable for the driver: he should see the readings of the display without changing the position of his head.
That's all! The whole procedure takes 2-3 hours - it’s not that long, but at the same time it’s educational. Below we offer you to watch the whole process in the video.
Installing parking sensors yourself
How to install parking sensors, how do you drill holes and connect the device to the bumper? Is it possible and necessary to paint it, what color should it be painted, how to do everything correctly? Installing parking sensors yourself and setting it up is not a particularly complicated procedure. You will need time and, of course, a standard repair kit.
Do-it-yourself device installation diagram
So, installing parking sensors involves choosing the right device itself - in this case, you focus on your preferences, as well as your budget. So that you do not have to constantly make repairs, decide in advance which model you want to purchase. To do this, use online review monitoring to understand what type of devices other car enthusiasts choose and how they behave.
Having chosen the right device, all you have to do is drill holes in the bumper, install and paint the device in the appropriate color. Keep in mind that each vehicle has certain design features; as a result, drilling the bumper may take some time. Accordingly, if you do not want to receive an impulse from the asphalt or the sky, you need to immediately know how to properly drill holes in the bumper and install it in general on your car model.
Bumper markings for correct installation
The parking sensor kit should include instructions for drilling the bumper, connecting and setting up, from which you can fully understand how this procedure is carried out. If there are no instructions on how to install the devices in the kit, then it is better not to choose such devices. In this case, you can simply purchase a flashing device for yourself, which will be of no use, no matter how you adjust it.
So, if you do not want to face repairs, then opt only for high-quality parking sensors. In general, the procedure for drilling the bumper and painting the device in the appropriate color is universal for all types of parking sensors. If the manufacturer has proven its products to be of high quality, the kit will include not only instructions, but also a cutter to size the regulators. This cutter will allow you to correctly select holes for drilling a vehicle bumper (video author - Autoden TV).
Material for assembling parking sensors yourself
Diagram of a conventional parking sensor:
-Embedded sensor – from 2 to 8. Naturally, the more sensors, the greater the area captured.
— Distance indicator: with one scale, LCD indicator, with 2 scales, etc. Right before the video signal is output to the windshield. Progress – it moves inexorably forward.
— Electrical control unit for this entire system.
If we are talking about the simplest device, which your homemade parking sensors can become, then 2-3 sensors are completely sufficient for the parking sensors circuit. If you are going to make parking sensors with your own hands, you must realize that all components for it must be only of the highest quality and properties. And the parking sensor circuit is assembled perfectly.
Even the most advanced parking sensors fail or malfunction, but this fact in no way relieves the driver of responsibility in the event of an accident.
How to install parking sensors with your own hands
Some modern cars are equipped with factory-installed parking sensors. This option can be ordered when purchasing a new car. But if this is not possible, then any technically knowledgeable car owner can install parking sensors with his own hands on a new or used car.
Before purchasing, it will be useful to study the materials of several automobile forums. They repeatedly discussed various models of parking sensors and the features of their installation on different cars. After analyzing the information, you can safely go to a store with auto products and select the device you need. When purchasing a parking sonar, pay attention to the complete set. The installation kit includes:
- 4 or 8 sensors (depending on the radar model);
- electronic control unit (ECU);
- cutter for drilling seats;
- signaling device with an audible or visual signal;
- wiring;
- instructions with connection diagram.
Before buying parking sensors, carefully study the materials of automobile forums
The absence of instructions in the radar installation kit indicates the low quality of the device. You should not buy such parking sensors!
Necessary tool
To successfully install parking sensors you will need the following:
- the parking sensor kit itself;
- screwdriver;
- insulating tape;
- knife with replaceable blades;
- nylon clamps.
Installation procedure for parking sensors
- Wash the bumper. It is not necessary to dismantle it. All work can be carried out by car.
- Mark the sensor installation locations with a marker. The two outermost ones should be placed on the bends of the bumper. The rest are placed between them at the same distance.
This is what the process of drilling a bumper with a milling cutter looks like
- Drill holes in the bumper using the included bit. Install sensors on the bumper. To strengthen the fastening, you can use glue or sealant.
Be careful when installing sensors. They shouldn't look at the sky. In this position, they are unlikely to help the driver park successfully!
Many drivers install the control unit in the luggage compartment
- The control unit is usually located in the luggage compartment. The installation location is chosen by the car owner himself. Typically, the parking sensor ECU is located under the trunk trim on the rear fender.
- Lay the cable from the control unit to the signaling device. It is usually placed on the front panel in front of the driver or slightly to the side.
- Connect power to the control unit from the electrical circuit of the vehicle's rear brake lights. The power supply is usually located near the rear light.
Video example of installing parking sensors
If everything is connected correctly, then the parking radar does not need additional configuration. The only thing that may be needed is fine-tuning the sensor position.
Full video report on installing parking sensors
I hope this story will be useful to Duster owners.
PS About 3 years after installing the parking sensors, for unknown reasons, water got into the control unit and it failed. I couldn’t find a similar one, so I had to buy a new set (now wired), but I didn’t change the old sensors, I only replaced the unit and the monitor. So far everything is working fine.
More articles about Renault Duster:
- Renault Duster: photos of how to prepare for winter
- Renault Duster video - Duster test drives
- Photos of Renault Duster
- News
- Useful
- Do it yourself
- Adviсe
- Reviews
- All articles
- Contacts
- Advice from a car lawyer
- Advice from a car lawyer. Part 2
- Terms of use
- Privacy Policy
- Auto lawyer online for free
- List of official Renault dealers
- Competitions
- Terms of advertising on the DusterAuto.ru project
- Form of car purchase and sale agreement
2019 All about Renault Duster: photo and video reviews from Renault Duster owners
Choosing a location for installing the monitor and electronic parking sensors
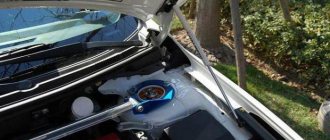
When parking in reverse, the driver usually looks at the side mirrors and rearview mirror. Taking the parking sensor monitor in my hands and sitting in the driver’s seat of the car, I began to look for the most rational place to install it. As a result, taking into account the need to lay wires to the electronic unit, it was decided to mount the monitor on top of the rear view mirror.
Ultrasonic parking sensors are installed in the rear bumper, and the supply voltage is most easily supplied from the reversing light, since the parking sensors should only work when reverse gear is engaged. Therefore, it was decided to install the electronic unit in close proximity to the sensors - in the luggage compartment.
As a result, the wiring diagram of the ultrasonic parking radar shown in the photograph was created. Now all the questions regarding the installation of parking sensors have been worked out and you can begin installing it in the car.
Each ultrasonic parking sensor, depending on its installation location on the bumper, must be connected to its own connector on the electronic unit. Therefore, the connectors must be marked in advance in accordance with the inscriptions on the body of the electronic unit.
How to install and connect the device?
How to properly install the device in a car bumper, how to adjust it and how to paint it in the desired color - we will talk about this further:
- First you need to properly prepare the place for installing the device. The gadget's electronic control unit is mounted in the luggage compartment; you need to choose the right installation location. You can mount the device under the plastic lining of the trunk or in the free space under the wing. This is not important, the main thing is that the control unit is not affected by moisture and other external factors.
- Now you can start preparing the bumper itself and first of all you need to wash it thoroughly. After this, taking into account the number of regulators that come with the device, you should correctly mark this body element. As a rule, modern gadgets are equipped with four sensors; in accordance with this number, the bumper can be correctly marked. As a rule, the outer two regulators are distributed to the lateral, radial parts of the bumper. The distance that remains can be divided into the appropriate number of parts, depending on the number of regulators that come with the kit.
- As for the marking itself, it can be done using a felt-tip pen or marker. In order not to spoil the color of the body, the marker is subsequently washed off with alcohol. It should also be noted that the marking is done in accordance with certain parameters of the gadget, that is, it is necessary to take into account the performance indicators of the device noted in the instructions. In most cases, the height from the ground is half a meter.
- Using a cutter, you need to drill the corresponding holes in the bumper, and then install the regulators into them. In most cases, the regulators are installed in their seats without problems, but to be more sure that they will not fall out, they can be glued on.
- Before painting the regulators in the desired color, they must be connected to the control unit, as well as to the monitor. To do this, use the diagram included in the kit. Next, you need to paint the sensor leads so that they match the bumper. In principle, the conclusions don’t have to be painted, it all depends on your preferences.
- The final stage will be diagnosing and testing the working condition of the gadget, and testing should be carried out with obstacles.
Installing the sensor in the bumper
In general, the process of installing a gadget is not particularly complicated; in principle, anyone can handle this procedure if desired. If you have doubts about this, it is better to pay once and trust the specialists, but be confident in the functionality of the device.
Installing parking sensors yourself
Parktronic is a device designed to facilitate the parking process for a novice motorist. You can install parking sensors at numerous car dealerships or do it yourself. We will consider the last option, when there is no desire or opportunity to go to a car service center.
First you need to decide on the choice of device. At the moment, stores offer an unlimited number of different models and modifications. In fact, there are not enough differences among this huge number. The main differences lie in the appearance of the monitor, and the properties of the sensors themselves are no different. A different number of sensors can be installed on car bumpers. Typically, car owners install 4 on each bumper, and some car owners only install them on the rear bumper. Parking sensors on tinted cars are especially important when, in conditions of limited visibility, you have to back out into the darkness.
Checking the parking sensors before installing them in the car
Before installing parking sensors in a car, to avoid surprises, it is necessary to check its functionality. To do this, you need, in accordance with the above block diagram, to connect all sensors and a display to the electronic control unit and apply +12 VDC supply voltage to it, observing the polarity, from a power supply designed for a current of at least 0.3 A or a battery. It is impossible to make a mistake here, since all the connectors are different, with the exception of the connectors for connecting parking sensors. But when checking, the order in which the sensors are connected does not matter, since they are interchangeable.
If the sensors are left lying on the table, then it will be impossible to check the parking sensors in operation. Therefore, you need to simulate their installation on a car bumper. To do this, you need to drill four holes in a sheet of corrugated cardboard or any other sheet material using the cutter from the kit and install ultrasonic sensors in them, as shown in the photo. The distance between the holes should be more than 10 cm.
Next, direct the sheet with sensors into a space two meters free from obstacles and turn on the parking sensors. All that remains to check is to walk in front of the sensors and see what is displayed on the monitor. If everything works, then you can begin installing the radar in the car body.
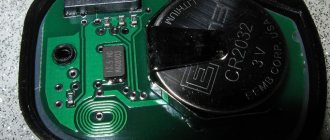
For interest and to evaluate the quality of the parking sensors, I opened the control unit, its printed circuit board is in the photo. The presence of markings of elements, neat installation, high quality soldering and voltage reserve of electrolytic capacitors pleased us.
Operating principle of parking radar
- Sensors installed in the bumper detect interference using ultrasonic waves.
- The wave is reflected from the obstacle and is picked up by the sensor.
- The signal from the sensor is transmitted to the electronic control unit (ECU).
- The electronic control unit processes the information and transmits it to the signaling device. The person driving receives audio, visual or combined signals.
What signal the driver receives depends on the model of the parking radar. Some parking sensors are equipped with a rear view camera, and then the image from the camera can be displayed on a standard or additional LCD screen.
Typical breakdowns
Many parking sensors are connected in such a way that when reverse gear is engaged, sensors and cameras are activated, displaying a picture on the screen inside the cabin. They are connected to a regular multimedia system. That is, you don’t even need a button to turn on the parking sensors.
But sometimes the video does not show, or strange signals are issued, and some kind of bacchanalia occurs with the parking sensors. Everything is clear, something is wrong with him. And what?
There are several typical faults. In some cases, simple simple repairs are needed, and sometimes replacement of elements is required.
Let's look at a few common situations.
- The danger signal is constantly on. Here we are talking about a short circuit in the system or the sensor being blocked by some object. For example, a piece of dirt, a leaf or snow has stuck to it. Even if water gets on the sensor, it begins to produce incorrect information and makes the driver panic. First, check the device for foreign objects. If they are not there, you will have to do the wiring. How to check its integrity? Take a multimeter and measure the parameters. Most often, it is the wiring that causes all the problems.
- Doesn't signal obstacles, although they exist. Here the sensor or several parking devices at once have broken down. The test is simple - cover each sensor with your hand in turn and listen to which one does not react. So solve problems with it by completely changing it or carrying out repairs.
- Overreacting to minor obstacles. You park on the grass, where there is nothing in the way, but the parking sensors are screaming. Why? It probably has increased sensitivity, so for the device even a blade of grass is an object of danger. The sensitivity can be adjusted, so there is nothing complicated here.
- Mechanical damage. They are not difficult to check visually. But the problem with such problems is that in most cases you have to change the sensors. Repairs are not enough here.
If your parking sensors start acting up, be sure to check the wiring first. It sometimes breaks, the integrity of the insulating shell is damaged, and the contacts come loose. Otherwise, some are already buying new sensors, although in fact they just needed to tighten the wiring fasteners a little tighter with a screwdriver. Don't spend extra money or jump to conclusions until you've checked all potential problems.
The most unpleasant breakdown is the failure of the control unit of your parking sensors. It is the most expensive to change. But let's hope this doesn't happen.
Share your impressions of the material, tell your stories related to parking sensors or ask questions.
Installing front parking sensors
Installing the front sensors is no different from the procedure performed for the rear axle. The difference will be in the power connection. Since the installation of additional devices is largely a creative process, there are several options for how to connect the front parking sensors to the on-board network. The simplest of them is power from the ignition switch. The front parking sensors will turn on after turning the ignition key to position 3 (On). This feeding method is one of the simplest.
You just need to find a wire near the mounting block that will receive power when the ignition is turned on. This can be determined using a special test. Since the system will always be on, in winter, when snow and a dense layer of dirt accumulate, a false signal may be given about approaching an obstacle. This will cause significant inconvenience. We invite you to watch the video of the installation process.
Inconsistent nutrition
- Power supply from the brake pedal. Power to the brake switch is also supplied only when the ignition is on. But the system will only work when the brake pedal is pressed. Since the limit switches react to even the slightest touch of the pedal, you can activate the front parking sensors by lightly touching the brakes. The connection method will remain the same. You just need to find the positive wire that will come from the end switch;
- from turning on the first speed. A rather extraordinary method, the essence of which is to install a button in the place where the manual transmission knob is in the extreme position when engaging first speed. You will have to build a bracket by calculating the position of the lever. In order to avoid having to constantly hold the lever pressed against the button, the system must be equipped with a time relay. After pressing the button once, the sensors will be powered for the programmed period. You can build such a relay with your own hands;
- output to a separate button, pressing which will trigger the supply of power to the sensors. Plus, in this case, you can take it from any convenient source that has voltage after turning on the ignition. The button can also be installed in any place convenient for you.
Rear parking sensors
Let's look at the installation process for the rear of the car in more detail. In order to install it yourself, you will need:
- screwdriver;
- a cutter (crown) of a suitable diameter, if the purchased set of sensors does not come with one;
- a little sandpaper to remove burrs after drilling the rear bumper;
- wire for pulling wires in hard-to-reach places;
- clamps or electrical tape for fixing the harnesses;
- a degreaser to enhance the adhesion of the place to which the parking sensor control unit will be attached;
- masking tape. It makes it easier to mark installation points. But the main reason for use is additional protection of the paintwork along the drilling contour with a crown;
- hot glue and a gun for sealing the junction of the wires into the car body.
Installation process
- Apply masking tape and mark the drilling points;
- fasten the wires with electrical tape, and best of all, place them in a special corrugation. Bring them to the technological hole in the car body. There is usually a rubber plug there that you can drill through. The area around the wires can be sealed with hot glue;
- clean the dirt and degrease the area where the parking sensor control unit will be attached. Secure the unit in a place where it will be protected from the risk of mechanical damage;
- connect ground. Often there are enough bolts in the rear of the car to secure the terminal. Power the positive terminal from the reverse light bulb. Accordingly, the sensors will be powered only when reverse speed is engaged. You can determine the corresponding wire using a tester. With the ignition on and the gear in gear, determine which connector is +. Connect to it using the latch described above;
- Run the wires from the stern to the location where you intend to install the display. Most drivers mount it on the rearview mirror or on the dashboard;
- connect the connectors to the control unit. Don't forget about the order in which the sensors are installed.
For greater clarity, we attach a video of the installation yourself.
Installing rear parking sensors
First of all, you need to decide where you plan to install the ECU. Most car owners place these elements in the trunk of the car, but some prefer to place the control unit in a niche under the trim, dashboard or on the fender of the vehicle. There is not much difference, so choose the most convenient place in your opinion.
This is interesting: Jaguar expands its line of engines for Russia
As for motion sensors, they are installed on the car’s bumper, which is best washed thoroughly before installing parking sensors.
After that we move on to the next steps.
Marking
On the washed and dried bumper we make markings for the sensors. Let's say the parking sensors are equipped with 4 sensors (by the way, this is the optimal number). The 2 elements must be separated into radial parts of the bumper, after which the distance between them must be divided into three equal segments for the remaining two sensors. If there are more sensors in the parking sensors, then the distance between the two extreme elements must be divided into a larger number of equal parts.
Advice! It is better to do the markings with a marker, since the pencil can be erased and you will “miss”. Marker marks can be easily removed with alcohol, which does not harm the paintwork of the bumper.
If we talk about the height at which the sensors need to be placed, then 50 cm from the ground is considered optimal. But this parameter may differ depending on the selected model, so be sure to check the instructions for the device.
Holes
After you have checked the correctness of the markings several times, you can proceed to drilling the holes.
Important! The holes are drilled strictly perpendicular to the surface of the bumper. Sensors must “look” at the world in a horizontal position.
Using a router bit, carefully drill holes in the previously marked locations. After this, install the sensors on the outside so that the sensors face outward and pass their wires inside the bumper. On the reverse side, the elements must be secured with locking rings (included in the kit). If you are afraid that the parking sensors will jump out of the holes, you can play it safe with glue or silicone.
Advice! If the bumper of your car is equipped with an additional lining - a damper, then use a wire, nail or awl to push the wires through.
Another important point is that the sensors must be installed in strict sequence (from left to right). For convenience, they are designated by the letters A, B, C, D.
If the sensor is different from the bumper in color, then do not be afraid to repaint it. This will not affect the performance of the sensor in any way.
Installation of the control unit
As mentioned earlier, the ECU can be installed in the most convenient place for you. We will look at installing the power supply in the trunk of a car. To do this, first of all, you need to remove the trunk trim and wind the wires from all the sensors together using electrical tape or zip ties. After this, they need to be guided under the bumper into the trunk through a special technological hole, which you can drill yourself. Next, fill the wires with sealant to protect and secure them. After this, the bumper is installed in its rightful place.
This is interesting: What kind of gadget is this - a car mug for coffee and tea?
Advice! The signal processing unit must be securely secured to the surface (for example, with double-sided tape) so that it does not get torn off by a load.
Connecting wires
Connecting the parking sensors with your own hands is almost complete, all that remains is to power the ECU from the reversing lamps, while maintaining the required polarity. First of all, decide on the rear lights and find the “plus”, which is most often the red wire. If in doubt, use a tester.
There are two ways to connect wires:
- The proven “old-fashioned” method. To do this, you need to strip the insulation from the two wires and twist them together. Wrap the junction tightly with insulating tape. The same must be done with the remaining wires (“plus” and “minus”).
- A modern method for which special rivets are used. When they are compressed, contact is created between the wires. In this case, you will not have to cut anything, nor will you have to remove the insulation.
Place a rivet on the positive wire of the reverse lamp, and connect the wire from the power supply into the second hole. Using pliers, press the jumper that goes through both wires, thereby creating the necessary contact between the two cables. After this, connect each wire to the block in the same way, each connector of which will be marked accordingly.
Display Installation
It is better to fix the display in the most convenient position for you. In this case, just like for the ECU, you can use double-sided tape. If you decide to mount the display in the rear so you can see it through the rearview mirror, be sure to mount it in the correct position as the mirror image changes from right to left (D, B, C and A).
After this, secure the wiring with clamps or electrical tape and test the parking sensors. To do this, turn on the ignition. If the screen lights up, it means you did everything right.