Operating rules
If at some point the cigarette lighter stops working, what will happen? All your additional equipment will no longer receive power. As a result, you will be left without a media center, navigator, will not be able to charge your phone, and so on.
There are several important rules that are recommended to be followed when operating your VAZ 2109 equipped with a cigarette lighter.
- It is not recommended to connect compressors directly through the cigarette lighter, which many people use today to pump up their tires on the road. It is better to connect it directly through the battery. Such devices consume a lot of energy and create an impressive load on the vehicle's electrical wiring. At some point it may melt or a fuse may blow.
- Do not try to insert devices whose connectors are larger than the size of the cigarette lighter into the cigarette lighter socket.
- Do not connect metal objects. Also, when connecting the device, do not use equipment that has metal rings on the body. They often fly out, resulting in a short circuit. At best, your battery will quickly run out.
And what's behind it?
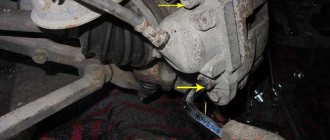
How to use it correctly
What happens if the cigarette lighter breaks? In this situation, the additional equipment installed on the machine will not be able to receive electricity and, therefore, will stop working.
To prevent this from happening, when using a cigarette lighter, you just need to follow a few fairly simple, but very important rules.
First of all, you should not connect the compressor, which is currently used by many car owners to pump up wheel chambers, directly into the connector, that is, directly. It would be more correct to power it from a battery. The thing is that these types of devices require a lot of voltage to operate and, therefore, create high loads on the wires. As a result, the latter often overheat and even melt. This most often happens on machines where fuses are replaced by jumpers.
Under no circumstances should you try to insert too thick plugs into the socket - they will damage the connector elements, some of which are made of porcelain.
Main nuances
So:
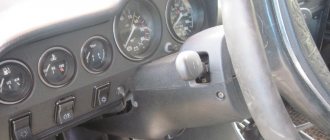
- Before connecting the car radio, you must carefully study the instructions, since incorrect actions will lead to equipment breakdown or even fire.
Connecting a VAZ 2109 car radio
- In modern players with automatic tuning, due to the wiring features of domestic cars designed for older models, settings may fail when turning the ignition key.
Note: therefore, it is also necessary to study the features of VAZ cars.
Cigarette lighter
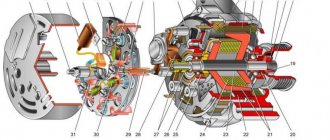
1 – block headlight; 2 – gear motor for headlight cleaner*; 3 – engine compartment lamp switch; 4 – sound signal; 5 – electric motor of the engine cooling system fan; 6 – fan motor activation sensor; 7 – generator; 8 – solenoid valve for turning on the headlight washers*; 9 – solenoid valve for turning on the rear window washer* (not installed on the VAZ-21099); 10 – solenoid valve for turning on the windshield washer; 11 – electric motor for glass washer; 12 – oil pressure warning lamp sensor; 13 – carburetor solenoid valve; 14 – carburetor limit switch; 15 – spark plugs; 16 – plug socket for a portable lamp; 17 – engine compartment lamp; 18 – ignition distributor sensor; 19 – carburetor solenoid valve control unit; 20 – windshield wiper gearmotor; 21 – switch; 22 – ignition coil; 23 – starter; 24 – top dead center sensor of the 1st cylinder**; 25 – diagnostic block**; 26 – starter activation relay; 27 – coolant temperature indicator sensor; 28 – reverse light switch; 29 – battery; 30 – brake fluid level sensor; 31 – mounting block; 32 – parking brake warning lamp switch; 33 – brake light switch; 34 – glove box lighting lamp; 35 – heater fan electric motor; 36 – additional resistor of the heater electric motor; 37 – heater fan switch; 38 – backlight lamp for heater levers; 39 – cigarette lighter; 40 – rear window heating switch; 41 – rear fog light switch; 42 – fog light circuit fuse; 43 – alarm switch; 44 – external lighting switch; 45 – ignition relay; 46 – ignition switch; 47 – steering column switch; 48 – instrument lighting switch; 49 – side direction indicator; 50 – lamp switch on the front door pillar; 51 – lamp switch on the rear door pillar (not installed on VAZ-2108 and VAZ-21083); 52 – lampshade; 53 – sockets for connecting individual interior lighting to the lampshade; 54 – switch for the carburetor air damper warning lamp; 55 – turn signal indicator lamp; 56 – indicator lamp for external lighting; 57 – rear fog light indicator lamp; 58 – backup warning lamp; 59 – control lamp for high beam headlights; 60 – indicator lamp for heated rear window; 61 – speedometer; 62 – instrument cluster; 63 – instrument cluster lighting lamps; 64 – coolant temperature indicator; 65 – voltmeter; 66 – fuel level indicator with reserve indicator lamp; 67 – econometrician; 68 – “STOP” indicator lamp; 69 – battery charge indicator lamp; 70 – control lamp for the carburetor air damper; 71 – hazard warning lamp; 72 – brake fluid level warning lamp; 73 – parking brake warning lamp; 74 – oil pressure warning lamp; 75 – rear light; 76 – sensor for level indicator and fuel reserve; 77 – pads for connecting to the rear window heating element; 78 – license plate lights; 79 – rear window wiper gear motor* (not installed on VAZ-21099)
Causes
Practice shows that there are two main reasons for cigarette lighter failure on a VAZ 2109.
| Cause | Your actions |
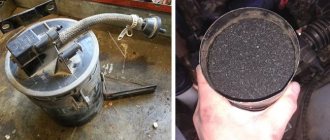
| Fuse burned out | You should look for the fuse inside the mounting block. Depending on the year of manufacture of your nine, the fuse for the cigarette lighter is designated F4 or F10. If it burns out, remove the fuse from the mounting block, replace it with a new one and watch to see if the situation repeats. If it burns out again after a while, this indicates a shortening in the wiring. The peculiarity of this fuse is that it is responsible for several devices connected to it at once. Therefore, check the condition of the remaining elements. Maybe it's because of them that the fuse melts, and not because of the cigarette light |
| Poor contact | It may be partially damaged or absent completely. Remove the cigarette lighter, check whether the wires are seated properly on the terminals, and whether the device is loose. A visual inspection is good, but it’s better to be more precise. Take a multimeter, turn it into voltmeter mode and check what voltage is between the black and red wires. If the device shows 12 volts, look for the source of the problem in the cigarette socket. If there is no voltage, there is a break in the wiring. |
Cigarette lighters are designed for a certain load, exceeding which leads to failure of the unit. When developing the VAZ 2109, engineers at that time could hardly have taken into account that the cigarette lighter would be used to connect portable compressors, powerful multimedia centers and other energy-consuming equipment.
The cigarette lighter doesn't work
Dismantling and replacement
If one or another equipment fails, you must first check the condition of the fuse responsible for it.
In practice, removing and removing an unusable fuse or relay is not difficult. To do this you need:
- Raise the hood and disconnect the minus from the battery. Since you are working with the fuse box responsible for electrical equipment, the car should not be energized at this moment;
- Find the mounting block. It is located in the engine compartment opposite the driver's seat directly under the windshield. The top of the block is covered with a plastic cover. To remove it, simply press the latches on the sides;
- Remove the cover and look at the back side. There is an electrical diagram showing the location of one or another fuse or relay. Just find the element that is responsible for the failed equipment according to the tables above;
- Remove the fuse. All mounting blocks are equipped with special pliers. Manually removing fuses is not recommended. The relays are removed by gently rocking up and down;
- Replace the failed component.
Fuse failure is determined by the melted filament. These are fusible elements that melt and make contacts, preventing equipment from being damaged by excessive voltage.
That's it, all that remains is to replace the fuse block element, close the cover, replace the battery terminal and check the functionality of the equipment.
Why it breaks and what to do
Experts say that there are only 2 reasons leading to cigarette lighter failure:
- fuse blown;
- loss of any contact.
In the first case, you will need to replace the melted protective device with a working one. It is located directly in the mounting block. So, if you have:
- low instrument panel (that is, an older car), then this is F4 or F10;
- high panel – 11.
It is worth noting that in this situation the following will also stop working:
- rear window heating element;
- socket for extension cord.
In early cars the fuse rating was 20 amperes, in new ones it was only 16.
By the way, the stove is powered through F7 in old models, 4 in new ones.
The blown fuse is removed with the battery disconnected and replaced with a new one. It is important to monitor his condition for some time. If it burns out again, then you should look for the cause in a short circuit.
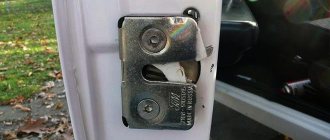
If contact is lost, you must:
- inspect the cigarette lighter socket;
- make sure that all wires are holding well;
- use a tester to check the voltage (black and red wires - should be 12 volts).
If everything is in order, then you should look for the problem in the socket. If there is no electricity, inspect the wiring for integrity.
It is important to understand that the cigarette lighter itself has a certain margin of safety, and not every load will pass without leaving a mark on it. If the norm is exceeded, the risk of breakdown increases. Therefore, you need to be more attentive to the selection of gadgets, giving preference to the most energy-saving ones.
Where are the power supply units located and what is their layout?
Regardless of the electrical circuit on a car with an 8 or 16 valve engine, the mounting devices are located not in the passenger compartment, but in the engine compartment of the car, in the area of the windshield. Cars with different fuel supply systems (injection or carburetor engines) can be equipped with new VAZ 21099 fuse blocks.
Old type power supply circuit
First, you need to show the electrical diagram of the device and talk about the designations of safety parts in old-type products.
Old-style device diagram
Relay values in the diagram.
| Number | Decoding |
| 1 | Used to activate cleaning mechanisms for front optics |
| 2 | A device that controls the operation of the rear window washing time system |
| 3 | Part used to protect the electrical circuit of hazard warning lights and turning lights |
| 4 | Windshield wipers |
| 5 | Jumpers mounted in the place of the relay for monitoring the health of light sources |
| 6 | This component is used to ensure the rear window defroster system is operational. |
| 7 | Backup relay |
| 8 | A device that ensures the working condition of light sources of distant lighting |
| 9 | Low beam optics |
| 10 | Safety element |
| 11 | Relay for monitoring the operating state of the cooling system ventilator. Damage to this component will lead to overheating of the car engine. |
| 12 | Ensures the working condition of the steering signal - horn |
Description of the purpose of safety devices in old-type power supplies
New model power supply
The new type of box is characterized by a slightly different scheme. However, it also contains all the elements to protect electrical systems and devices, including the cigarette lighter and stove. Below we will look at which fuse is responsible for what.
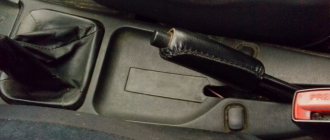
Design and purpose of the cigarette lighter
The cigarette lighter in VAZ 2108, 2109 and 21099 cars is used:
- for its main purpose, that is, for lighting cigarettes;
- for powering devices such as video recorders, navigators, radar detectors, etc.;
- for charging mobile gadgets, players and tablets.
As for the device, the cigarette lighter consists of:
- a housing in which all the constituent elements are enclosed;
- insulator;
- terminals for connecting to the power circuit;
- holder contacts;
- heating element - the main component of the device;
- metal legs fixing the element;
- a spring that knocks the cigarette lighter itself out of its seat in the event of full heating.
Scheme
The entire line of VAZ 2109 cars can be divided into two branches - those produced before 1998 and those produced after 1998.
Older cars are equipped with fuse blocks whose marking is 17.3722. This power supply consists of a housing and an engineering board. Wire contacts, fuses and relays are soldered to the board.
Newer versions of nines, the production of which began in 1998, here the power supply is marked 2114-3722010-60. Here we are already seeing fuses.
The required mounting block is also located the same everywhere - in the engine compartment opposite the driver's seat, almost under the windshield.
Location
Differences
Are there any differences between the old and new versions of the power supply? Of course. They are as follows:
- The parts of the mounting block are marked differently;
- The fuse ratings are different;
- The new power supply does not have a relay for the cooling system fan motor and a time relay for the rear window washer device.
The relationship between a car lighter and a radio in VAZ cars
A common problem for all VAZ car models (2114,2115, 2109, 2110, 21099), this is the same voltage supply circuit to the car player, with output to one common fuse, which is additionally responsible for the power supply:
- cabin heater (stove);
- cigarette lighter;
- heated rear window;
- the radio itself.
Thus, a failure as a result of a break, short circuit, etc., in the electrical circuit of any device leads to the shutdown of the rest.
Since the tape recorder is equipped with an additional safety device, coming after the main one, after checking them and replacing them, if necessary, the operation of the head unit, like all the above-mentioned equipment, is restored. If only the cigarette lighter (without the player) resumes operation, the cause of the malfunction should be sought in the car radio itself (which is the topic of a separate article).
Where is the VAZ-21099 carburetor fuse box and its diagram
In domestically produced vehicles, a problem such as the breakdown of one of the electrical appliances often occurs. First you need to check the serviceability of all fuses that are installed in the car. The VAZ-21099 carburetor fuse box looks like a small box located near the windshield on the left side. If the car has two blocks, another box is located in the cabin near the steering column below. It has been verified that the location under the hood of a vehicle is extremely inconvenient. After all, it is precisely due to this placement that it so often fails. Drops of rain easily get under the hood, which leads to the block becoming wet. Almost all electrical circuits are protected by fusible devices.
Tuning VAZ-21099 with your own hands
Relay and fuse box: functions
Almost all sections of electrical circuits are combined thanks to the mounting block. This unit also provides all critical areas with the necessary fuses and relays.
The mounting block allows you to repair and assemble circuits much faster and easier due to the close arrangement of wires and relays to each other.
In the event of an electrical fault, the current in the node increases, so a short circuit occurs.
Today we often find devices on cars that are suitable for reusable use. During heating, they unbend and open the contact, and when they return to the original temperature, they take on their original appearance.
Due to this, the service life of the fuse is significantly increased, which makes it possible not to purchase a new one after each circuit.
It also happens that these fuses do not return to their original form, so the driver of the car must independently correct the situation and press the button after the origins of the short circuit problem are found.
What is the fuel consumption of the VAZ-2109 (injector, carburetor)
The symbol F denotes fuses with a serial number, the letter K denotes the devices themselves. The designation scheme is as follows:
- F1 – washes headlights (10 A);
- F2 – provides emergency lights, as well as their breaker relay (10 A);
- F3 – responsible for interior light and rear lights (10 A);
- F4 – responsible for heating the rear window (20 A);
- F5 – provides cooling using a fan, as well as a horn signal (20 A);
- F6 – responsible for raising the windows (30 A);
- F7 – provides lighting in the glove compartment, as well as a washer pump (30 A);
- F8 and F9 – illumination of fog lights (7.5 A);
- F10 – responsible for the side light (7.5 A);
- F11 – responsible for the rear right headlight (7.5 A);
- F12 and 13 – provides low beam and right headlight (7.5 A);
- F14 and 15 - responsible for the light of the left high beam headlight (7.5 A).
Fuse F16 (15 A) performs many functions:
- Direction indicator.
- Monitoring the brake fluid level.
- Oil sensor monitoring.
- Cooling sensor monitoring.
- Ensuring automatic door opening.
Replacing fuses or the entire block
In order to change fuses, you need to remember their location. The diagram, which should be indicated on the block cover, should help. First of all, when you decide to change the fuses, you should reset the mass. The black box should contain tweezers, which are provided for replacing fuses. With its help, it becomes much easier to get and hook small parts.
To understand which fuse requires replacement, it is worth looking at the diagram presented on the block cover. When completely replacing the block, you need to completely unscrew the old box and remove the brackets from it. In this case, you need to study where and how the wires are connected, so that later they can also be connected to the new device.
How to replace the hand brake cable of a VAZ-2110
Old and new type of VAZ-21099 fuse box
There are several types of fuses. They can be old or new designs. Natural data differ in their location and shape. When replacing an old unit with a new one, a small problem may arise. The engine cooling fan starts to operate continuously. You can correct this situation yourself. You need to get the black wire that comes out of the fan power supply and insulate it. In addition, you need to do the same with the black and white wire that comes from the fan indicator. The terminals that have become free must be connected with one wire, and then the battery terminal must be attached to them.