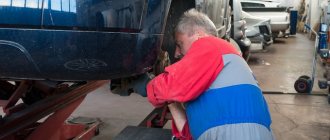
One of the most common types of body work that owners of the “Seven” have to deal with is replacing the front wing of a VAZ 2107.
The reasons for wing failure are simple:
- The appearance of traces of corrosion, even through holes. Despite the fairly high-quality metal and anti-corrosion treatment used in the manufacture of the car, dirt, moisture and, in particular, chemicals that are sprinkled on roads in winter cause the destruction of the paintwork and steel of the wing.
- Damage to a part due to an accident. It is worth replacing the wing only if the degree of its damage does not allow it to be straightened. Otherwise, it is better to restore and paint the old wing than to waste time and effort replacing the part.
Purchasing a new VAZ 2107 wing in a store is not a problem, but you should pay attention to the geometric parameters of the part. Sometimes there are body parts on the market that do not meet factory standards. It is quite difficult to perfectly install such wings in place. It is better to choose a high-quality part that does not require additional straightening or bending in accordance with the seat. You can do the work of replacing the wings yourself. You just need to have a few plumbing tools, a drill, a grinder and a semi-automatic welding machine adapted for welding in a carbon dioxide environment.
Replacing rear fenders
A car fender is one of the body elements that is used to prevent dirt or small stones flying out from under the car’s wheels from hitting pedestrians and passengers. It is also a design element and affects the appearance of the car.
The coating of a car fender can be very diverse - it all depends on the engineers of the auto manufacturers. The main goal is maximum resistance to corrosion processes and reliability of the structure.
It should be understood that the size and location of the car's wings affect the steering angle of the wheels and the travel of the car's suspension.
The reasons for replacing wings are varied:
- As a rule, a car body is made of sheet steel having a thickness of 0.8 mm. When operating a car, air and moisture have a harmful effect on the body. As a result, corrosion processes occur and the car body begins to collapse.
- Very often, when a car gets into a traffic accident, it is the fenders of the car that receive the greatest damage. If the nature of the damage is not too serious, then the solution to the problem will be the usual alignment of the wing, otherwise you simply cannot do without replacing it.
- Also, do not forget about the desire of the car owner to transform his “horse” by changing its appearance.
Replacing a car's rear wing
Let's consider the process of replacing a wing using the example of a VAZ 2107 car.
To work you need to prepare the following tools:
- welding machine;
- drill;
- pliers;
- grinder (with sharpening and cutting wheels);
- rubber spatula;
- chisel or thin chisel.
Before performing work, you should carefully inspect the wing. If the nature of the damage is minor, then you can limit yourself to welding a repair insert, which you will have to choose from a huge assortment.
The repair insert is an imitation of the necessary part of the part, it is used when a small area is damaged and there is no need to change the entire wing, and is selected individually for each specific case.
If the damage to the wing is very severe, then it must be replaced.
This is done in stages:
- We remove the bumper, lights, rear seats and disassemble the decorative trim in the trunk. If we are changing only the right wing, then in addition the fuel tank should be removed. In this case, all electrical wiring must be disconnected.
- We cut off the joints with a sharp chisel or with a grinder:
- with the rear part of the sidewall: cut along the bend, retreat a distance of 15–20 mm from the edge of the wing;
with the rear wheel arch: cut along the bend, retreat 12-15 mm from the edge of the wing;
- with the panel of the rear of the car: cut it off, 2 mm away from the connecting line;
- with the floor where the spare wheel is located: cut along the bend, retreat 12–15 mm from the edge of the wing;
- with the rear window cross member panel: step back from the edge of the bend 2–3 mm and cut it off.
- Use pliers to remove the tape that remains on the weld seam of the old wing. Sometimes such a tape is quite difficult to tear off - in this case, you should drill out the contact welding point with a drill or cut it off with a thin chisel. After cutting off the old wing, we level the place intended for planting the new one. If there is damage to the inner arch, then we must cut it off as well.
- After the damaged metal is cut off with a grinder, you need to fit the repair insert to the inner arch and weld it.
- Now the new wing needs to be fitted to the car. To do this, you should attach it and secure it in several places with clamps. Since the quality of the fender may vary, it may not initially fit the vehicle. In this case, it should be pressed or pulled. If everything fits, then we weld the new wing to the car. It is better to use the spot welding method with pre-drilling holes.
- After welding the wing, we clean the seams using a grinder and a grinding wheel. Now the welding seams must be sealed with a special sealant for cars. Using a rubber spatula, apply the sealant evenly along the seam. You can also use mastic - plastisol.
- After it dries, we clean out the irregularities and sand the surface, giving it an even and smooth shape.
- After all the work has been completed, you can start painting. It is advisable to treat the inside of the new wing with an anti-corrosion mixture, because after replacement, access to its inside becomes slightly worse.
The figure below shows the places where the wing will be chopped or cut off.
Replacing the rear wing video
How to replace the rear wing on a car is shown in the videos below.
Source: https://allkoreancars.ru/obsluzhivanie/kuzov/zamena-zadnih-krylev.html
Rear fender replacement
First, we remove the trim in the luggage compartment, and in the cabin - on the rear seats. For safety reasons, it is recommended to remove the gas tank (even if you are replacing the left fender). We take a grinder and cut the wing, departing about 1 cm from the factory seam. Using strong pliers, twist the remaining metal into a ribbon and remove it. Inspect the inner arc and repair (boil) if necessary, then refill. Next, attach the fender, secure it with clamps and align it so that there are equal spaces between it and the trunk lid and rear door. If everything is fine, you can solder (preferably spot welding).
Once the wing is in place, sand the welds using a grinder and a grinding wheel. Then they need to be primed and treated with automotive sealant. Treat the element installed from the inside with any anti-corrosion compound. After this, it is recommended to completely coat the wing with primer (this also applies to the front wing), because the processing at the factory leaves much to be desired.
How to replace the front wing of a VAZ-2107
The reason for this is traces of corrosion or even through holes that have appeared over time, despite the fact that fairly high-quality metal was used during the production of the machine.
And those who purchased a VAZ-2107 car much later, and it was produced until 2012 at the Volzhsky Automobile Plant, could encounter such a problem as an accident.
It is worth understanding that it is possible to resolve the issue of replacing the front fenders for such a car without even contacting expensive special service services. To do this, you need to be aware of at least the basic concepts of the work of a straightening welder.
Even though this is a rather complicated procedure, you can still do it yourself.
Buying a front wing for a car today is quite simple. It’s a good idea to go to a specialized auto store or try to find one at auto dismantling yards, where they sell spare parts for domestic cars.
Please note that if the damage allows the spare part to be straightened, then it is better to carry out such measures, because the wings that are produced as new spare parts do not always meet factory standards.
This may lead to difficulties during their further installation.
Preparing the car to replace the front wing
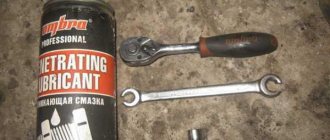
To carry out all the necessary procedures you will need the following tools:
- drill or so-called hole punch;
- Grinder;
- spanners;
- impact screwdriver, etc.
To remove a damaged car part, namely the fender, you must first remove several other parts. The first thing you need to do is remove the front door.
This can be done using an impact screwdriver, as it is screwed on with Phillips screws.
Next, the hood, wheel, headlight, and front bumper are dismantled, regardless of whether the right or left fender is being replaced. It is advisable to seal the doorway to prevent dust from entering the interior. This way you will avoid unnecessary expenses on dry cleaning services. When operating the grinding machine, it is necessary to cover the windshield from abrasive particles.
After all the dismantling and preparation of the site for installation of the new wing has been carried out, you can begin to directly replace the part.
Description of self-replacement of the front wing of a VAZ-2107
A drill or hole punch is used to make holes in a new car part so that it can later be welded to the body. Considering that the work is performed by a non-professional in a garage, and it is not possible to use resistance welding, it is better to use a semi-automatic machine. In this brand of car, the front fenders are welded, not screwed, so welding cannot be done without.
Source: https://ladaautos.ru/vaz-2107/kak-proizvoditsya-zamena-perednego-kryla-vaz-2107.html
Preparing the car for front wing replacement
Before deciding to replace the front fenders, you should make sure that such actions are necessary. If the damage is minor, the part can be straightened. It will cost much less than buying a new wing. If the wing has significant damage, then it is better to replace it.
To replace the front fender yourself, you need to prepare the following tools:
- Drill for drilling holes.
- Angle grinder - grinder.
- A set of wrenches for removing the old and installing a new part.
- Impact screwdriver.
If you plan to replace a part, the first step is to replace the damaged device. This can only be done after dismantling the front door and headlights. To remove the door, you will need to use an impact screwdriver. To remove the front fender, you will also need to remove the front headlight unit on the right or left side, depending on the part being removed. You will also need to remove the wheel, fender liner and front bumper, after which you can begin dismantling and installing a new front wing on the VAZ 2107.
Replacing the front fender - when necessary
When is it necessary to replace the part in question? If you love your car and try to take care of it, then the first sign of corrosion will greatly upset you. However, in this case, you should not remove the part and replace it with a new one. Replacing the front wing on a VAZ 2107 is carried out for a number of the following reasons:
- Corrosion marks in the form of through holes. In this case, you can use soil substances and do without welding, but such repairs will not last long. The best option to prevent further damage to the part by corrosion is to replace it. You can use a repair insert or overlay, but to do this you need to cut out the rotten part and weld the metal overlay. This method is labor-intensive and requires the use of paints and varnishes.
- The part was damaged if the car was involved in an accident. Often it is the front wings that are affected. If the straightening specialist says that the wings cannot be repaired, then it is better to replace them.
To make a replacement, you will need to buy a new or used device. When purchasing, it is important to pay attention to the geometric dimensions of the part, as well as the color. You can do the replacement work yourself at home, but we’ll find out how to do it correctly below.
Removing the old wing
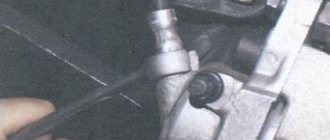
When carrying out dismantling work, you should use an impact screwdriver and WD-40. When it comes to the wing or wings themselves, before removing them it is necessary to clarify that they are secured with welds. To dismantle a wing secured by welding, you will need to use an angle grinder.
When the wing on a VAZ 2107 is dismantled, in order to prevent dust and dirt from entering the interior, it is better to first seal the doorway with polyethylene. It is advisable to put a cloth on the windshield that will prevent chips and abrasives from getting on it. After this, we proceed to dismantling manipulations:
- The first step is to cut off all welding joints by which the part is attached to the drain gutter.
- The connection near the headlamp also needs to be cut with a grinder, making an indent of about 2-3 mm.
- The cut from the side post must be made at a distance of 5 mm from the bend.
- The remaining parts are also removed using a grinder, and the joints ultimately need to be cleaned.
When the old wing is removed from the car, you can begin to prepare the area for installing the new part. To do this, we evaluate the condition of the car body. If there are no obvious damages (including corrosion), then we proceed to removing contaminants and cleaning the joints. Many people do not pay due attention to this process, but if the procedure is not performed properly, the result will be disastrous. Soon you will need to remove the front fender again and repair or replace it.
If there are places of corrosion, they must be cleaned with a grinder and then primed. Before installing a new wing, it is necessary to treat its cavities with primer and apply Movil. In this way, you can completely protect the part from the emergence of new corrosion foci.
How to install a new wing on a VAZ 2107
To install a new wing on a VAZ 2107, you will need to use a welding machine - semi-automatic or gas welding. You can secure the part using connecting bolts, but this will require drilling holes and cutting threads. This method cannot be called simple, but you need to choose depending on the tool at your disposal.
Self-replacement of the front wing of a VAZ 2107
One of the most common types of body work that owners of the “Seven” have to deal with is replacing the front wing of a VAZ 2107.
The reasons for wing failure are simple:
- The appearance of traces of corrosion, even through holes. Despite the fairly high-quality metal and anti-corrosion treatment used in the manufacture of the car, dirt, moisture and, in particular, chemicals that are sprinkled on roads in winter cause the destruction of the paintwork and steel of the wing.
- Damage to a part due to an accident. It is worth replacing the wing only if the degree of its damage does not allow it to be straightened. Otherwise, it is better to restore and paint the old wing than to waste time and effort replacing the part.
THIS IS INTERESTING: Where is the oil pressure sensor on the loaf?
Purchasing a new VAZ 2107 wing in a store is not a problem, but you should pay attention to the geometric parameters of the part. Sometimes there are body parts on the market that do not meet factory standards. It is quite difficult to perfectly install such wings in place.
It is better to choose a high-quality part that does not require additional straightening or bending in accordance with the seat. You can do the work of replacing the wings yourself.
You just need to have a few plumbing tools, a drill, a grinder and a semi-automatic welding machine adapted for welding in a carbon dioxide environment.
Preparing a VAZ 2107 for wing replacement
For preparatory work you will need:
- impact screwdriver;
- angle grinder (“grinder”) with disc;
- drill with drill bit;
- chisel;
- hammer;
- set of wrenches.
Before dismantling the old front wing of the VAZ 2107, it is necessary to remove some adjacent parts from the car:
- front door;
- hood;
- bumper;
- block headlight;
- wheel.
The screws securing the front door of the VAZ 2107 are tightened very tightly, so it will not be possible to unscrew them without an impact screwdriver. You can make it easier to unscrew them by treating the threads with WD-40.
The fastening of other parts is easier to unscrew. The front fenders are attached to the body by a welded joint. Therefore, to dismantle them you will have to use a grinder.
Before cutting off the old wings, you need to seal the doorway (where the dismantled door was) with plastic film and tape. Otherwise, dust and metal filings may contaminate the interior of the car. You should also cover the windshield from hot particles and abrasives.
The old wing is dismantled in four stages:
- Cut off or cut away the flash weld points securing the fender to the gutter.
- After retreating 2-3 mm, cut off the connection between the wing and the front panel (near the headlight).
- Stepping back 5 mm from the bend line, cut off the connection between the wing and the sidewall pillar.
- Remove the remains of the wing from the body and clean the seats with a grinder.
When the old wing is removed, it is necessary to check the condition of the body cavities that it covered. They should be thoroughly cleaned of dirt and washed. If there are pockets of corrosion, they must be cleaned and primed. Before installing a new wing, all cavities must be treated with zinc-chromate primer and additional protection with Movil applied to the surface. This will allow you not to worry about the emergence of new corrosion centers after the wing is installed.
Installation of a new VAZ 2107 wing
To install the wing, semi-automatic welding or gas welding is required. The first option is safer and does not require the use of explosive gas cylinders. To properly install a new VAZ 2107 wing, you need to replace the door, headlight, hood and bumper of the car. After this, the wing needs:
- align the wing, maintaining the gaps between it and other parts of the body;
- secure the wing with clamps.
Next, you will have to dismantle the doors, headlight, bumper and hood again. Before this, you can additionally “grab” the wing by welding in several places so that it does not move. Care should be taken not to damage the paintwork of other parts. Welding is carried out in three stages:
- the wing is welded temporarily, with several short seams, so that it cannot move even without clamps;
- the correct position of the wing on the car is checked;
- The final welding of the wing is carried out.
This completes the replacement of the VAZ 2107 wing. All that remains is to thoroughly clean the welding areas and prime, and then paint, the wing and welding areas.
Source: https://semerkavaz.ru/raznoe/zamena-perednego-kryla-vaz-2107/
Installation of a new VAZ 2107 wing
Replacing a front fender requires the ability to operate a welding machine. It is recommended to use gas welding with a brass rod L-62 or L-58. After checking the part on the seat, contact welding is carried out in increments of 40-50 mm. If electric welding is used in a carbon dioxide environment, it is recommended to use wire Sv 08 G1S or G2S, with a diameter of 0.8 mm. Welding should be done with a 10 mm seam in increments of 30-40 mm, the optimal current strength is 50-90 A.
Before installing a new element, it is necessary to mount all the removed parts on the body: door, hood cover, bumper and try on the new element on the seat.
Replacement using welding step by step:
- Insert the wing into the seat, observing the gap.
- Secure with clamps or other fasteners.
- Remove the bumper, hood, door.
- Grab the part in the area of the front pillar and check the geometry.
- Remove the clamps.
- Weld.
- Clean weld areas.
- Prime the joints, treat them with anti-corrosion agent, and paint over them after drying.
How to replace the front wing of a VAZ?
How to replace the front wing of a VAZ? This question arouses the interest of car enthusiasts. Over the 42 years of production of classic Zhiguli models, VAZ has assembled more than 17 million cars.
And if the final point in the conveyor history of the classics was set in April 2012, then the time when such a car becomes a rarity on the country’s roads is still about 15 years away. During this time, two generations of car mechanics and straighteners will have time to grow up who will repair these rarities.
And for another decade and a half, experienced advice on replacing individual parts on these cars will be in demand.
How to replace the front wing of a VAZ
Classic VAZ models are now most widely represented by the 2105 and 2107 brands, which stayed on the assembly line longer than others. And the seventh model was produced in Egypt until 2014.
The sedan body type assumes that the car has both front wings and two rear wings of the VAZ 2107. In terms of maintainability and the techniques used in this operation, replacing the rear wing of a VAZ 2107 practically repeats the work on the front wing. The VAZ 2105 is practically indistinguishable in body design, the only difference being the rich interior trim and the presence of a more powerful engine in the seventh model.
To replace the front wing of a VAZ 2105, the front wing of a VAZ 2107 (by analogy, the rear wing of a VAZ 2107 is replaced), you need a simple set of tools and the desire and space for repairs in the garage:
- A grinder or pneumatic chisel is used to remove the old front or rear wing of a VAZ and clean the surface before welding to fit the new wing.
- Drill with metal drills with a diameter of 6 and 8 mm for drilling out iron in spot welding areas.
- A sharp chisel for cleaning up small residues of welding slurry on the surface and separating the drain gutter.
- Screwdriver and self-tapping screws for fixing the wing before welding.
- Zinc chromate primer for protecting the cleaned surface before welding and priming the rear surface of a new wing.
Tinsmiths blame the low quality of the new iron that is used to produce spare parts for classics, so they prefer to replace entire body parts only if this cannot be avoided by patching and straightening the old part.
Replacement procedure
At the beginning of the dismantling operation, the front or rear wing of the car is removed by cutting with a grinder or cutting with a pneumatic chisel at a distance of 10-15 mm from the edge.
Before starting dirty and loud work, it is necessary to remove all adjacent intact parts: the front door, bumper, light fixtures. After dismantling the VAZ 2105 wing, VAZ 2107 wing, it is necessary to clean the joints, drill out the weld points, removing excess metal, and separate the drain using a regular chisel.
After separating the old wing and removing the remaining weld metal, it is necessary to clean the joint with a grinder along the circle of the future joining of the new wing and the body. Mechanical cleaning will remove dirt and traces of rust.
It is necessary to clean the new wing from the transport soil using a grinder and coat the inner surface with fresh product. To ensure a good fit of the fender to the drain at the bottom and the threshold of the car, you need to drill holes for welding and grind the places from the inside for alignment and a tight fit.
Before welding, it is recommended to fix the fender in place using self-tapping screws to adjust the distances to the hood and door of the car.
THIS IS INTERESTING: How are Toyota and Lexus related?
Welding can be done either with resistance welding pliers (if available) or with conventional electrodes with an intermittent seam 10 mm long and at intervals of 15-20 mm.
After welding, it is necessary to check the mating of the parts and correct any inaccuracies.
Then you need to sand the joints and prime the surface to prepare for painting. After painting, reinstall all the removed parts in their original places: bumper, front door, light fixtures. Stand in front of the car and admire the well-done repair.
At the same time, the only disadvantage is the time spent on this, which is covered by minimal costs, acquired knowledge and skills, and a feeling of satisfaction from quality work done with your own hands.
Source: https://korchim.ru/biblioteka/kuzov/zamena-perednego-kryla-vaz.html
Replacing the front fender
Before removing the damaged fender, remove the bumper, front door, hood and antenna (if equipped) from the vehicle.
Then remove the headlight, side turn signal and trim from the front of the car. Visually identify the welding points - they are located in the front, where the headlight was installed, on the exhaust chute near the engine compartment and where the door hangs. Take a drill and drill out the solder joints. Now you will need a well sharpened chisel. It is necessary to cut through the joints with the front, lower part of the side wall and its A-pillar. Next, you can remove the wing and, using a grinder and the same chisel, knock off the remains of the old damaged body element. At the next stage, smooth out the fastening points with sandpaper (you can use a grinder with a Velcro circle). After this, you can hang the hood, door and install a new wing; it needs to be adjusted so that there are no gaps. Then secure the new housing element, for example with a clamp, and temporarily weld it first. Remove the clamp, make sure that all gaps are met, and weld a new wing revision.
Replacing the rear wing of a VAZ 2107
Replacing the rear wing is a fairly popular operation, especially for those who have just purchased a VAZ 2105-2107 car or simply want to put it in order. Corrosion and mechanical damage (as a result of an accident or hooliganism) require periodic replacement of this element. For VAZ 2105-2107 models, the operation is carried out in a similar way.
It is best to choose a rear wing for your car in advance, and pay special attention to quality. A cheap wing made of thin metal with factory defects will require replacement in just one or two seasons, so saving on this factor is unwise.
Tools and equipment for work
- Bulgarian;
- drill and drill bits included;
- Screwdriver Set,
- welding equipment.
As for the additional components that it is advisable to stock up on in advance, this, in addition to the wing itself, is also the outer part of the inner arch of the rear wing. It is also necessary to check the condition of the panels, tank and niches for the spare tire - it may also be necessary to at least install patches there.
The work of replacing the rear wing of a VAZ 2107 takes place in several stages:
- Removing the wing. The work must be carried out very carefully so as not to damage adjacent parts.
Often a drill is enough for dismantling. It is recommended to carefully (not all the way through) drill out the welding points, and then use a screwdriver. If the welding points are not noticeable, use a grinder. Light grinding will “reveal” all the welding points, including on the arch of the doorway, on the side of the wheel and from the inside of the trunk (at the junction of the wing and the rear panel). - Preparing new elements for welding. Everything here is simple and standard - we clean the new part, clean the base, prepare holes for welding, prime the wing on the inner surface.
In addition, it is advisable to secure the wing with self-tapping screws before welding. This way, it will be possible to avoid deformation of the part during the welding process, and the actual welding will be much more convenient if the base is securely fastened. At the preliminary stage, you should also think about the sealant, in particular, at the junction of the drain and the wing. It is best to take care of it in advance - the car will thank you for your care with durability. - Welding.
We carefully go through all the welding areas, controlling the position of the wing during the work. Of course, secured with self-tapping screws, it can extremely rarely move, but it is better to further check this issue.
Also read with this article:
Source: https://videovaz.ru/vaz-2107/1773-menyaem-zadnee-krylo-vaz-2107
The practice of replacing the rear wing of a VAZ 2105 - 2107
Actually, I started the process of replacing the rear wing with a detailed inspection; the panel was replaced earlier. By the way, if you are changing the panels, then replace the panels first, and only then the fenders or sills.
The gap between the wing and the door, the arch is rotten, masked with anti-gravel
Holes in the bottom of the wing
Next, we drill out the rear wing from the rear pillar; in order to find all the welding points, you may need to grind the surface with a grinder.
Welding points that need to be drilled
Drilled out these points
It is also necessary to drill out all other points - on the arch in the door opening, on the arch from the wheel side, cut off the points from the inside of the trunk where the rear panel meets the wing.
If the tire tank cover also changes, then we tear off this cover too, you will get something like this:
Photo of VAZ 2107 without rear wing
Small holes on the rear fender arch
Thanks for subscribing!
Here you can see that in some places it was necessary to weld the patches; the arches were not completely changed. We fasten the wing with self-tapping screws - this will allow you to adjust the wing panel in any direction and securely fix the wing before welding.
We fix the wing with self-tapping screws
By the way, I didn’t show the preparation for welding a new part, but everything is standard:
- Drilling holes for welding
- Cleaning and priming the wing from the inside
- I highly recommend putting sealant at the junction of the fender and the drain (where the trunk rubber is)
We place the wing on the screws immediately, then it will not be possible to tighten it, we also check during the welding process whether the wing has moved.
Check the gap, cook
We cook the wing to the rear pillar
Thus we weld the wing, the welding points are the same as on the old wing.
One of the most common types of body work that owners of the “Seven” have to deal with is replacing the front wing of a VAZ 2107.
The reasons for wing failure are simple:
- The appearance of traces of corrosion, even through holes. Despite the fairly high-quality metal and anti-corrosion treatment used in the manufacture of the car, dirt, moisture and, in particular, chemicals that are sprinkled on roads in winter cause the destruction of the paintwork and steel of the wing.
- Damage to a part due to an accident. It is worth replacing the wing only if the degree of its damage does not allow it to be straightened. Otherwise, it is better to restore and paint the old wing than to waste time and effort replacing the part.
Purchasing a new VAZ 2107 wing in a store is not a problem, but you should pay attention to the geometric parameters of the part. Sometimes there are body parts on the market that do not meet factory standards. It is quite difficult to perfectly install such wings in place. It is better to choose a high-quality part that does not require additional straightening or bending in accordance with the seat. You can do the work of replacing the wings yourself. You just need to have a few plumbing tools, a drill, a grinder and a semi-automatic welding machine adapted for welding in a carbon dioxide environment.
Features of replacing the front or rear wing in a VAZ 2107
23.09.2019
Production of the VAZ 2107 ended in 2012, but even today this brand remains one of the most used in the VAZ line, along with 2106 and 2109. Drivers consider a durable, hard-to-kill body to be a feature of the 2107 configuration, the elements of which, although not coated with zinc, show high performance characteristics.
Replacing a VAZ 2107 wing is a type of repair that every Zhiguli owner has to deal with sooner or later. The market offers a complete catalog of body parts for the entire VAZ line, so choosing an original part from official manufacturers is not difficult.
In what cases are body parts replaced?
Few drivers know that rolled, black, galvanized steel loses 1% of its thickness every year. This is a natural process that builders and metallurgists know well. For body parts, natural wear and tear as thickness decreases is more than 2% per year of the original figure.
Therefore, the first reason for repairing and replacing a car body is natural processes, which for all metal parts end the same way: complete rotting or corrosion of the parts. Corrosion processes cannot be stopped, but can be delayed for 2-3 years by constant inspection of the body and anti-corrosion treatment of the metal. Reasons when an element needs to be changed:
- Corrosion has covered more than 50% of the surface, and there are through-holes.
- Accident, careless parking. Replacement is carried out if there is a break in the part, a deep dent that cannot be pulled out and straightened.
- The material used to make the part is plastic.
If there are small scratches on the paintwork, shallow dents with non-sharp edges, it is not advisable to replace the entire wing; it is recommended to straighten and draw out the metal.
Before changing the wing on a VAZ 2107, you need to inspect the element to check how the part is attached to the body. Factory assembly involves only welding; the wing is welded to the base at certain points. If the car is used, there is a chance that the model already has removable fenders mounted on bolts. In this case, replacing the part does not require the use of a welding machine.
Preparation of VAZ 2107
Replacing the front wing of a VAZ 2107 begins with preparing the car and selecting the necessary tools and materials. For repair you will need:
- drill with a set of drills 0.8 mm;
- angle grinder (grinder);
- impact screwdriver;
- set of wrenches;
- hammer;
- chisel;
- clamps or other metal fasteners;
- welding machine.
If it is necessary to replace a removable part, then clamps and a welding machine are not required. Regardless of the structure, removable or non-removable, before work it is necessary to dismantle some of the mounted body elements. Step by step preparation process:
- Remove the front door.
- Remove the hood cover and the wheel under the wing that needs to be replaced.
- Remove the bumper and headlight unit.
Source: https://InfoKuzov.ru/remont/zamena-kryla-vaz-2107
Replacing the Wing of a VAZ 2107 Without Welding
How to replace the front wing of a VAZ- 2107
The prerequisite for this is traces of corrosion or even through holes that appear over time, despite the fact that fairly high-quality metal was used during the production of the machine.
And those who received the VAZ- 2107 much later, and it was produced until 2012 at the Volzhsky Automobile Plant, could encounter such a problem as an accident.
It is worth realizing that it is possible to resolve the issue of replacing the front fenders for such a car without even contacting expensive special service services. To do this, you need to be familiar with at least the simple concepts of the work of a straightening welder.
Despite the fact that this is a rather complicated procedure, you can still perform it without the help of others.
Buying a front wing for a car is now quite easy. It’s good to go to a special auto store or try to find it at auto dismantling yards, where they sell spare parts for specifically Russian cars.
Please note that if the damage allows the spare part to be straightened, then it is better to carry out such measures, because the wings that are produced as spare parts of the new standard do not always correspond to the factory standards.
This may cause difficulties during their upcoming installation.
Preparing the car to replace the front wing
To carry out all the necessary procedures, the following tools will be useful:
- drill or so-called hole punch;
- Grinder;
- spanners;
- impact screwdriver, etc.
Body repair without welding
Rivets. VAZ body repair
-2121 Niva with your own hands. Report after 12 years
Replacing the front wing on a VAZ 2107
Car body repair in the garage. A channel about car repairs and more. Details on my website
To remove a damaged car part, namely the fender, you must first remove several other parts. The first thing you need to do is remove the front door.
This can be done using an impact screwdriver, as it is screwed on with Phillips screws.
Next, the hood, wheel, headlight, and front bumper are dismantled, regardless of whether the right or left fender is being replaced It is advisable to seal the doorway to prevent dust from entering the interior. This way you will avoid unnecessary expenses on dry cleaning services. When operating the grinding machine, it is necessary to cover the windshield from abrasive particles.
After all the dismantling and preparation of the site for installation of the new wing has been carried out, you can begin to directly replace the part.
Description of self-replacement of the front wing of a VAZ-2107
A drill or hole punch is used to make holes in a new car part so that it can later be welded to the body. Considering that the work is performed by a non-professional in a garage, and it is not possible to use resistance welding, it is better to use a semi-automatic machine. In this brand of car, the front fenders are welded, not screwed, so welding cannot be done without.
Using a grinding machine equipped with a special wheel, you need to clean the places where the welding took place. After this, you should install the door and hood, and return the headlight unit to its place. In order to align the replaced wing, it is necessary to adjust the gaps. Such events are carried out using a clamp. This will help secure the unwelded part and ensure that it is aligned correctly.
Then, using a semi-automatic machine, it is necessary to weld a new wing of the VAZ- 2107 . After all the holes are fixed, they need to be sanded with a grinding wheel.
At the very last stage, painting work is carried out. First you need to prepare the surface. The new wing is available in black and is coated with a preservative, which must be removed before painting. It is better to perform these works manually, without using grinding machines, as the surface can be damaged, which will subsequently entail additional processing, the purchase of materials and painting work.
Source: https://avto-melvin.ru/zamena-kryla-vaz-2107-bez-svarki/
How to change the wing on a VAZ 2107
The VAZ 2107 brand car is known not only in Russia, but also in neighboring countries. Its production began in the 80s, and production was closed in 2012. A lot of time has passed, but the car continues to be popular. Over time, it is possible that you will get into an accident or cause corrosion to appear. Usually the front fenders are the first to suffer. If any of these troubles happen, then repairing or replacing the damaged front wing on a VAZ 2107 will help maintain its appearance.
Preparing the car for front wing replacement
Before deciding to replace the front fenders, you should make sure that such actions are necessary. If the damage is minor, the part can be straightened. It will cost much less than buying a new wing. If the wing has significant damage, then it is better to replace it.
To replace the front fender yourself, you need to prepare the following tools:
- Drill for drilling holes.
- Angle grinder - grinder.
- A set of wrenches for removing the old and installing a new part.
- Impact screwdriver.
If you plan to replace a part, the first step is to replace the damaged device. This can only be done after dismantling the front door and headlights. To remove the door, you will need to use an impact screwdriver. To remove the front fender, you will also need to remove the front headlight unit on the right or left side, depending on the part being removed. You will also need to remove the wheel, fender liner and front bumper, after which you can begin dismantling and installing a new front wing on the VAZ 2107.
Replacing the front fender - when necessary
When is it necessary to replace the part in question? If you love your car and try to take care of it, then the first sign of corrosion will greatly upset you. However, in this case, you should not remove the part and replace it with a new one. Replacing the front wing on a VAZ 2107 is carried out for a number of the following reasons:
- Corrosion marks in the form of through holes. In this case, you can use soil substances and do without welding, but such repairs will not last long. The best option to prevent further damage to the part by corrosion is to replace it. You can use a repair insert or overlay, but to do this you need to cut out the rotten part and weld the metal overlay. This method is labor-intensive and requires the use of paints and varnishes.
- The part was damaged if the car was involved in an accident. Often it is the front wings that are affected. If the straightening specialist says that the wings cannot be repaired, then it is better to replace them.
To make a replacement, you will need to buy a new or used device. When purchasing, it is important to pay attention to the geometric dimensions of the part, as well as the color. You can do the replacement work yourself at home, but we’ll find out how to do it correctly below.
Removing the old wing
When carrying out dismantling work, you should use an impact screwdriver and WD-40. When it comes to the wing or wings themselves, before removing them it is necessary to clarify that they are secured with welds. To dismantle a wing secured by welding, you will need to use an angle grinder.
When the wing on a VAZ 2107 is dismantled, in order to prevent dust and dirt from entering the interior, it is better to first seal the doorway with polyethylene. It is advisable to put a cloth on the windshield that will prevent chips and abrasives from getting on it. After this, we proceed to dismantling manipulations:
- The first step is to cut off all welding joints by which the part is attached to the drain gutter.
- The connection near the headlamp also needs to be cut with a grinder, making an indent of about 2-3 mm.
- The cut from the side post must be made at a distance of 5 mm from the bend.
- The remaining parts are also removed using a grinder, and the joints ultimately need to be cleaned.
How to replace the front wing on a VAZ 2107 with your own hands
Owners of all old sevens sooner or later are faced with the need to replace the front wing on a VAZ 2107. Buying a new wing in an auto shop for any VAZ models will not be difficult. It is better to buy body parts from a reliable manufacturer. After all, if the dimensions are slightly off, then it won’t be possible to fit the new part perfectly into place. Let's discuss how to replace the wing on a VAZ in a garage.
Removing the old wing on a VAZ
First you need to make sure that you have all the necessary tools:
- spanners;
- impact screwdriver;
- Bulgarian;
- drill;
- hammer;
- chisel.
Before dismantling, you need to temporarily remove parts that may interfere with operation:
- front door;
- hood;
- wheel under the wing;
- bumper;
- block headlight.
Generally, the mounting screws are fairly tight, so it will be easier to remove them with an impact driver. First you need to spray the threads with WD-40 and let it sit for a few minutes.
The remaining elements unscrew more easily.
The wings themselves are attached to the body by welding. To remove them you will have to use a sander.
Before you begin the cutting process, we recommend sealing the door opening with polyethylene or tape. This will protect the interior from large amounts of metal dust and sawdust getting into it. It's also a good idea to cover your windshield to protect it from hot sparks and abrasives.
Dismantling is carried out in four stages:
- Cut or chop off any weld points that secure the fender to the drain channel.
- Back off two to three millimeters and cut off the connection near the headlamp.
- About five millimeters from the bend line, cut off the connection to the side post.
- Using a grinder, remove the remaining parts of the wing and clean the landing areas.
After dismantling, you need to make sure that the body cavities are thoroughly cleaned and washed. If there are pockets of corrosion, prime and clean them. Treat them with zinc chromate primer and also apply Movil. This will protect the new wing from the appearance of new foci of corrosion.
How to install a new wing on a VAZ
To install the wing, you need to know how to work with a welding machine. Gas or semi-automatic welding is suitable. It is better, of course, to use the second option. This will prevent the use of explosive gas containers.
Before installing the new wing, replace all other previously removed body elements: bumper, headlight, door and hood. This is done temporarily to fit the new wing and set the gaps.
Now you can get started:
- align the part, observing the gaps with other body parts;
- secure it with clamps;
- dismantle the previously installed body elements again;
- temporarily weld the wing in several places so that it does not move with the clamps removed;
- make sure that the part is installed correctly;
- finally secure it in place using spot welding.
After the work has been completed, finally install the removed body elements, clean the welded areas, prime them and paint them.
Source: https://7vaz.ru/remont/zamena-perednego-kryla.html
Removing the old wing on a VAZ
Dismantling, depending on the method of its installation, will be different. How to change the front wing on a VAZ 2107 if the original part is installed on the body by welding? The process of dismantling the old element step by step:
- Determine spot welding locations. At the service station, to dismantle the wing, they do not use cutting out the part with a chisel, but welding it with a welding machine.
- Drill out the welding points of the gutter on the body, cut off the gutter with a chisel.
- Cut off the connection between the fender and the front panel from the headlight downwards.
- Cut the connecting seam in the area of the side post, 5 mm away from the bend line.
- Use a grinder to cut out the remaining parts of the wing.
- Clean the cut areas and straighten the deformed edges.
- Inspect the body cavity, if there is rust or corrosion plaques, carry out repairs and treat the surface with anti-corrosive or zinc-chromate primer class GF-073. Experienced drivers recommend using Movil for any body work. This will protect the new wing from corrosion.
To dismantle a removable element that is installed on the body with bolts, you must use a power screwdriver. With this replacement, there is no need to remove the hood and door covers, and also protect the windshield from welding. Dismantling process step by step:
- Raise the hood and install the support stand.
- If the model is equipped with special protection, remove it.
When replacing the right fender, the steering wheel is turned all the way to the right; when replacing the left fender, it is turned to the left.
The part is attached to the VAZ 2107 using 8 bolts. The process of replacing removable, often plastic elements is a fairly simple procedure even for an inexperienced technician. Repairs take up to 2 hours and are carried out in the garage.