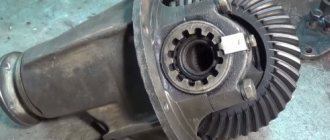
In any car, the main driving element of movement is the axle shaft with a bearing. The bearing on the axle shaft ensures equal rotation of the rear and front wheels, and, accordingly, minimizes shock and other mechanical loads on them. The axle bearing is located in the rear axle, behind the brake drum. Like any other mechanical part, a bearing has a certain working life, after which it fails and requires replacement. If the bearing is not replaced, this can lead to serious consequences for the vehicle owner. A deformed bearing can very quickly destroy its cell from excessive friction in the rear axle. Accordingly, the bridge itself will have to be replaced. And this will result in financial losses much more expensive than replacing only one bearing.
Quick navigation
- list of faults
- Selecting a bearing to replace
- Replacing the axle bearing
- Sequence of actions when dismantling the axle shaft
- Removing wheels.
- Removing the brake drum.
- Unscrewing the axle shaft bolts.
- Removing the axle shaft.
- Removing the lock bearing from the axle shaft.
- Installing a new bearing and lock ring on the axle shaft.
- Replacing the axle shaft seal.
- Installing the axle shaft.
Characteristics of the axle bearing for VAZ 2107 classic
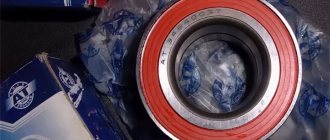
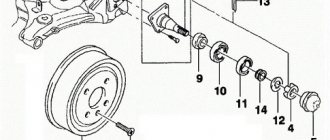
Russian-made bearings for VAZ are produced with article numbers 2101-2403080 and 180306. And foreign-made parts have article number 6306 2 RS.
The main characteristics of axle bearings include:
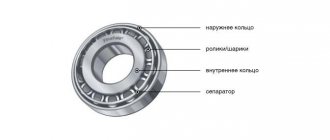
- part type. The bearing belongs to the group of ball, single row;
- radial two-way direction of loads. The value shows which bearing can withstand the load perpendicular to the axes of rotation;
- outer diameter of the bearing – 72 mm;
- internal diameter – 30 mm;
- product width is 19 mm;
- dynamic load capacity, or possible service life - 28100 N;
- static load capacity for residual deformation – 14600 N;
- its weight is 0.35 kg.
List of faults
The total service life of an axle bearing in domestic cars can range from 50 to 150 thousand kilometers. However, the bearing wears out faster when the car is driven on uneven roads, and vice versa, if the car is driven on roads with good coverage, its service life can be significantly longer. Most often, the initial signs of axle bearing wear, which a car enthusiast can notice, appear after the car has covered a mileage of 100 thousand or more km.
Mechanical deformations and material wear of the bearing lead to its malfunction and should be replaced. Without disassembling the axle shaft, it is not possible to determine wear or damage to the part. There are factors by which bearing failure can be determined:
- Noise, hum when turning the wheels.
At the initial stage of bearing wear, a hum or metallic grinding noise can be heard when the wheels are turned. These sounds may increase or decrease depending on the speed of the car. This factor is not critical when the car is moving. But at the same time, you should not put off replacing the bearing for too long.
- Drum heating.
When moving, a faulty bearing increases the friction force of the axle shaft and flange, and the excessively generated heat is transferred to the central part of the drum. This factor can be noticed if you drive the car a little and then touch the central part of the drum with the back of your hand.
- The grinding of wheels.
After a hum appears during the turning movements of the wheels and the drum heats up, and the grinding of the wheels also becomes audible, then it’s time to sound the alarm. Most likely, the axle bearing has failed or is completely destroyed. Given the combination of these three factors, you should not continue further movement, but immediately look for a service center to replace the bearing. Otherwise, it will lead to irreparable consequences.
- The appearance of a gap on the wheels.
If the wheel has a gap or play, this may indicate a faulty axle bearing. To detect this, you need to shake the wheel using your hands and a jack. If the bearing is normal, the wheel will not wobble.
Signs of malfunction on the VAZ 2107
If the bearing itself fails or its seat breaks, the car owner will definitely notice this. We list a number of the main signs of failure of this part:
- While driving, a uniform low hum appears in the area of the rear axle, which over time can turn into a loud creaking or crackling sound. And the faster the car goes, the louder the noise becomes.
- A strong play appears on one of the rear wheels (to check this, just jack up the rear axle of the car and pull the wheel with your hands away from you and towards you).
- Balls fall out of the bearing (this means that the separator in which these balls are located has completely collapsed).
- Finally, the rear axle may simply jam. The drive wheels will stop rotating, and this can happen while driving (which may well cause an accident).
This is interesting: Hail crashed 17 thousand new Volkswagen cars.
The reason for the destruction of a part can be both metal fatigue, which occurs due to very long cyclic loads on this part, and the quality of domestic roads, driving on which is often associated with impacts and other mechanical damage, falling on the rear axle.
Selecting a bearing to replace
The bearing for a VAZ is a single piece and cannot be repaired if completely worn out. Even if you try to lubricate it, it still won’t last long. During the operation of the car, it will be destroyed.
Since Russian-made bearings fully comply with regulatory documentation and are manufactured in accordance with GOST, preference should be given to them when purchasing. Russian bearings are fully intended for vehicle movement on Russian roads, so their wear life will be more optimal for the owner.
Bearings are produced at factories in Vologda and Samara. The average cost of one unit is about 250 rubles. Do not forget that along with the bearing you must also purchase a locking ring and an oil seal. Their cost varies 220 rubles and 25 rubles, respectively.
Experienced car enthusiasts advise changing the bearing head right away, since they have approximately the same mileage and if one fails, then most likely in a few days the second one will also fail.
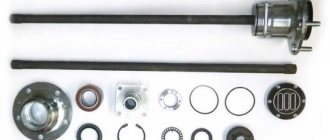
How to change the rear axle axle bearing on a VAZ Classic
The first thing you need to do is remove the wheels, then release the handbrake cable (this will make it easier to remove the brake drum).
During long-term use, the brake drum may “stick” to the axle shaft and you will have to knock it down using a wooden adapter. Please note that “wooden only”, if a metal attachment is used, the drum will most likely be damaged.
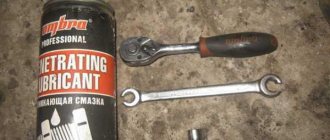
List of required tools:
- A chisel and a hammer, if you have a grinder, that’s great.
- A pipe with an internal diameter of 32 mm and a length shorter than 80 cm.
- A socket head at “32” will come in handy.
- Approximately 50-100 grams of transmission or engine oil, it doesn’t matter, you can use the waste oil. Also prepare Litol-24.
- Gas or kerosene burner, take care of the source of fire, on it, you will heat the locking ring. Without a torch, you will not succeed, because the locking ring on the axle shaft must be pressed onto the axle shaft only after heating.
The process of removing the lock ring and bearing
Using a chisel, cut the locking ring; if you have an angle grinder, then simply cut off part of the ring. It is best to cut the ring so that the grinder disk is parallel to the axis itself, after which the weakened ring can easily be knocked off the axis.
If the bearing sits dead and does not even budge, then again we take the grinder in our hands and cut it off.
After the bearing has been removed, old grease and dirt are removed from the axle shaft.
Installing the Bearing and Snap Ring
Before installing the bearing, you need to carefully remove the boot from it and check the lubrication (there are unscrupulous manufacturers who can leave the bearing without lubrication).
Using a pre-prepared metal pipe, the bearing is pressed onto the axle shaft.
We begin to heat the locking ring (I used a gasoline stove).
The ring needs to be heated to an even ash color (do not overheat), then we take it with pliers and put it on the axle shaft (the enlarged part should look up). Using a pipe, the ring is seated close to the bearing, then quickly cooled with oil; if it is not cooled, the boot may become deformed.
While the axle shaft is “cooling”, the oil seal can be replaced. Using a pry bar, the oil seal is pushed out of the seat.
And it is installed using a 32" socket and a hammer; when the axle shaft has cooled down, you can begin assembly!
Replacing the axle bearing
It is quite difficult to replace a bearing yourself, but it is possible. This process is very labor-intensive and time-consuming. To replace the bearing you will need about two hours of free time. The most important point in this process will be the availability of all the necessary tools to carry out the replacement efficiently:
- Jack.
- Devices for strengthening the raised body. (can be replaced with a removed wheel)
- Balloon wrench.
- Wheel stops.
- Reverse hammer. (can replace removed brake drum)
- Keys for 8 and 12.
- Socket or socket wrench size 17.
- Vise, workbench. (working with a vice is safer)
- Slotted screwdriver.
- Blowtorch or gas torch
- Bulgarian.
- Hammer and chisel
- Pliers.
- Grease and rags.
Sequence of actions when dismantling the axle shaft
To dismantle the axle shaft and get to the bearing, you must perform the following steps in strict sequence:
- For convenience, the vehicle is placed on a flat surface.
- Secure all the wheels of the car with stops or other devices.
- The wheel bolts must be turned with a wheel wrench until they are slightly loosened before removal.
Removing wheels.
- Use a wheel wrench to completely unscrew all the bolts on the wheels.
- Use a jack to raise the car body and secure the lifting with supports.
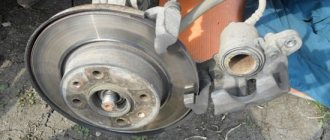
Removing the brake drum.
- Remove the two drum guides using a 8 or 12 wrench.
- Remove the drum itself. If necessary, assist removal with hammer blows. To avoid deformation, place a wooden stand. An alternative way to remove the brake drum: start the car, put it in third gear, spin the engine to 3 thousand rpm and sharply press the brake. Repeat acceleration and deceleration several times, after which the drum can be easily removed
Unscrewing the axle shaft bolts.
Little by little, without using much effort, turn the axle shaft to get to the nuts. The axle shaft mounting bolts can be unscrewed using a 17mm socket wrench. They are used to loosen and remove 4 fastening nuts, which are closed with a special flange.
Removing the axle shaft.
We turn the removed brake drum over (with the inner side facing us), screw it to the axle shaft with a couple of bolts and sharply pull it towards ourselves, thus pulling out the axle shaft. (Instead of the brake drum, you can use a previously removed wheel)
But if you have a reverse hammer, you can remove the axle shaft with it. The hammer is attached to the axle shaft with wheel bolts. If you sharply place a load in the opposite direction, then due to the appearance of a shock load, the axle shaft begins to move towards the load. Thus, the axle shaft is removed. Then unscrew the hammer from the axle shaft and remove the rubber sealing ring.
Removing the lock bearing from the axle shaft.
The axle shaft is clamped in a vice and a small cut is made using a grinder on the outside of the locking ring.
The clamped locking ring is finally split by alternately striking the cut from the grinder with a hammer or chisel. Thus, the bearing is removed from the axle shaft. The axle shaft is checked after removing the bearing for surface deformations or chips or other damage. If there are any, then the axle shaft will have to be changed.
Installing a new bearing and lock ring on the axle shaft.
- The boot is pulled out of the new bearing.
- The bearing is then lubricated with grease or grease.
- Reinstall the boot.
- Lubricate the axle shaft with grease.
- Place the bearing on the axle shaft so that the boot is turned towards the oil deflector.
- Use a hammer to drive the bearing into the cell. To make it easier, you can use a piece of pipe. Place one end of it against the axle shaft with the bearing, and hit the other end with a hammer.
- The locking ring is heated with a blowtorch until a white coating appears on it.
- Using pliers, place the ring on the axle shaft of the VAZ 2107.
- Install the ring hermetically tightly to the bearing.
- Cool the lock ring by pouring engine oil onto it.
Replacing the axle shaft seal.
The oil seal to be replaced must be pulled out of its cell. To do this, lift its body with a screwdriver and remove the oil seal. The cell under the oil seal is wiped from the accumulation of dirt and dust, and grease is applied. The new oil seal is inserted into the seat with a spring to the beam. Use a special bushing and a hammer to drive the oil seal so that it is pressed tightly.
Installing the axle shaft.
Installation of the axle shaft is carried out in the reverse order from its removal. Put on the rubber sealing ring and bolt the axle shaft. Use small rotational movements to put it in place.
After installing the axle shaft, it is necessary to check it for the formation of gaps. They shouldn't exist. To do this, the wheels are rotated in all directions. If there are no gaps and no extraneous sounds appear during rotation, then the installation of the bearing and axle shaft was done correctly and correctly.
If necessary, replace the bearing on the second axle shaft in the same manner. Also, when carrying out these actions, you can immediately replace the brake pads and check the presence and level of lubricant in the axle housing.
Important points
- You need to be very careful when cutting off the old bearing with a grinder so as not to touch the axle shaft itself. It is best to cut off only the outer ring of the bearing and the cage with a grinder. Only a few small cuts (not through) should be made on the inner ring. Then you can insert a chisel into these cuts and, with a few careful and precise blows, split the inner ring of the bearing without touching the axle shaft.
The inner ring of the bearing is cut off with a chisel - The new bearing cannot be placed on the axle shaft without effort. In fact, it will have to be stuffed onto the axle. But in no case should you use only a hammer for this, since there is a high risk of distortion and damage. The best way is to take a piece of pipe whose diameter is slightly larger than the diameter of the axle shaft, and use it to seat the part in place.
- Some car enthusiasts heat the bearings and place them hot on the axle shaft. This really makes it easier to fit the new part because all the metals expand when heated. But it is strictly forbidden to install bearings in this way, since when this part is heated and subsequently cooled in air, it may anneal (that is, heat treatment, which consists of heating the steel to temperatures below critical, followed by slow cooling). Annealing will reduce the hardness of the bearing several times and increase its ductility, as a result, its service life will be reduced significantly.
This is interesting: Peculiarities of operating a loader in Russian conditions
Replacing a bearing is a difficult task, but it can be done. The main thing here is to avoid damage to the axle shaft when cutting off the bearing and distortions when installing a new part. In addition, you should take into account the fragility of the bearing rings and use the hammer with extreme caution. Otherwise, the procedure is quite within the capabilities of even a novice car enthusiast, who, by doing it with his own hands, can save a significant amount.
Copywriter with five years of experience. (1 vote, average: 1 out of 5)