Replacing the front wheel bearing of a VAZ classic model
Wheel bearings facilitate the rotation of the wheels, they account for part of the car's support, while they fix its axles and bear a high load. This part is an important element of the chassis, and if it breaks, the front wheel bearing of the VAZ classic models will need to be replaced. If this is not done in time, an unpleasant hum will appear, the vehicle's rolling will worsen, and fuel consumption will increase. If the bearing fails, the machine will be unusable.
How to replace the wheel bearing on a VAZ 2101-VAZ 2107?
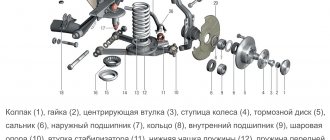
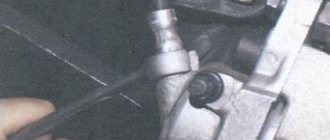
1. First, hang up the front wheel you need, if necessary, hang both and, most importantly, stop the rear of the car using the handbrake (For greater safety, you can also place bricks or heads under the rear), then remove the wheel from the hub (Read how to do this in the article: “Correctly replacing wheels on cars”) and using a thin flat-head screwdriver, pry out the protective cap that protects the hub nut from dirt, see the photo below for more details:
Sign of a faulty VAZ classic wheel bearing.
A faulty bearing usually produces extraneous sounds in the form of a hum or grinding sound, and the wheel can also hang on such a bearing due to wear or due to a poorly tightened wheel nut.
To diagnose a bearing, it is enough to hang the wheels (or each separately) and rock the wheel in different directions. If there is play when rocking in all planes (wheel rotation left and right and tilt up and down), the wheel bearing may need to be replaced. But the backlash can also be due to tired silent blocks or ball bearings. To exclude a suspension malfunction, you need a second person who will check whether the wheel wobbles together with the steering knuckle or walks separately from it. If the wheel moves separately from the steering knuckle, then the wheel bearing is definitely faulty (in this case, tightening the wheel nut may briefly save the situation).
A sign of a malfunction may also be extraneous sounds when the wheel rotates (usually a hum, sometimes a grinding sound) or its uneven rotation.
You can also determine a faulty bearing by an excessively heated wheel (for example, if the front right wheel disc is much warmer than the front left one). But you can’t compare the temperature of the rear and front wheels because... They have brakes of different designs.
And so, let’s summarize everything we’ve read. The wheel bearing is replaced if:
- The wheel dangles separately from the steering knuckle.
- A hum and grinding noise is heard when the wheel rotates.
- The wheel does not spin evenly.
- The wheel rim gets very hot.
Replacing the wheel bearing VAZ 2101-2107
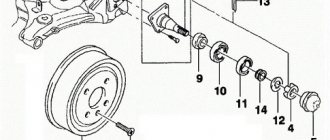
1. Raise the car on a jack and hang the front wheel where we are going to work. We remove it to gain access to the hub and brake mechanism
2. Dismantle the caliper as described in this article. We place it in the bottom of the steering knuckle, make sure that the brake hose is not stretched - it can be damaged.
3. Take a flat screwdriver and remove the protective cap. There is no thread on it, we just pry it from all sides and it flies off. If it is damaged, it is advisable to replace it with a new one.
4. Align the edge of the hub nut (adjusting). It is visually visible that one of its edges is dented into the groove of the steering knuckle axis.
5. Use a 27 key to unscrew it.
Important. Depending on the side where you want to change the bearing, the nuts are turned in different directions. On the left side of the car counterclockwise, on the right side clockwise, its thread is reversed. This must be remembered when twisting them.
On the left wheel, a nut with a right-hand thread is used, it is marked with a dot, on the right - with a left-hand thread, it has notches on its edges so as not to confuse it.
6. Remove the hub assembly with the brake disc.
7. Use a slotted screwdriver to remove the washer and outer hub bearing.
8. Using a 12mm wrench, unscrew the guide pins. In some cases, ring wrenches size 11 are used. Before unscrewing, clean the contact points between the guides and the ring, spray with WD-40 or its homemade equivalent.
9. Remove the spacer ring
10. Take a wooden block and use a hammer to knock the hub out of the brake disc housing. In this case, it is more important not to damage the disk itself. It is advisable to place it on two boards so that there is room in the center for the hub to fall out. Otherwise, it will rest its edge on the surface and with further blows of the hammer it can be damaged.
11. Place it in a vice with the inner bearing facing up and clamp it. Use a slotted screwdriver to remove the hub cuff. She may not give in the first time. Carefully pry it off from all sides with a screwdriver so that it can be removed evenly; if necessary, use an impact tool.
12. Remove the inner bearing. We clean the hub body from old grease
13. Clamp it in a vice. Using a mandrel or other metal device with a blunt end, knock out the outer ring of the outer bearing.
Important. We tap it evenly over its entire plane with a mandrel so that it does not become warped. This is the only way it will come out of the housing, otherwise it will jam inside.
14. We also take out the outer ring of the inner bearing.
15. Wipe the inside, rinse with kerosene or diesel fuel. We inspect to ensure there is no damage inside the case.
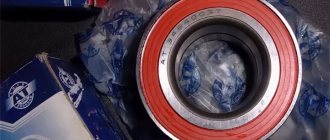
What bearings to put
When a wheel bearing requires replacement, the question immediately arises of which part to install. Many people advise using original components. However, today the quality of parts leaves much to be desired and the issue of choice remains quite relevant.
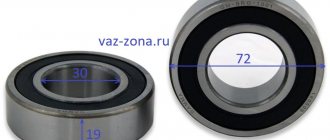
Table: type, installation location, and size of bearings
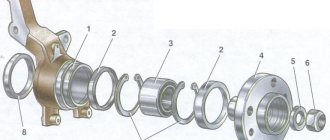
| Installation location | Bearing type | Size, mm | Quantity |
| Front wheel hub (outer support) | Roller, conical, single row | 19,5*45,3*15,5 | 2 |
| Front wheel hub (inner support) | Roller, conical, single row | 26*57,2*17,5 | 2 |
| Rear axle shaft | Ball, radial, single row | 30*72*19 | 2 |
Manufacturer's choice
When choosing a manufacturer of a wheel bearing for a VAZ “Seven”, we can recommend SKF , SNR, FAG, NTN, Koyo, INA, NSK. The companies listed have many locations around the world. These products are of high quality and meet the most stringent requirements.
Among the domestic manufacturers that supply bearings for cars of the Togliatti plant, we can highlight:
- CJSC "LADA Image" - manufactures and sells original Lada wheel bearings through secondary markets;
- Saratov plant - produces parts under the SPZ brand;
- Volzhsky Plant - uses the Volzhsky Standard brand;
- Vologda plant - sells products under the VBF brand;
- Samara plant SPZ-9.
Wheel Bearing Adjustment
The main parameter when carrying out a replacement is setting the correct hub clearance. The procedure is performed in two ways: using a dial indicator or by touch.
- Prepare an indicator stand.
- Place the device on the brake disc and secure with bolts.
- Place the end of the indicator against the end of the trunnion, as shown in the figure.
- Rotate the hub to measure the play.
- If the value is more than 0.15 mm, it is necessary to loosen the nut and tighten it with a torque of 9.6 N*m. Spin the disk several times. Loosen the nut (approximately 20-25 degrees), tighten with a torque of 6.8 N*m.
- Check the backlash value.
- Lock the nut.
Setting the gap without an indicator:
- Put on the wheel.
- Evenly tighten the nut while rotating the hub.
- Rock the wheel in a vertical plane to “feel” for play. To do this, place your finger on the end of the trunnion. A barely noticeable gap should be felt when the wheel rocks.
- If the play is caught, tighten the nut to a torque of 19.6 N*m. Don't counter.
- Rotate the assembly several times in both directions (to self-install the bearing). Check the gap.
- Lock the nut.
The rebuilt unit should rotate easily, without wedging.
Front wheel bearing for VAZ-2107
After removing the consumable, it is necessary to inspect and, if necessary, repair the bearings. To do this, do the following:
- It is necessary to remove the bearings for inspection and lubrication. To do this, it is worth fixing the hub with a vice.
- Perform gentle blows on the outer part of the bearing race to knock it out of the hub without damaging it.
- Remove the oil seal by prying it with a screwdriver. Underneath there is a spacer sleeve that also needs to be pulled out.
- Using careful movements, knock out the inner bearing.
How to replace and adjust
Because bearings wear out over time, they must be replaced. When disassembling, you need to take them out and carefully inspect them.
To do this, you need to clean the bearings and hub from old grease and contaminants. They are first wiped with a rag, then washed with kerosene. After these parts are completely cleaned, they need to be inspected.
At the same time, check the degree of wear and the presence of mechanical damage. If necessary, they replace the wheel bearings on the VAZ-2107. The new ones will also have to be lubricated and installed in place - in the hub. After this, the wheel is assembled and installed.
If the parts are suitable for further use, they are installed in place after cleaning and lubrication.
Replacing a VAZ-2106 wheel bearing
So, on the VAZ-2106 there was an assumption that this element of the hub was worn out. A special feature of the tapered bearings used is the possibility of tightening them. Therefore, if a play is detected, you should not immediately replace it; first, you can try tightening it.
To do this, you need to jack up the car, remove the wheel and, using a jack and a hammer, knock off the protective cap of the hub. Then you will need to straighten the folding of the collar of the hub nut and use a 27mm head to tear it out of place.
Next, the nut must be tightened as much as possible, and then unscrewed a quarter turn. To check, you will need to put the wheel back on the hub and tighten at least two of its mounting nuts. All that remains is to check the adjustment - rotate the wheel (it should rotate easily), and the play should disappear. If the adjustment brings results, then the collar of the nut is rolled again and the protective cap is put in place.
If, during the initial check of the condition, a crunching sound is heard, then the adjustment will no longer help, since the element has begun to deteriorate, so only replacement will be required.
Next, let's see how this element is replaced on a VAZ-2106. To complete the work you will need:
- socket wrenches or heads with collars at “7”, “12”, “17” and “27”;
- wheel wrench;
- pliers;
- powerful flat screwdriver;
- hammer;
- soft metal attachment;
- bench vice.
To carry out the replacement, you will have to remove the hub with the brake disc from the steering knuckle of the VAZ-2106. To do this, you will need to jack up the wheel, remove it from the car, knock off the protective cap, and flare the hub nut flange.
Then you will need to unscrew the brake caliper mounting bolts and remove it from the disc. There is no need to completely dismantle the caliper, just remove it and hang it on the strut spring so that the brake pipes are not under tension.
Afterwards you will need to unscrew the hub nut, use a screwdriver to pry and remove the thrust washer, as well as the inner race of the outer bearing.
To remove the hub, you should grab the disc well and pull it towards you. If you can’t remove it by hand, you can carefully knock it down with a hammer and a wooden pointer, but the blows should be applied not to the disk, but to the hub. The remaining work is carried out on the removed element.
First you will need to remove the inner bearing race and seal. Then use a screwdriver to remove the split spacer sleeve.
Next, the hub must be fixed in a vice so that the installation side of the outer bearing is at the top. Using a “7” or “12” socket wrench (on older models), unscrew the guide bolts, and then remove the spacer ring from the hub, and then the brake disc.
Then, using a tool and a hammer, you will need to knock out the outer rings of the bearings from the hub. This completes the disassembly.
To press in the new outer rings, you need to use a vice. In this case, use the old rings as attachments, and install wooden spacers between the attachments and jaws of the vice.
After pressing the rings, you need to fill the internal cavity with lubricant, install the inner bearing race, as well as the split ring and oil seal. Next, assembly is performed in reverse order.
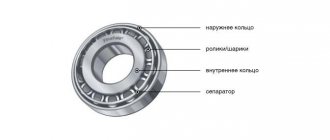
Repair of VAZ 2101, 2106, 2107 hub
Maintenance-free front hubs on VAZ 2107 (bushing drawing)
This time we will talk about maintenance-free front hub bearings. Having changed 3 bearings over the winter (sometimes they didn’t last, sometimes they overtightened them, sometimes they fell apart during maintenance), I got tired of all this, surfing the Internet and DRIVE came across articles about maintenance-free bearings on the front. There are several options: 1. Buy a ready-made kit. There are people who sharpen hubs and axles for them. 2. hub with axle from Izh od (also suitable) - I couldn’t find it 3. Rear hub from 08 VAZ + bearing also rear and + adapter sleeve - that’s what you need and in terms of cost.
Replacing the wheel bearing VAZ 2101-2107
1. Raise the car on a jack and hang the front wheel where we are going to work. We remove it to gain access to the hub and brake mechanism
2. Dismantle the caliper as described in this article. We place it in the bottom of the steering knuckle, make sure that the brake hose is not stretched - it can be damaged.
3. Take a flat screwdriver and remove the protective cap. There is no thread on it, we just pry it from all sides and it flies off. If it is damaged, it is advisable to replace it with a new one.
4. Align the edge of the hub nut (adjusting). It is visually visible that one of its edges is dented into the groove of the steering knuckle axis.
5. Use a 27 key to unscrew it.
Important. Depending on the side where you want to change the bearing, the nuts are turned in different directions. On the left side of the car counterclockwise, on the right side clockwise, its thread is reversed. This must be remembered when twisting them.
On the left wheel, a nut with a right-hand thread is used, it is marked with a dot, on the right - with a left-hand thread, it has notches on its edges so as not to confuse it.
6. Remove the hub assembly with the brake disc.
7. Use a slotted screwdriver to remove the washer and outer hub bearing.
8. Using a 12mm wrench, unscrew the guide pins. In some cases, ring wrenches size 11 are used. Before unscrewing, clean the contact points between the guides and the ring, spray with WD-40 or its homemade equivalent.
9. Remove the spacer ring
10. Take a wooden block and use a hammer to knock the hub out of the brake disc housing. In this case, it is more important not to damage the disk itself. It is advisable to place it on two boards so that there is room in the center for the hub to fall out. Otherwise, it will rest its edge on the surface and with further blows of the hammer it can be damaged.
11. Place it in a vice with the inner bearing facing up and clamp it. Use a slotted screwdriver to remove the hub cuff. She may not give in the first time. Carefully pry it off from all sides with a screwdriver so that it can be removed evenly; if necessary, use an impact tool.
12. Remove the inner bearing. We clean the hub body from old grease
13. Clamp it in a vice. Using a mandrel or other metal device with a blunt end, knock out the outer ring of the outer bearing.
Important. We tap it evenly over its entire plane with a mandrel so that it does not become warped. This is the only way it will come out of the housing, otherwise it will jam inside.
14. We also take out the outer ring of the inner bearing.
15. Wipe the inside, rinse with kerosene or diesel fuel. We inspect to ensure there is no damage inside the case.
Replacing the wheel bearing of a VAZ 2107
The chassis of the VAZ 2107, like all classic models, is not distinguished by its design complexity, but at the same time it fully complies with the somewhat inflated endurance requirements that road surfaces impose on us. The 7 has a reliable and simple wishbone suspension, but it does not last forever, and can remind you of itself from time to time with tapping and creaking.
Content:
Signs of a worn out bearing
We immediately pay attention to the knocking of the suspension and play in the steering, and try to find and neutralize the tired part as soon as possible. The front wheel bearing behaves completely differently. As a result of wear and tear, it does not immediately show its fatigue, but gradually. When turning right, the left wheel bearing begins to hum, and when turning left, vice versa.
It is quite possible that the bearing adjustment nut has become loose, but then the hum should be accompanied by a knocking sound. This can be easily determined by checking the play on the front wheel. To do this, hang the car on a jack and grab the wheel by the lower part and the upper part with your hands, then rock it. If there is play, then it will be enough to tighten the adjusting nut with a torque of 2 kg/cm and tighten it with a blunt chisel. If the hum continues after this, it means the bearing has worn out and needs to be replaced.
Removing the front hub of a VAZ 2107
Before starting work, place the car on a level surface, secure the rear wheels with wheel chocks and tighten the handbrake. After this, we jack up the front wheel with a jack, but it is advisable to place a stand under the lower arm after we remove the wheel. We loosen the jack, the bulk of the car falls on the stand, and now the car is securely fixed.
- Using a blunt chisel or screwdriver, remove the hub protective cap.
- Remove the front brake caliper. To do this you will need to remove the brake pads. We unpin the pad pin, take it out, and then you can use a pry bar or a large screwdriver to press the pistons into the caliper. After this, you can remove the brake pads.
- The front brake caliper is attached to the axle with two bolts that need to be unscrewed. In order not to disconnect the caliper from the brake system, we hang it on a wire so that the brake hose is not stretched.
- Let's move on to the hub. Using a 27mm socket, unscrew the hub adjustment and fastening nut. To avoid any surprises, let us remind you that the right wheel has a left-hand thread, and the left one has a right-hand thread. It's hard to confuse. Having oriented towards the cardinal points, unscrew the nut.
- Remove the hub from the axle and place it on a horizontal surface.
Replacing the Wheel Bearing of a VAZ 2105
Vas 2105 . hubby
front wheel
bearing replacement August 11, 2013
If the adjustment is unsuccessful, create a fake hub bearing on a VAZ 2105
.
We also replace if grease leakage is detected under the hub nuts, indicating a seal failure. Replacing silent front manual blocks with classic ones \ VAZ 2105. Duration: 11:24. VAZ 2101-2107 and others. Do-it-yourself VAZ repair 2. VAZ 2105. replacing the front wheel bearing. VAZ 2105. Removing and replacing steering rods. It's also worth remembering to replace
the bearings are paired on each side. For repairs, prepare standard tools and perform the following steps:
- Remove the wheel from the repair side. Volkswagen Golf II | Replacing the front wheel bearing. The VAZ repair has been completed. Replacing the hub bearing with another front wheel VAZ-2105, VAZ-2106. Next, remove the brake caliper and hang it on a wire so it doesn't hang on the brake hose.
- Then, using a twenty-seven socket wrench, they first loosen and then completely unscrew the nut. hubby
and remove it with the washer underneath it.
Then remove the outer wheel bearing spacer . - Now you can remove the hub from the brake rotor, gently pull them towards you and it will come off the stud.
READ Changing the oil in a Nissan Almera n16 box
replacing bearings front hub VAZ 2107
Replacing bearings
front
Hobby VAZ
2107, repair kit
front
bearings hubby
.
replacing bearings hubby VAZ. (All details)
ADJUSTMENT Wheel bearings
HERE: DIAGNOSTICS
Wheel bearings
HERE:.
- Remove the pliers or any other handy grip hubby
first the oil seal and then the inner cage
bearing
.
- We then proceed to replace the bearings. To do this, knock out a flathead screwdriver and remove the retaining ring, that is, the cutting sleeve, from its place.
- Place the brake disc on a vice and use a deep-head screw wrench to unscrew the two idler pins.
- Remove the spacer ring and brake disc the hubby Removal and installation of the VAZ 21099 stabilizer, removal and installation of VAZ 2108 supports, replacement of the VAZ 2109 wheel bearing, replacement of the ball joint and suspension repair. Replacing the front axle bearing of a VW Golf 3. Replacing the front axle bearing of a UAZ Patriot. Now we begin to squeeze out the carrier cells.
- We make a small impact and apply light blows with a hammer around the entire circumference of the frame, knocking out the outer and inner rings.
- Now that the bushing is disassembled, thoroughly wash off the old grease and begin installing new ones.
- First of all, we install the inner race of the outer bearing . We then install a separator, which also lubricates the spacer ring.
- Similarly, press on the new oil seal, outer ring bearing
, and then install the brake disc and outer spacer.
READ Replacing Intake Manifold Gaskets Renault Megane 2
This is repair work to remove and replace wheel bearings, front wheel
completed for VAZ
2105 Reassemble in reverse order. After assembly, adjust the bearing
.
Instructions for replacing the wheel bearing on a VAZ-2107 with your own hands
Removal
Put the car on the handbrake. Place a shoe under the wheel to prevent the machine from rolling away. Loosen the front wheel nuts.
Raise the car and place a support under the body. Remove the wheel. Unscrew the caliper mounting bolts located on the inside and remove the caliper. To avoid damaging the brake hose, it is better to tie up the caliper.
Using a screwdriver, pry up and remove the hub cap. Unscrew the hub nut. After removing the nut and washer, pull out the outer separator. Pull the brake disc towards you and remove it together with the hub. After unscrewing the two guide pins, remove the brake disc from the hub.
Using a screwdriver, pull out the oil seal and separator, and then the spacer ring. Now you need to knock out the clips. Using a mandrel of the required diameter or a drift, knock out both clips with a hammer.
Installation
Before assembly, wash all components with any grease-cleaning liquid. Remove the races from the new bearings and, holding them in a vice, press them into place through spacers (it is best to use the old race as a mandrel).
Lubricate the inner bearing cage and install it in place. Insert the spacer ring, press the oil seal through the spacer, being careful not to damage it. We put on and secure the brake disc with studs.
We install the unit in place. Having pre-lubricated, insert the outer bearing separator into place and, having installed the washer, tighten the nut until it stops. We put on the wheel. We turn it several times to ensure complete seating. Then slowly unscrew the nut until a small amount of play appears. Lock the nut in this position.
We clean the hub cap of old grease, fill it with new one and install it in place.
Having examined how the wheel bearing is replaced on a VAZ-2107, we can conclude that this repair is not so complicated. And if desired, almost every car enthusiast can do this.
Timely maintenance and the use of high-quality spare parts will extend the life of your car. It is important not to forget that the serviceability of the car’s front suspension is a guarantee of your safety.
Elements protecting hinges on front-wheel drive VAZ vehicles
The boot is a hinge protection element on front-wheel drive Zhiguli cars, made of special corrugated rubber. It is installed on the internal and external drive joints and protects them from external factors. It also holds the lubricant necessary for operation inside the joint.
Power Torque: Front Wheel Bearing Replacement
Basic concepts on how to replace a defective front wheel bearing. The list of main transitions will allow you to independently carry out this operation.
Replacing bearings yourself
Modern drivers often encounter such a problem as the occurrence of hum and various extraneous noises in the car suspension. The main reason for this is usually the presence of faults in the bearings. This means it's time to replace them. To carry out repair work
Determining the causes of a windshield wiper malfunction on a VAZ car
wipers If suddenly the wipers on your car stop working, this is not a reason to panic. This device is quite simple and, if desired, anyone can independently eliminate the cause of the malfunction by following the further instructions. And so, let's find out why the wipers on your VAZ-2105 do not work.
How to independently replace CV joint boots on a VAZ 2109.
The CV joint boots are a front-wheel drive unit, which is popularly called a “grenade”. The reasons that lead to their damage can be different: aging of the material, hitting an obstacle, as well as careless operation of the car.
Replacement features
The front hub of the VAZ 2107 car has a pair of roller bearings, one of which is called internal, and the second external. The manufacturer recommends replacing these products in pairs, on both front wheels of the car. We will find out further what the replacement of the parts in question is.
Algorithm for replacing a faulty bearing
The work is performed in almost the same sequence. As for many other VAZ models (classics):
The vehicle is fixed;
Hanging out;
The wheel is dismantled;
The caliper is removed (it is possible without disconnecting the brake hoses);
Use a bayonet screwdriver to pry up the protective cap that covers the hub nut, remove it;
Unscrew this nut, remove the separator and washer, dismantle the hub along with the brake disc;
Remove the oil seal;
Remove the separator;
Remove the ring placed between the outer and inner bearings;
Using a suitable size drift and hammer, knock out the clips.
Now you can proceed to installing a new bearing and assembling the hub. The operations are performed in reverse order.
Before starting assembly, it is imperative to remove dirt and old lubricant residues and wash the parts (using special cleaning fluids).
The outer races are removed from the new bearings in a vice. Internal ones, using special spacers (for example, an old clip), are pressed into place.
Installing new bearings
The inner bearing cage is lubricated and installed in place. Then, the spacer ring. Next, the oil seal is pressed in (be careful not to damage it during installation).
Apply lubricant
The brake disc is put on and secured with studs.
The assembled unit is put in place. Then the separator of the second bearing (external) is lubricated and installed, the washer is inserted, and the nut is tightened until it stops.
Read, it may come in handy: Replacing front brake pads: which ones are better
The wheel is put on and the nut is unscrewed until slight play occurs. Then it is locked in this position.
We put new grease into the previously cleaned cap and put it in its original place.