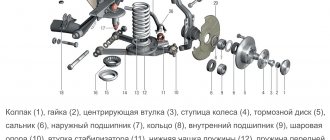
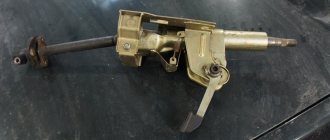
Front hub and its parts
In a VAZ 2109 car, replacing the front hub is necessary if it is worn out. The hubs, in turn, play a very important role. Without them, the wheels will not rotate at the required speed, which will first lead to damage to the brake system, and then to failure of the entire car. Therefore, if there are any problems with the front hubs, they need to be diagnosed in advance so that later it is not too late. Replacing the front hub of a VAZ 2109 is a difficult and responsible task, but you can handle it in your garage yourself.
Front hub wear
Replacing the front hub on a VAZ 2109
Typically hub wear manifests itself in the following ways:
- There is play in the hub bearings, that is, they wobble slightly.
Note: the play should not be allowed to be too strong, as this will require replacing not only the hub, but also the bearing.
- The bearings are “humming”. While driving, strange sounds are heard coming from the wheels. As a rule, with increasing speed they become even more pronounced. After this, when the speed decreases, the noise does not become less quiet.
Note: If the hum is heard on only one side, then only one hub needs to be replaced. If it occurs in both wheels, both hubs need to be replaced immediately.
- Bearings This can cause the caliper to overheat as well, causing it to fly off as well. In addition, the brake fluid also boils too quickly. This leads to rapid failure of the braking system.
Causes of hub wear
Replacing the front hub on a VAZ 2109
Usually there are the following reasons due to which the hub wears out:
- The wheel bearing has completely fallen apart. Perhaps it is only in the early stages of destruction. In any case, it will have to be changed, but after appropriate diagnostics.
Replacing the front wheel hub of a VAZ 2109
- The wheel bearing nut is not tightened properly. Such an oversight can cause backlash. In this case, you can get by by simply screwing in this nut all the way. That is, you should not change the hub or its bearing.
- The steering tip does not work well.
- There are shortcomings in the operation of the upper or lower ball joint.
Replacing a wheel bearing on a VAZ 2109 (video)
Malfunction of the front hub of a VAZ 2109 car caused by faulty bearings can lead to quite dire consequences.
Without a properly functioning hub, the wheels stop rotating at the required speed. This leads to damage to the braking system, and then the entire car breaks down.
If any malfunctions are found, they should be corrected immediately.
How to diagnose bearing play
VAZ 2109 front wheel hub
In fact, this process is very simple, and even a beginner can do it. For this:
- Raise the car using a jack to the optimal distance.
Note: It is much easier to diagnose using an inspection hole, but if you don’t have one, a jack will also work.
- Bleed the wheel. This should be done according to a certain pattern: hold the wheel on both sides, squeezing it as much as possible. You should swing your arms in the same direction (preferably away from you). By the way, this procedure is also carried out in car services, so it is advisable to attend it in order to be prepared for its implementation later.
VAZ 2109 front hub
- If there is slight play, the bearing nut should be tightened as much as possible.
Note: if this does not eliminate the play, then the hub or its bearing must be replaced.
- You should still hold the wheel on both sides. However, now you need to pump it not in one, but in different directions. What does it mean? You just need to press the wheel towards you with your left hand, and away from you with your right. If play is also observed, then the reason is not in the hub. In this case, the steering tip is faulty. It should be replaced.
Note: In some cases, tie rod ends are sold complete with tie rods. However, these thrusts do not always need to be changed either. They can be left, replaced if they break soon.
- Pull the wheel, placing maximum emphasis on the top of the wheel. If in this case there is also play in the bearing, then the upper ball joint should be replaced.
VAZ 21093 front hub
- Pull the wheel by the bottom. Accordingly, if there is still play, then the lower ball joint needs to be changed.
Note: if only one bearing has failed, then it is better to immediately change the second one, since it will most likely also break very soon.
Replacement
First, let's set priorities. If you just want to save money, so you do the work yourself without any experience, then this is a wrong decision that can lead to dire consequences. If you have experience and certain knowledge, you can safely do the repairs yourself.
In any case, we recommend watching the training video instructions, where you will be told in detail about all the nuances of such work. This way you will gain additional experience and useful knowledge.
After this, we proceed directly to the work of replacing the wheel bearings. There are several ways. We will tell you about each of them in more detail, and you will decide for yourself which option suits your skills and capabilities.
- The first method involves carrying out work without removing the steering knuckle from the car. But here you will definitely need a special puller to dismantle the bearings. The advantage of the method is that there is no need for subsequent wheel alignment adjustment. But this is the most inconvenient way. To press out and reinstall the wheel bearing, we recommend driving the car into an inspection hole.
Puller
- The second method will require removing the steering knuckle. A workbench will also be useful for removing the bearing. In this case, you will definitely break the collapse. If you don’t want to go to a service station after repairing yourself, use a couple of tricky tricks: Before removing the lower bolt of the strut and steering knuckle, apply marks;
- One mark will allow you to determine the position of the bolt;
- The second mark will be responsible for the position in the steering knuckle strut;
- During the reassembly process, try to ensure that the marks match each other as accurately as possible. This method allows you to simultaneously make adjustments to the chassis and check the condition of the components.
The third method will require removing the bearing along with the stand and dismantling it using a vice. This method is complex compared to others.
It remains to press out the element
Before work, do not forget to turn on the handbrake and place wheel chocks under the wheels to avoid accidental movement of the vehicle.
- Remove the strut, knock out the tie rod ends and unscrew the fasteners of the upper support to the body of your car.
- Position the jack so that it does not become an obstacle during operation. It all depends on your personal understanding of comfort.
- The wheel bolts are unscrewed, after which the nut of the desired bearing is removed using a 13 mm wrench.
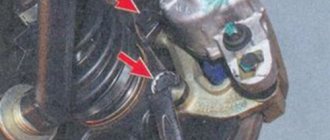
- Using a 17 mm wrench, you dismantle the caliper, which is secured with wire to prevent sagging on the brake hose.
Dismantling works
- After this, the brake disc and ball joint are removed.
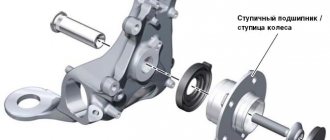
- The hub will now be knocked out of the steering knuckle, giving you access to the damaged bearing.
- All that remains now is to press out our problematic element using a puller.
- If you do not have a device such as a puller, use a metal tube whose diameter is slightly smaller than the diameter of the bearing.
- Clean the landing site, treat it with lubricant, after which you can install a new spare part.
- Reassemble in reverse order. Do not forget to simultaneously check the condition of various components, lubricate, change gaskets as necessary.
As you can see, there is a lot of work to do. Do not rush to conclusions regarding the ease or difficulty of such a task. If you want to do everything quickly, efficiently, without having any experience, contact the service station. Otherwise, be prepared to spend a whole day, or even more, on repairs.
Replacing the front hub
Necessary:
- Unscrew the wheel nut with a 30 mm socket.
- Raise the car on a jack.
- Remove the wheel.
- Remove the brake caliper.
- By removing the brake disc, you will have access to the front hub.
- Unscrew the hub nut. It is secured with three bolts. The bolts are too close to each other, so the head becomes very tight here and is difficult to rotate.
Note: You can loosen these bolts slightly and then remove them. If the bolt is very tight, you can warm it up.
- Using a screwdriver, pull the hub out of its seat.
Mounting the front hub on a VAZ 2109
- Thoroughly clean the seat.
- An oil seal must be inserted into the hub housing. It needs to be pryed off, as it will get in the way (it can be inserted into a new hub). To make it fit better, its seat should be lubricated with oil.
- Traces of dirt will remain under the oil seal, so that in the future dirt does not get under the new oil seal, it is necessary to lubricate it with a special liquid.
- Put the hub in place. Lightly tighten the hub nut so that the hub does not fall out.
- Press it in.
- Tighten all the necessary screws on the reverse side.
Checking the wheel bearing
The condition of the wheel bearings should be checked not only at intervals determined by the manufacturer, but also during each vehicle diagnosis. During inspection, it is necessary to determine the correct rotation of the wheel, which should not have free axial displacement (play). For this purpose, you need to act in the following sequence:
We spin the car wheel clockwise, checking it for extraneous noise.
- Alternately, in different planes, we loosen the wheel perpendicular to the hub axis. We act with both hands at the same time.
Checking for play is done by rocking the wheel in a vertical plane.
Be sure to test the rear hub for vertical and horizontal play.
In the horizontal plane, play is less common, but diagnosing this malfunction is mandatory
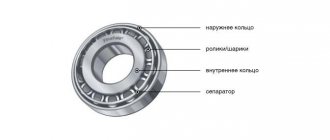
- In the first case, a check is made for the presence of corrosion “shells” and the cleanliness of the roller track, in the second, the wear of the treadmills is checked, where even a small play should not be noticed.
An example of wear on the running part of the outer race of the bearing
Video: how to check your car wheels for play yourself
Replacing the rear wheel bearing of VAZ 2113, 2114, 2115
Replacing the rear wheel bearing of VAZ 2113, 2114, 2115
The other day a very nasty squeak appeared in the rear left wheel. I decided that the cylinder was a working brake cylinder, which might be causing the pads to move poorly, but it turned out that the bearing itself was jammed. It was already unbearable to drive with a creak. A faulty rear wheel bearing of a car makes itself felt by the appearance of play in the wheel, which is easily determined by the presence of noise in the rear of the car when driving, or by the appearance of a knock if the play in the bearing has become too large. You can finally be convinced of the malfunction if you jack up the car and swing the hanging wheel - if there is play, you will certainly feel it. As a rule, the rear hub bearing cannot be adjusted and if it fails, it must be replaced. If the play is not too large, then you can try to tighten the hub nut a little; as a rule, this step helps to get rid of it, but not for long and, in the near future, replacement will still have to be done.
Replacing the front wheel hub bearing of VAZ 2108, 2109, 21099 cars
The service life of front wheel hub bearings on VAZ 2108, 2109, 21099 vehicles and their modifications is within 40-60 thousand km. Depending on the operating conditions and the quality of the part, it may vary up or down.
In any case, after a characteristic hum appears when the car is moving from one or both front wheels, it makes sense to check the condition of the hub bearings and, in case of malfunction, replace them.
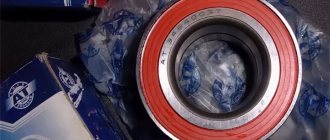
Necessary tools, fixtures and parts
— New front wheel hub bearing and new hub nut
It is recommended to replace the bearings on both front wheels at once, but based on practice, you can replace only one, the one that is humming.
— Wheel bearing puller (cup or other design)
Before carrying out work, it is imperative to acquire this puller, which will allow for a high-quality replacement of the bearing.