How to determine the serviceability of a wheel bearing on a Lada 4×4?
Before replacing a bearing, you need to make sure it is faulty. One of the symptoms is a hum when driving on the highway, which changes when cornering. But the hubs on the Niva can be adjusted. If the car's mileage does not exceed 20-30 thousand kilometers, then the hub on the Chevrolet Niva simply needs to be adjusted. After several adjustments, adjustment is no longer acceptable and the faulty bearing must be replaced.
How to determine its malfunction? It is enough to do the following:
- Hang up the wheel.
- Grab the wheel with both hands and swing it in a vertical plane. Large play is a sign of a malfunction.
- Spin the wheel by hand. It should spin for a while without making a sound. The presence of extraneous noise is a sign of a problem.
What signs indicate bearing failure?
The Niva's radial and axial loads are taken by the rear shaft axle bearing. Other parts have their own problems, but the symptoms of a malfunction remain approximately the same in almost all situations:
- Extraneous noises, metallic knocks;
- The appearance of backlashes. It is easy to check when the wheels swing perpendicular to the bearing axis;
- Vibration while driving inside the cabin;
As soon as the driver hears one of the characteristic sounds of bearing wear, it is recommended to immediately go for repairs. Most often, Chevrolet Niva wheel bearings fail. An SUV is more likely to experience axle loads.
Which bearing to choose?
The best wheel bearings for the Chevrolet Niva and short Niva can be selected from the list below:
- FINWHALE - price 450 rubles;
- AVTOVAZ - price 350 rubles;
- KOYO - price 800 rubles;
Also good companies are SKF and SNR.
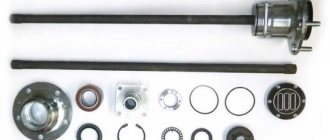
Adjustable bearings should not be confused with the new type of double row bearings. They are different in width, price and article number. The catalog number of the wheel bearing on Niva is 2121310302010 . This number is the adjustable bearing.
Reinforced, non-adjustable hubs
For Niva 4x4 you can find on sale reinforced, non-adjustable hubs with double-row bearings from the Iveco Daily truck. According to the manufacturer, this modernized unit has the following advantages over Nivovsky:
- there is no need to adjust (the bearing tightening is precisely set during its production);
- no need for regular lubrication;
- eliminates rotation of bearings on the hub;
- eliminates wear of bearing seats on the steering knuckle and hub;
- a ball bearing reduces friction in the hub assembly;
- The service life of the hub is increased due to thickening (see photo).
Instructions for installing steering knuckles with non-adjustable bearings are included. To download files you need to log in to the site. There is at least one drawback of such a modified Niva hub - high cost.
How to replace front bearings on a Chevrolet Niva?
To perform this procedure, you must complete the following procedures:
- Hang up and remove the front wheel of the car. Also remove the protective cap of the hub nut:
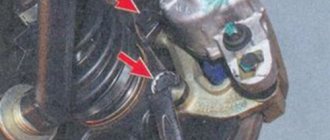
2. Unscrew the nut 27 of the wheel bearing and unscrew it:
3. To prevent the hub from turning, you can fix it with a mounting tool:
4. Remove the brake caliper. To do this, you must first remove the pads. Then unscrew the caliper bracket and remove it. The caliper itself with the pistons can be suspended on a suspension spring or any other element. The main thing is not to damage the hoses:
5. Remove the hub with the brake disc:
6. Remove the cotter pin of the steering end nut:
7. Unscrew the nut 22 securing the steering tip to the steering knuckle:
8. Applying light blows to the tip and eye, knock it off the steering knuckle. Or use a puller:
9. We knock the ball joints off the steering knuckle. How to do this is described here. After this, take out the steering knuckle and remove the outer oil seal from the bearing:
10. Remove the thrust ring:
11. We take out the bearing itself:
12. We install a cylindrical stop under the steering knuckle, larger in diameter than the hub bearing on the Niva.
13. Knock out the bearing with a drift:
The photo below shows where the drift rests to remove the outer race of the Lada 4×4 wheel bearing:
15. Clean the old seat from dirt and rust. Press in the new bearing race. You can use the clip of an old part as a mandrel. To do this, you can clamp the parts in a vice and gradually press the part inside the steering knuckle or use a press:
You can use another mandrel:
16. The pressed-in clip looks like this:
17. Lubricate the holder well with lithol:
18. Lubricate the wheel bearing well with a portion of lithol and place it on the outer race:
19. Reassemble all the elements in the reverse order: install the steering knuckle on the Niva, secure the ball joints, steering end and caliper. Adjust the new bearing. This procedure is mandatory!
Replacement process - step by step
The steps to replace the front bearing, after removing the nut, can be divided into 4 stages: 1
) Removing and disconnecting the steering knuckle and brake drum along with the hinges, from the strut and CV joint.
2
) Pressing out old parts.
3
) Pressing in new wheel bearings (two of them for each wheel).
4
) Reassemble the assembly and tighten the nut and adjust the gap.
For repairs you will need a standard set of plumbing tools
.
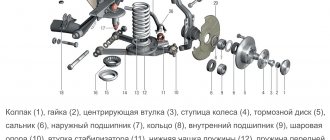
• Pullers for pressing out the ball pin and inner ring of a worn part. • You also need a strong 30mm socket wrench to loosen the nut. • Screwdriver to unscrew the brake caliper. We place the car on a flat surface, engage first gear, remove the handbrake, and put chocks under the wheels. This completes the preparation. Also, before repairing, it is necessary to study the location of the elements of the car's chassis according to the diagram: (pay attention to the steering knuckle - position 27
, bearing - position
9
).
Required set of tools for work:
• Socket wrench with long base;
• Set of sockets and ratchet; • Round nose pliers; • Hammer; • Mandrel or pipe for pressing; • Puller with claws (if possible); • Jack and vice; • Torque wrench to properly tighten the hub nut. The first stage begins with the following actions: 1
. Using a jack, we lift the required side, loosen the hub lock nut in advance, remove the wheel, put it under the side member, 2 more boards and a block on top, and place the car on this stop.
2
. We lift it with a jack by the lower suspension arm, so as to compress the spring as much as possible, put a reliable stand under the lower arm, and you can leave the jack.
3
. We turn the wheel towards the one being replaced, unscrew the caliper bracket, remove the caliper and pads, hang the caliper itself on a wire by the spring, trying not to load the brake hose. We turn the wheel in the direction opposite to the one being changed. Unscrew the ABS sensor (8 bolt).
4
. Undo the cotter pin, unscrew the tie rod ball pin nut, knock out the pin with a puller (or alternatively, unscrew the steering gear bipod from the steering knuckle, but do not touch the tie rod ball pin nut). Unscrew the hub nut head 27. Unscrew 3 bolts 13 fastening the upper and lower ball joints. We do not touch the nuts of the ball pin itself.
5
. That's it: now the entire hub, together with the brake disc, steering knuckle and two ball joints on it, should be removed from the CV joint splines. It is necessary to remove carefully, without distortions. Separate the brake disc from the hub. We remove the caliper protective screen, unscrew it and remove the bipod of the steering mechanism.
6
. We clamp the steering knuckle in a vice. We remove the old oil seals (mount) using any convenient method.
7
. Using a suitable soft metal mandrel, remove the outer races of the old bearings from the hub. We wipe and clean everything. We disassemble the new bearings. We press the outer bearing races into the hub. For pressing, we use the outer races of old bearings or a suitable mandrel. It must be taken into account that new races should be installed with the wide edge inside the hub. We try not to crush the outer narrow edge of the clip when pressing it. Before pressing, you can heat the hub with a blowtorch.
8
. We put grease between the bearings in an amount of 2/3 of the available space. On one side of the hub we install the inner race of the bearing, the ring and press in a new oil seal. We press the new oil seal using the old one. On the other side of the hub we perform the same operation. The hub and knuckle are assembled and ready for installation. Without making significant efforts, we install the steering knuckle with the hub back onto the CV joint splines and tighten the hub nut. We fasten the ball joints and bipod of the steering mechanism. We put the caliper bracket in place, under the 2 bolts of which the caliper protective screen is installed. We bend the antennae of the screen at the edge of the bolts, thereby locking the bolts. We return the caliper and brake pads to their place. Check all connections again. Use a jack to lift the car off the stand and install the wheel. By hitting the wheel at 12 and 18 o'clock alternately or simply turning the wheel, we tighten the hub nut. Adjust the tightening of the hub nut.
Adjusting the wheel bearing NIVA Chevrolet
1
.
After assembling the unit, tighten the locknut to a torque of 19.5 N.*M (or 1.95 kgf.m), turning the hub itself to the sides. 2
.
We loosen it back and tighten it to a torque of 6.8 N*M (or 0.68 kgf.m). 3
.
We check the gap according to the diagram, the limits are from 0.02 to 0.08 mm. 4
. We lock the locknut by bending the edges.
About maintenance-free bearings
A good way to strengthen the suspension is to install non-adjustable double-row wheel roller bearings on the Niva instead of the standard ones. But there is one caveat - such products have a different outer diameter, to solve this problem there are 2 ways: bore the “original” knuckles or buy and install a ready-made kit. A SKF bearing marked IVEKO BTH-1024 C is suitable.
Adjusting the clearance in Niva hubs
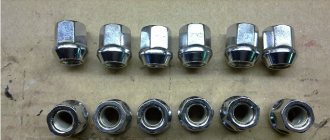
After installing a new bearing, a new wheel nut should also be used. The wheel must be on the car.
Adjustment of the front hubs on the Niva and Chevy Niva is carried out as follows:
- Screw the hub nut all the way and loosen slightly.
- Checking the play. If it persists, tighten the nut.
- We check the play again.
- The procedure is carried out until the backlash disappears.
- Use a sledgehammer to break a tire or drive a Niva a couple of meters.
- A small backlash appears. We also tighten the nut and leave it barely noticeable.
- Now the nut can be tightened.
Attention! You should drive the car for one day, after which, adjust the bearing again.
This is how wheel bearings are replaced and adjusted on Niva 2121, 21213, 21214, 2123 and Lada 4×4.
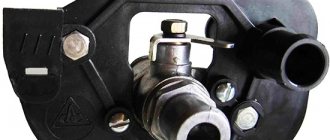
Release bearing: replacement recommendations
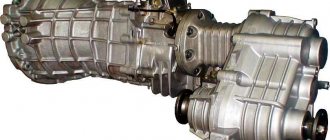
Removing the gearbox is a mandatory step for those who are interested in replacing a Chevrolet Niva release bearing that has failed. The work is labor-intensive, because you have to remove the drive shaft. It's good to have an assistant.
The following procedure is relevant when replacing the clutch mechanism:
- Installing the car on the inspection hole and removing parts;
- Removing the gearbox;
- If it is necessary to replace the bearing, the part is pulled out. Its base must be disengaged from the fork. The plug is removed from the structure, then the part is easy to remove.
The main difficulties are associated with removing the gearbox. Replacing a bearing is an operation that takes no more than 10 minutes. Before installing a new part, it is recommended to lubricate it thoroughly. The quality of the material used determines how durable the structure will be in the future.
Purpose and design of a wheel bearing
Bearings serve a dual function. On the one hand, they provide support for an axis, shaft or other element of rotation. On the other hand, they convert sliding friction into rolling friction. The wheel bearing is designed to ensure uniform rotation of the wheel hub. This is the connecting link between the hub and the axle of the car. Note that these elements ensure rotation of not only the front, but also the rear wheels.
Any bearing has the same basic structure:
- Outer ring (outer race);
- Inner ring (inner race);
- Guide for rolling elements (cage);
- Conical, cylindrical or spherical elements).
Bearings of modern imported cars have a more complex structure. Typically, their inner race is part of the hub, and the design itself contains electronic sensors. They are characterized by an increased service life. Russian manufacturers have not yet reached such technology, so they use simpler devices. On Chevrolet Niva cars, as on previous generations of the VAZ SUV, a pair of tapered bearings are installed on each hub.
Simplifying a unit negatively affects its reliability. Moving elements are especially sensitive to sharp impacts that chassis parts receive when driving over uneven surfaces.