How to check the front wheel wheel bearing on a Chevy Niva
The failure of the unit is indicated by the appearance of a low hum from one of the wheels. The sound does not disappear when cornering and intensifies as the vehicle speed increases.
If you notice this, you should immediately carry out a diagnosis, since if the wheel bearing seizes while driving, the consequences and costs can be very high.
The upcoming replacement of the Niva Chevrolet front wheel bearing is determined as follows:
- the front wheel of the car is suspended with a jack;
- rotate it by hand and check the play.
Signs of bearing wear:
- Extraneous noise and metallic knocking.
- Noticeable play is checked by rocking the wheel perpendicular to its axis.
- Vibration in the cabin when driving.
Before carrying out repairs, for clarity, watch the video of checking the front hub of a Chevrolet Niva:
Video: “Checking the front wheel bearing”
Video: “Signs of a bearing failure”
Wheel Bearing Maintenance
The front wheel bearings of the Chevrolet Niva experience constant loads during operation, even when driving on a flat road. In addition, the aggressive effects of moisture and dirt should be taken into account. All maintenance comes down to constant monitoring of the operation of moving parts. It is necessary to check as often as possible that there is no play in the wheel or extraneous noise when it rotates.
When pressing the outer race, you should use mandrels that prevent distortion. During the assembly process, grease is generously applied between the rings and the separator. It not only reduces friction, but also protects the rollers from dirt. There are two types of hubs available for the Chevrolet Niva. A conventional hub is installed with tapered bearings that need to be adjusted periodically
, and, if necessary, disassemble to replace the lubricant. The reinforced hub is installed with a double-row ball bearing.
The service life of such a bearing is significantly higher than that of a tapered one, however, the likelihood of the transfer case breaking under overload increases, while the standard hub is a kind of “fuse”.
How to change a wheel bearing on a Niva
The steps to replace the front bearing after removing the nut can be divided into 4 stages:
- Removing and disconnecting the steering knuckle and brake drum along with the hinges, from the strut and CV joint.
- Pressing out old parts.
- Pressing in new wheel bearings (two for each wheel).
- We put the unit back together and tighten the nut and adjust the gap.
For repairs, you will need a standard set of plumbing tools. We also recommend that you familiarize yourself with the structure of the node.
Required set of tools for work:
- A 30mm socket wrench to loosen the nut;
- Screwdriver to unscrew the brake caliper;
- Set of sockets and ratchet;
- Round nose pliers;
- Hammer;
- Mandrel or pipe for pressing;
- Puller with claws (if possible);
- Puller with claws;
- Jack and vice;
- Torque wrench to properly tighten the hub nut.
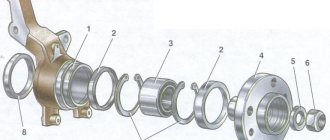
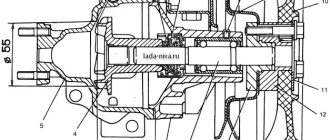
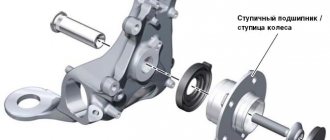
We place the car on a flat surface, engage first gear, remove the handbrake, and put chocks under the wheels. This completes the preparation. Also, before repairing, it is necessary to study the location of the elements of the car’s chassis according to the diagram: (pay attention to the steering knuckle - position 27, bearing - position 9).
Removing the front hub
The first stage begins with the following actions:
- Loosen the wheel and hub nuts. You need to carefully remove the decorative cap, then lift the replacement side and lower it onto the stops. We place wheel chocks under the rear wheels.
- We remove the front wheel using the well-known method, freeing it from the bolts. Next, you need to carefully remove the decorative cap.
- Unscrew the hub nut. To do this, you need to unlock it with a screwdriver. Remove the cone washer and unscrew the ABS sensor (if equipped).
- After that, the pads are removed and the caliper bolts are unscrewed, and the casing bolts are also unscrewed. The caliper itself, after being removed with wire, is attached to the upper arm.
Next, you need to remove the entire rotating mechanism from the CV joint splines along with the ball joints. To do this, several operations are performed:
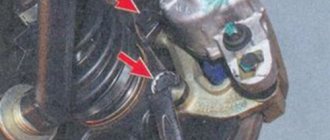
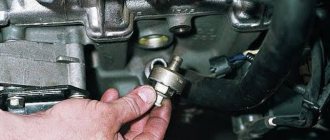
- Press out the steering rod ball pin using a puller, having first unscrewed the fasteners, as shown in the photo.
- Unscrew the pin bolt on the top ball. supports and pull it out of the socket.
- The lower ball joint must be disconnected from the lever by unscrewing 3 nuts.
- Once all the joints are disconnected, you can safely remove the entire assembly and begin replacing the wheel bearing.
How to change the wheel bearing of a Niva Chevrolet: replacing the front hub and rear hub bearings
Let us immediately note that the replacement process is not simple and requires certain knowledge and experience. Let's take a closer look at how to change the wheel bearing of a Chevrolet Niva on the front axle. To replace the front wheel bearings, the following tools are required:
- torque wrench, 30 hex head, minus flat head screwdriver;
- wrenches “17” and “19”;
- pullers, mandrel for pressing, press, hammer;
- penetrating lubrication, new bearing;
- wrench, chisel.
To replace Niva Chevrolet wheel bearings, it is necessary to carry out a number of preparatory work:
- place the car on a flat surface, placing it on a pit or lifting it on a lift;
- loosen the fastening nuts and bolts of the front axle wheel disk;
- Remove the wheel rim along with the hub nut cover.
Replacing the front wheel bearing of a Niva Chevrolet is performed as follows:
- by removing the decorative cap and tearing off the hub nut (front hub on Niva Chevrolet), holding the hub with a suitable wrench, avoiding turning, unscrew the nut;
- Using flat screwdrivers, spread the brake system pads and unscrew the mounting bolts of the bar;
- Having disconnected and moved the brake caliper to the side, tie it with wire to the suspension elements so that it does not load the brake hose, and also to protect the non-adjustable bearing;
- remove the brake disc by carefully tapping a rubber hammer from the eye of the steering knuckle, pressing the pin into the steering tip, after disconnecting, move the tip to the side and secure it at a certain distance;
Next, you need to remove the mounting bolts of the shock absorber strut and the steering axle and unscrew the mounting bolts connecting the knuckle and the ball joint with a “19” key (we use penetrating lubricant).
- release the drive axle shaft from the hub nut, and then do the same with the thrust washer;
- dismantle the hub from the steering knuckle using a press, press the part with a puller focusing on special holes specifically provided for this;
- using a lift, remove the two locking rings from the knuckle and dismantle the bearing;
- clean the seat for the new ring (the front hub of the Niva Chevrolet and the rotary washer are cleaned);
- We install a new bearing support ring;
- Using a special type of lubricant, lubricate the seat and the bearing itself;
- Having installed the bearing in the spacer ring, press it into the steering knuckle socket;
- Reinstall the steering knuckle in reverse order and adjust the clearance in the hub bearing.
Now let's move on to how to change the Niva Chevrolet wheel bearings on the rear axle. Replacing the rear wheel bearing is similar, but slightly different from similar work on the front. To replace the rear wheel bearing on a Chevrolet Niva, you will need the following tools: a flat-head screwdriver, a “24” socket head, pullers, and pliers.
As in the case of replacing the front bearing, the car must be prepared by placing it on a pit or a lift. Next, remove the wheel and brake drum, dismantle the axle shaft and separate it from the bearing and ring. The general sequence of work performed when removing the rear bearing is the same as when removing the front bearing.
Let us also add that when dismantling and installing a bearing, it is necessary to pay attention to the condition of the seals, protective covers, boots, etc. Even the slightest damage to the protective elements is not allowed, since water and dirt if they get on the bearing will quickly damage even a new element
Pressing out and dismantling old bearings
The removed assembly and steering knuckle do not require further disassembly. The only thing you need to do is remove the old oil seal using a regular flathead screwdriver, holding the hub assembly in a vice. It is not recommended to use them in the future; new ones are installed, just like the bearing.
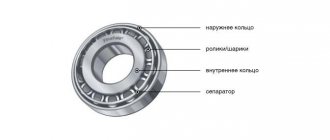
Inside the fist, there are two tapered angular contact roller bearings. They are installed at random and form a hub unit.
- To begin dismantling, it is enough to separate the brake disc mounts from the wheel turning mechanism.
- Don't forget to remove the seals.
- The small race of the inner bearing can be removed without any problems by hand.
- Next, at the same time, using the adapter, you need to knock out the outer roller bearing race from the pipe, as shown in the photo below.
- After separation, one ring with a separator remains on the hub, and the second remains inside the knuckle. The old clip is pulled off with a special puller equipped with grips.
- The second part of the part is knocked out of the trunnion through a spacer made of soft metal in the form of a rod or carefully with a screwdriver.
- The attachment is placed against the clip and light blows are applied, moving it in a circle.
- After this, the old grease should be carefully removed from the cavity.
Replacing Chevrolet Niva front wheel bearings
Tools:
- Straight box spanner 13 mm
- Straight box spanner 17 mm
- Straight box spanner 19 mm
- Straight box spanner 27 mm
- Small hammer
- Chisel
- Beard
- Driver for 3/4 socket bit
- Knob attachment 13 mm
- Knob attachment 17 mm
- Knob attachment 19 mm
- Knob attachment 27 mm
- Rolling jack
Parts and consumables:
- Front wheel hub bearings 4pcs
- Litol-24 lubricant
- Kerosene
- Container for washing parts
Notes:
External signs of the need to remove bearings for troubleshooting are: – increased noise when the wheel rotates; – the impossibility of adjusting to achieve the nominal clearance in the bearings.
We carry out the work on an inspection ditch or overpass.
1. We hang up the front of the car and remove the wheel.
Helpful advice:
It is more convenient to work on a lift. It is permissible to work on a vehicle raised by a jack on supports, taking the necessary precautions.
2. We disconnect the caliper from the pad guide as described here and tie them with wire to the upper arm.
3. Unscrew the wheel bearing adjusting nut as described here.
4. We take out the conical bushing.
5. Using a chisel, we straighten the edge of the locking plate of the nut for the front attachment of the lever to the steering knuckle.
6. Similarly, loosen the rear fastening nut.
7. Using a 19mm spanner, unscrew the nut that secures the rear lever to the steering knuckle.
8. Similarly, unscrew the front fastening nut.
9. Remove the locking plate.
10. Having removed the lever from the bolts, we move it away from the steering knuckle.
11. Disconnect the brake hose from the steering knuckle as described here.
12. Disconnect the upper and lower ball joints from the arms.
13. From the splines of the front wheel drive outer joint housing, remove the steering knuckle assembly with ball joints, hub assembly and brake disc.
14. We disconnect the steering knuckle and the hub with the brake disc.
Installing new bearings in the steering knuckle
It is important to know:
Manufacturers do not lubricate their bearings and rings very generously, so you will have to add the missing amount of grease yourself. Litol-24 in an amount of 40 g is suitable, apply lubricant to the separator and rollers before replacing the Niva front hub.
- We insert a new outer race of the inner and outer roller bearing into the prepared hole of the steering knuckle. We press the clips on both sides, in the same way as they were installed at the factory.
- Next, apply lubricant to the raceways and spread it in an even layer.
- We insert the inner race and close it with an oil seal. Lightly press the boot with a mandrel of the required size. We do the same on the other side, install the clip and boot.
- Now we insert the hub into the steering knuckle, namely into the holes of the installed roller bearings.
- The hub must be inserted smoothly and without distortion. In some cases, depending on the actual mounting diameters, pressing through a press will be required. In this case, a spacer was used.
- Replacement is complete. We install the assembled unit in the reverse order. Read about adjustments below.
If there is no hydraulic press or puller, replace it using a hammer and a mandrel (or using an old ring). This option is not recommended, but is demonstrated in the video for your reference.
- The outer race is inserted into the hub socket and driven without distortion through a wooden spacer.
- For its final landing, you can take a pipe of a suitable diameter or a mandrel.
- Then a separator is placed inside, and the assembly is assembled using the reverse algorithm.
Video: “Method of replacing a wheel bearing without a press”
The procedure for adjusting the bearing clearance:
- After assembling the unit, tighten the locknut to a torque of 19.5 N.*M (or 1.95 kgf.m), turning the hub itself to the sides.
- We loosen it back and tighten it to a torque of 6.8 N*M (or 0.68 kgf.m).
- We check the gap according to the diagram, the limits are from 0.02 to 0.08 mm.
- We lock the locknut by bending the edges.
It is important to know about the adjustments:
We recommend that you visually watch the adjustment process in the two videos presented below.
Video: “Adjusting wheel bearings”
Video: “Diagnostics of the gap in the hub assembly”
Replacing the front wheel bearing Niva Chevrolet
The Chevrolet Niva deservedly enjoys great popularity both among city residents and among off-road enthusiasts. It is one of the few that allows you to drive over the most rugged terrain.
In this case, from time to time there is a need to replace some parts, including wheel bearings. This part performs an important function: it ensures smooth running of the wheels, minimizes friction, and ensures free rotation of the wheel relative to the axis. Bearings are installed on each wheel.
When this part wears out, the wheel becomes misaligned. As a result, severe wear of the rubber appears on one side. If the defect is not corrected in time, this can lead to wheel jamming as a result of bearing scattering. At high speed, this means loss of steering control - the car can fly off the road or into oncoming traffic.
Replacing the front wheel bearings of a Niva Chevrolet is done a little more often, as on other SUVs, which is explained by the operating conditions of such vehicles. Severe road conditions lead to excessive load on the car suspension, so it is necessary to periodically diagnose the condition of the car and, if problems arise, make a timely replacement, without waiting for the period recommended by the manufacturer.
What is a non-adjustable bearing and why is it installed on a Chevrolet Niva
The problem with standard wheel bearings is that they need to be constantly adjusted during vehicle operation. If this is not done in time, they will fail, creating a howl or hum when moving. You can save yourself from such problems by installing non-adjustable hubs or double-row bearings.
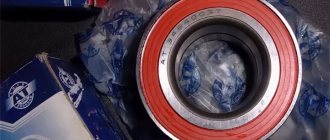
On sale you can find reinforced, non-adjustable hubs with double-row bearings. According to the manufacturer, this modernized unit has the following advantages:
- there is no need to adjust (the bearing tightening is precisely set during its production);
- no need for regular lubrication;
- eliminates rotation of bearings on the hub;
- eliminates wear of bearing seats on the steering knuckle and hub;
- a ball bearing reduces friction in the hub assembly;
- The service life of the hub is increased due to thickening
A good way to strengthen the suspension is to install non-adjustable double-row wheel roller bearings on the Niva instead of the standard ones. But there is one nuance - such products have a different outer diameter; there are 2 ways to solve this problem:
- 1) Boring the “native” fists for a double-row p/w;
- 2) Insert a set of spacers and fix both roller bearings, making them non-adjustable;
- 3) Buy and supply a ready-made kit.
For options 1 and 3, a SKF bearing marked SKF IVECO BTH-1024 C is suitable. For the second option, you need to purchase a special set of bushings, the installation of which is described in the video below.
Video: “How to make non-adjustable bearings from adjustable bearings”
Reworking the hub and installing a non-adjustable bearing
Such a hub, for an adjustable bearing, can be made from a standard part. It is necessary to bore the hole to the size of the bearing +50 microns (0.05 mm) for interference, and press it into the resulting mounting hole.
- According to the instructions provided, we dismantle the old parts.
- We grind the hub to the required diameter ourselves or order it from a turner in your city.
- We press in a new double-row ball bearing, for example SKF IVECO BTH-1024 C.
- Install the retaining ring.
- We install a spacer (washer) of about 3.5 mm and a seal (the size of the washer is determined using additional measurements).
- The process is complex, so it is recommended to watch it in video format.
Video: “Installing a non-adjustable bearing”
Video: “Installing reinforced bearings”
Video: “Replacing an IVECO bearing”
Now let’s look at the question of choosing a suitable bearing for replacement, both in the case of a conventional replacement and for conversion to a double-row reinforced one.
Front hub design on Niva Chevrolet
The hub on a car is the element that connects the wheel and the drive shaft. It has two bearings, which reduce the friction force when rotating on the shaft.
Diagram of hub assembly.
A special feature of the hub is that the play gap can be adjusted.
This gap may increase over time and due to wear and tear of parts. In this case, the wheels begin to vibrate on the axles, which is the cause of premature tire wear . To correct the situation, the wheel bearings should be changed in a timely manner.
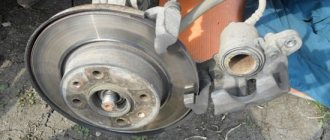
Hub assembly on steering knuckle
When is it necessary to change a wheel bearing?
With such lifting, the load on the wheel bearings will be increased.
There are two reasons that may indicate that the bearings need to be changed . This:
- Increased wheel play and knocking in the hub area.
- Grinding or humming noise in the hub area.
To more accurately determine the breakdown, you should disassemble the mechanism and inspect it.
How to diagnose a broken hub
Surely every driver has at least once encountered a situation when, while driving, a so-called crackling noise is heard. The sound can appear at speeds of 40 km/h and above. Using a car with such a sign is fraught not only with danger to the life of the driver and passengers, but also with serious consequences for the car itself. Most likely, you will notice a hum in a loaded car when turning.
Finding out which wheel bearing is worn out is quite simple: if there is noise from the wheel when turning to the right, the left bearing should be replaced. Similarly, if a hum occurs when turning left, pay attention to the right bearing.
There are several stages of wheel bearing wear:
- hum when turning;
- hum during normal driving with a loaded car;
- hum when driving an empty car;
- constant hum that increases during turns;
- a strong hum, accompanied by crunching, grinding and unregulated movements of the car from side to side.
The period of time between the first and fifth stages with moderate driving can be up to 5 years. It is recommended to replace the part as soon as possible so as not to put the car and the driver’s life at risk.
What could have caused the Niva Chevrolet bearing to fail:
- in 70% of cases, breakdown occurs due to unsuitable lubricant: its quality, excess or shortage may well damage the part;
- it happens that various contaminants and moisture penetrate deep into the bearing;
- this is the cause of failure in 18% of cases;
- There is also a possibility of incorrect assembly of parts, which entails excessive load and overheating.
What are the risks of driving a car with a damaged wheel bearing? There is a considerable possibility of the wheel jamming, which can end in disaster when driving at high speed. It is quite possible to lose control of the car due to the wheel “moving to the side”. Spreading brake pads is also a possible consequence.
Symptoms of a problem
Bearing wear manifests itself as the following symptoms:
- Vibration of the front wheels, which can be reflected in the steering wheel or felt in the cabin.
- Knocking or crackling sounds in the front of the car when driving;
- Heating of the front wheels in the axle area.
If such manifestations occur, you need to check the condition of the wheel bearings. To do this, jack up the car and rock the wheel in different directions. Play and knocking in the bearing area indicates the need for replacement and adjustment. The malfunction may also manifest itself in the form of noise when the wheel rotates.
1. The hubs get hot. It is important to understand that when braking, the kinetic energy of the car is converted into thermal energy. As a result, the brake discs and the hubs on which they are attached become very hot. Heating of the part during movement, and not during braking, indicates wear of the bearing or its incorrect adjustment.
The second option is typical for adjustable hubs. The adjusting nut must be tightened with a force of 2 kgf*m. If you tighten it further, the tapered bearings will be too tight.
Their rotation will be difficult. Prolonged operation of the machine in this condition leads to bearing failure and wheel jamming.
This is interesting: Installing the ignition and explosive wires on a Kia Spectra car
2. The adjusting nut is unscrewed while moving. Sometimes this happens literally after 20-50 kilometers. The phenomenon is observed in three cases: the master forgot to tighten the nut, there was a misalignment between the bearing races, or play appeared in the coupling of the CV joint with the hub.
How to choose a replacement part and bearing number
Once you are convinced that the bearings need to be repaired, you should select a hub bearing in the retail chain based on three main criteria (by default, single-row tapered roller bearings are installed - the new kit must have a nut):
- Chevrolet Niva front hub part number: 2007108 (catalog number - 2121-3103020-10, bearing according to GOST - 2007108, foreign equivalent according to ISO - 32008).
- You need to buy two roller bearings in the kit.
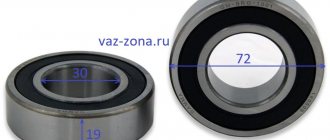
- Dimensions of the Chevrolet Niva front hub bearings: height – 19 mm, internal diameter – 40 mm, external diameter – 68 mm.
- The cost of a new set of parts for the hub, including double-row bearings, as well as suitable manufacturers, are presented in the table below.
Table - Recommended manufacturers, numbers and articles of hub bearings
| N p/p | Manufacturer | Catalog number | Price for 2021, rub. | Additional Information | |
| Dimensions (mm) and parameters | Applicability | ||||
| Standard sets of two bearings | |||||
| 1 | Volzhsky standard, Russia | 2007108 | 200 | Inner diameter - 40 mm; Outer diameter - 68 mm; Width -19 mm; Weight - 0.278 kg; Number of rollers in the bearing - 21 pcs.; Roller dimensions - 7/11x19 mm; Dynamic load capacity - 40 kN; Static load capacity - 52 kN; The maximum rated speed is 7000 rpm. | Chevrolet NIVA trim levels L, LC, LE, GL, GLC. In that case Restyling 2021. |
| 2 | VPZ, Russia | 32008 | 200 | ||
| 3 | SKF, Sweden | 32008X/QSKF | 770 | ||
| 4 | KOYO, Japan | 32008JR | 880 | ||
| Double row bearings (for reinforcement) | |||||
| 1 | OPTIMAL, Germany | 681 923 | 2200 | Inner diameter - 40 mm; Outer diameter - 73 mm; Width - 55 mm; Number of raceways - 2 pcs.; Seal - Yes. | Likewise |
| 2 | RUVILLE, Germany | 4013 | 2480 | ||
| 3 | SKF, Sweden | BTH-1024 C VKBA 3551 | 2300 | ||
It is important to know:
Parts of satisfactory quality last about 20 thousand km, mileage with high-quality products exceeds 30 thousand km. The most popular products from the Volzhsky and Samara plants are labeled SPZ-GROUP. The average price of a wheel bearing is 1000 rubles.
Replacing the front wheel bearing Niva Chevrolet
The Chevrolet Niva deservedly enjoys great popularity both among city residents and among off-road enthusiasts. It is one of the few that allows you to drive over the most rugged terrain.
In this case, from time to time there is a need to replace some parts, including wheel bearings. This part performs an important function: it ensures smooth running of the wheels, minimizes friction, and ensures free rotation of the wheel relative to the axis. Bearings are installed on each wheel.
When this part wears out, the wheel becomes misaligned. As a result, severe wear of the rubber appears on one side. If the defect is not corrected in time, this can lead to wheel jamming as a result of bearing scattering. At high speed, this means loss of steering control - the car can fly off the road or into oncoming traffic.
Replacing the front wheel bearings of a Niva Chevrolet is done a little more often, as on other SUVs, which is explained by the operating conditions of such vehicles. Severe road conditions lead to excessive load on the car suspension, so it is necessary to periodically diagnose the condition of the car and, if problems arise, make a timely replacement, without waiting for the period recommended by the manufacturer.
Hub repair: popular mistakes and misconceptions
Connoisseurs of tuned cars are often able to make radical changes to their cars. And few restrictions exist for them. Owners of Niva Chevrolet are no exception. Tuning fans also took a look at the design of the front hub assembly. Often on online forums in discussions you can find advice (and even corresponding training videos) about replacing the bearing using a hub mechanism that has a steering knuckle from a VAZ 2121 car, since it is believed that this design is better in terms of reliability.
However, this is a misconception. Yes, tightening will occur without any difficulties, but this will make it impossible to adjust the camber of the front wheel of the car. The fact is that each fist has distinct differences in size and axial angles. But much more stupid are the tips that require turning the hub and shaft on a lathe.
Repairs such as replacing a wheel bearing in a field can be done independently without much difficulty. Wheel bearings on the VAZ 2121 and Chevrolet Niva have a very short resource due to the suspension design, compared to other all-wheel drive vehicles, therefore, these parts need to be given increased attention in order to identify the fault in time.
Replacing a wheel bearing in the field does not involve anything complicated if you follow the instructions strictly. Anyone, even a novice car owner, can cope with such repairs. Not all vases have wheel bearings changed the same way. The design of the Niva car hub differs from the design of other VAZ models, so the process of replacing the bearing will also have its differences.
Symptoms and identification of a worn wheel bearing
When the life of the hub bearing is running out, a hum is clearly audible when driving, this is the main sign. If you listen, you can understand which direction this hum is coming from. When driving at low speeds, it is not too noticeable, and it can easily be confused with noise from rubber, but as speed increases, the hum increases, which is reminiscent of flying in an airplane. You can’t drive with a humming bearing, because soon it may simply break into pieces, and this implies a lot of other problems.
And also interesting: Cons of Renault Duster Diesel according to Owner Reviews.
If there is an assumption that the bearing has exhausted its service life, then you can check this with the car parked. To do this, you need to jack up the wheel whose bearing is suspected and pull the wheel vertically with your hands. If there is play, then the bearing is most likely to blame.
Necessary tools for work
- Jack and supports. To replace the front bearing, you need to lift both wheels, otherwise the stabilizer will interfere, pinching the suspension elements;
- Wrench for unscrewing wheel nuts;
- Flathead screwdriver. To remove the protective cap;
- Head 27;
- Locksmith's beard. To straighten the collar of the hub nut;
- Hammer;
- Wrenches for 10, 17, 19 and 22;
- Chisel and wooden spacer. To avoid damaging other parts when knocking out;
- Vise;
- A piece of pipe for pressing in bearing retaining rings.
Bearing replacement process
- Loosen the nuts on the wheel where replacement is planned and jack up both wheels of the axle. Remove the desired wheel;
- We dismantle the caliper and guide. To avoid damaging the brake hose, we tie the caliper to the upper arm with wire;
- Having removed the protective cap, use a 27mm head to unscrew the hub bearing nut and remove the conical bushing;
- Using a chisel, unbend the locking plate of the front and rear lever mounting nuts. Using a 19mm wrench, unscrew the front and rear nuts securing the lever. After this, remove the locking plate;
- When the lever is released, it must be moved away from the steering knuckle, freeing the brake hose;
- Disconnect the ball joints (upper and lower) from the lever;
- Now you can remove the entire steering knuckle assembly, along with the ball joints and the brake disc, by removing it from the CV joint splines;
- Separate the steering knuckle from the hub with the brake disc. If the parts do not separate freely, then we clamp the fist in a vice and, using a soft metal drift or chisel, through a spacer from wood, knock out the hub with the brake disc;
- Next, pull out the bolts securing the lever and knock down the protective ring with a chisel;
- Using a 10mm wrench, unscrew the bolt that secures the casing and remove the casing itself;
- We hold the fist in a vice and, using a flat-head screwdriver, pry up and remove the wheel bearing seal. There is a metal ring behind the oil seal, we also remove it;
- The next step is to remove the inner ring of the outer bearing assembly from the well. Next, we also remove the oil seal, metal ring and inner bearing ring assembly;
- Using a punch and a hammer, we knock out the metal rings of the outer and inner bearings. At this point, dismantling is considered complete.
After cleaning the well from old grease, you can proceed to installing a new bearing. Replacing a wheel bearing in a field occurs in the reverse order; it is only important not to forget to fill it with fresh Litol 24 grease and, after installing the steering knuckle on the car, adjust the clearance in the bearings.
Thematic materials:
What happens if you pour gasoline into a diesel engine? Car engine cooling system What malfunctions prohibit the use of a car Orion on-board computers Pressure reduction valves, selection and operation issues Installation of additional headlights Reviews: Chrysler engine on a Gazelle Electronic speedometers for a car
103583
If you notice an error, select a piece of text and press Ctrl Enter
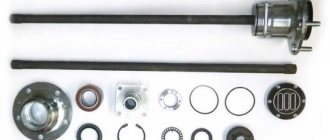
Replacing the axle bearing
First of all, you should pay attention that when replacing a bearing, you need to install not only it, but also new axle shaft seals and new retaining rings. For cars with and without ABS, the locking rings are different - on cars without an anti-lock braking system, the axle locking ring has a smooth surface, and on cars with ABS, the locking ring is splined. It is impossible to confuse them. We assemble tools and accessories:
- Bulgarian.
- Standard set of tools and screwdrivers.
- Inertia axle puller.
Inertia axle puller.
New set - oil seal, retaining ring and bearing.
The tool has been selected and the axle shaft can now be removed. This is done in the following sequence:
- We place the car on a flat surface and install wheel chocks under the front wheels.
- We tear off the wheel mount, jack up the car, and install a stand under the rear axle.
- Remove the wheel and unscrew the brake drum mounting screws.
We unscrew the bolts securing the brake drum to the axle shaft.
We knock down the brake drum using a wooden block.
We unscrew the four nuts of the axle bearing mounting plate bolts.
We remove the axle shaft using an inertial puller.
When removing the axle shaft, you need to try not to damage the oil seal if there is no desire or need to change it. After this, the entire brake mechanism is suspended from the spring using a wire.
Another element that experiences heavy loads while driving is the Niva Chevrolet axle bearing. Which are recommended to be changed along with the axle.
A symptom that this part needs to be replaced is the appearance of loud noise at any speed, as well as the appearance of axial and radial play. This part is not in short supply and can be purchased at any auto store, its factory part number is 2121-2403080, the analogue has part number 62208-2RS, and the industrial part is 180508.
To make the replacement, first of all you need to remove the axle itself and do the following:
- To remove the retaining ring with the bearing, take a vice and clamp the axle shaft in it
- We take a grinder and cut the stopper and bearing in several places, this must be done carefully so as not to touch the axle shaft
- Take a chisel and split the retaining ring and bearing
- We remove rust and dirt from the ring and bearing seats
- We take the pipe and use it to press the new bearing into place; during these actions, we must not allow the cage to rotate
- We take a blowtorch and use it to heat the locking ring until red and use pliers to install it in its place
- We wait until the axle shaft cools down, while it cools down in the brake flap we replace the oil seal
Also interesting: Which is better to choose Chevrolet Niva or Renault Duster
After everything has been changed, you need to check the transmission oil level in the rear axle. At this point, all replacement work can be considered completed. As you can see, all the work can be done independently without the participation of a specialist; it is enough to have a little knowledge and a standard set of tools.
- To remove the retaining ring with the bearing, take a vice and clamp the axle shaft in it
- We take a grinder and cut the stopper and bearing in several places, this must be done carefully so as not to touch the axle shaft
- Take a chisel and split the retaining ring and bearing
- We remove rust and dirt from the ring and bearing seats
- We take the pipe and use it to press the new bearing into place; during these actions, we must not allow the cage to rotate
- We take a blowtorch and use it to heat the locking ring until red and use pliers to install it in its place
- We wait until the axle shaft cools down, while it cools down in the brake flap we replace the oil seal
Unregulated
As a rule, the Niva has a standard adjustable hub, which requires periodic adjustment. But in order to get rid of this inconvenience, non-adjustable hubs for the Chevrolet Niva were developed, which have such positive qualities as:
- No maintenance required. They don't need to be adjusted
- The bearing in the device does not rotate
- It is filled with special lubricant from the factory, so there is no need to lubricate it.
- Due to the fact that the work occurs thanks to the ball bearing in the unit, friction is reduced
- There is no wear on the seat in the rotary cam
- Not adjustable as it is tightened from the factory
- No need to change the bearing
- Long service life which is equal to 100-120 thousand kilometers