Hub nut M18x1.5 left without point VAZ 2101-14044871
Used in VAZ 2101-2107, 2121-21214 Niva, 2123 Niva Chevrolet cars
can find out the price and buy M18x1.5 left hub nut without point VAZ 2101-14044871 by calling toll free. Calls within Russia are free.
A motorist may often be faced with a situation where he needs to install new Niva nuts, the thread size of which is designated as M12x1.25. It would seem that the task is simplest. But wheel nuts are to a great extent responsible for the safety of the driver and passengers, so you can’t just throw them away and put in anything.
How to replace a Chevrolet Niva wheel bearing yourself: what you need to know
Chevrolet Niva is a serial Russian off-road SUV with an all-wheel drive system.
At the same time, a number of elements in the structure of this car are designed for heavy loads. For example, a wheel bearing (rear bearing or front wheel bearing of Niva Chevrolet), Niva Chevrolet hub, wheel disc (front or rear), brake drum or brake disc, etc. However, despite the quality and reliability of the parts, over time they still wear out and require repair or replacement. The service life of each element depends on various factors. The Chevrolet Niva hub and wheel bearing were no exception. Next, we will look at how to replace a Niva Chevrolet wheel bearing.
Chevrolet Niva wheel bearings: signs of malfunctions and causes of failure
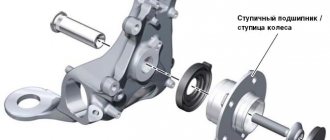
So, the hub allows the car wheel to rotate. The part itself is quite durable and rarely fails.
In turn, a bearing is installed inside the hub. This part is most susceptible to overload and periodically fails, requiring replacement.
It turns out that although the hub itself is quite wear-resistant, the wheel bearings, experiencing enormous loads, wear out faster. In turn, wear of a part depends on many factors:
- high mileage (70-80 thousand km);
- active operation of the vehicle in off-road conditions (driving the vehicle on bad roads);
- uneven pressing of the bearing during repair (part misalignment);
- loss of tightness (destruction of rubber or plastic casings, water and dirt entering the bearing lubrication);
As a rule, certain signs of malfunction indicate that Chevrolet Niva wheel bearings need to be replaced. However, the symptoms cannot be ignored.
Main symptoms of malfunctions:
- while the car is moving, extraneous noises appear (crunching, humming, metallic knocking) - destruction of the bearing walls;
- While driving, the car begins to pull to the side, vibration appears in the cabin, noticeable on the steering wheel and along the body (wheel bearing wedging;
- the appearance of play in relation to the bearing axis (the wheels swing perpendicularly), indicating wear and other defects.
Causes and signs of failure of the Chevrolet Niva hub
A broken car hub is usually a serious problem and should not be ignored.
Among other things, a worn hub heats up more when the car is braking, which negatively affects the performance of the car’s brakes. It happens that damage to the hub occurs gradually and, as a rule, this is indicated by an unpleasant sound, accompanied by vibration of the body or weak shocks.
The main reasons for hub failure are:
- careless driving on roads;
- multiple overloading of cars;
- driving on sandy soil or “mud baths”;
- frequent car slipping;
- aggressive driving style with sharp acceleration and braking.
These reasons can have a significant negative impact on the hub housing, outer or inner bearing ring. They are also sources of dirt, moisture and sand getting inside the bearing mechanism, which causes the journal to fail.
How to change the wheel bearing of a Niva Chevrolet: replacing the front hub and rear hub bearings
Let us immediately note that the replacement process is not simple and requires certain knowledge and experience. Let's take a closer look at how to change the wheel bearing of a Chevrolet Niva on the front axle. To replace the front wheel bearings, the following tools are required:
- torque wrench, 30 hex head, minus flat head screwdriver;
- wrenches “17” and “19”;
- pullers, mandrel for pressing, press, hammer;
- penetrating lubrication, new bearing;
- wrench, chisel.
To replace Niva Chevrolet wheel bearings, it is necessary to carry out a number of preparatory work:
- place the car on a flat surface, placing it on a pit or lifting it on a lift;
- loosen the fastening nuts and bolts of the front axle wheel disk;
- Remove the wheel rim along with the hub nut cover.
Replacing the front wheel bearing of a Niva Chevrolet is performed as follows:
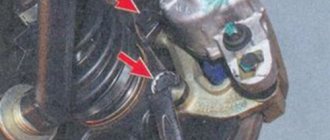
- by removing the decorative cap and tearing off the hub nut (front hub on Niva Chevrolet), holding the hub with a suitable wrench, avoiding turning, unscrew the nut;
- Using flat screwdrivers, spread the brake system pads and unscrew the mounting bolts of the bar;
- Having disconnected and moved the brake caliper to the side, tie it with wire to the suspension elements so that it does not load the brake hose, and also to protect the non-adjustable bearing;
- remove the brake disc by carefully tapping a rubber hammer from the eye of the steering knuckle, pressing the pin into the steering tip, after disconnecting, move the tip to the side and secure it at a certain distance;
Now let's move on to how to change the Niva Chevrolet wheel bearings on the rear axle. Replacing the rear wheel bearing is similar, but slightly different from similar work on the front. To replace the rear wheel bearing on a Chevrolet Niva, you will need the following tools: a flat-head screwdriver, a “24” socket head, pullers, and pliers.
Let us also add that when dismantling and installing a bearing, it is necessary to pay attention to the condition of the seals, protective covers, boots, etc. Even the slightest damage to the protective elements is not allowed, since water and dirt if they get on the bearing will quickly damage even a new element.
Pros and cons of secret fasteners
To prevent your Chevrolet Niva from being “taken off” the next night after installing new tires, it is recommended to install 1 secret nut on each wheel. No matter how new technologies develop, more reliable means of stingray theft have not yet been invented. Hence the first and main advantage of the secret: such fasteners will help protect much more expensive property from thieves than it is worth.
Modern secrets are no match for the first ones that appeared in distant Soviet times. They are structurally more perfect and differ in aesthetics, which is important. The part is an elongated nut with an adapter for an individual key. If you choose closed-type decorative fasteners of the same length for it, then the wheel as a whole will look quite aesthetically pleasing.
The secret mount is very useful for the spare wheel of the Chevrolet Niva, which is screwed to the bracket on the rear door with ordinary nuts, and therefore most vulnerable to thieves. To unscrew secrets, the following types of keys are made:
To prevent the nut from being grabbed by a gas wrench or other similar tools, the lock on top is equipped with a rotating bushing (shell), and the place for the wrench is located in a recess. Cheap products and fakes may not have a shell, so you cannot buy such nuts. The disadvantages of secrets are:
- The tightening torque is weak, so the remaining nuts must be held securely;
- any tricky fastener can be unscrewed if the thief has the time and opportunity to do so;
- the need to always have the key with you and not forget it under any circumstances.
The last drawback is a real scourge of forgetful drivers. If the ramp of exits 2 is punctured: go get the key or call a tow truck, otherwise the wheel cannot be removed.
The content of the article :
“Reinforced” hub unit for Niva with reinforced hub 2123 (24 splines) from VolgaAvtoprom
I purchased this product:
An initial inspection showed the presence of strange holes through which water freely gets to the bearing bypassing the seal...
Holes past the seal
I called the manufacturer to clarify why they were needed, and why the instructions did not say to seal them. To which I was told that these are technological holes for pressing out the inner race from the hub. Then I began to wonder why such tricks were needed. It turned out that the hub shaft with a diameter of 40.03 (personally measured) was made supposedly to prevent the hub race from turning... Although it should be -0.01 ... -0.02 in order to be able to remove the hub without disassembling the bearing.
VolgaAvtoProm has a conditionally dismountable unit (not dismountable) - each time an expensive bearing must be replaced. Because it comes apart and the clip remains on the hub.
In addition to everything, the hub has no traces of heat treatment and when measured for hardness, it turned out that the hub is completely raw.
Raw hub VolgaAvtoProm
As soon as I drag the 100% original Conveyor hub to the stand, I will make a note about it.
Symptoms of a problem
Bearing wear manifests itself as the following symptoms:
- Vibration of the front wheels, which can be reflected in the steering wheel or felt in the cabin.
- Knocking or crackling sounds in the front of the car when driving;
- Heating of the front wheels in the axle area.
If such manifestations occur, you need to check the condition of the wheel bearings. To do this, jack up the car and rock the wheel in different directions. Play and knocking in the bearing area indicates the need for replacement and adjustment. The malfunction may also manifest itself in the form of noise when the wheel rotates.
Separately, it is worth mentioning two problems that arise during the operation of the Chevrolet Niva:
1. The hubs get hot. It is important to understand that when braking, the kinetic energy of the car is converted into thermal energy. As a result, the brake discs and the hubs on which they are attached become very hot. Heating of the part during movement, and not during braking, indicates wear of the bearing or its incorrect adjustment.
The second option is typical for adjustable hubs. The adjusting nut must be tightened with a force of 2 kgf*m. If you tighten it further, the tapered bearings will be too tight.
Their rotation will be difficult. Prolonged operation of the machine in this condition leads to bearing failure and wheel jamming.
2. The adjusting nut is unscrewed while moving. Sometimes this happens literally after 20-50 kilometers. The phenomenon is observed in three cases: the master forgot to tighten the nut, there was a misalignment between the bearing races, or play appeared in the coupling of the CV joint with the hub.
How to change the wheel bearing on a Chevrolet Niva with your own hands?
For repairs you will need:
- Powerful socket wrench 30.
- Puller for steering rod pin.
- A mandrel for pressing out a bearing or a piece of pipe of suitable diameter.
- A set of spanners or ratchet sockets.
- Balloon wrench.
- Hammer.
- Round nose pliers.
- Jack.
- Wheel chocks.
- Vise.
- Mount.
- Torque wrench.
- Boards or wooden block.
The replacement process is divided into five stages:
- Disconnecting the assembly (brake disc, hub and steering knuckle) from the CV joint strut.
- Pressing out old bearings.
- Installation of new parts.
- Assembling the unit and installing it in place.
- Tightening the adjusting nut.
Work is carried out on a level area. The presence of an inspection hole is not necessary.
To change bearings, you must perform the following steps:
- Place the car on the site and place wheel chocks under the rear wheels.
- Jack up the wheel.
- Unscrew the wheel rim mounting bolts.
- Build an improvised support under the side member from a wheel with boards or timber laid on it and lower the jack so that the car rests on it.
- Jack up the lower arm, compressing the suspension spring.
- Turn the steering wheel to the right or left (depending on the side from which the replacement is performed).
- Unscrew and remove the caliper, caliper and brake pads.
- Hang the caliper so that it does not put any weight on the brake hose.
- Turn the steering wheel in the opposite direction.
- Remove the ABS sensor.
- Unscrew and unscrew the tie rod nut.
- Remove the pin using a puller.
Attention! Without a puller to remove the rod pin, you can disconnect it in another way. To do this, you will have to dismantle the bipod of the steering mechanism from the steering knuckle.
- Unscrew the hub nut.
- Remove the ball joint mounting bolts.
- Carefully remove the hub along with the steering knuckle, ball joints and brake disc.
- Remove the caliper protective screen.
- Remove the brake disc.
- Unscrew the steering arm.
- Clamp the steering knuckle in a vice.
- Remove the seals with a pry bar or a powerful screwdriver.
- Substituting the mandrel, knock out the outer races of the bearings.
- Wipe and clean the seat.
- Disassemble new bearings.
- Press the outer races into the hub using a mandrel or old parts.
Important: the clips are installed with the wide edge inward. You can make pressing easier by preheating the hub.
- Apply lubricant, filling ⅔ of the space in the cage.
- Install the bearing race and inner race.
- Carefully press in the new oil seal.
- Repeat the installation operation for the bearing on the second side of the hub.
- Place the assembly on the CV joint splines.
- Tighten the hub nut.
- Screw on the ball joints and steering bipod.
- Install the protective cover and caliper bracket.
- Tighten the bolts securing the protective screen and lock.
- Put the caliper and brake pads in place.
- Jack up the car.
- Place and secure the wheel.
- Tighten the hub nut by tapping the wheel in the 6 and 12 o'clock directions.
Detailed video about replacing wheel bearings
Types of hub units for cars of the Niva, Chevrolet-Niva family
All owners of Niva and Chevrolet-Niva family cars sooner or later face the need to replace wheel bearings. The reasons may be different:
- bearing wear over time
- untimely adjustment of the front wheel hubs
- wear due to poor quality parts.
And there are two solutions to replacing the wheel bearings.
- install the original bearing or assembly
- or install hub units with maintenance-free bearings
The first method is the most affordable, but has very big disadvantages. You need to find high-quality bearings, install them correctly and constantly monitor them and make adjustments. Failure to comply with all these points will lead to premature failure of the unit and may also lead to an accident. The second way is to install a hub assembly with a non-adjustable bearing. These bearings have a longer life and do not require adjustment. When installing such bearings, the hub is tightened once during installation and does not require attention during operation.
Adjusting the wheel bearing
To work, you will need an indicator and a torque wrench.
To prepare for adjusting the wheel bearing, you must perform the following operations:
- Secure the indicator by resting its leg on the hub near the adjusting nut.
- Place spanners on the studs and secure them with nuts.
- Rotate the hub and move it axially. (Screwed spanners are used as handles).
- Measure the amount of axial movement (clearance) of the hub, guided by the indicator readings.
- If the stroke exceeds 0.15 mm, adjust the play.
The adjustment is carried out as follows:
- Straighten the collar of the nut.
- Unscrew it with a spanner.
- Install a new nut and tighten with a force of 2 kgf*m.
Important: when tightening, it is necessary to rotate the hub in different directions.
- Loosen the nut and tighten again with a torque of 0.7 kgf*m.
- Loosen the tension by turning the key 20-25 degrees counterclockwise.
- Check hub play.
- Make sure that the indicator readings correspond to the norm (0.02-0.08 mm).
- Lock the nut by pressing its edge into the groove of the outer CV joint.
You can adjust the hub play without using a torque wrench. To do this you need:
- Tighten the nut tightly.
- Rotate the wheel a few turns.
- Check the play.
- If necessary, loosen or tighten the nut slightly.
- Continue until the free play of the hub is within 0.02-0.08 mm.
- Lock the nut collar.
Video instructions for adjusting the wheel bearing You can install non-adjustable IVECO bearings on the Chevy Niva. To do this, you need to buy the appropriate hubs or remake the old ones. For the rework you will need a jig boring machine. In addition to boring the mounting hole, you will have to make spacer rings. Drawings of parts are provided at the link.
Attention! Rework makes sense only if you have turning skills and free access to the machine. Otherwise, it is easier and cheaper to buy ready-made hubs for non-adjustable bearings.
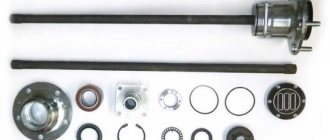
The design of the rear wheel mounting of the Chevrolet Niva is very different. However, they also use bearings that need periodic replacement. They are replaced either together with the axle shafts or separately. The second option is much cheaper, but requires good metalworking skills and a torch to heat the metal.
To work you will need:
- Jack, wheel wrench, chisel, hammer.
- Standard set of screwdrivers and wrenches.
- Axle puller.
- Gas (gasoline) burner or muffle furnace.
- Repair kit including bearing, oil seal and retaining ring.
- A pipe with a diameter of 40-45 mm, the length of which exceeds the size of the axle shaft.
Replacement of bearings is carried out as follows:
- Place the machine on a level surface.
- Place wheel chocks or bricks under the front wheels.
- Jack up the car.
- Remove the wheel.
- Place a support under the rear axle.
- Unscrew the brake drum mount.
- Dismantle the part.
- Unscrew the nuts holding the bearing.
- Load the rear axle by lowering it onto the stand.
- Pull out the axle shaft using a puller.
- Hang the brake mechanism on a wire.
- Knock down the retaining ring using a chisel, hammer and grinder.
- Crack the bearing races using a chisel.
- Remove rust and dirt from the seating surface.
- Put the new bearing in place.
- Heat the locking ring to 200-250 degrees (dark red color) and hammer it into the seat with a pipe
- Replace the oil seal.
Assembly is performed in the reverse order of disassembly. The bearing does not need adjustment.
A visual process of replacing a Niva Chevrolet axle bearing
Why change the mount?
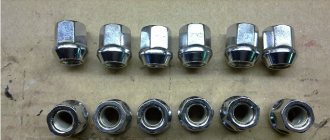
There are several reasons why Niva car owners change their wheel nuts to new ones:
- the old ones are worn out, their edges are licked or the threads are torn off;
- Alloy wheels must be installed on the car, and the standard mount does not fit them;
- the owner just wants to decorate the wheels of his car without resorting to installing decorative plastic caps, which are constantly lost.
Old nuts that are worn or mechanically damaged do need to be replaced, especially when they have poor threads or missing edges. It is difficult to tighten such a part with a torque of 10-11 kgf/m to securely fasten the wheel. It’s better to install a new set; it’s pointless to change 1-2 fasteners. The main thing is that the threaded part of the stud remains normal.
Alloy wheels, although thicker than stamped steel ones, can theoretically be fastened with factory nuts. Another thing is that such details will ruin the entire appearance of the new wheels, so in such a situation it is better to install elements that are in harmony with the wheel. There is another point: in some models of alloy wheels, samples are made in the form of a hemisphere, rather than a cone. Then the standard fasteners will definitely not fit; you need to purchase nuts with a spherical end that fit into the mating part of the rim.
In addition to improving the appearance of the car, there is another reason that forces you to change 1 out of 5 nuts to a special one that can only be turned with an exclusive key. The reason lies in the high cost of car tires and storing the car itself in the open air in the yard, as often happens in cities. To prevent tires from being stolen at night, one clever security nut is installed on the car.
Checking and adjusting the clearance in the front wheel hub bearings of Niva Chevrolet
With increased clearance in the front wheel hub bearings, vibration in the steering wheel is observed in a certain speed range.
At the same time, the tires wear out unevenly (in patches), and the service life of the bearings themselves sharply decreases. The complete absence of clearance, at which tight rotation of the hub is observed, also leads to a decrease in service life.
The clearance in the front wheel hub bearings should be no more than 0.15 mm.
You will need: a wrench for the wheel bolts, a 27 wrench, a hammer.
1. Place the car on supports
2. Remove the corresponding wheel.
3. Remove the decorative cap,
4. Unlock the hub nut and
5. . holding the hub from turning with a suitable wrench, unscrew the nut.
6. Screw and tighten the new hub nut to a torque of 19.6 Nm (2 kgf m), while turning the hub approximately 90° in both directions 2-3 times to self-align the bearings
It must be taken into account that if there is large play in the bearing, the bearing must be replaced.
Since when the bearing is tightened with increased wear, progressive wear of the bearing will begin.
And eliminating the backlash can only be a temporary measure.
7. Loosen the adjusting nut and tighten it again to a torque of 6.8 Nm (0.7 kgf m)
8. Loosen the adjusting nut approximately 25°.
9. Lock the hub nut (by jamming the collar of the nut into two grooves on the front wheel drive outer joint housing trunnion).
10. Install the removed parts in the reverse order of removal.
The gap is most accurately determined using an indicator.
If there is no indicator, swing the hanging wheel in a vertical plane.
If you feel any play, the bearing clearance may need to be adjusted.
To make a final check of the bearing, have an assistant press and hold the brake pedal.
Rock the wheel again in a vertical plane.
The disappearance of wheel play during such a check confirms the need to adjust the clearance in the bearings
When adjusting, be sure to replace the hub nuts with new ones, since after adjustment the nut may take its previous position and it will not be possible to securely lock it, since the collar in the right place will already be damaged by the previous locking.
As a last resort, if possible, use a nut from another car.
After adjusting the clearance in the hub bearings, make sure that the wheel rotates easily.
Perform a final check of the correctness of the adjustment by assessing the degree of heating of the hubs after driving the car for about 1 km without using the brakes.
Replacing the wheel bearing Niva Chevrolet
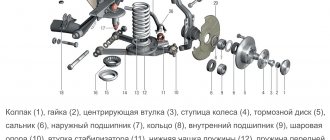
The Chevrolet Niva SUV (VAZ 2123) is reliable and, like no other car, is adapted to the realities of road conditions in Russia. Thanks to the arrangement of the hub, wheel bearing, brake drum, and wheel disk, a community of parts is created that can withstand heavy loads. The greatest pressure falls on the wheel bearing; in fact, it holds the entire mass of the car.
Unfortunately, even on such a car, harsh operating conditions have a sad effect on the components, especially the suspension. Therefore, sometimes the wheel bearing fails.
Signs of wheel bearing failure in Niva Chevrolet
It is more convenient to check the suitability of the wheel bearing on a lift. You can also use a jack, while observing safety precautions.
Signs indicating the need to replace a wheel bearing are as follows:
- increased noise when the wheel rotates;
- it is impossible to eliminate the gap formed between the bearings and the hub;
- play when trying to swing the wheel;
- tire wear occurs unevenly, as a rule, there is a wear line along the edge of the wheel;
- noticeable vibration in the cabin when driving the car.
Wheel Bearing Removal Tips
After pressing out the bearing, remember that the seal is unsuitable for further use . It needs to be replaced with a new one.
If you don't have a micrometer to determine the wheel play, you can simply wobble the wheel. If play is felt, then it is necessary to tighten the hub nut more tightly. Then move the wheel up and down again and tighten the nut. A similar procedure must be carried out until the backlash is completely eliminated.
After adjusting the clearance in the hub bearing, you should make sure that the wheel rotates freely.
Having analyzed the maintainability of the Chevy Niva, we can conclude that replacing a wheel bearing with your own hands is a rather complicated procedure; you can undertake it if you have experience in such repairs.
To replace the wheel bearing you will need :
- two keys “13”;
- vice;
- balloon;
- screwdriver;
- hammer;
- pliers;
- chisel;
- penetrating lubricant WD-40;
- Litol 24 lubricant;
- new oil seal (article - 21210310303800);
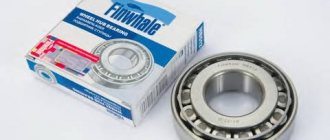
- new bearing.
The catalog number of the Chevrolet Niva wheel bearing is 21210310302010, and the price is 350 rubles. His tax from the company Fenox has the article TRB102008O7 and a price tag of about 200 rubles.
Relevant for Moscow and the region (summer 2021).
We jack up the car. Unscrew the five wheel nuts.
Replacing the hub on a Chevrolet Niva
The Chevrolet Niva (VAZ 2123) vehicle model has no equal in situations with bad roads. When creating this car, parts of the well-known American car “Chevrolet” are used. Unfortunately, there are shortcomings in the chassis that were inherited from the Russian Niva. Along with other parts, they also included the hub.
Speaking about the importance of this part, it is an integral and connecting link that connects the shaft with the wheel disk and transmits torque from the rotating axis of the crankshaft to the wheel. In addition, it is the most important part of the braking system of any vehicle.
Causes of problems with the Chevrolet Niva hub
Its failure, as everyone knows, entails a serious problem, to which it is imperative and urgent to pay attention.
A hub that is not replaced in a timely manner can lead to a serious traffic accident.
Also, a hub that has become unusable heats up more when the car is braking, this, in turn, leaves a bad imprint on the performance of the brakes. Damage to this part is usually indicated by an unpleasant sound, which is accompanied by weak shocks.
The main causes of hub failure are: negligent driving on the roads; frequent car overload; automobile traffic on sandy soil or “mud baths”; frequent slipping of the driving wheels of vehicles when trying to accelerate; driving with sudden speeding and braking.
The above has a direct negative impact on the hub housing, outer or inner bearing ring. With their help, dirt and moisture penetrate the mechanism, and as a result, the trunnion ceases to function properly. The following useful tips will help you when replacing the Chevrolet Niva hub: Before you disassemble the front suspension, first of all look at the problems with the lever mechanism (their damage, any damage).
The central nut is tightened to a significant torque. Use a durable socket head. Observe the landing channels of the rings, both internal and external, and the condition of the working surface of the bearing rollers. Corrosion of metal is under no circumstances acceptable. When removing the hub from its seat, be careful not to accidentally grab the shank of the inner joint from the gearbox, otherwise this will cause lubricant leakage from the car axle. Damaged bearings must be replaced at the same time as the outer rings. After installation, you need to adjust the clearance in the bearing and lock the hub nut.
It is more convenient to replace the Chevrolet Niva hub on a lift. In general, the activity can be carried out using a jack, while observing the appropriate safety measures.
To replace the hub you will need: keys “10”, “13”, “17”, “22”, “30”; wheel wrench; vice; puller for steering tip; screwdriver; hammer and chisel; Litol 24 lubricant; pliers; new hub.
The cost of a new Chevrolet Niva hub with article number 21230310301400 is 1,460 rubles. The analogue from has catalog number HBP2123, and its price ranges from 1110 rubles.
Prices are indicated for Moscow and the region for the summer of 2021.
We jack up the car. Unscrew the five wheel nuts.
Remove the wheel and decorative cap, then “unlock” the hub nut.
Use a 30mm wrench to remove the hub nut.
We remove the rubber holder along with the hose from the bracket.
Then a wrench with a “17” head unscrews the two caliper mounting bolts, first at the bottom.
... then up.
Then remove the casing.
Take a flathead screwdriver and pry apart the brake pads. We remove the caliper.
Carefully hang the caliper on a wire or move it to the side so that it does not interfere with work and does not dangle on the brake hose.
Unscrew the pin nut of the outer joint of the side link and turn it out.
We take a hammer and try to knock out the hinge pin.
If it doesn't work with a hammer, use a puller.
We install it and...
... we press the hinge pin out of the swivel arm boss.
Using a 22mm wrench, unscrew the hinge pin nut, first at the top.
...then below.
Using a hammer, knock out the hinge tip.
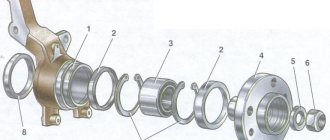
We take out the steering knuckle assembly.
Taking the appropriate mandrel, we press the hub out of the inner rings of the bearings.
The result of a broken hub is obvious.
Lubricate the brake disc mounting surface in contact with the hub.
We install a new hub on the brake disc.
We install through one and hammer in the bolts holding the brake disc and hub. We twist them.
Lubricate the hub landing shaft.
We also lubricate the joint tips.
Install the steering knuckle.
We assemble the suspension parts in reverse order.
Tighten the wheel bolts and...
... hub nut.
Next, you need to lock the hub nut by jamming the collar into two grooves.
Adjusting wheel bearings.
Adjusting wheel bearings.
Post by master112 » May 20, 2012, 9:53 pm
Re: For those who just bought a Niva (LADA 4X4)
Post by Nikolay » May 21, 2012, 09:11
Install a new adjusting nut. We tighten it to a torque of 19.6 N.m (2.0 kgf.m), simultaneously turning the hub in both directions. Loosen the adjusting nut and tighten it again to a torque of 6.86 N.m (0.7 kgf.m). Then loosen the nut 20–25o. We check the clearance in the bearings: it should be in the range of 0.02–0.08 mm. We lock the nut by pressing its collar into the grooves of the shank of the outer drive joint.
A quarter turn is 90 degrees
I always unscrew halfway, which is 15 degrees.
Adjusting wheel bearings.
Post by Skrater » Mar 23, 2013 1:37 pm
Re: Signs of a dying wheel bearing.
Post by arty » Mar 23, 2013, 02:58 pm
Re: Signs of a dying wheel bearing.
Post by Skrater » Mar 23, 2013 06:31 pm
Re: Wheel bearing adjustment.
Post by plantain » April 15, 2013, 05:54 pm
Re: Wheel bearing adjustment.
Post by Captain » April 15, 2013, 6:09 pm
The method that I use at the service station, which I use to adjust bearings for all clients (and regular ones too) for many, many years, and which gives an excellent result without any problems: unscrew the old nut, take a new hub nut , screw it onto the thread, put a 27 socket on the nut and, turning the head with your fingers, tighten the nut until it stops.
If the bearings are new, then I first tighten the nut with a wrench, while simultaneously rotating the wheel so that the rollers are positioned, then I loosen the nut and tighten it by hand.
Re: Wheel bearing adjustment.
Post by KiLLtheCAT » May 11, 2013, 10:59 pm
Re: Wheel bearing adjustment.
Post by FAUST » May 12, 2013, 01:44
Front hub
Post by ILIA » 03 Nov 2013, 12:05
Since you still need to tighten the nut on the hub if the Niva 21214m 2012! Should I release it like the old one or tighten it all the way?
Re: Front hub
Post by trumen » 03 Nov 2013, 12:14
Re: Front hub
Post by ILIA » 03 Nov 2013, 12:24
How do you know which ones are worth it? Mileage 20 thousand, I don’t think they’ve changed it yet!
Re: Front hub
Post by trumen » 03 Nov 2013, 13:39
Re: Wheel bearing adjustment.
Post by ILIA » 04 Nov 2013, 00:12
What is a manual? Conical means regular-old?
Re: Wheel bearing adjustment.
Post by Skrater » 04 Nov 2013, 00:26
Re: Wheel bearing adjustment.
Post by Captain » 04 Nov 2013, 03:03
Re: Wheel bearing adjustment.
Post by trumen » 04 Nov 2013, 03:16
Re: Wheel bearing adjustment.
Post by ILIA » 04 Nov 2013, 16:12
Thank you! There is a book with photographs, but not on an emka!
Re: Wheel bearing adjustment.
Post by Skrater » 04 Nov 2013, 16:23