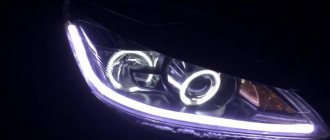
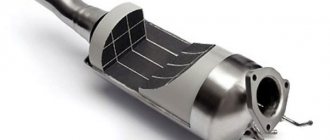
Replacing the lamp in the fog lamp on a VAZ 2113, VAZ 2114, VAZ 2115
Welcome! Fog lights - they are regarded only as an additional source of light, when the main source of light is the head light, so to speak (Head light is the low and high beam headlights, which shines in cars from the main headlights and not from the foglights), but the head light is sometimes completely is not needed, for example, if your fog lights shine well, then during the day you can turn them on instead of the main light, and that’s not even the point, but the point is that fog lights (from the name it’s already clear) are created only to illuminate the road during fog, because when there is heavy fog on the street, then there are small particles of water in it, so when you turn on the headlight, it hits these very small particles of water and due to this, reflection occurs and thus the light begins to fall at the same time blinding oncoming drivers, for example, many drove in fog and many have already seen how, when driving into it, the light scatters and begins to cover a larger area than it was before driving into the fog, so to prevent this from happening, fog lights were invented , the light from them does not scatter only for the reason that they are located at the very bottom of the car, and the fog, mainly with small particles of water, flies some distance higher from the ground and therefore at the very bottom there is usually very little fog and water particles.
Note! In order to replace the bulb in the fog light, you will need to take with you: A small wrench with which you will unscrew and, as a result, blue the minus terminal from the battery!
Summary:
Where is the bulb located in the fog light? The lamp in the headlight can only be seen if the lamp is disassembled, or if the lamp itself is removed from the headlight, but still, so that you know the approximate location of the lamp, we will immediately note the fact that the lamp is located in the very central part of the headlight itself, but it is buried a diffuser that is needed so that a stronger light comes from the headlight, if it is not there, then the headlight itself will shine very poorly, but that’s not about that now, you can see in more detail what is inside the fog light in the small photograph shown in the photo below:
When should you change the fog lamp bulb? Basically, many people change it after it burns out, but still this is many but not all, because in general people do not consider fog lights as the main source of light and after they fail, not everyone immediately goes to a car store and buys lamp.
Note! There are cases when people come and complain that two of their fog lights are out of order, after that you start communicating with these people and many of them say that they came out from a sharp temperature change, that is, the person was driving for a very long time in hot weather and got under some kind of bridge in which water mainly accumulates after long rains and after the car enters the front lower part into the water, the lamps and the glass of the fog lights themselves sometimes crack, but the lamps do not always crack, so if you immediately If both lamps are out of order, then before changing them, look for a fuse on them, perhaps it burned out due to a sharp temperature change!
How to choose foglights VAZ 2115 and PTF VAZ 2114
Let's start with the fact that there are several types of fog lights. More precisely, there are two types: standard and universal PTFs
It is important to understand that their effectiveness greatly depends on the quality of the fogs themselves.
Let's move on. Standard PTFs can be original or analogues. In any case, they are produced for a specific car model, have similar mounts, housing, etc. Such PTFs are the easiest to install, especially if the bumper already has places for installation, covered with plugs.
Universal PTFs have a mount that allows them to be installed on different car models; such fog lights can be installed in the area of plugs on the bumper, on the radiator grille, hung on the bumper, etc.
The disadvantages are the insufficiently bright and strong glow of such lamps, as well as a short service life. At the same time, it is not always possible to replace the blades quickly and easily, taking into account possible difficulties with access (especially if the fogs are installed in standard places).
PTFs with a xenon lamp shine brighter than halogen lamps, the service life is also 50-60 or even 80-100% longer (provided that high-quality lamps are used). However, the cost of the equipment is much higher; for such lamps it is also necessary to install separate ignition units, correctly connect xenon, etc.
Also, brighter xenon light, which is better than halogen lights on a dry road, often provides worse visibility in fog and rain, since the color temperature is slightly different from halogen headlights, even for xenon analogues that are as close in characteristics as possible.
It is also worth noting that the brighter xenon glow can cause blinding oncoming drivers. Taking into account this feature, PTFs with xenon need to be lowered lower, constantly monitor their adjustment, keep the headlights clean and do not turn on the fog lights under normal conditions (when there is no fog, snow or rain).
LED PTFs are more economical in terms of energy consumption and place less load on the battery and wiring. The service life of good quality LED PTFs is usually longer than halogen or xenon ones.
Such fogs shine well (if the product is of high quality), in some cases you can change the temperature of the glow (from white to yellow, etc.). In practice, such PTFs may well perform the function of DRLs during daylight hours.
The downside is the high cost of high quality products. Additional requirements should be taken into account during installation, since in case of installation errors or poor ventilation, the LED headlights can become very hot, which renders them inoperable.
How to replace the lamp in the fog light on a VAZ 2113-VAZ 2115?
Note! In all cases, when working with electronics, it is best to protect yourself by de-energizing the car battery, namely by removing the minus terminal from it and thereby it will stop supplying electricity to the wiring! (For information on how to remove the terminal, see the article entitled: “Replacing a car battery on a VAZ”, point 1)
Removal: 1) Firstly, to make installation of the light bulb in the headlight easier, we recommend that you drive the car into a pit, or if the car has a high suspension, then simply spread some kind of carpet under its front part and lie next to the fog lamp on which you are going to replace the lamp.
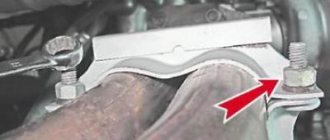
2) Then grab the rubber cover with your hand and, as a result, slide it along the headlight, after which you will see that on the rubber cover, namely on its inner part, there will be a connector (Indicated by a red arrow), into which the wire will be inserted (Indicated by a blue arrow ), so when the cover is moved along, disconnect the connector and the wire block from each other and release the connector together with the rubber cover, as a result of which it will hang from you.
3) And to complete the operation, fold the spring clamp (It is indicated by a red arrow) back, namely, remove both loops of the clamp itself from the hooks that are located on the headlight itself (One of the hooks is indicated by a blue arrow) and then remove the lamp itself from the hole in which it is located.
Note! As you can see in the photo above, the light bulb itself, which is built into the fog light, comes along with a wire; this wire cannot be disconnected from the lamp itself, so when buying a new lamp, be sure to pay attention to the fact that the same wire that is installed at its end is installed installed on the lamp in the picture above!
Installation: Install a new fog lamp in the reverse order of removal.
Additional video: If you do not have fog lights on your car, but you want to install them, then watch an interesting video that tells you how you can install fog lights in a car.
Preparing for installation
If your VAZ 2114 does not have fog lights provided by the factory, then you can install them yourself. First, you need to buy all the necessary parts and tools, namely:
- Fog lights, along with special wires;
- The framework in which the PTF will be installed;
- Mounting brackets;
- Light bulbs.
Preparing the bumper for PTF installation
Before you start connecting this device, you need to prepare the holes in the bumper. On some models, plugs are installed that you simply need to remove and replace with headlights. But with some samples of the VAZ 2114, the situation is a little more complicated - you need to make the holes for the headlights yourself.
In order to do this work, you will need a stencil. To get it, trace the headlight mounting frames on paper and cut them out. Then, attach the stencil to the place where the fog light will be located. Trace the stencil, leaving a clear outline. Next, using a drill, drill many holes along the contour, close to each other, so that the middle of the plastic falls out and a hole is formed. It is advisable to sand the edges of this hole.
Can fog lights be used instead of DRLs and low beams?
I am glad to welcome everyone to our FaraInfo website! Today in the “Useful Tips” section we’ll talk about this: is it a violation of traffic regulations to use fog lights (FTL) instead of daytime running lights (DRLs) as well as low beam headlights?
You all know that according to paragraph 19.5 of the traffic rules of the Russian Federation, “During daylight hours, low beam headlights or daytime running lights must be turned on on all moving vehicles for the purpose of identifying them.” In this regard, many motorists had counter-questions, namely: is it possible to use dimensions or PTF instead of DRLs and whether this would be a violation of the rules, which could entail a protocol and a corresponding fine.
Some motorists were not just confused, they were outraged and puzzled by the question of why turn on the running lights, and even more so the low beam, during daylight hours? The fact is that studies have shown that when driving along the highway at high speeds, drivers react better to vehicles with DRLs or low beam headlights on. This allows you to notice approaching vehicles in time and perform the maneuver in time. In general, in a word, turning on the lights during the day is aimed at reducing accidents that occur during the daytime.
We seem to have sorted this out, but what about the differences between DRLs or side lights?
Let's sum it up
As you can see, there is a way out. You can drive the neighbor if you are not too worried about fuel consumption and the degradation of the life of light bulbs. You can also use PTF if they are installed on your car, this will not be a violation of the rules and you will not have any questions from the inspectors. The third option is to install daytime running lights. DRLs consume significantly less energy compared to low beam headlights, as well as PTF, while they shine brighter than their dimensions and are clearly visible at any time of the day - therefore they are the most profitable and acceptable option!
DIY installation and connection of fog lights on VAZ 2113, 2114, 2115
One of the most unpleasant and dangerous natural phenomena for road users is fog. In poor visibility conditions, the likelihood of vehicle collisions increases. Equipping your car with fog lights allows you to drive in any weather conditions. You can install and connect such lighting devices to a VAZ 2113, 2114, 2115 at a car service center, but doing it yourself will cost much less.
What you need for installation
To properly install the PTF VAZ 2114, you will need to assemble a certain set of components, without which the installation of fog lights is not only undesirable, but also harmful to the car.
It looks like this:
- wires with terminals (a total of 3 wires are required: from the common block to the relay, from the relay to the switch, as well as a connecting wire between the two headlights);
- mounting pads;
- tie clamps;
- PTF relay;
- button;
- actual fog lights.
Mounting kit PTF VAZ 2114
In addition, in order to install a PTF on a car bumper, you will need to prepare a simple set of tools, namely:
- electric jigsaw;
- file;
- electric drill;
- roulette;
- marker.
Also, during installation you will need several mounting bolts to secure the headlights to the plastic of the bumper.
Why do you need PTF on VAZ 2113, 2114, 2115
The fog is located above the surface of the earth (road) at some distance and this gap remains transparent. Thanks to the fog lights (FTL), a beam of light is formed: wide in the horizontal plane and narrow in the vertical plane. It is directed parallel to the roadway. When the fog lights are on, the fog is illuminated from below, which improves road illumination. Thanks to the wide beam, side markings and the curb are clearly visible, thereby reducing the risk of leaving the roadway.
Installing PTF provides better illumination of the roadside and side markings, reducing the risk of leaving the road
Some motorists have the mistaken opinion that fog lights with high lighting efficiency can only be yellow. In fact, the road is illuminated quite well by devices with both white and yellow glasses. The designated colors, compared to green, red or any other, are characterized by maximum light energy in the spectrum. However, it should be taken into account that when installing even the highest quality PTFs, visibility will be no more than 10 m in heavy fog. But since in such weather conditions the speed of movement is low, these indicators are quite sufficient. Sometimes vehicles are equipped with rear fog lights, the purpose of which is to improve the vehicle's visibility when driving in fog.
Installing a button in a panel
To install the button (which comes with the mounting kit), you need to partially disassemble the front panel. Fortunately, the factory came to the rescue and installed wiring for the PTF in all Samar configurations, so all we have to do is remove the center console and find a block in the wiring for connecting the button.
To disassemble the panel, use the article: How to remove the instrument panel and remove only the center console:
None Next, we check the headlights for functionality.
Do not forget that the fog lights turn on only after the side lights are turned on! After installing the PTFs, they need to be configured and adjusted!
- vazweb.ru
- pol-z.ru
- ladaservice.info
- vaz-2114-lada.ru
Methods for installing PTF on VAZ 2113, 2114, 2115
Installation of fog lights can be done in several ways. Which one to choose, each car owner decides for himself, based on his capabilities and preferences. Let's look at the most common installation options:
- Buying a front bumper with PTF. In this case, the headlights are sold already mounted in the front bumper. As a rule, a part can be purchased without any problems at a car tuning studio and immediately installed and connected. The disadvantages of this option include high financial costs.
Buying a bumper with PTF installed is the most expensive option for installing fog lights on a car.
When purchasing a bumper with holes for fog lights, you will need to purchase the lights themselves and all the necessary components for connection
The most common option for installing PTF is to purchase and then install a set of fog lights yourself.
PTF location diagram on a car
Before connecting the fog lights, it is important to install the devices correctly on the front of the car. This is done in accordance with certain rules, which clearly stipulate the location of the light source. On modern cars, the installation locations for fog lights are marked from the factory. Basically, such lighting elements are installed on more expensive car configurations. If the headlights were not installed from the factory, then the places for their installation are closed with plugs.
Fog lights on the front of the vehicle must be installed in accordance with established regulations
Is it possible to install xenon in PTF
Many car owners seek to install xenon in fog lights, arguing their actions by increasing lighting efficiency. Is this really true? Let's figure it out. First of all, when installing xenon in standard PTF housings, focusing is disrupted, which is due to a different operating principle in contrast to conventional lamps. Since standard fog lights are designed to operate with certain lamps, they simply cannot cope with xenon. The result of such changes will be too much reflection in the reflector, the rays are refracted, and the light becomes blurred. A well-known situation arises - the blinding of drivers of oncoming vehicles, which increases the risk of an accident. Installing xenon in PTF is far from the most successful solution and the effectiveness of such light is questionable, so it should be abandoned.
When installing xenon light in standard fog lights, focusing is disrupted, which leads to dazzling oncoming drivers
Video: how to choose fog lights
Connection process
Connecting fog lights on a VAZ 2114 should be carried out strictly as shown in the diagram. This process starts from the inside of the car. On the panel of any VAZ 2114, regardless of its configuration, there is a special connector for the button for turning on the fog lights.
'); if("undefined"===typeof loaded_blocks_drive){loaded_blocks_drive=[]; function n(){var e=loaded_blocks_drive.shift(); var t=e.adp_id; var r=e.div; var i=document.createElement("script"); i.type=”text/javascript”; i.async=true; i.charset=”utf-8″; i.src=»https://www.drivenetwork.ru/data/»+t+».js?async=1&div=»+r+»&t=»+Math.random(); var s=document.getElementsByTagName("head")||document.getElementsByTagName("body"); s.appendChild(i); var o=setInterval(function(){if(document.getElementById(r).innerHTML&&loaded_blocks_drive.length){n(); clearInterval(o)}},50)} setTimeout(n)}loaded_blocks_drive.push({adp_id:e ,div:t})})(47602)
After the button is installed, the connection diagram goes into the engine compartment, to the fog lamp relay. This element is sold in a kit for connecting PTF. Its location should be in close proximity to the mounting block. This is explained by the fact that the block contains two terminal blocks that will need to be connected to the relay.
Mounting kit
Next, when all the elements are connected, the relay should be connected to the fuse block, according to the order indicated in the diagram. Now, take the positive wire and lay it along the engine compartment, connecting the button contacts to the relay. Also, connect the PTF to this “plus”. The negative wire, in turn, needs to be connected at one end to the headlight, and at the other to the fastening nut, for ground.
Now that the connection is complete, connect the battery and try turning on the PTF. If everything works, then the work can be considered complete, and if not, then you should review the connection diagram again. You may have connected the wires incorrectly, or damaged the wiring when installing parts.
In general, experts recommend leaving as little excess wire length as possible. Since the loose presence of wiring in the engine compartment can cause it to weaken, and as a result, fall away from the relay.
Connecting the PTF on a VAZ 2114 should not be done independently, without the appropriate skills, as it can cause a short circuit and damage some elements of electrical equipment. If the installation of this device is simply necessary, then it is better to contact a specialist for help in connecting it.
Installation and connection of front and rear PTFs on VAZ 2113, 2114, 2115
Before you begin installing fog lights, you will need to select a certain list of tools and additional elements. You can purchase a ready-made connection kit or select the necessary spare parts separately. When everything is prepared, you can mark on the front bumper a place for installing future headlights. The VAZ 2115 comes with standard holes from the factory, but in the case of the VAZ 2113 and VAZ 2114 you will need to work with a tool (a jigsaw or a drill). If you don’t want to damage the bumper, you can install the lighting fixtures on special brackets.
Connecting PTF and control keys
The connection diagram that comes with the kit is simple and easy to understand.
Connection diagram for fog lights
First, we cut the wiring of these lighting devices into the mounting block installed under the hood, near the windshield on the right. To do this, unscrew the bolts securing this block and lift it to gain access to the pads, marked Ш7 and Ш8.
These blocks provide for the connection of fog lights, although they are not installed regularly. They connect the wiring from the headlights themselves, as well as from the relay included in the kit. All this needs to be connected correctly, and the diagram is as follows:
- The wire coming out from pin “87” is ground and we connect it to the car body.
- Pin “85” leads to block Ш7 (connects to connector 17).
- Pins “30” and “86” are connected to block Ш8 (pin “30” - to connector 8, and “86” - to connector 1).
Preparatory work
To adjust the headlights yourself, you need to carefully prepare the car and tools. This will help you avoid distractions while working and reduce adjustment time.
Finding a location is an important step. The site must meet the following requirements:
- to be level;
- be in a dark place without unnecessary glare from flashlights;
- the site must have a flat wall, gate, fence, garage door.
All of these factors affect the accuracy of the adjustments. High-precision adjustments can be achieved without special optical instruments only if all instructions are followed.
The car is prepared as follows:
- Using a high-pressure washer, all dirt is washed off from the body and fender liners.
- The luggage compartment is cleared of all unnecessary items. If the spare wheel is missing, it must be replaced.
- The fuel tank is filled to the cut-off point.
- The tire pressure is checked and adjusted to the standard values of 2.0 or 2.1 bar.
- The optics are inspected for cracks, chips and defects on the surface of the glass and reflector.
You should also check the attachment of the headlights to the body. If free play is detected, the optics must be firmly tightened with standard bolts. A faulty part with cracks and other defects must be replaced, since broken glass refracts rays and blinds oncoming drivers.
To work you will need tools:
- rag;
- thick fabric or cardboard;
- cleaning composition for windows;
- felt-tip pen;
- roulette;
- construction level;
- a shoe or stick to support the wheel.
To independently adjust the light on a VAZ 2114, 2115, you do not need special tools. The built-in plastic thumbwheels on the back of the optics are easy to scroll with your fingers.
To carry out work, you need to choose a warm day without precipitation or strong wind. Droplets on the optics cause refraction and will interfere with proper adjustment.
How to install a PTF: necessary materials and tools
Installation of fog lights, regardless of the chosen installation method, requires the presence of certain parts and tools, without which it is impossible.
What are the button and relay for?
In order to install fog lights on a VAZ, you need to assemble certain parts in advance or purchase a ready-made kit. The cost of such a set rarely exceeds one thousand rubles.
The PTF kit includes:
- wires with blocks and terminals for a specific VAZ model. There are three of them as standard: one connects the headlights, the second goes to the relay from the switch, and the third goes from the relay to the fuse box;
- fog lamp relay;
- power button;
- clips and ties that secure the wires;
- fog lights.
Which PTFs should you prefer? The headlights themselves are chosen by the driver to his taste, but the main thing when choosing is not to make a mistake with the power, so as not to overload the generator and the car’s electrical wiring. It is better not to purchase headlights with xenon: the generator has a certain power reserve, but is not designed for too high loads. Regular light bulbs will be sufficient.
Step-by-step instruction
Adjusting the headlights of a VAZ 2114 or 2115 with your own hands is a simple procedure. With proper preparation of the car, you can achieve optimal results that will not differ from adjustments on an optical machine.
- Install the VAZ 2114 at a distance of 5 meters from the wall. The measurement is made strictly from the headlight glass.
- The height of the lamp relative to the asphalt is measured with a tape measure.
- The value is marked on the wall with a horizontal line.
- A vertical stripe marks the center of the car.
- From the horizontal mark, an indentation is made downwards by 65 mm and a mark is made where the cut-off strip should be located.
- To identify the center of the beam, the transition points into daws are used.
- The centers of the jackdaws are marked on the wall with vertical lines, the distance between which should be 964 mm.
A schematic sketch is recommended by the manufacturer as the most accurate method for adjusting the optics.
- Turn off the car engine.
- Turn on low beam.
- Set the headlight hydraulic adjustment lever to position 0.
- Open the hood.
- Cover one headlight with cardboard or a thick rag. This improves the visibility of the beam boundary.
- Using the built-in screws, adjust the direction of light first on one headlight, then on the other.
- Rock the car and check that the settings are correct again.
When performing work, the vehicle must be without passengers. You can put a load weighing 50-70 kilograms on the driver's seat, but this is not necessary. Installation on the handbrake often changes the position of the body relative to the road surface, so you should use a wheel support or a regular stick.
By adjusting each headlight separately, you can achieve the most accurate result of the beam position. Correctly configured VAZ optics will not blind oncoming traffic participants and provide high-quality illumination of the road surface.
Selection of body and main criteria when selecting PTF VAZ
When choosing a PTF VAZ 2114 or for any other car, it is important to consider what kind of lamp will be installed in the fog lights, why fog lights are installed, etc. As a rule, such headlights themselves can be in a plastic, aluminum or magnesium housing. It is quite obvious that aluminum and magnesium are more reliable and durable, but they also cost more.
Fog lights may also have a plastic or glass light diffuser. Plastic products are resistant to damage, but quickly turn yellow and cloudy, and light transmittance decreases. As a result, after just a couple of years the quality of road lighting deteriorates.
PTFs with glass lenses last longer, but often the glass cracks due to temperature changes (especially when installing diode lamps) or as a result of mechanical damage. One way or another, it is advisable to select models where the diffuser can be replaced separately without changing the entire body.
We also note that if the car is used actively or in difficult conditions (for example, driving on the highway at high speed or driving on bad roads), when choosing, it is better to choose PTF models, which can be closed with special foglight plugs made of plastic to protect against stones, etc. d.
- Now let's move on to the choice. To decide which fog lights to install on the VAZ 2114, first of all, you should choose a reliable housing. As you know, the condition of roads in the Russian Federation and the CIS is poor, so PTF made from a material resistant to damage and temperature changes will be the best solution. If there are protective plugs, this will be an additional plus. The kit should also include good quality fasteners, wires, and relays.
The fogs themselves should provide the widest possible spot of light, distribute the light evenly, with a minimum of losses due to refraction and dispersion of the light flux. It should also be possible to adjust and adjust the light spot (both vertically and horizontally) so as not to blind drivers of oncoming cars. Even if the lamp burns out, access for replacement should be easy. This allows you to quickly change the llama yourself.
We also note that when choosing PTF 2114 or 2115, as well as for other cars, it is important to take into account their power. The fact is that fogs that are too powerful can create a large load on the generator and wiring. As a rule, 55 W lamps are sufficient. If the PTF is lensed (fog lights with a lens), you need to pay special attention to the quality of the lens, the reliability of its fixation, etc.
Finally, we note that when choosing PTF, it is also important that such headlights have acceptable aerodynamic performance and fit well into the overall exterior of the car.
As practice shows, car enthusiasts install domestic fog lights VAZ or Avtosvet as PTF on VAZ 2114. The list of imported solutions includes Bosch or Hella, as well as various Chinese PTFs. Also, regular PTFs from Samara, Niva, Priora, etc. are often installed on VAZ 2114 or 2115.
In fact, Avtosvet products are considered a high-quality budget option. However, it is important to remember that non-original fakes are often found. If we talk about expensive headlights, then Hella is a recognized leader, but the price for Hella PTFs is quite high.
As for fog lights from China, they can be either cheap or expensive, and the quality can also vary greatly. At the same time, it often happens that more expensive analogues may turn out to be no better or even worse than average-priced options.
Setting the fog lights
- vehicle preparation;
- drawing up a diagram;
- adjustment.
The preparatory steps are no different from the actions performed before adjusting the main headlights. The fog lights should be clean, the tires should be inflated, and the trunk should be empty.
When setting up fog lights, you should use a special diagram that you create yourself. This requires:
- Place the car at a distance of 5-10 meters from the wall.
- Measure the height of the center of the headlight and mark it with a line on the diagram.
- Transfer the marks of the center of the car and the fog lamps to the wall.
- Draw a line 10-12 centimeters below the height mark of the fog lights.
To adjust the optics, you need to turn the screw until the beam reaches the level marked on the plan. If the headlight cannot be adjusted, you should clean the bolt head and inspect it for souring. You can use WD-40 aerosol to lubricate the parts. If the bolt rotates but the reflector remains in place, you will need to dismantle the fog lamp and check the integrity of the mechanism.
Types of lights on the VAZ 2114
It is very easy to adjust the headlights on a VAZ with your own hands. The design allows adjustments to be made without removing additional plastic elements and the battery.
The VAZ 2114 uses the following types of light sources:
Adjustment of low and high beam is carried out using two built-in screws located in the main optics housing.
To adjust the fog lights, you do not need to remove the bumper. The screwdriver is placed in a special hole in which the bolt is located.
Installation, connection and adjustment of PTF
Depending on the type of fog lights, installation may be simpler or more complex. It is easier to install PTF where there are already places for installation and are simply covered with plugs. If there are no such places, then they will need to be cut or drilled. In the case of VAZ, some owners also sometimes change the entire bumper (for example, from 2115 with holes for PTF).
If we talk about connection, according to traffic regulations, fog lights should only be turned on together with the side lights. The PTFs themselves must be connected via a relay, suitable wires must be used, and there must be a fuse in the circuit. If you have certain skills, you can install the PTF yourself in a regular garage.
As for adjusting the PTF, this option is not provided on many cars. In the case where headlight adjustment is required on non-adjustable PTFs due to the fact that the fog lights are blinding or do not shine on the road, special gaskets are used to change the tilt angles, overlays are installed, etc. By the way, to adjust the light, you need a special stand, with the help of which you can adjust the low and high beam, as well as the PTF.
How to identify problems with optics
The need to adjust the light will be required in the following cases:
- lamps shine strongly up or down;
- the beam is shifted to one side;
- uneven brightness of headlights when inspecting the car;
- insufficient light intensity, a clear jackdaw is not visible;
- One of the headlights does not work.
The tuned optics of the VAZ 2114 or model 2115 cope perfectly with any weather conditions. To identify deficiencies, a visual inspection of the performance of the lamps should be carried out once a week, and adjustments should be made at least once a season.
Adjusting the fog lights
Any more or less experienced driver understands the need to use additional lighting devices, such as fog lights.
Standard high-beam (low-beam) headlights, designed to provide a sufficient level of illumination of the roadway, do not always cope with their functional task, and in conditions of drizzling rain, sleet and, especially, fog, they can significantly complicate the reality of the driver’s perception of the road situation. The relatively high beam of light they create, refracting in the humid air, creates a rather dense light curtain that limits the view of the road. The solution to this problem was the use of special external lighting devices on the vehicle, called fog lights. The practice of using these headlights has shown a direct dependence of the degree of efficiency of their functioning on the correct location of the device relative to the surface of the earth.
What are fog lamps for?
The main task of the PTF is to illuminate the space in front of the car. Correctly adjusted “fog lights” can illuminate a section of road 10–15 meters long. This distance is quite enough for safe movement by car in poor visibility conditions. The switching on and off of such lighting devices must be fully controlled by the driver.
Adjustment of fog lights is carried out during their installation. The procedure does not take much time, but requires care and precision. You can install the rear and front PTFs yourself.
This is interesting: How to remove the front bumper on a VAZ-2114 to replace it - useful tips and videos
How to use fog lights
The design of fog lights must meet the requirements of the existing regulatory framework, including the Road Traffic Rules (hereinafter referred to as the Traffic Regulations), GOST 8769-75 (hereinafter referred to as the GOST) and the UNECE Rules (Uniform Regulations). The list of basic requirements of these regulations is as follows:
- The light beam produced by the fog lamp must meet several conditions:
— the light distribution of the beam is directed downward, and its upper boundary should be clearly defined;
— the horizontal dispersion angle does not exceed 70 0 .
- The installation height is at least 250 millimeters from the road surface.
- The maximum distance between the fog lamp and the external dimensions of the vehicle is no more than 400 millimeters.
In addition, the traffic rules define the mode of use of fog lights - conditions of insufficient (rain, snow, fog) or limited (mountain roads, sharp turns) visibility.
Installation options
You can equip your VAZ 2114 with fog lights in several different ways:
- Purchase a ready-made tuned bumper with PTF already installed. This option is the simplest, but requires the highest financial costs (such bumpers are not cheap).
- Install a bumper from the 15th model on the car with ready-made windows for fog lights (the PTFs themselves will need to be purchased separately).
- Buy only fog lights and install them on your original bumper.
Installing PTF on a VAZ 2114
We will dwell on the last method in more detail.
How to adjust fog lights
The main task of the fog lamp adjustment process is to give them a certain position in space, characterized by the formation of a light beam directed into an area free of condensation and evaporation, located at a distance of 0.3-0.7 meters from the surface of the road surface. Expanding these boundaries in one direction or another significantly affects the functionality of fog lights.
The technological operation for performing adjustment work comes down to setting certain values for the vertical and horizontal angles of the device.
Preparatory activities
Adjusting the fog lights is preceded by the following measures:
- selection of a flat horizontal platform;
- measuring the pressure in the car tires and bringing it to the value specified in the car’s operating instructions (the value of this parameter affects the height of the fog lights relative to the road surface);
- refilling the fuel tank (until full);
- loading the vehicle to a weight equal to the load weight of the main period of operation;
- at a distance of 10 meters (some experts reduce it to 5 meters) from the vehicle we place (perpendicular to the surface) a special screen (you can use a wall, garage door, etc. as the latter);
- preparation of tools: screwdrivers, measuring instruments (ruler, tape measure).