Finally, I solved the problem that was half a year old (www.drive2.ru/l/460455954454937999/) The panel backlight stopped working, although all the turn indicators, hazard lights, check, battery, etc. work. The backlight rheostat is covered
Remove the regulator handle by pulling it towards you, then unscrew the nut (I unscrewed it by hand)
We remove the rheostat from the side of the ignition switch. We see that the contact has been unsoldered
The problem arose that the connector on the new rheostat turned out to be much smaller, so I had to transfer it from the old one to the new one
How to create a new design for the VAZ 2110 dashboard
The entire process of updating your dashboard yourself will not take much time. All that needs to be done is dismantling the outdated “part” and installing a modernized model. You can find out how to remove the VAZ panel here and in the car repair and operation manual. But the main steps should be recalled:
After this, you can install the new panel in the reverse order. Such tuning of a VAZ 2110 with your own hands will always cause admiration among passengers and a sense of pride.
You can, no doubt, use ready-made tuning options, but this will also cost a lot. It is best to do it yourself. In this situation, the main thing is to have the necessary materials and patience. First you have to disassemble the “tidy”. The protective glass must be removed. Next we remove the arrows. To do this, you need to use a screwdriver and hard cardboard.
3. Now you can start completely replacing the backlight. We attach the LEDs to the “tidy” frame. Such LEDs can be purchased complete with a color switch. We install them in place and attach them to the standard dashboard backlight contacts.
4. Let's move on. Now we need to make sure that the arrows have the ability to change the backlight. To do this, remove the layer of red paint from the arrows. For this operation, you can use a stationery knife and acetone. Once the arrow is clean, it can be painted using white nail polish. The main thing is that the arrow is white, since this color conveys the color scheme of the LEDs.
Once the button is pulled out, the light bulb can be accessed. If you wish, you can take it out. If you can’t pull out the light bulb, then we move on. Using a screwdriver or knife, pry up the latches on both sides. A switch mechanism will appear in front of us. Here we need a black staple. By prying it off, we will calmly scatter the entire mechanism.
It should be noted that almost all buttons, if desired, can be modified in this way. The only exception is the position of the negative and positive contacts; they need to be looked at in the electrical diagram. If there is no diagram, you can easily find a photo of it on the Internet. The negative contact is usually designated by a black wire, the positive contact by any color.
Using a knife, you can remove the soft area of the panel (plastic on the outside, something like foam rubber on the inside). Then we take a drill and drill around the pre-marked area. It is better to use compact drills. Once the hole is drilled, the rough edges should be corrected. To do this, you can use special attachments for drills.
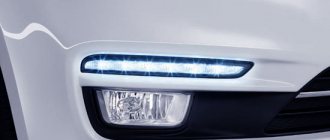
This tweeter is an important component if a speaker system is being built in the car. Without such a detail, the sound and volume of sound will not be complete.
In the first option, you need to remove the panel, because otherwise you won’t be able to tighten the top trim. If only the soft part has come off, then there may be several solutions. You can glue it, but it will not stick tightly to the plastic air deflector. Another option is to mask the gap that appears when the corner of the panel peels off.
Then we apply foam inside, using a wet rag to remove excess foam. Use paper clips to press the corners. There is no need to remove the foam immediately. You should wait until it dries. After the foam has dried, you need to paint over it with a marker. It may seem like the foam is bursting, but in fact, the corners of the panel will not come out.
Cosmofen and cold welding are also suitable for use. To prevent the crack from standing out, you should repaint the dashboard. In the second method, when reupholstering this automobile part, leather or vinyl leather is used. First, the crack must be filled with putty. If the problem is in the corner of the panel that has come unstuck, then repairing it will not be difficult.
Replacing the backlight
In analysis
To improve the quality of your dashboard lighting, it is advisable to install new LEDs in place of the old ones. They provide excellent illumination, consume minimal energy, and guarantee a high level of data reading.
- Buy a set of LED lamps, having previously calculated the number of devices needed for each sensor.
- After removing the block, install the resistors and lamps in specially designated places on the VAZ 2114 - in the sockets. To dismantle the cartridges, they are carefully unscrewed counterclockwise. New sockets are installed in their place and light bulbs are inserted. Respect the polarity and position the LED heads. They will have to be carefully ground off.
- Connect the power and check how the new backlight works.
- Reassemble step by step. Be sure to route the wiring to the board and carefully secure it to it. This way, the backlight components will not interfere with the reassembly process.
- Make sure the instrument panel arrows are positioned correctly. When trying to quickly complete a job, they often become deformed and bent.
- The backlight structure is fixed with screws.
- The power for the LEDs is connected to the power supply for the light bulbs, the arrows are put on and set to zero.
- Using the on-board computer, check the operation of each sensor and device. If the IDs are functioning correctly, return the instrument panel to its original condition. That is, assemble the entire assembly.
Didn't find the information you are looking for? on our forum.
How to create a new design for the VAZ 2110 dashboard
The entire process of updating your dashboard yourself will not take much time. All that needs to be done is dismantling the outdated “part” and installing a modernized model. You can find out how to remove the VAZ panel here and in the car repair and operation manual. But the main steps should be recalled:
After this, you can install the new panel in the reverse order. Such tuning of a VAZ 2110 with your own hands will always cause admiration among passengers and a sense of pride.
You can, no doubt, use ready-made tuning options, but this will also cost a lot. It is best to do it yourself. In this situation, the main thing is to have the necessary materials and patience. First you have to disassemble the “tidy”. The protective glass must be removed. Next we remove the arrows. To do this, you need to use a screwdriver and hard cardboard.
3. Now you can start completely replacing the backlight. We attach the LEDs to the “tidy” frame. Such LEDs can be purchased complete with a color switch. We install them in place and attach them to the standard dashboard backlight contacts.
4. Let's move on. Now we need to make sure that the arrows have the ability to change the backlight. To do this, remove the layer of red paint from the arrows. For this operation, you can use a stationery knife and acetone. Once the arrow is clean, it can be painted using white nail polish. The main thing is that the arrow is white, since this color conveys the color scheme of the LEDs.
Once the button is pulled out, the light bulb can be accessed. If you wish, you can take it out. If you can’t pull out the light bulb, then we move on. Using a screwdriver or knife, pry up the latches on both sides. A switch mechanism will appear in front of us. Here we need a black staple. By prying it off, we will calmly scatter the entire mechanism.
It should be noted that almost all buttons, if desired, can be modified in this way. The only exception is the position of the negative and positive contacts; they need to be looked at in the electrical diagram. If there is no diagram, you can easily find a photo of it on the Internet. The negative contact is usually designated by a black wire, the positive contact by any color.
Using a knife, you can remove the soft area of the panel (plastic on the outside, something like foam rubber on the inside). Then we take a drill and drill around the pre-marked area. It is better to use compact drills. Once the hole is drilled, the rough edges should be corrected. To do this, you can use special attachments for drills.
This tweeter is an important component if a speaker system is being built in the car. Without such a detail, the sound and sound volume will not be complete.
In the first option, you need to remove the panel, because otherwise you won’t be able to tighten the top trim. If only the soft part has come off, then there may be several solutions. You can glue it, but it will not stick tightly to the plastic air deflector. Another option is to mask the gap that appears when the corner of the panel peels off.
Then we apply foam inside, using a wet rag to remove excess foam. Use paper clips to press the corners. There is no need to remove the foam immediately. You should wait until it dries. After the foam has dried, you need to paint over it with a marker. It may seem like the foam is bursting, but in fact, the corners of the panel will not come out.
Cosmofen and cold welding are also suitable for use. To prevent the crack from standing out, you should repaint the dashboard. In the second method, when reupholstering this automobile part, leather or vinyl leather is used. First, the crack must be filled with putty. If the problem is in the corner of the panel that has come unstuck, then repairing it will not be difficult.
Replacing lamps
Choice
The process of replacing lamps on a VAZ 2110 is extremely simple. However, before you begin this operation, you must purchase new lighting elements.
This vehicle is factory equipped with H7 standard halogen bulbs. Today there is a large selection of lamps on sale, not only halogen, but also other types - xenon and LED.
The photo shows a H7 standard halogen lamp
Their features, advantages and disadvantages have been discussed many times on car enthusiast forums, so below we provide only a comparative table with the main characteristics of these lamps:
| LED | Xenon | Halogen | |
| Brightness | Up to 2000 lm | Up to 3300 | Until 1550 |
| Durability | 50,000 hours | 3000 hours | 1500 hours |
| Colorful temperature | 4300-8500 K | 4300-8500 K | 3300 K |
| Lamp price | From 10 USD | From 30-40 USD | From 20-30 USD |
Note! The most optimal color temperature of the light flux is in the range of 4300 – 5000 K.
It must be said that in addition to the data from the table, when choosing, you should also take into account the penetrating ability of the light flux. Halogen lamps are the leaders in this parameter - they illuminate the road much better in rain, fog or snow.
In addition, installing xenon or LEDs in the fog lights of the VAZ 2110 will require electrical intervention, in particular the installation of additional equipment (ignition units). Therefore, it will not be possible to perform their high-quality and safe installation with your own hands.
Note! Experts recommend changing light bulbs in pairs so that both headlights shine equally. In addition, their service life is approximately the same, so if one of them burns out, the second one will soon fail.
Each car owner must choose for himself which light for the VAZ 2110 will be better based on his own financial capabilities, weather conditions of the car, etc.
Removing the plug
How to replace the lamp
Instructions for replacing light bulbs look like this:
- First of all, you need to open the hood and disconnect the terminal from the battery.
- Then you need to remove the plug located closer to the wing.
- Next, you need to unfasten the spring clip that presses the light bulb to the headlight housing.
Disconnecting the block from the contacts
- After this, you should carefully disconnect the block from the contacts and remove the light bulb itself, since nothing else interferes with it.
- Now you need to insert new light bulbs in the same position in which the old ones were located, connect the block to the contacts and secure everything with a bracket.
- At the end of the work, you should install the plug in place.
Note! When replacing lamps, it is important not to touch the glass with your fingers. Otherwise, grease stains will remain on the surface, which will lead to overheating and failure of the lighting element.
The lamp replacement is now complete. As a rule, this operation takes several minutes even for beginners.
Advice! Many car owners are interested in how to improve headlights? The easiest way is to disassemble the headlights, wash them, replace the glass if necessary and adjust the light beams. As a rule, these simple procedures give good results.
Adjusting the stove controller
The manufacturing plant provides for heating the interior to the specified temperature in fifteen minutes with a deviation of up to two degrees. Use the controller knob to set a comfortable temperature in the car interior.
To check the proper functioning of the stove, use a regular mercury room thermometer. If after fifteen minutes the interior has not warmed up to the required temperature, the controller must be adjusted.
To do this, pull the heater control module back out and rotate the temperature regulator, first to the maximum value, then in the opposite direction. After carrying out such actions, install the unit in place and check the operation of the stove again.
At the same time, it is necessary to check the operation of the heater dampers. If there are extraneous sounds when switching temperature modes, then you need to check the condition of the dampers. If cold air flows well, but hot air hardly flows in, then the lower damper is faulty. If there is no normal flow of cold air but there is a good flow of hot air, there is a problem with the upper damper. The reason may be deformation of the dampers under the influence of air of different temperatures. In this case, it is better to replace the standard plastic dampers with aluminum analogues, which are more resistant to temperature changes.
After adjusting the controller, all heater elements are installed in their original places. Assembly is carried out in reverse order.
Design features of the VAZ-2110 stove control unit
One of the common heating system problems that VAZ-2110 owners encounter is the failure or malfunction of the heater control unit. Dozens of them are equipped from the factory with stoves, which are coordinated through an automatic heater control system. In short, the system is called the SAUO block. The main indicators of its malfunction are the operation of the heating system not in all modes. If one or more stove speeds do not work, then most often the problem is in the ACS unit. Thanks to the electronic module of the VAZ-2110, the temperature set by the driver is maintained in the car interior.
Before you begin repairing the VAZ-2110 heater, you need to find out what kind of heater is on your vehicle. Cars that were produced before September 2003 are equipped with old-style stoves
Accordingly, there are significant differences in the design, which are important to pay attention to during repairs.
The ACS unit consists of electronic elements, which are coordinated using handles on the central console of the machine.
The VAZ-2110 stove control unit is equipped with a controller with two handles. The right handle is responsible for turning on a certain fan speed. An additional resistor is directly responsible for switching its speeds. Old style stoves have resistors for two or three fan speeds. The new model stoves have a modified resistor RDO 2123–2118022. The unit for coordinating the operation of the improved stove model has four speeds and does not have an auto mode.
The left handle is responsible for turning on the temperature mode in the vehicle interior. Depending on the position of the handle, information about the set air temperature is supplied to the micro-reducer of the damper drive and, using the controller, the required position of the damper is set. Using the regulator, you can set the temperature from sixteen to thirty degrees Celsius.
Until 2003, cars were equipped with old-style stoves with four- and five-position controllers, which are now out of production and are very difficult to find. Also, the simple VAZ-2110 heater control unit is not suitable for car models that were produced after 2003 and are equipped with modified stoves from the factory.
Accordingly, before buying parts to repair the heating system of a vehicle, you need to look in the technical documentation to find out which heater model is on your top ten. The stoves differ not only in the ACS unit, but also in the heater radiator, micro-reducer, and resistors.
Possible reasons
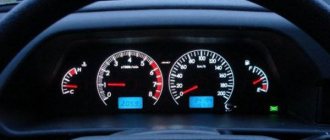
What to do in a situation where the instrument panel backlight on a VAZ-2110 car has disappeared? First of all, you should look for the reason why this malfunction occurred. Sometimes it can be identified immediately, but in some cases this process takes some time. In fact, there may be several reasons, so you will need to check everything methodically.
The most banal and simplest option is that someone turned the rheostat knob, which is responsible for the amount of light flux, all the way to the left.
This, by the way, is often the sin of children who are placed in the front seat. “Young drivers” love to turn all sorts of knobs, press buttons and switch levers. Perhaps the adults overlooked it, and the child “corrected” the dashboard lighting. The problem, as you understand, is solved by simply returning the rheostat knob to its previous position. Therefore, before you start looking for possible reasons for the sudden disappearance of the backlight, check this particular point.
I would like to remind you of one simple rule. In a situation where there may be several possible causes of failure, when searching you need to follow the path of least resistance. In other words, test the simplest assumptions first. You may be lucky and find the problem with minimal time and effort.
Cigarette lighter splitter: types and connection
Sometimes it becomes necessary to connect 2-3 devices to the cigarette lighter, which cannot be done without a splitter, and, given the design features, it is not always possible to connect even a telephone charger normally. Well, since Lada Kalina does not provide other alternatives, it is better to use this one.
The most common type of splitter has 3 sockets plus one USB port. By connecting an inverter (converter of on-board current to 220 V), you can easily charge devices such as an e-reader, tablet computer or laptop on the road. The price of the device in question ranges from 170 to 300 rubles. Buying a power strip is much cheaper and easier than replacing a cigarette lighter.
You can, of course, connect the necessary devices to the ignition without touching the cigarette lighter. But here you cannot do without the hands and knowledge of an experienced auto electrician, and installation will take more time. There will be a lot of extra wires and additional fuses will be needed. However, some car owners consider this method more reliable for Lada Kalina.
It is, of course, better to use an inverter with direct wiring. But without it, a high-quality splitter will be enough. The only question is to find a really high-quality device. The splitters are structurally similar to any extension cords used in everyday life for sockets. But there are differences between different models, which do not always have a good effect on both their operation and the condition of the Lada Kalina’s electrics. Cigarette lighter socket splitters can be divided into three types:
- those in which the block with sockets is made in a single housing with a central plug;
- those in which the plug and socket are connected by a flexible connection;
- connected via a power cord.
A splitter with a solid body is considered more reliable for obvious reasons: there is no need to fear that an important wire will break and the device will become unusable. And the price of a splitter in the classic version is much less. But it’s not always possible to position it in a way that is convenient for the driver and passenger, especially if all its connectors are used. Moreover, the purely mechanical load on the cigarette lighter increases, but the socket itself is unreliable.
How to replace the cigarette lighter in Kalina, Priora, Grant. Installation of a convenient cigarette lighter.
Replacing the cigarette lighter
to a more convenient option. Adapters do not lose contact! The plugs will no longer fall out! ______…
Misalignment of the plug will again lead to a short circuit. So Lada Kalina owners choose more advanced models of splitters. For example, with a swivel joint. But they are also capable of deforming the socket more clearly than usual, in a monolithic case, and the hinge itself can easily break. Therefore, for Kalina, where the cigarette lighter is located quite low, it is better to use a splitter with a cord. There is only one inconvenience: an extra wire, which must be placed so that it does not interfere.
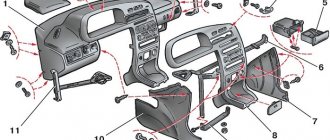
Replacing switches and backlight lamps on the Lada Granta instrument panel
Tools:
- Open-end wrench 10 mm
- Pliers
- Medium Phillips screwdriver
- Set of plastic mounts
- Small flat screwdriver
Parts and consumables:
- Trunk release button
- Outdoor Light Switch
- Hazard switch
- Heated rear window switch
- Switch for operating modes of the heating fan and interior ventilation
- Lamp W1.2W - 2 pcs.
Replacing the trunk lock actuator button
1. Disconnect the wire terminal from the negative terminal of the battery.
2. To replace the trunk lock actuator switch, remove the mounting block cover from the instrument panel.
3. Using pliers, squeeze the two latches of the switch and remove it from the cover of the mounting block.
4. Install the trunk lock actuator switch in the reverse order.
Replacing the Outdoor Light Switch
1. To replace the exterior lighting switch, remove the mounting block cover from the instrument panel.
2. Use a Phillips screwdriver to unscrew the screw securing the switch.
3. With the top of the switch tilted toward you, squeeze the two connector clips (indicated by arrows) of the wiring harness and disconnect the connector from the switch.
4. Remove the exterior light switch.
5. Install the outdoor lighting switch in reverse order.
Replacing the hazard warning switch
1. To replace the hazard warning switch, remove the center trim of the instrument panel.
2. Squeeze the two switch latches (indicated by arrows) and remove it from the instrument panel trim.
3. Install the hazard warning switch in reverse order.
Replacing the rear window heating switch
1. To replace the rear window heating switch, remove the central trim of the instrument panel.
2. Squeeze the two latches of the switch and remove it from the instrument panel trim.
3. Install the rear window heating switch in the reverse order.
Replacing the heating and interior ventilation fan operating mode switch
1. To replace the heating and interior ventilation fan operating mode switch, remove the central trim of the instrument panel.
2. Squeeze the two latches of the switch and remove it from the instrument panel trim.
3. Set the fan operating mode switch in reverse order.
Replacing the backlight lamps of the heating and ventilation control unit regulators
1. To replace the backlight lamps for the controls of the heating and ventilation control unit, remove the central trim of the instrument panel.
2. Turn the lamp socket clockwise and remove it with the lamp from the instrument panel trim.
3. Remove the lamp from the socket.
4. Install the new lamp W1,2W in the reverse order.
5. Replace the other regulator illumination lamp in the same way. The layout of the backlight lamps is shown in the photo below.
6. Reassemble everything in reverse order.
Changing the dial design
Another fairly simple way to tune the instrument panel is to change the dial design.
For this:
1. The structure is dismantled and dismantled. 2. Purchase or create your own sticker that will be used to decorate the instrument panel. 3. Peel off the old dial and glue on the new one. 4. We assemble the structure and install it.
In addition to the dial, you can change the color of the hands. To do this, paint is applied using a spray can.
Replacing the Viburnum cigarette lighter lamp
Replacing the cigarette lighter on a Priora and its backlight lamp
Problem with Kalina's cigarette lighter. Solution
Replacing the cigarette lighter for Lada Kalina
How to replace the cigarette lighter in Kalina, Priora, Grant. Installation of a convenient cigarette lighter.
Replacing heater backlight lamps for Lada Kalina
Replacing lamps. Dashboard. Kalina.
How to replace the cigarette lighter on a Priora in 3 minutes
How to make a cigarette lighter button?
Kalina cigarette lighter does not work
how to remove license plate light on viburnum
The modern car owner is provided with a lot of information about replacing the light bulb on a viburnum cigarette lighter - we invite you to visit us. Videos and reviews on do-it-yourself car maintenance and repair. How to repair a car yourself at home. We will help you with repairs and repair the car yourself. We know how to restore a car with minimal investment. I have attached video instructions.
Soundproofing panel VAZ 2110
Every owner of a VAZ 2110 is familiar with the problem of a panel device squeaking while the car is moving. The only way out in this situation is sound insulation.
In order to begin the process of upgrading the panel, it must be disassembled into three parts, which are attached to each other using mounting bolts.
Modelin can be used as an “anti-creak”, and bitoplast will serve as a noise-absorbing material.
In those areas where the panel parts touch, a model will be needed, they need to cover all the bolt holes to reduce the loss of heater air flow. We will cover the back side of the torpedo with bitoplast.
Often the black box with the fuse and the glove compartment are susceptible to squeaks. In this case, we will place a model under the sides of the box, as well as those areas where it is in close contact with the panel, and bitoplast at the bottom of the glove compartment. The main advantage of bitoplast is that it shrinks perfectly, so there should be no problems when reinstalling the panel.
Thanks to these simple steps, you can easily eliminate all annoying noises and squeaks in the cabin and ensure silence in the car.
Refinement of the backlight of the heater control unit Lada Granta and Kalina
It is no secret that the Lada Kalina heater control unit has migrated to more modern Lada Granta and 2nd generation Lada Kalina cars. Along with it came some shortcomings, for example, dim lighting. There are many ways to improve interior lighting, but we will focus on only one of them, which in our opinion is the best.
The reason for the poor illumination of the stove control unit is the green filter on the sticker. Most often, car enthusiasts simply erase it, thereby making the backlight a little brighter, but this does not solve another problem - uneven glow.
We propose to approach the issue comprehensively, improve the backlight and the scale itself on the heater control unit, and for this you will need:
- Layout of scales in Corel Draw x5 - To download files you need to log in to the site (password: lada.online).
- Matte film with adhesive layer, 0.5 m - 350 rub.
- White translucent film 0.4 m. - 250 rub.
- LED modules for illumination.
- Plotter cutting services - 180 rub.
We remove the central trim of the instrument panel (dashboard), to do this, use a screwdriver to pry up all the handles of the heater controls, and then the plastic trim itself, snapping it around the perimeter, starting from the lower right corner. Then we install the LED modules on double-sided tape. We are guaranteed bright illumination.
We carefully glue the cut out models; the first layer is a light filter for red and blue temperatures. The second layer is a white translucent film, and the third is a black matte film. The reflectors on the plastic can be aligned so they are out of the way, but the reflectors on the inner rings can be left alone.
As a result, we get uniform and bright illumination of the stove control unit. You can compare with how it was and how it became:
Upgrading the backlight of the heater control unit
Very often, in parallel with replacing the light bulb, the lighting of the heater control panel is upgraded. The fact is that the standard illumination of the vehicle’s stove is very dim compared to the instrument panel of the VAZ-2110. It is not always enough for comfortable switching of heater modes at night.
You can modernize the appearance of the control panel by installing an LED light bulb instead of a conventional incandescent lamp. The LED lamp is characterized by a more intense glow. There are lighting elements on sale in different colors. Most often, white, red, blue or green colors are used to illuminate devices. Sometimes the scale of the VAZ-2110 heater damper is subject to modification, the appearance of which is improved with the help of LED elements. They can be matched to the color of the heater controls lighting.
Selection of light bulbs
Today the market offers a wide range of lamps that can be used for the dashboard of the VAZ 2114. Among the most well-proven devices, we note a few. Their name and cost are presented in the table.
| Manufacturer | Price |
| LED lamps Sho-Me SM-T5 (blue, white and red (Korea) | 80 rubles - pair |
| High Brightness SMD LED Module | 20 rubles |
| LED Sho-me SM-T5-cap-super (white) | 50 rubles |
| Osram and Philips halogen lamps | About 40-80 rubles per unit |
Problems and their solutions
Old and new sample There are several common problems typical for the dashboard of the domestically produced VAZ 2110 model.
- The instrument panel lights on the VAZ 2110 do not light up. Check the contacts and the condition of the wiring that is responsible for the suspension. The fuses could simply have blown, or the light bulbs themselves could have burned out as a result of wear and tear or a short circuit. In fact, there can be many reasons, so it is not always possible to resolve the issue in a couple of minutes.
- The most serious failure for the instrument panel is a complete failure of the unit. In such a situation, all indicators stop working, the arrows fall down, and the warning lamps do not light up. To fix the problem, first check fuse 15, which is designated F6. You will find it on the mounting block. If this element is blown, simply replacing the fuse will not solve the problem. Look for the reason why it burned out. Usually this is a simple short circuit in the electrical network.
- The arrows jump up and down. This is also a common phenomenon, the cause of which in most cases is poor ground contact: This ground wire goes to the partition that separates the interior and engine compartment, from the instrument panel. To get to it, remove the radio from its seat. Check the quality of its fastening;
- Often, when installing an alarm system, the ground wire is moved to another location for more convenient access. Therefore, if you have an alarm system, but there is no wire under the radio, then look for it behind the interior trim near the driver’s left foot;
- The ground wire may be damaged when installing a new audio system. When the minus is connected, the mass is unscrewed and then often mounted back, only not as reliably as it was originally. Due to vibrations, collisions with bumps and holes, the fastening weakens and contact disappears. Hence the non-functional panel. Do not be lazy to properly wrap the bulk wire, since poor fastening is often explained by the inconvenience of performing this activity.
Problem with the instrument panel. To check if everything is fine with it, remove it as much as possible from the seat, but do not disconnect the wiring going to the pads. The white wire (X1) that goes to the first contact is checked. It would be a good idea to check the voltage on pins 10.9 and 6. During normal operation of the system, the device should give a reading of about 12 volts. Be sure to look at the back of the shield and make sure the conductive paths are intact. Cigarette lighter. It is not uncommon for the instrument panel on a VAZ 2110 to fail due to the cigarette lighter. You are probably no exception among drivers who connect all sorts of additional devices and devices through this socket. This is how many people charge their phones, connect tablets, video recorders and other equipment. By consuming a large amount of current, the devices damage the cigarette lighter or cause fuse F19 to blow. Because of this, the instrument panel turns off or does not work correctly. If the fuse is intact, simply disconnect the cigarette lighter connector. If such measures do not produce results, simply replace the fuse with a new one.
The backlight of the VAZ 2114 instrument panel does not light up: do-it-yourself repairs
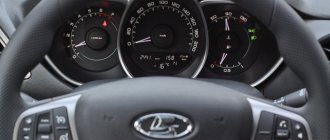
The dashboard on the VAZ 2114 allows the driver to control engine data, monitor the remaining amount of fuel, his speed, and other data. The panel should be maintained in working condition so that the backlight not working does not cause discomfort, and the sensors show real values.
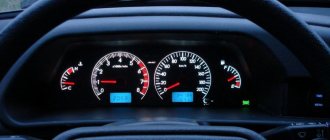
Bright backlight
But quite often, VAZ 2114 owners discover that the instrument panel lights do not light up. If such a situation occurs, appropriate action should be taken immediately to eliminate it.
Replacing a light bulb in a VAZ 2110 clock
The standard clock, which is located on the dashboard of VAZ 2110 - 2112 cars, is a fairly simple design, but still, this part often fails and has to be replaced. Many owners in a hurry break the case out of the panel, breaking the watch itself, and in some cases manage to break parts of the panel. In this case, you must act especially carefully.
In order to remove the clock, or rather remove it from the dashboard, we need two thin flat-blade screwdrivers, although everything can be done even with one:
You need to insert screwdrivers on the sides of the case and pry the watch off, or on top, as shown in the photo:
After this, without any extra effort, pull them out a little from the recess to gain access to the power wires and the light bulb.
If you need to replace the watch, then disconnect the plug and simply insert a new one in its place. If you only need to change the light bulb because it is burning out, then carefully turn the cover:
And then you can remove the light bulb by also turning it counterclockwise by the base:
We installed a new light bulb and now the backlight should work without problems. We put the clock back in reverse order. The price of new VAZ 2110-2112 is about 450 rubles.
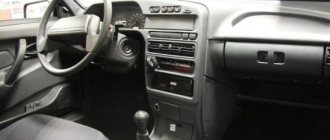
Removing the dashboard
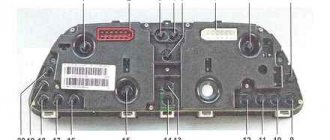
To replace the light bulbs in the dashboard of the VAZ 2114, it will first have to be dismantled. Without this action, you will not be able to access the problematic device.
Panel disassembly diagram
Therefore, now we’ll figure out how to disassemble the instrument panel on a VAZ 2114:
- Unscrew the three screws, remove the trim and the protrusion from below. It comes out of your car's body bracket;
- Now remove five more screws located on the right console trim;
- Remove the screen; Disconnect the negative terminal from the battery;
- Disconnect the wiring harness connector from the cigarette lighter;
- Remove the handle from the lever;
- The fasteners for the electric fan of the heating system, that is, the stove, also have to be removed;
- Unscrew the steering wheel block bracket fixing bolts;
- Remove LEDs, lamp sockets and decorative inserts on the panel;
- Unscrew the hydraulic corrector illumination lamp. For this you will need a key for 21;
- Now all that remains is to remove the screws at the top and bottom.
Thus, we figured out how to remove the dashboard on your VAZ 2114. Be sure to cover the electrical circuit with something after the measures have been taken to prevent moisture, dust and all kinds of contaminants from getting there.
Proceed to replace the lamps that turned out to be faulty. At the same time, many are interested in how many light bulbs are in the dashboard of the VAZ 2114. There are 13 of them, but only 8 can be replaced. Do not forget to clean the contacts if there are traces of oxidation on them. In some cases, it is not the lamp itself that has to be replaced, but the socket for it.
Let's sum it up
The lack of lighting on the heater control panel does not affect the technical characteristics of the car, however, it causes significant inconvenience for the driver
Searching for an unlit heater switch at night distracts the driver's attention from the road and can become an indirect cause of an accident.
If the backlight of the stove regulator does not work, it is necessary to replace the bulbs. Even a novice driver can cope with this task. To improve the appearance of the heater controls, use LED elements instead of conventional light bulbs, and the appearance of the device will delight you with warmth and comfort in the car interior.
Source
Let's sum it up
The lack of lighting on the heater control panel does not affect the technical characteristics of the car, however, it causes significant inconvenience for the driver
Searching for an unlit heater switch at night distracts the driver's attention from the road and can become an indirect cause of an accident.
If the backlight of the stove regulator does not work, it is necessary to replace the bulbs. Even a novice driver can cope with this task. To improve the appearance of the heater controls, use LED elements instead of conventional light bulbs, and the appearance of the device will delight you with warmth and comfort in the car interior.
Problems with the backlight of the VAZ-2110 dashboard: causes and repairs
It’s probably no secret to anyone that the reliability of VAZ “ten” leaves much to be desired. Often, the owners of these cars have to deal with certain malfunctions. One of these problems is the lack of dashboard lighting. It is clear that the breakdown should be corrected as soon as possible. After all, going somewhere at night will be quite problematic - few people will like to move, essentially, blindly, without seeing either the current speed or other, no less important indicators.
Let's sum it up
Malfunctions of the VAZ-2110 heater control unit can lead to both incorrect functioning of the vehicle’s heating system and complete failure of the heater. During the cold season, this will affect not only a comfortable stay in the car, but also safe driving for the driver of the vehicle.
Repairing the stove control unit can be done on your own if you have basic knowledge of electronics, a desire to work and improve your comfort.
High-quality repairs and timely regular inspections of the unit before the onset of cold weather will help you save money on stove repair services at service centers and the purchase of expensive heating system elements.
VAZ 2110 often have problems with the stove, this is their disease. All this happens due to improper operation of the SAUO unit. Before you begin repairs, you need to understand why the breakdown occurred. To do this, we connect a known-good unit. If the heater functions properly with the ACS operating unit, then the problem is related to it. We dismantle the buttons next to the heater unit, after which we set the regulators to the zero position and remove the front cover and glass.
We remove the board from the plastic case and check the integrity of all tracks, jumpers and resistors. in a particular case, the first speed of the heater did not work because the jumper was broken. We solder it on one side and the other. Assembly occurs in reverse order. All fan speeds, except the last one, are connected through an additional heater resistor, which is located under the frill. One of the possible reasons why the first heater speed does not work is a faulty resistor. Depending on the ACS unit, this additional resistor is divided into types. The first resistor RDO 2108-8101081 is used in the oldest SAUO units, which had only two speeds.
RDO 2110-8118022-01 is installed on a modified heater; this unit has three speeds. The most common cause of breakdown is that all stove speeds stop functioning except the maximum one. This happens due to the thermal fuse being disconnected. You just need to solder it in place. But if it continues to disconnect, then you need to inspect the motor, it’s probably taking too much current. RDO 2123-2118022 is the latest version, has 4 speeds and no automatic mode.
Changing lamps
Remember: when working with electrical appliances, first of all we disconnect the battery. Even if we just change a light bulb in a headlight or PTF. It is better to protect yourself from discharge.
- remove the casing from the engine compartment;
- disconnect the wire block;
- remove the spring that secures the light bulb;
- rotate the holder and remove the light bulb;
- This is followed by replacing it with a new one, and putting everything back together in reverse order. If it is halogen, you should not handle it with bare hands - it will burn much faster. Use gloves. If you do touch the flask, wipe it with alcohol.