Replacing gas tank clamps for Lada Kalina
I drove onto the overpass and was horrified when I looked under the car.
One gas tank clamp was completely rotten. On the right side, the gas tank fell off completely and was held on by one clamp.
Taking a metal brush, I thoroughly cleaned all the fastenings of the clamps and did not forget about the fuel filter bolt (I decided to change the fuel filter in one go), it is located on the right side of the gas tank. Taking a WD
and thoroughly sprayed all the clamp fastenings
After which, a ring wrench is set to 13 and...
Moved to the other side of the clamp. Having removed the brake cables from the hooks, reaching for the loop, taking a knife, I decided to bend the petals on both sides. But that was not the case, (the petals did not give in) everything was so rusty and besides, there was not enough space. Taking a hammer and a screwdriver, he began to stupidly knock out the cotter pin from different sides. Surprisingly, the cotter pin gave way, thereby straightening the petals.
Having bought new clamps
(300 rubles per pair) having greased the old plastic covers with grease, I began to assemble them in the reverse order. (Don’t forget to bend the petals back so that the cotter pin doesn’t fly out) All this work was done together. By tightening the tension bolt of the clamp, the gas tank itself was pressed tightly to the bottom of the car. (At the same time, using available means, 2 long sticks. One was placed across the overpass and the second was pressed, it turned out to be a lever)
The muffler was in the way on the left side, I had to unhook the muffler in three places and move the muffler to the side
Well, everything else is in the same spirit.
We made small sacrifices, without removing the gas tank and spending 2 hours of free time, 300 rubles, a WD wheel, and a 13 ring wrench.
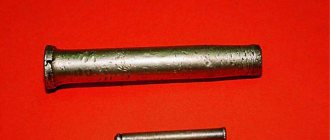
This is what's left of the old clamps.
Location of Lada Kalina fuel filters
This element of the Lada Kalina is “hidden” under the bottom of the car next to the gas tank. To get to it, you will need to lift the car or drive into a viewing hole. The filter is clearly visible from below. Its location is to the right (in the direction of travel) of the gas tank.
The Lada Kalina fuel filter is “hidden”, under the bottom of the car next to the gas tank
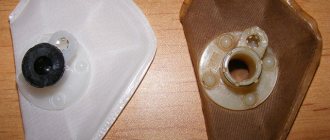
The fuel pump strainer is installed inside the tank. To get to the neck, you will need to lift or remove the rear seat, unscrew the floor trim flap and unscrew the hatch cover.
The fuel pump strainer is installed inside the tank.
Drain algorithm
On the “classic”, gasoline was always drained through the neck of the tank; for Kalina (as well as for other front-wheel drive), this method is very difficult, especially if there is little gasoline in the tank.
The old-fashioned method involves draining gasoline through the neck . However, this number will not work with the first generation Kalina due to the curvature of the neck. The same applies to second-generation cars, in which the low location of the fuel tank is added to the above factor.
You can find a long silicone (transparent) hose and try to “stick” it into the neck as far as possible. If it's not cold outside, you may be able to reach the tank with a hose.
Parsing method
- There is a nipple at the end of the injector frame. We find and unscrew it.
There is a plastic cap on the ramp - there is a nipple underneath it.
We unscrew the nipple from the wheel.
- We put a hose for draining fuel onto the ramp.
If the hose is slightly larger than the diameter, fix it with a clamp.
- We lower the free end of the hose into the bucket.
- You need to insert a jumper into the fuel pump relay, and then turn on the ignition.
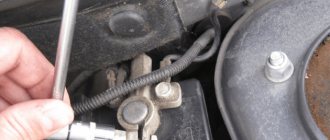
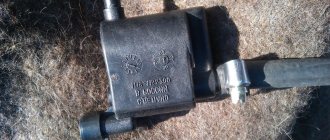
Removing the fuel filter
The method is similar to the previous one, only we will drain gasoline from the fuel filter. The fuel filter is located at the bottom of the car. We remove the supply fitting, close the relay and drain the gasoline.
The arrow indicates the fuel filter.
It is necessary to turn off the fuel pump as quickly as possible, as soon as gasoline stops coming out, otherwise the fuel pump may burn out!
Removing the fuel pump
It is necessary to drain the gasoline by removing the fuel pump.
- Raise the rear sofa. We lift the carpet.
Raise the rear sofa.
Find this place.
Unscrew it, there is a fuel pump inside.
- Remove the bolts securing the fuel pump cover.
- Disconnect the connectors and power cord.
- We get the fuel pump.
After dismantling the fuel pump, we gain free access to the contents of the fuel tank.
- Next, use a hose to pump out the gasoline. It is better to use a special hose with a bulb to avoid poisoning.
Read more in the material: “Replacing the fuel filter on a Lada Kalina.”
In addition to Kalina, these methods can also be used for Grants, since these models have the same fuel system.
Location of Kalina fuel filters
To replace filter elements on VAZ 1117-1119 series cars, you need to know where they are installed. The location of the parts is as follows:
- mesh bag - a trap for large particles is attached to the suction pipe of the gasoline pump, immersed in a tank of fuel;
A screen for catching large particles is located in the fuel tank along with the pump.
The fine cleaning element is hidden in a niche to the right of the tank
The location of the filter elements is the same for all modifications of Kalina and does not depend on the body type. That is, on the “station wagon” and “hatchback” you will find parts in the same places as on the “sedan”.
How to remove the fuel pump on a Lada Granta, Kalina, Priora with your own hands
Removal of the electric fuel pump module (MEBP) is performed to replace the fuel level sensor, coarse fuel filter, electric pump or pressure regulator. Let's look at how to independently remove the fuel pump on Lada Granta, Kalina and Priora cars.
Required
: Phillips and flathead screwdrivers, hammer, empty containers.
1. Remove the rear seat cushion (fold it forward, remove the front part of the cushion from its hinges).
2. Remove the fuel pump cover (4 screws, Phillips screwdriver).
3. Clean the surface of the electric fuel pump from dirt and dust.
4. Disconnect the connector with the wires (press on the antenna and pull).
5. To prevent a lot of gasoline from spilling out during further actions, you should relieve the pressure in the fuel system. To do this, start the engine and let it idle until it stops completely. Turn off the ignition and remove the negative terminal from the battery.
6. Disconnect the fuel pipes (press the spring clamps on the sides of the clamp at the same time, you can use special pliers).
7. Remove the retaining ring by turning it counterclockwise. If there is no special puller (key 67.7812-9574), use a large flat-head screwdriver and a hammer.
8. Remove the electric fuel pump module from the fuel tank, first wipe the surface from dirt so that it does not get into the gas tank. Be careful not to damage the float. Lower the pump into a previously prepared container so that gasoline does not get on the interior trim.
Advice
. After removing the fuel pump, look inside the fuel tank. If there is dirt and water at the bottom, remove it using a tube and syringe.
The process of removing the fuel pump is also shown in the video:
Have you ever had to remove the fuel pump on a Lada Granta, Kalina or Priora yourself? Let us remind you that we previously told you how to check the fuel pump. By the way, do you know that a special bracket is sold for the gas tank cap?
Lamp selection
When choosing lamps, you can go in two ways:
- Install regular incandescent lamps, such as those installed by the manufacturer.
- Install LED lamps.
We recommend installing LED lamps, since their lifespan is longer than standard ones and you can also slightly reduce the load on the generator. Also keep in mind that LED lamps have pros and cons. If you install an LED lamp and it does not light, turn the socket with the lamp 180 degrees.
The instrument panel on Kalina uses a type of lamp with a W1.2W socket. In any auto store you can buy a socket with a lamp or a light bulb separately.
Buy a fuel pump for VAZ (LADA) KALINA sedan (1118)
Purpose
A fuel pump is needed to pump gasoline or diesel fuel from the gas tank to the engine.
Alternative name: fuel pump, gasoline pump.
Signs of failure of the fuel pump VAZ KALINA sedan (1118)
You should not be surprised that this spare part or its individual components systematically break down. The fuel pump is a part that is constantly in operating mode. Here are some symptoms of a poorly functioning fuel pump.
- low engine power, which will definitely be felt by a driver who knows his car
- problematic engine starting
- high-pitched sound of a running engine
There are plenty of signs and causes of failure. All the symptoms listed above may indicate other problems with the car. Therefore, do not try to self-medicate, but contact a good car service station. Replacing a fuel pump is a responsible undertaking. And repairing fuel pumps - even more so. Therefore, if you have never installed a fuel pump, do not take risks.
Where to buy a fuel pump for VAZ KALINA sedan (1118)?
The pump is the main component of the fuel system and its quality cannot be neglected. Fuel pumps can be purchased at almost any city market. But is it necessary to make a purchase this way? City markets and small shops are where you can often find counterfeit products.
The AutoTO electronic catalog offers a fuel pump for VAZ (LADA) KALINA sedan (1118) from the best manufacturers of electronics for cars. All products are tested for safety and certified. Here you can purchase fuel pump parts such as fuel pump check valve or fuel pump relay.
Where to buy a fuel pump for a VAZ (LADA) KALINA sedan (1118) with delivery?
To order, just leave a request and wait for a call from our specialist or dial one of the numbers listed on the website.
All components presented on the AutoTO store website can be ordered with delivery to all regions of Ukraine. Delivery of spare parts is carried out by the most reputable courier services in Ukraine.
To watch online, click on the video ⤵
Replacing the clamp (fastening, tape, bracket, hinge) of the gas tank for Lada Kalina VAZ 1117, 1118, 1119 Read more
Replacing the fuel tank mount. For some reason the mount didn't fit. More details
VAZ2109, gas tank came off, reverse sensor, ASP 16 Read more
Replacing the fuel pump mesh for Lada Kalina, Priora, Grant, VAZ 2110. 15 Read more
Viburnum mount on the gas tank fastening tape Read more
Replacing the fuel pump for Lada Kalina 1118 1.4 LADA Kalina 2010 Read more
Removing or replacing the fuel sensor on a VAZ-2110
To dismantle the fuel module and remove the FLS from it using a 17 wrench, unscrew the fittings of the fuel supply and return pipes. We take the tubes to the side.
Then, using a socket head No. 7, unscrew the nuts securing the clamping ring. Since the nuts are usually very tight and may be oxidized (rusted), WD-40 (or a similar product) is used, and their tightening can be loosened by light blows of a hammer on a non-sharp chisel or the handle of a flat-head screwdriver, the “tip” of which is placed on the edge of the nut.
Then, using a screwdriver, we remove the pressure ring from the hatch. We remove the module by carefully removing the FLS float from the hole in the gas tank, being careful not to bend the sensor lever. To do this, tilt the module slightly.
Using a Phillips screwdriver, unscrew the 2 screws securing the FLS to the fuel module. Disconnect the FLS wires from the module connectors. If this is difficult to do on an assembled module, then disassemble it: bend the clamps of the two tubular guides from the pump side (bottom of the module), and then separate the upper and lower parts of the module.
The removed FLS can be inspected and, in case of repairable faults, repaired and replaced, or immediately replaced. We install the FLS in the reverse order of dismantling. During assembly, it is recommended to apply petrol-resistant sealant to the pressure ring and the seals underneath it.
Before closing the hatch of the body opening above the fuel module, you should check the tightness of the fuel line connections. To do this, after connecting the battery ground, turn on the ignition for 5 seconds, while observing whether there is a gasoline leak.
Before purchasing a new sensor, you need to find out the markings of the one installed on the VAZ-2110 - it is better to replace a failed device with the same model. Experts do not recommend choosing a sensor “by eye”, because there are a dozen types of FLS, differing in resistance values. If you don’t guess with the right modification, then the indicator arrow on the dashboard may “float”. The catalog number is printed on the sensor body.
Removing the fuel tank
We carry out the work on an inspection ditch or overpass with an empty tank. To remove fuel from the tank, we dismantle the fuel module (see “Removing and disassembling the fuel module”) and pump out the fuel through the hole in the tank.
Using a wrench or a 10mm socket, loosen the clamp securing the inlet pipe hose. . and remove the hose from the fuel tank pipe. Press the spring lock on the hose end of the ventilation tube.
. remove the ventilation tube hose from the fuel tank pipe. By pressing the spring clamp of the tip of the fuel vapor removal tube from the separator.
. disconnect the tip from the tube located on the tank.
Using a 10mm head, unscrew the three nuts securing the protective casing of the fuel supply tube to the ramp and the fuel vapor supply tube to the canister purge solenoid valve. We remove the casing. Squeeze the clamps on the tips of the above tubes located on the tank.
. We disconnect them from the fuel pipes laid along the bottom. We install an adjustable stop under the fuel tank, placing a wooden block between the stop and the tank so as not to crush the tank.
Using a 13mm socket, unscrew the bolts securing the two clamps securing the fuel tank to the body.
Lower the fuel tank on the adjustable stop. We install the fuel tank in the reverse order. Fill the tank with fuel, turn on the ignition and check the tightness of the fuel line connections.
Egnition lock
The ignition switch is a complex device designed to control the power supply to the vehicle systems, prevent the battery from discharging and ensure that the engine starts from the starter system. The castle includes two components:
- mechanical, represented by a lock cylinder;
- electrical, which is a set of contacts that close electrical impulses when the key is turned in one way or another.
The ignition switch on the Lada Kalina has three modes:
- Mode "0". In this position, the key can be easily removed, and the lighting, emergency lights, and audio system work.
- Mode "1", fixed. It is no longer possible to remove the key from this position; when it turns on, the ignition system is turned on and power is supplied to all systems except the starter. But it is worth considering that keeping the key in mode “1” for a long time can lead to battery discharge. This position is used when turning on the starter, so that the running fuel pump pumps up the required pressure to ensure further ideal operation of the starter.
- Mode “2”—activation of the starter system.