When servicing your car, you should carefully pay attention to its filter elements. Particular attention should be paid to fuel system filters. One of these filters is the fuel pump mesh; its replacement can be done quite simply and without much difficulty by following the instructions given in this article.
Purpose
The fuel pump mesh is a coarse fuel filter.
It serves to ensure that the fuel sucked in by the gasoline pump enters the fuel system without coarse particles of debris and is then processed in a fine filter, and then goes to the injectors.
Without the use of a mesh, the life of the gas pump is reduced significantly, since the quality of fuel in our gas stations leaves much to be desired.
Where is
The coarse filter is located directly in the car’s gas tank, namely in the gas pump cup and fits tightly onto its fitting. People call it a “diaper” - this is not the case, where the correct name suggests is a coarse fuel filter. Its cost starts from 50 rubles.
Signs of a clogged filter
By indirect signs you can determine whether it is dirty, but it is not always possible to reliably find out about its condition without visually assessing the mesh.
Signs of a dirty filter:
- The car accelerates poorly;
- There is no necessary dynamics;
- Unstable idle;
- The engine starts poorly and stalls;
- Increased engine vibrations;
Based on the signs already stated above, you should begin inspecting the fuel system and be sure to start with coarse and fine filters. You can read how to replace the fine filter here.
Also, if the mesh is very dirty, the fuel pump itself may fail. Therefore, it is not recommended to neglect its replacement.
Replacement process
Before proceeding with the replacement, it is necessary to prepare the tool and the place for disassembling the glass itself. To do this, you need a clean cloth to spread it on a workbench or table and work on it. This is necessary to prevent excess debris from getting into the fuel pump.
Required tool:
- Ratchet or crank;
- Head on “10” or “8”;
- Key to "17";
- Pliers;
- Screwdriver;
Step by step process
- The first step is to relieve the residual pressure in the fuel line. To do this, remove the fuel pump fuse (F3-15A). The fuel pump fuse is located under the center console on the passenger side behind the plastic footwell vent cover.
- We start the car and let it idle until the car stalls.
- Next we proceed to removing the rear seat. On sedan cars, you must press the seat latches on both sides.
- On station wagon and hatchback cars, you need to pull the tongue and lift the seat up.
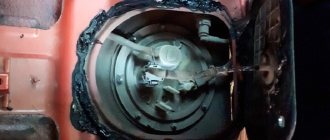
- Unscrew the two self-tapping screws of the fuel pump glass cover.
- We clean out all the debris and dirt under the lid of the glass. You can use a brush, vacuum cleaner or compressor. This is necessary so that after the fuel pump glass is removed, excess dirt does not get into the tank.
- Remove the fuel pump connector.
- We unscrew the fuel pipe fittings on cars older than 2003. On cars manufactured after 2003. plastic fitting clamps were installed. In order to remove the plastic clamp, you need to press the buttons as shown in the picture and pull the fitting towards you.
- Next, using a “10” or “8” head (also depends on the year of manufacture of the car), carefully unscrew the 8 nuts securing the fuel pump cup ring.
- We remove the glass, without carefully bending the fuel level sensor, from the tank.
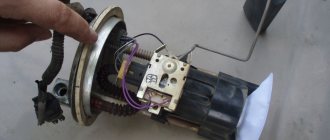
- Next, we proceed directly to disassembling the fuel pump glass on a clean rag.
- We pull out the glass stopper and remove the sump.
- We remove the old fuel pump mesh by prying it up with a screwdriver.
- We install a new mesh and reassemble in the reverse order.
- When tightening the fuel pump cup ring, do not apply excessive force, otherwise the pins on the gas tank may come off.
- We hope the article was useful to you, then you can watch a video on replacing the fuel pump mesh on a Priora.
Video on replacing the fuel pump mesh
Source: https://enginehack.ru/zamena-setochki-benzonasosa/
Replacing the fuel pump and fuel pump mesh for Lada Priora
1. Replacing the mesh in the fuel pump of the Lada Priora
2. Replacing the fuel pump on a Priora
Replacing the mesh in the fuel pump of Lada Priora
Today I decided to change the strainer on the fuel pump. First, I removed the back seat and unscrewed two bolts on the cover that leads to the fuel pump.
We disconnect the wires going to the fuel pump and get behind the wheel. We start the car and let it idle until it stalls, thereby releasing the pressure inside the pipelines. Be sure to bleed.
Disconnect the wiring harness.
We disconnect the two pipelines that are attached to the fuel pump. Removed by pressing on the iron bracket and, pushing away from you, disconnect the pipeline from the fuel pump
Disconnect two pipelines
Unscrew the eight nuts by 10.
Next, remove the fuel pump holder ring and put it away so that it does not interfere with us.
Then, carefully removing the pipeline hoses, holding them with your hand, we pull the fuel pump itself out of its seat, most importantly, without excessive effort, and carefully so as not to damage the float on the fuel pump.
After removing the fuel pump, disconnect the plastic pipe. Without removing it we will not be able to disassemble the fuel pump
Remove the two small retaining rings on either side of these guides.
Then we disconnect the plastic fasteners (there are three of them) by detaching them, we can get to the mesh itself.
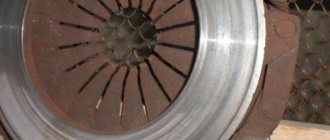
We got to the mesh, as we see, there are some shavings on it - this means the filter is working well. Next we will remove it to exchange it for a new one.
Using a screwdriver, pry up the mesh and remove it from the fuel pump seat.
Side view of the mesh here you need to insert a screwdriver
So we removed the strainer from the fuel pump to replace the old one with a new one.
Removed mesh from fuel pump
Installing a new mesh on the fuel pump and reassembling in reverse order.
Replacing the fuel pump on a Priora
Repair of priors and revision of the fuel system.
After the fuel level sensor (FLS) failed, I went for diagnostics, where it turned out that my fuel pump on the Priora did not hold pressure. The needle twitched and the mechanic said that the fuel pump would break very soon. So, in connection with replacing the sensor, you need to replace the Priora fuel pump motor, fuel filter and coarse filter.
All this is discussed in this article.
Bosch fuel pump motor for Lada Priora
Fuel level sensor DUT K2
Fuel filter SCT (article ST 342) Priora coarse filter 16V
We begin to disassemble and remove the Priora fuel pump.
– First of all, we reduce the pressure in the fuel system. We lift the rear sofa, unscrew the fuel pump cover and pull out the plug that goes to the fuel pump. After this, we start the car until it stalls on its own.
– Remove the terminals from the battery. This must be done before any repair of the priors
(optional) Vacuum to prevent dirt from falling into the fuel tank
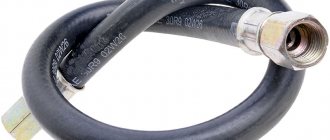
– Remove the hoses (direct and return) going to the fuel pump
Using a regular 10mm wrench, unscrew the nuts and remove the iron and plastic rim
– pull out the fuel pump sideways, being careful not to catch the FLS.
We disassemble the pulled out fuel pump of the Lada Priora
-remove the retaining ring from one of the guides.
-Disconnect all the wires, pull out the plug from the housing, the plug from the fuel pump motor and disconnect the wire
-Unbend the 3 latches and take it out along the plastic guides
-Remove the mesh from the motor
Pull back the latch and take out the motor
This photo is so that you can put everything back in place. Here you can clearly see the location of the motor and corrugated hoses
There is dirt on the mesh at the bottom of the fuel pump.
The Priora comes with FLS 11 from the factory. But according to reviews, FLS K2 is better.
Fuel level sensors are completely identical and interchangeable.
On the left is an old fuel pump. on the right is a new Bosch fuel pump for a Priora
This is what the Priora fuel pump looks like when disassembled:
We carry out assembly in reverse order.
We insert the motor into the stand along the guides, put on the mesh from below, simply pressing it against the motor.
We connect the new FLS and do not forget to plug in all three plugs.
This is what the new assembled Priora fuel pump looks like